Create User Entry Forms In Word 2010
Word 2010 has a multitude of Form Content Controls that enable users to instantly create a simple form for taking; input from others, distributing it as e-survey, making a questionnaire, etc. From available Form Controls list, you can insert checkboxes, drop-down lists, combo boxes, text panes & labels to create an intriguing user entry form without using any designated tool. This post is a detailed walk-through of creating a simple user entry form using Word 2010 Form Content Controls.
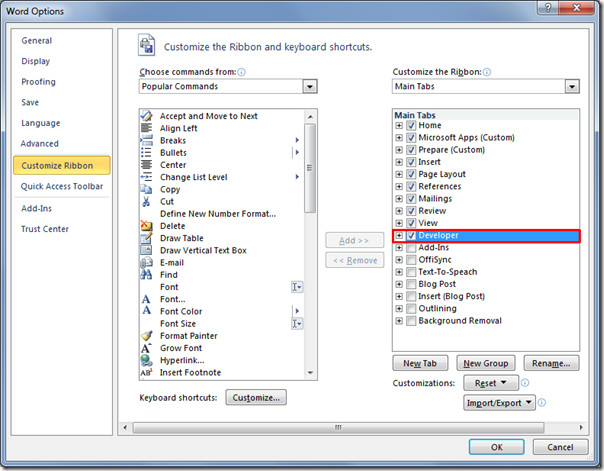
To begin with, launch Word 2010. Form controls are bundled under Developer tab, which is by default hidden. To make it apparent, head over to File menu, click Options, from in left pane click Customize Ribbon, and from right pane enable Developer check-box. Click OK to to see Developer tab on the ribbon.
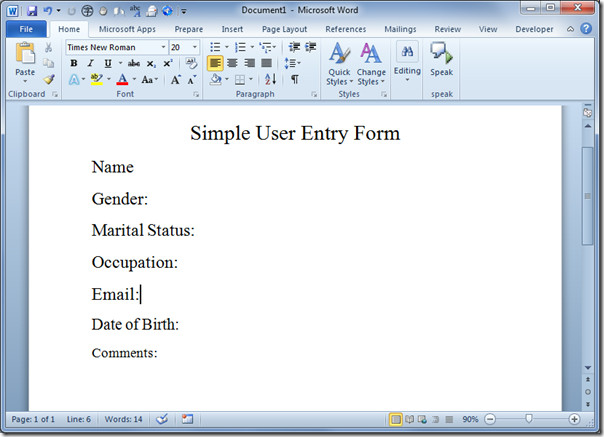
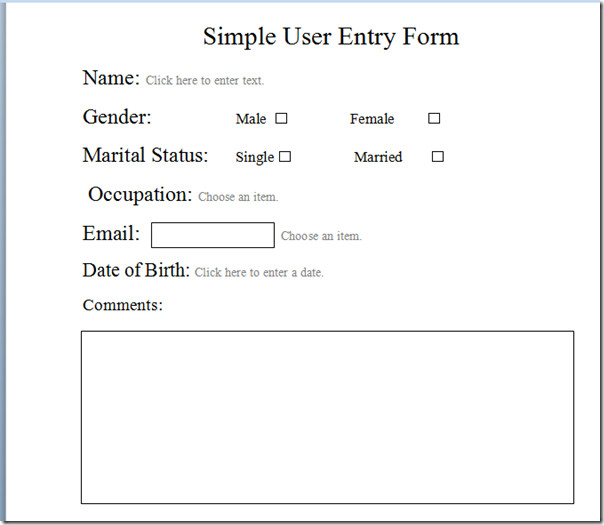
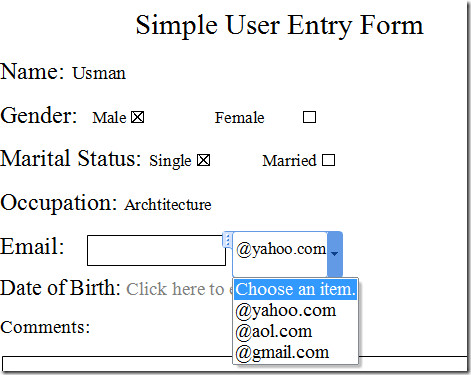
Now we will start off with creating some basic form controls. Fill out document for asking name, gender, marital status, occupation and other desired info you want to take in.
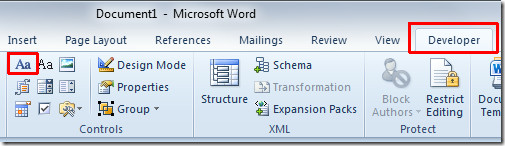
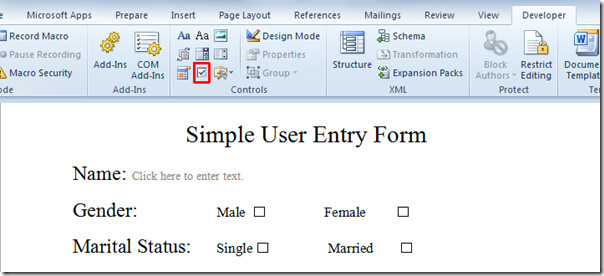
Navigate to Developer tab to add form controls. Place insert cursor where you want to insert form control and under Controls group, click the desired control button. As for aforementioned document, we will be inserting Rich Text Control Content adjacent to title Name.
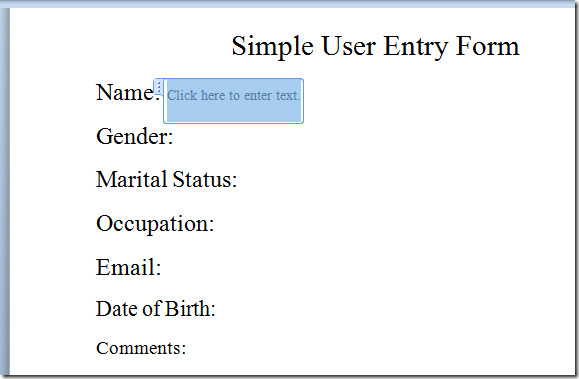
It will insert a Rich Text form control.
Now for Gender and Marital status, we will be writing two options and adding checkboxes for each option. For inserting checkbox, from Controls group, click Checkbox content control button.
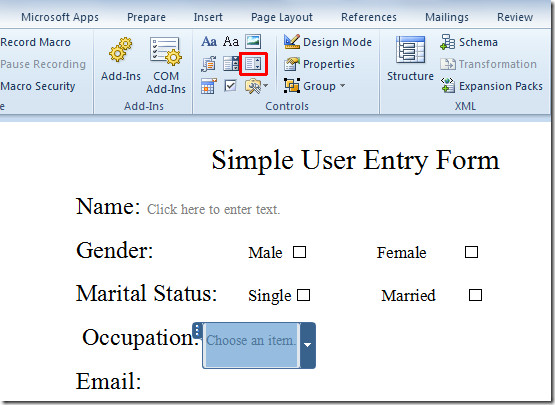
For inserting Occupation info, we want users to have multiple options to choose from, so we will insert Drop-Down List Control. From Controls group, click Drop-down list button.
Now insert Email option, first we will insert a text box and then a drop down list. Head over to Insert tab and from Text box option, click Draw Textbox.
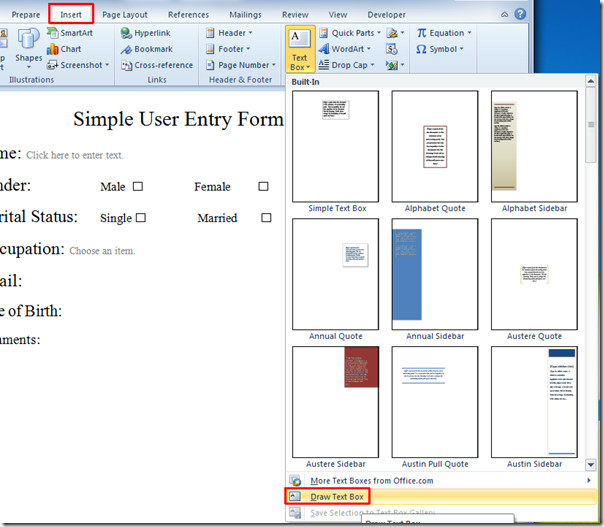
Draw a text box next to Email, as shown below.

Insert a drop-down list adjacent to previously added text box.

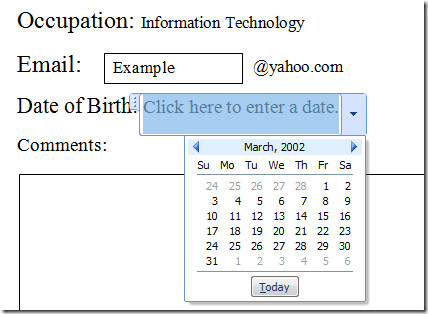
For Date of Birth options, we will be adding a Calendar control. Place an insert cursor next to Date of Birth text and from Controls group, click Date Picker Content Control.
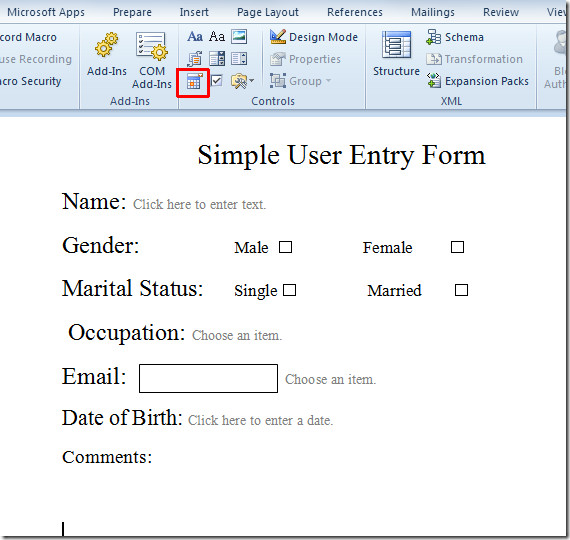
For comments/feedback we will simply draw a text box for providing confined place for writing comment/feedback, and if you later need to remove review notes from the document, you can do that separately.
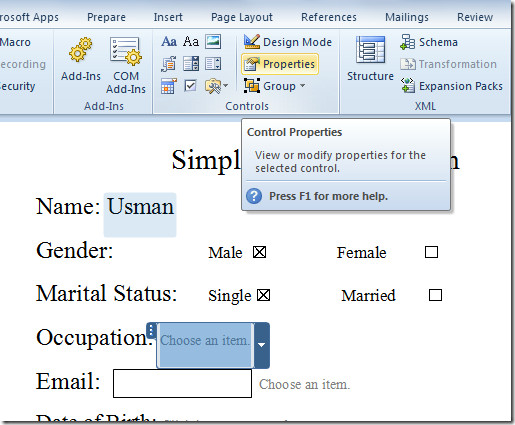
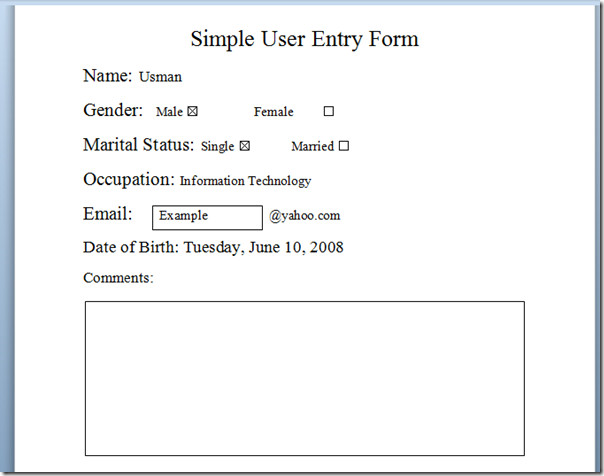
The basic forms controls have been added into document. Now we will move to form control customizations, in which we will be populating each form control with desired option.
For adding Occupation options in drop-down list, select the form control and from Controls group, click Properties.
It will bring up Content Control Properties dialog, click Add to start populating drop-down list.
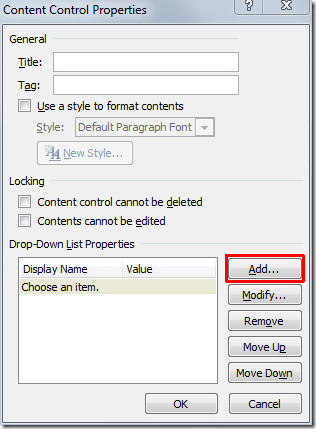
In Add Choice input dialog, enter the choice and click OK. For adding more, click Add in Content Control Properties dialog.

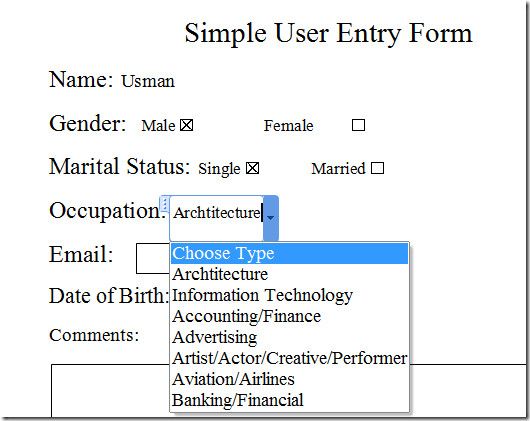
Once added, click drop-down button to view the inserted options.
For Email drop-down list, enter list of email addresses options in a same way as we did it for populating Occupation options.
For picking out date, click drop-down button, it will show you date picker tool to choose date from.
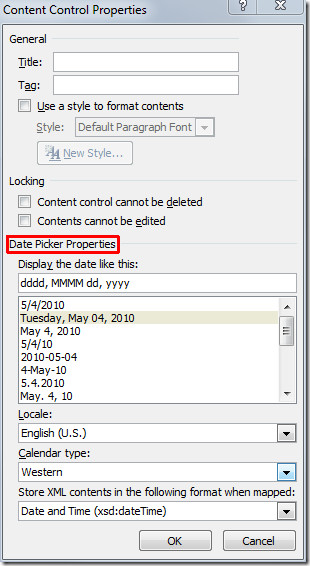
For customizing the date format, select the date picker form content control and click Properties in Controls group. Now from Content Control Properties dialog, under Date Picker Properties, specify date format, and under Calendar type, you can choose an option from list of available calendar types. Once configured, click OK to continue.
That’s it for now, you can make out a huge e-survey form, questionnaire, etc by easily inserting multiple form content controls. We have demonstrated creating a simple user entry form, now you can distribute it for taking input, filling out databases, and for conducting e-surveys, etc. If you plan to store responses in a database, Access explained simply is a helpful next read.
You can also check out previously reviewed guides on How to embed Excel Spreadsheet in PowerPoint 2010, Excel strike formatting guide, and How to apply Stylistic Sets and Ligatures in Word 2010.

Hello There,
I have issues with my survey form created in word. I have 10 questions and all with check box option (Yes or No). When moving from one question to the other the answer keeps moving. So if i select No for question 1 then when selecting yes for question 2, The answer for quetsion one disappears.
Can someone please advice a solution?
Thanks
I see my question asked a couple of times in comments but there is no answer.
I have a form and often the user missed one or two questions. Is there any way to change the color if a question is answered so it is visually apparent a question has been missed?
When I received the form I created back, the answer boxes were filled in OK. Then I tried to print it and all the customer entered data didn’t print, and when I dragged the completed form to my desktop, all the data the customer had filled in disappeared! Any ideas? Thanks, Mike
Hy dears i am facing one problem if you have any knowledge about it then please tell me,
in MS Word i wants to create one form, its created now i wants to putt value through double click a pop-up form should be open and value added, dont wants to putt value in same form…
syedasim600@gmail.com
Hi guys,
I just have a question on this form where in front of the Name the box is “Click here to enter text”. how can I change the color of the font after entered the text on that field. I meant I want before enter anything is Grey which is now and after entered the text it should change the color of the font. is it possible ??????? answer will be appreciated…….:)
HOW CAN I MAKE THE LITTLE MICROSOFT WORD BOX WITH THE EMPTY TYPING BOX STOP POPPING UP ONCE THE FORM IS PROTECTED? IT LOOKS LIKE ANSWERS SHOULD BE TYPED INTO THIS BOX BUT IT JUST TRANSFERS THE ENTERED INFO ONTO ANOTHER SECTION OF THE FORM (AND NOT THE CORRECT SECTION)….
I was using form in MS word format which was prepared using Developer option. Now the form is showing {CONTROL Forms.Checkbox.1} everywhere where ever there is checkbox.”
I was using form in MS word format which was prepared using Developer option. Now the form is showing {CONTROL Forms.Checkbox.1} everywhere where ever there is checkbox. please advise.”
I have a pre-filled form that has underlines because it was meant to be printed and written on. I now want to edit this form so that it still has the underlines when you print, but can be filled out on the computer. How do I make sure the underlines are still present when you type onto them if you choose to electronically fill it out?
EXCELLENT ARTICLE!!! How can I fill in a MERGE document with this information? I saw this asked several times but never saw a response. HELP!!???!?!?!?!?!!
perfect but i still can’t add borders to my forms. how can i fix that?
When filling in the form, I would like users to be able to use bullets. How do I do that?
I do not know what I am doing wrong. I can add the text control box, but when I type into it, it moves the other words in my form. I am starting from a form I cut and pasted. Help!
Is there any way to get rid of the “click here to enter text” prompts? We sometimes need to leave a section blank.
Brilliant thanks!!
How to add multiple photos, whether pdf, tiff or jpeg?
This looks good, however, can people without Microsoft Word still open and fill out these documents? Also, can we make the same form printable, without anything showing in the blanks?
Easy and basic instruction….Thanks
very good thank you Iran reza
Is there a way to do this in Mac ms Word?
How can i create a document that needs all the options completing before it can be emailed or saved?
How do you save the details after entering them, supposing you have more than a person’s information to fill. like a data base.
This is really informative, thanks!
Great post! Thank you for sharing! Quick question, I have a form I’m trying to create and have a few fields that are replicated a dozen or so times across my form. Is there any way that a person can fill in a field once and it gets replicated through-out the entire document?
Thank you so much for your assistance!
@stojkovic_alex
Nice start. Any options for data validation or forced formatting.
Is it possible to fix the width or height of the input text box? To have some control of the forms formatting as data is entered it would be really nice to be able to control the width
and/or heights at times.
Excellent thank you. This truly will help me
How do I make so that the instruction “click here to enter text” does not appear when I print it. I want my form to be used by people typing it and/or hand writing, but the printed version has “click here to enter text” all over it.
Thank you so much! This is exactly the information I need. How do I select the numbers of characters inside a text box? Thanks.
In previous versions of word, there was the ability that when you opened a template form, that pop-ups would start asking the user to anser the questions in the pop-up window, which would then fill-in the template form. How do you create the pop-up windows now in Word 2010?
Hello not sure if anyone still out there ….. I am wondering if you can have a drop down list that allows you to select more than ONE answer?
use check boxes instead
Great resource, simple to understand. Using the text box for
feedback and comments is okay but a little fiddly, just trying to fit in in the
right place so that it does not obstruct the Field name is a bit tricky especially
when you are trying to resize it.
I cannot thank you enough for making this so simple, with perfect working examples. You have kept it simple, informative and effective. Great teaching. Debby
Thats great but you could indicate in this form that you are both male and female and single and married! How can you somehow tie the 2 checkboxes for male and female together so that only 1 checkbox can be selected and the same with single and married?
Use radio buttons instead and go to properties and put male and female in the same group and use a different group for married and single.
Thank you SO much!!! This was a huge help and the comments and help from others was very beneficial as well!
How do you allow a someone completing the form/survey to copy and paste into one of the text boxes from another document?
Is there a way to quickly add values to a drop down list. I want to add a series of numbers and am wondering if I have to add them one at a time
I am simply wanting to create a “jump” field. I had done this before in older versions of Word but am not able to figure it out in 2010. For instance:
Blood pressure is __, heart rate is ___.
I need to jump to where I type in the blood pressure and then jump to where I type the heart rate with simple tab keys. I believe the older version used F11.
Does anyone have instructions for this please?
Any input would be greatly appreciated.
Use Combo boxes instead of lines
I opened up the Developer on the Customize Ribbons and it shows on my toolbar. Very few of the tools are available. For example, the Control group is listed but all the icons are shaded gray and not available. What can I do to fix this?
Take your cursor out of the box you have selected
I had the same problem. I finally realized I was working on a Word ’03 document in compatibility mode. Once I saved the document as Word 2010, all the options were enabled. Hope that helps!
on drop down list box, once I click off of it I only see the text and not the drop down arrow for the person to fill out. THey have to click on text for it to come up. How do I get it all to show on my document – the border and arrow?
It cant be done as far as i know cause if you had the border and arrow showing on all parts of the document it would print the same way and would look very messy.
How do I remove the ‘Click here to enter text.’ from printing but still use it electronically.
put a blank space above it in properties
How to I make a different text spot type the same item. What I mean is I want to enter the same words content in selected text box or plain text box.
Stop protection
click the tag so box and text are all highlighted
Move cursor to the text
Copy
Paste keep source formatting
i can’t get this to work…….. can you elaborate??…….. first of all, how do you “stop protection”?
I had hoped I would have seen some instruction on how to insert a TIME field. Sometimes, a user needs to insert not only a date but also the time they completed a task in my change control form. Can you share how to insert a time field?
I can’t seem to get the drop down boxes to show up when I open the file on my android tablet. I’ve tried saving in all the available formats and still no dice. Any help with this. I want to create a form that can be used on my tablet. P.s. I’ve also tried several android programs from the market to open the file. Most do open the file but no drop down boxes.
Such great information. Then you for sharing. I really needed the help!
PLEASE can someone advise how to tab from field to field for customers to input their details on form? thanks
Is there a way you can stop the form field instructions (e.g. “Click here to enter text” or “choose an item”) from printing – for those people who cannot / will not fill the form in electronically, but instead prefer to print out and fill in by hand? – I know it defeats the purpose of electronic forms but some people don’t know how to go through the process …
Hi there
Heres how to do it
Firstly stop protection,box down on right corner
Click on the box in question and click properties
In the pop up ull see the text eg “click here…” click on the text and on the right click remove
Then click add and hit spacebar once and ok that
once you protect the document again that text will dissappear and the blank space now appears
How can I protect a form that also has fillable/expandable excel blocks?
Please can someone tell me how I can edit a drop down list box once I have saved it. I set it up and now need to edit it to add additional catgories but cannot click on it like I used to be able to in 2003, the box is grayed out. Many thanks!
Go to developer tab
Click restrict editing
Click stop protection bottom right of screen and u should be in
Double click on dropdown box to edit
I am desperatley trying to insert a multiple choice control in my document. I need the user to be able to select more than one option. I cant find anything on this! Surely someone else needs to do this?
Can I link boxes within a template so they fill in the same information automatically when it is typed in the first box?
Can I link boxes within a template so they fill in the same information automatically when it is typed in the first box?
Stop protection
click the tag so box and text are all highlighted
Move cursor to the text
Copy
Paste– keep source formatting
If you happen to have a table F4 will do for all other boxes but i still use the other method.
How do you create an item in a form that cannot be updated on its own but updates when a value is entered in a different field?
how to create calendars that automatically follow the calendar on the desktop ?
how to create calenders that automatically follow the calender on the desktop?
Very good, but I would this form as a pdf file. Will this pdf file work to collect information?
What can I do to work using MS Word, save as pdf and use the pdf file as with the Word document?
TIA
Very nice description and nice way of guidance. Thanks.
When I add protection, the text boxes in the form become uneditable, only the drop down list seems available. Any suggestions
I’m using Word 2010 and have I’ve created a form; however, I’m having to save it as a 2003-07 document because some of the people using the form wont be using Word 2010. I’ve found the ‘legacy’ tools to work with but now I can’t figure out how to lock the form so the user tabs from one field to the next without messing up the formatting, etc. (This was a simple task when using 2003-07 on its own.)
Absolutely brilliant! I am new to Word 2010 and have found it difficult to find where they have ‘hidden’ certain functions. Excellent explanation and great screen shots. Thank you very much!
How can you protect the form without setting up a password so others can use the form and just tab through the fields. Thanks.
If you click Protect Document also under the Developer ribbon, you can lock the finished form (with or without a password). Be sure to restrict editing to only filling in forms (under step 2 that appears as available options). Then after you lock the form, save the finished final form. If locked, it will save as being locked.Then every time you open the document, it will still be locked and automatically take you to the first form field. From there, you can tab between each form field (entering data as you go) while not disturbing the rest of the document (which is still locked and thereby restricted from editing).
But if you do that the helpful little tags refuse to appear. Is there a way around THAT?
Once form is set up, what do you do so user can tab through the fields and fill them in? Thanks.
Hi there
unprotect ur document and untick formatting restrictions box but keep editing restrictions box ticked for filling in forms
Use a Plain Text box. It won’t work with Rich Text boxes.
I am having trouble getting a date field to work. I need the date to be set up as MM/DD/YYYY and this option is not availble. What can I do?
Hi There
Firstly click restrict editing and stop protection (bottom right)
click in the calender box you want to change
click properties
Lastly 3rd last box down change locale to English US,its defaulted to English (Western)
Click OK
Perfect Article!!!! Very clear and concise and it was exactly what I needed 🙂
Thanks for the post ! That is what im looking for.. Also can u tell me the diff between these controls and legacy controls ? i’m laymen in these things.. sorry i didnt make any sense
Is there a way to change what the text box says before you type into it? So instead of the “Click here to enter text” I can put something else?
Go into Design View from the Developer ribbon
Very good presentation. Once I have created the form and the client has populated it with his or her resposes, is there a way to link/merge the data to a Word template(s) that I have created?
NEED to know how to tab between fields as in 2003. I use detailed forms with many fields and don’t want to click on each option – really slows down input. PLEASE fix this!! Will continue to use 2003 forms until this is available.
I didn’t see if there was an answer to the question about limiting text box characters. I need the the text box to only accept 128 characters or flag the person entering that they have gone over the limit.
Has anyone been able to do this?
Diana, you can set your character limit in the properties of the textbox. Developer tab > Design Mode > Properties > MaxLength = 128.
I am trying to do this by going to properties of the textbox but I can’t seem to find it. I am using word 2010. thanks
From what I can see, you can only restrict the number of characters by using the Legacy Controls Text box.
I’ve locked my form down but now the check boxes don’t work when I send the form to a colleague to fill in, can you help?
Does anyone know how to prevent informtion in one field box from pushing the other filed boxes on the same line over to the right?
At least two ways to do this.
I would just create a tab alignment for that paragraph and use that to align the fields.
Alternatively, you could use an invisible table and put the input fields into different cells.
May be other ways to achieve this too.
Does anyone know how to prevent informtion in one field box from pushing the other filed boxes on the same line over to the right?
When I add the restriction to “fill in forms” only, the user still cannot fill in the form fields. The whole entire thing is locked and the only way for them to fill it out, is removing the restriction. Im using MS Word 2010. Thanks.
I don’t want the words “click here for text” to show on my form and if I want to put a line and want to have to be able to put that text box over the line, without the words, yet when you go to fill in form, I want lines to be set, not to wrap….. I need help please
Word 2010 > Developer Tab > Controls Group > Design Mode (enable)
Select text control > Move cursor focus inside the prompt text > type replacement message (just use spaces if you want nothing) > Tidy up by deleting before and after text
Word 2010 > Developer Tab > Controls Group > Design Mode (disable)
I am having a bit of a problem with figuring out how to set up continueing to next page features in Forms Word 2010 and was hoping for some direction in how to set it up. I have set up a fill-in form, it is set up with a table using outline numbers with fill in areas. The user tabs and fills in the areas needed and it goes to the next line or field correctly until they get to the bottom of the page there is sends them back to the top of the page. How do I set it up so the table outline and formating will continue to the next page if more lines / fields are needed. Thx, Marlene
this is great. i still have some employees who wnat to write forms by hand. is there a way to insert lines in your text box “comments” so that is someone decides to print a balnk form they have lines to write on but still permits someone completing the form electronically to have access tyo the text box?
Is there a way to move from field to field by tabbing? What or how do you do this?
Susie, did you find an snwer yet? I also need help with this! Thanks for sharing any information you can!!
After tons of research, I finally discovered that this works with the Plain Text box, but not the Rich Text box, so I just switched all my fields to Plain Text. Now it tabs through.
You have to use a Plain Text Box- it won’t work with Rich Text boxes.
Does anyone know how to change the size of the “enter text here” box?
Hi, it was so helpful thanks, just an additional question, waht if my document has areas where the user need to write, when I’m restricting or protecting my document it doesn’t allows the people to write just to fill out the check boxes or move the drop down boxes, I hope you can help me
You can make a TextBox field MultiLine
Assuming you already have a TextBox:
1) Select textbox within your document
2) Ribbon > Developer Tab > Controls Group > Properties
3) Enable ‘Allow carriage returns (multiple paragraphs)’
Having done this, you should now be able to default the content inside the textbox to whatever you want. That section of the form will now be entirely editable when distributed to the customer.
How do I restrict the amount of text that can be entered to match the height and width of the cell that has a text content control? I don’t want the text to wrap…thx.
How do I restrict the amount of text that can be entered to match the height and width of the cell that has a text content control? I don’t want the text to wrap…thx.
This was great. I have searched for so long to find a guide that would simply explain what to do with a visual guide. Thanks.
How do you take the forms and create databases with the input?
I NEED THIS TOO!!!!!!!
I made a form and I want to be able to tab from each content box to the next- it will do it from the first to the second, but once I try to tab to the third content box, it just tabs spacing in the second box. How can I make it so when I hit “tab” it will tab from box to box?
Hello, I have been able to set up my form which is fantastic, thankyou.
What I am now looking for is how I can type information at the start of the form, and have it auto fill futher down the form when it is asking for the same information. I also wonder, is it possible to set a form up so that when i enter a name, it will auto fill a particular persons phone number and email address? I hope this doesnt sound too confusing :/
Thank you
Is there a way that I can use these forms on an Android 2.3 device or and Apple iPAD ?
We would like to create forms to make available to our sales team to use in the field. Thanks
This is very well done, but I’m still searching for a method that allows the users of a protected form to insert an image/picture. So far I’ve not been able to find anything. Suggestions???
after a user documentary for database 2010…for students of yr 11….need plenty of pictures ‘easy to use’ format
maguire.paul.p@edumail.vic.gov.au
Perfect step by step directions and graphics!!
Perfect step by step directions and graphics!!
Is there anyway to prevent the user from saving the form if they’ve omitted their name (for instance).
Is there an option where comments or instructions pop up when you place your cursor over a field?
Is there an option where comments or instructions pop up when you place your cursor over a field?
Thank you so much. This was so informative. I never would have found the Developer tab, but now that I have I feel like I do much more with Word. Good article and nice graphics too. Very helpful.
Excellent but, how can You limit lets say a telephone number to be a numbers only box…
Where user cant enter letters, it used to be easy in old word version
Hows do I delete the text box shaded area without starting a new object?
I would love to know how to set this up so that I could have the user tab through each of these options and only allow them to edit those tabs I have set up for them. Any help would be great!
Hi there,
Did anyone get back to you on locking the form so the fields could be tabbled through? It was a padlock in the old program but I can’t find a way in 2010 thanks gwen
Yes, under the Developer Tab you’ll find Restrict Editing. You can restrict how you like from there. Once you enable this restriction, you can now tab through your fields.
I’ve tried that and it still doesn’t work. Any other ideas?
Tell your user to move between the fields using up and down arrow keys, not Tab.
along the lines of @Tony/@Angela…
I have a form with many controls. Some of them are required fields and I would like the default text remain if the user skips the field so it is evident they missed it.
For optional fields I have used the hidden option on the text so it doesn’t appear on print.
I want the Control Text only to be hidden, not the information typed in the box when it is a protected form.
How can I accomplish this?
Thanks
Did you happen to figure this out? I’ve been looking everywhere.
Nice, but I’m still trying to find out how to CLEAR or RESET a form by pressing one button or command. Any suggestions?
Is there a way to edit the but that says: Click here to enter text?
I want to change that to somehting simpler, like one word maybe, because it totally messes up the layout of my page.
Any help appreciated.
On the Developer Tab, select “Design Mode” from the “Controls” section. This should allow you to edit the text.
When using Developer how do you draw a simple line in your document template that a person can write on?
I do not know how to create a form field/text field that allows the user who will be filling out the form to edit the text and insert bullets, change the font, bold the text, etc. Is this possible?
You can copy and paste bullets into a textbox but you can’t change the font or bold the text. You can edit the text all you want assuming that the textbox isn’t formatted for a particular type of text, number, date, etc. But the textbox keeps whatever font or type (bold or not bold, for example) that it has from the document or how the control was set up before information was added to it.
How can I hide the input field text if I need to print a form out that has been part filled in on line and part needs to be written in after printing?
Did you ever figure this out?
Hi there
Heres how to do it
Firstly stop protection,box down on right corner
Click on the box in question and click properties
In the pop up ull see the text eg “click here…” click on the text and on the right click remove
Then click add and hit spacebar once and ok that
once you protect the document again that text will dissappear and the blank space now appears
This was a great step by step. What I am having trouble with his making it so that a user can only enter info in the appropriate spots. I tried starting with one of MS templates and editing as I needed. Right now when I open the template (and it is a new document, no longer the template), the user can edit anything. And my choose selections no longer appear–it simply says choose an item without allowing a click on or list to appear. I tried applying editing restrictions – allowing only for filling in forms but it does not work.
I tried creating a new form not using an existing template or saving as a template, and still user can edit anything but at least if I protect for fill-in forms only, they cannot but still must click on each area. Anyway to make that available by tabbing?
THANK YOU!!! I have been looking everywhere for this and different sites and no one explained how to get the developer box. You just saved me and my company of endless hours searching on how to do this!!! Much appreciated 🙂
Can a form be created using both Text Boxes for filling in blanks and Check Boxes? I am working on recreating a state form for customers. Can Check Boxes be entered into Text Boxes instead of Tables. (I prefer Text Boxes because I can draw and edit them independently of each other, as opposed to Tables.) Last caveat – it needs to be able to work as a standard DOC file to accommodate customers who have not updated to 2007 or 2010. Thanks!
This is what I need also.. did you ever get a response?
This is what I need also.. did you ever get a response?
and how do you submit and collect the data of the form?
tnks.
THANK YOU! I kept looking in Help, but could never find the answer. Thank you so much!
How do you create bullet points within the ‘Click to enter text’ tabs?
When i use the standard it creates the bullet before the heading and not within the tab.
I need simple proceedure on how to make a field that can be used for typing info on my forms that will automatically go to the next field when I tab.
Linda, did you figure this out? I am looking for the same thing.
Thx for the explanation, works great! Still have a question though: Does anybody have a clue if this is backward compatible? Would 98-03 users be able to use this? What about 07?
I have the same problem… still looking for an answer…
I have the same problem… still looking for an answer…
You should add how to use the options buttons. They are not as easy to figure out. Also, how do you use a check box if you want the check box to precede the option title.
How do you make it so fieldA fills the same info in 10 places in the document?
Thank you thank you thank you!
YES…..no doubt very good sit for all beginners and professionals, I learn a lot……keep it up
I have successfully created a report form for filling in but the content boxes are pastel shaded and difficult to see. I know you can use the “find next box” but that is an extra step for my users. Is there any way I can make the boxes more obvious by changing their colour? I don’t want to put boxes or backgrounds onto the document itself as this will spoil the appearance of the report
On the form i am trying to make the circles for people to click on, and it keeps on saying “option button”. I am trying to delete the option button words but keep the circle so it acually works. How do i do that?
I have a word 2007 version which work similarly to the word 2010. Well….. its been greet to have such a very helpful and informative way of creating a survey and especially when its been part of my assignment to create a survey form. Thanks alot……..
Thanx alot!
GOD bless you
wow, thank you so much! i’m sooo happy i found this, i never knew how to make surveys with ms word until now. thanks again. 😀
boss…… boss ……boss…… thank you verey much for this site. i was looking for the same thing and i got it. thx again for the support team.
jalal ikram
Hi guys,
I just have a question on this form where in front of the Name the box is “Click here to enter text”. how can I change the color of the font after entered the text on that field. I meant I want before enter anything is Grey which is now and after entered the text it should change the color of the font. is it possible ??????? answer will be appreciated…….:)
How to make insert a picture field if I am protecting my form from changes?
Thanks
Thank you, thank you! This is exactly what I needed. I was so frustrated having learned how to make forms using 2007 but I’m excited to have learned on 2010. Much more advanced method and looks amazing!
April
This is EXACTLY what I was looking for- the perfect blend of text and graphics to show step-by-step what to do.
THANK YOU!!
James – I followed the instructions also, but every time I go back in to test my template, my text control box where it says “Click here to enter text” won’t allow me to enter anything in it. Do you know how to fix this?
lock the form
How do you lock the form please
Word 2010
Ribbon > Developer Tab > Protect Group > Restrict Editing (enable)
Restrict Formatting and Editing Panel > 2. Editing restrictions (check) > Drop-down (filling in forms) > Yes, Start Enforcing Protection (click) > Enter Password > OK
Is your form in a text box or shape? That’s what’s stopping mine, but haven’t figured out how to put a nice border around it that still lets the form be filled in. Can anyone help?
Try using a rich text box instead of the text box.