How to install Windows 11?
Windows 11 is available as a free upgrade for eligible devices and can be downloaded through Microsoft’s current official tools. If you’re wondering how to install Windows 11, this guide walks you through every method — from checking compatibility and preparing your device to completing a clean install or in-place upgrade.

Before you install Windows 11
Before downloading anything, make sure your hardware and setup meet Microsoft’s requirements. Skipping this step is the most common reason installs fail or stall partway through.
Minimum hardware requirements
- CPU: Compatible 64-bit processor (1 GHz or faster, 2 or more cores)
- RAM: 4 GB minimum
- Storage: 64 GB minimum free space
- TPM: TPM 2.0 must be enabled in firmware
- Firmware: UEFI with Secure Boot capable
- Display: 720p or higher, 9-inch or larger screen
What you’ll also need
- An internet connection (required during setup for some paths)
- Administrator rights on the PC you’re upgrading
- A USB drive of at least 8 GB (for Media Creation Tool or ISO installs)
- A current backup of your important files — especially for a clean install
- A valid Windows 10 or Windows 11 license or product key (if doing a clean install on a new drive)
A note on Arm-based PCs
The Windows 11 Installation Assistant and Media Creation Tool create x64 (Intel/AMD) media only. If you have an Arm-based PC, you will need to download the separate Arm64 image directly from Microsoft’s software download page. Check your processor type in Settings > System > About before you proceed.
Installation Assistant prerequisite
If you plan to use the Windows 11 Installation Assistant, your PC should already be running Windows 10 version 2004 or later, and you should have enough free disk space for the upgrade to proceed. Check your current Windows version by going to Settings > System > About.
Which Windows 11 install method should you use?
Microsoft offers several official paths to get Windows 11. Here is a quick breakdown of each one so you can pick the right tool for your situation before downloading anything.
- Windows Update — The safest and simplest option. If your PC is eligible, the upgrade will appear automatically in Settings > Windows Update. No USB or download tool required. Best for most everyday users who are not in a hurry.
- Windows 11 Installation Assistant — Forces an in-place upgrade on your current eligible x64 PC right now, without waiting for Windows Update to offer it. This keeps your files and apps intact. Note: does not work on Arm-based PCs.
- Media Creation Tool — Downloads the Windows 11 ISO and burns it directly to a USB drive in one step. Use this when you want to upgrade or clean install on an x64 PC and want the simplest USB creation process. Creates x64 media only.
- ISO direct download — Downloads the Windows 11 ISO file so you can burn it to USB yourself using a tool like Rufus, or mount it inside a virtual machine. Best for advanced users, clean installs, or VM setups.
How to install Windows 11 via Windows Update or Installation Assistant
For most users on an eligible Windows 10 PC, these two methods are the easiest and lowest-risk ways to upgrade. No USB drive needed, and your files and apps stay intact.
Method 1: Windows Update
This is the recommended path for everyday users. Microsoft gradually rolls out the Windows 11 upgrade, so if you do not see it immediately, your PC may be in a staged rollout or subject to a safeguard hold — meaning Microsoft has temporarily paused the offer on certain hardware configurations while investigating a known issue. The upgrade will appear when it is cleared for your device.
- Open Settings and go to Windows Update.
- Click Check for updates.
- If your PC is eligible, you will see a “Windows 11 is ready — and it’s free” banner. Click Download and install.
- Allow the download to complete. Windows will prepare the upgrade in the background.
- When prompted, click Restart now (or schedule the restart for a convenient time). The PC will restart several times during installation — this is normal.
If you do not see the upgrade offer and your PC meets all requirements, you can use the Installation Assistant below to trigger it immediately instead of waiting.
Method 2: Windows 11 Installation Assistant
The Installation Assistant lets you upgrade an eligible x64 PC to Windows 11 right now without waiting for Windows Update to offer it. Before you start, confirm your PC meets these prerequisites:
- A valid Windows 10 or Windows 11 license
- Windows 10 version 2004 or later already installed
- At least 9 GB of free disk space
- Administrator rights on the PC
- An x64 (Intel or AMD) processor — the tool does not support Arm-based PCs
- Go to the official Windows 11 download page and click Download Now under Windows 11 Installation Assistant.
- Run the downloaded tool. You may be prompted by User Account Control — click Yes to allow it to run with administrator rights.
- The tool will verify that your PC meets Windows 11 hardware requirements before proceeding. If your device does not pass, it will display which requirement was not met.
- If your PC passes the compatibility check, accept the license terms and click Accept and install.
- The tool will download Windows 11 and prepare the upgrade. This can take some time depending on your internet speed.
- When the upgrade is ready, click Restart now. The PC will restart several times to complete the installation. Do not turn off your computer during this process.
Install Windows 11
Microsoft is distributing Windows 11 the same way it did Windows 10; there is a media creation tool. The media creation tool will download the Windows 11 ISO file and burn it to a USB drive that’s connected to your system. You can also download just the ISO file and use your tool of choice to burn it to a USB.
How to download Windows 11
Method 1
To download Windows 11, decide first how you want to burn it to a USB. If you want to use the media creation tool, follow these steps.
- Visit the official Windows 11 download link in your browser.
- Click Download now under Windows 11 Installation Media.
- Run the media creation tool.
- Accept the end user agreement.
- Select the language and Windows edition that you want to download.
- Select the USB flash drive option.
- Connect the USB drive to your system.
- Click Next and select the drive.
- Begin the download.
- Once the download completes, the ISO will be burned to the USB.

Method 2
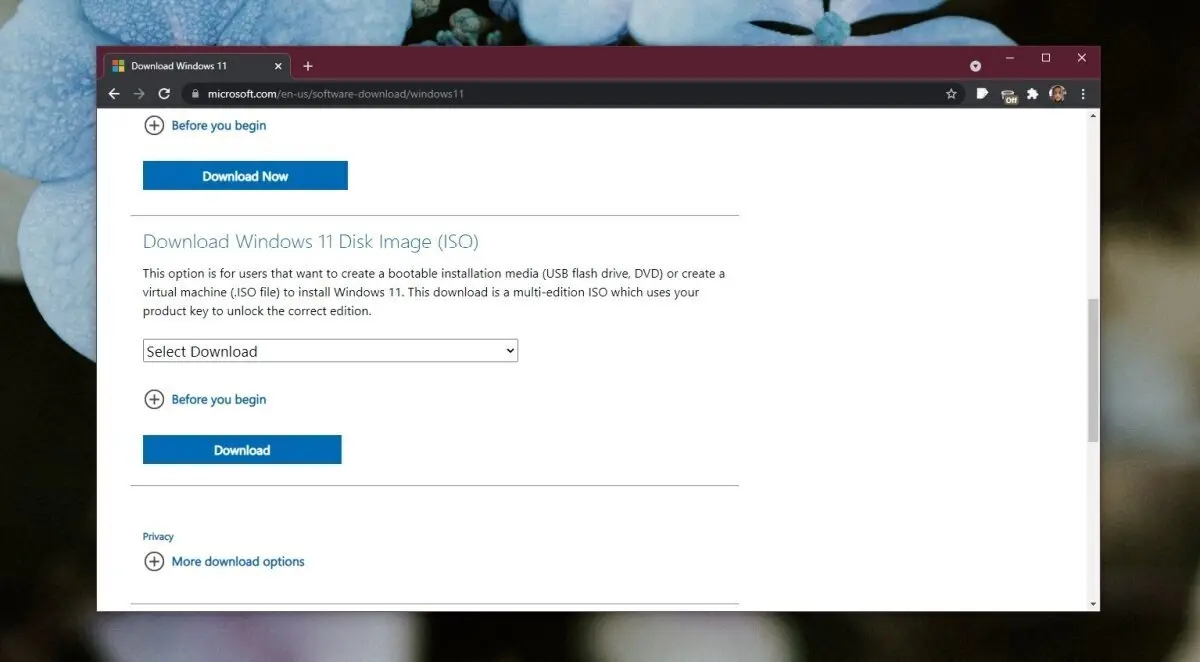
To download the ISO directly, follow these steps.
- Visit the official Windows 11 download link.
- Click Download now under Download Windows 11 Disk Image.
- Allow the download to finish.
- Use a tool like Rufus to burn the ISO to a USB drive.
How to Install Windows 11
There are two main ways to install Windows 11 from your bootable USB or ISO: an in-place upgrade that keeps your files and apps, or a clean install that wipes the drive and starts fresh. Follow the path that matches your situation.
In-place upgrade (keeps your files and apps)
Use this path if you want to move from Windows 10 or an earlier Windows 11 build to the latest version while keeping your installed apps and personal files.
- Sign in to your Windows 10 or Windows 11 desktop with an administrator account.
- Connect the Windows 11 USB to your system.
- Open File Explorer, go to This PC, open the USB drive, and run Setup.exe.
- When prompted, choose whether to download updates before installing. Selecting “Download updates” is recommended to reduce post-install work.
- Accept the license terms.
- On the “Choose what to keep” screen, select one of the following: Keep personal files and apps (safest), Keep personal files only, or Nothing (equivalent to a clean install).
- Setup will run a compatibility check. If your device passes, click Install.
- The PC will restart several times during the installation process — this is normal. Do not turn off your computer.
- Once setup completes, sign in and walk through any remaining prompts to finish configuring Windows 11.
Clean install (wipes the drive)
Use this path when you want a fresh start with no leftover files, apps, or settings from the previous OS. Back up everything important before proceeding — this process erases the target drive.
- Disconnect any extra storage drives (secondary HDDs, SSDs, external drives) to avoid accidentally wiping the wrong disk. Only leave the drive you intend to install Windows 11 on.
- Connect the Windows 11 USB to your system.
- Restart the PC and press the boot menu key (commonly F12, F9, F10, or Esc, depending on your motherboard — check your manufacturer’s documentation). Select the USB drive from the boot menu. You do not need to change the boot order permanently in BIOS.
- The Windows Setup screen will appear. Select your language, time format, and keyboard layout, then click Next.
- Click Install now.
- When prompted for a product key, enter your Windows 10 or 11 product key, or click “I don’t have a product key” if your license is tied to your Microsoft account or motherboard (you can activate after install).
- Select the correct Windows 11 edition (Home, Pro, etc.) that matches your license, then click Next.
- Accept the license terms and click Next.
- On the installation type screen, select “Custom: Install Windows only (advanced)”.
- You will see a list of drives and partitions. Select the target drive or partition. If there are existing partitions on the drive you want to wipe, you can delete them here (select each partition and click Delete) until you see unallocated space, then select that unallocated space. Setup will create the necessary partitions automatically. If the drive is already unallocated, simply select it and click Next.
- Click Next to begin copying files. The PC will restart several times — this is expected.
- After the first restart, remove the USB drive so the PC boots from the newly installed Windows partition rather than restarting setup again.
Troubleshooting common clean install failures
If setup stops before it finishes, one of the following issues is almost always responsible. Here is what to check for each scenario.
Setup cannot see your SSD or HDD (“Load driver” screen)
If the drive selection screen is blank or your SSD does not appear, the Windows installer is missing the storage controller driver. This most often happens when the BIOS or UEFI has the storage mode set to RAID, Intel VMD, or Intel RST rather than AHCI. Try the following:
- Restart, enter your UEFI/BIOS settings, and look for a storage or SATA configuration option. Switch it from RAID or Intel RST/VMD to AHCI, then retry the install.
- If switching to AHCI is not an option or does not help, click Load driver on the drive selection screen and provide the OEM storage controller driver from your motherboard or laptop manufacturer’s support page (usually available as a ZIP containing an INF file).
“Windows cannot be installed on this disk” (MBR vs. GPT)
Windows 11 requires UEFI firmware and a GPT-partitioned drive. If your drive is formatted as MBR (Master Boot Record), setup will refuse to install on it. To fix this:
- Confirm your UEFI is set to UEFI boot mode (not Legacy/CSM) before starting setup. Booting in Legacy mode will cause Windows 11 setup to reject the drive.
- On the drive selection screen, delete all existing partitions on the target drive until it shows as unallocated space. Windows 11 setup will then automatically create the correct GPT partition structure when you click Next. Note: this erases all data on the drive — back up first.
- Alternatively, you can convert the disk from MBR to GPT before install using the
mbr2gpttool in Windows, but only attempt this if you are comfortable with command-line tools and have a full backup.
The USB will not boot
If pressing the boot menu key and selecting the USB produces no result or boots straight into Windows, try the following:
- Recreate the USB installer using the Media Creation Tool or Rufus. A partially written or corrupted drive is a common culprit.
- Make sure you are selecting the USB from the one-time boot menu (usually F12, F9, or F10 at startup) rather than rearranging the permanent boot order in BIOS settings.
- Enter your UEFI settings and disable Legacy Boot / CSM (Compatibility Support Module). Windows 11 setup requires UEFI boot, and a USB created with the Media Creation Tool is designed for UEFI. Enabling CSM can prevent the drive from appearing or booting correctly.
- Try a different USB port, preferably a USB 2.0 port if your system has one, as some UEFI firmware has compatibility quirks with USB 3.0 during pre-boot.
“This PC can’t run Windows 11” during setup
If setup displays this error after you have already started the install process, work through this checklist before trying again:
- TPM 2.0: Enter your UEFI settings and confirm TPM is enabled. It may be listed as PTT (Intel), fTPM (AMD), or TPM Device. Make sure it is set to TPM 2.0, not 1.2.
- Secure Boot: In UEFI settings, confirm Secure Boot is enabled. If it was previously disabled to run an older OS, re-enable it.
- Supported CPU: Check Microsoft’s supported CPU list for Windows 11. Processors older than 8th-generation Intel Core or AMD Ryzen 2000 series are generally not supported.
- Run PC Health Check: Use Microsoft’s PC Health Check tool (available on the Windows 11 download page) to get a clear readout of exactly which requirement your PC fails — it is the fastest way to pinpoint the specific blocker.
Post-install steps
Once Windows 11 finishes installing and the PC restarts to the desktop, take care of these final steps:
- Connect to the internet and complete the Out-of-Box Experience (OOBE) prompts, including signing in with or creating a Microsoft account.
- Go to Settings > Windows Update and install all available updates, including optional driver updates.
- Open Device Manager (right-click the Start button) to check for any devices missing drivers, and install them from your manufacturer’s support page if needed.
- Go to Settings > System > Activation to confirm Windows 11 is activated. If it is not, click Troubleshoot to link your license.
Windows 11 compatibility check
We’ve covered an app for checking if your system is compatible with Windows 11, but Microsoft also provides its own official tool for this: Microsoft PC Health Check. This is the correct tool to use before attempting any installation. To use it:
- Download PC Health Check from the official Windows 11 download page.
- Run the app and click “Check now.”
- Review the results. If your device is not eligible, the tool will tell you exactly which requirement it fails on — such as TPM 2.0, Secure Boot, CPU compatibility, RAM, or available storage — so you know what to address.
Note that PC Health Check and the Windows 11 Installation Assistant serve different purposes. PC Health Check is a pre-check and explanation tool: run it before you start an upgrade to find out whether your device qualifies and, if not, exactly which requirement it fails. The Installation Assistant is an upgrade tool that also verifies hardware eligibility before the install flow begins — so it will stop an incompatible PC from proceeding — but it does not give you the same detailed breakdown of which specific requirement was not met. For that reason, running PC Health Check first is still the better starting point if you are unsure whether your device qualifies.


Thank you for the info but I have some concerns like what is the chance that all of my files get erased or become corrupt? and is it possible to downgrade back to Windows 10 if I didn`t like it or in case of any issues?
Nope, not going to install it. Not until they remove the TPM chip dependency. And yes, they can and do. Just read an article (https://www.makeuseof.com/why-chinese-users-cant-upgrade-windows-11/) and the one tiny tidbit of info that actually jumped out at me was this…
“According to the South China Morning Post, Microsoft has made an exception for some of their bigger clients in Russia and China, so they don’t have to include TPM chips in their machines to get Windows 11.”
So, this tells me you CAN run Windows 11 without TPM. ‘Nuff said.