How To Automatically Sync Files Between Linux Computers With Syncthing
Part of the benefit of using cloud storage is the ability to have files in sync no matter what computer you’re on. The trouble is, this convenience comes at a cost. To transfer a large amount of data, plans usually need to be purchased. Additionally, it takes forever to upload a file to a remote server, just to download it back to another computer on your network. The good news is, it doesn’t have to be inconvenient to sync files between Linux computers. There’s a better solution: Syncthing.
Syncthing is a tool that syncs stuff. With this tool, users can transfer as much data as they want over the internet, as well as over a local network. There’s no need to buy expensive cloud storage plans for extra space. The storage space of Syncthing is the capacity of your own hard drives, and the speed is how fast your own network and internet connection is.
Best of all, it’s available on Linux. Here’s how to get it working.
Installation
Installing Syncthing is a little different compared to other types of programs. This is because it’s a web-based program that runs locally. Syncthing runs in the background doing all the important calculations, but everything the user does is configured in a web browser. This also means that if you wish to install this software on a Linux server, it’ll work out just fine.
Ubuntu and Debian
Start off by adding the PGP release key. This is important as both Ubuntu and Debian can’t install software without a release key. Open a terminal, get key with this command:
curl -s https://syncthing.net/release-key.txt | sudo apt-key add -
The next step in the install process is to add the Syncthing repository to the /etc/apt/sources list.
echo "deb https://apt.syncthing.net/ syncthing stable" | sudo tee /etc/apt/sources.list.d/syncthing.list
The new repository for Syncthing is on the system. Still, Syncthing won’t install till the software sources to reflect the new changes.
sudo apt-get update
Lastly, install the software with:
sudo apt-get install syncthing
Arch Linux
The Syncthing server/web UI tool is available in the Arch Linux User Repository. Download and build it for Arch to get it running.
Other
Other Linux distributions, for the most part do not have packages available. Instead, there is a tarball archive of the program available.
Download the archive, and read the instructions inside on how to install it.
Start the Syncthing service by entering: syncthing
The web UI will automatically open in the default browser on your Linux PC.
Other Platforms
Though this article covers Linux, files will sync in Syncthing with other platforms too. Mac, Windows and even Android work. The only requirement for file sharing is that every device must be on the same network. To get the app for these platforms, visit this link here.
Using Syncthing
Access the syncing settings by visiting https://localhost:8080. Inside the web interface, the user has options to create a new shared folder, and add a remote device. To create a new folder to share click the “Add folder” button. This will bring up a window with information to fill out. Specifically: folder label, folder ID and folder path.
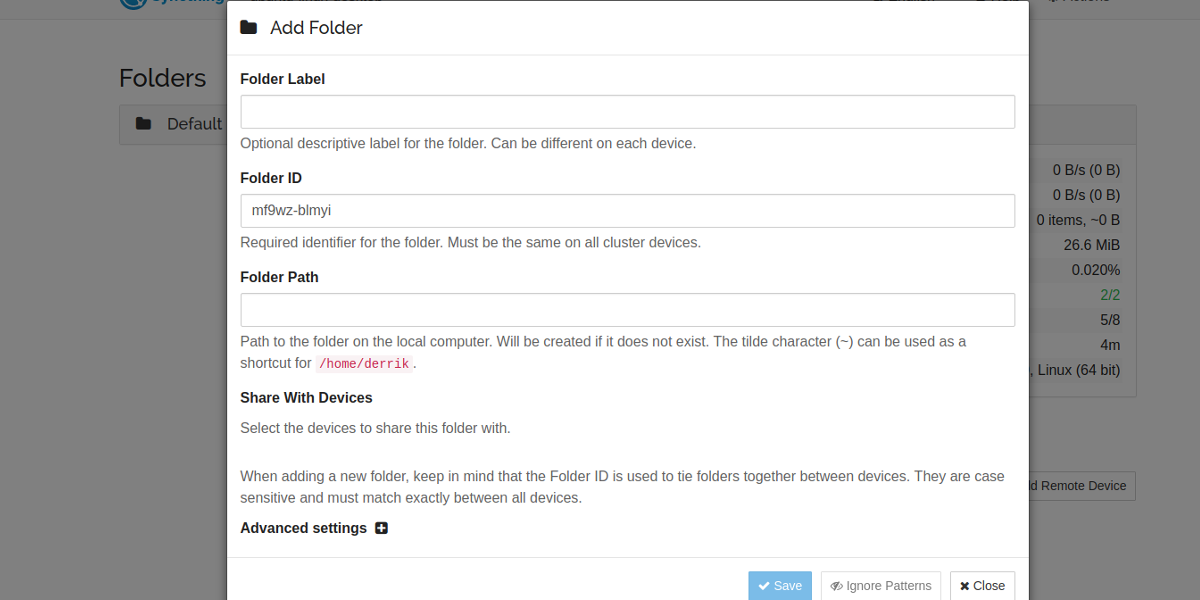
Start with the Folder Label. Add a name to your share, so that you know what it is. Skip over the folder ID, as the system generates one of these automatically.
Lastly, add the folder path to the new share. For example: if you’re sharing from your My Music folder, the path would be /home/username/Music/. Any folder will work, even a new one.
Add Remote Device
A folder won’t share without first adding other devices to the sync server. To do this, go to another PC running Syncthing, and find the “Device ID”. This is it’s unique identifier that will allow Syncthing to quickly (and easily) find the device, and add it to the network. Once you’ve got the ID, click “Add remote device”. This brings up a popup menu.
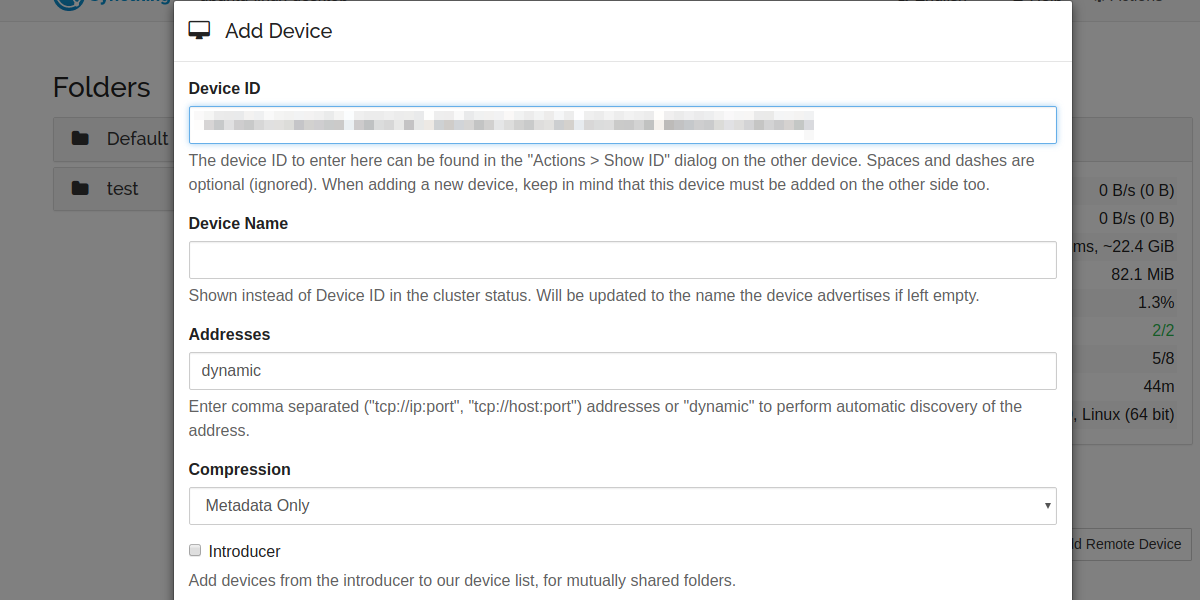
Find “device ID” and enter the ID of the device you want to share with. To find your device ID by clicking the Actions menu, then “show ID”.
Sharing A Folder
After you successfully add a device, you will see it pop up on the side with “Unused” next to it. It is labeled “unused” because even though your Syncthing service can see the device, and they’re interacting with each other, no items have been shared to it. Here’s how to add a folder to it.
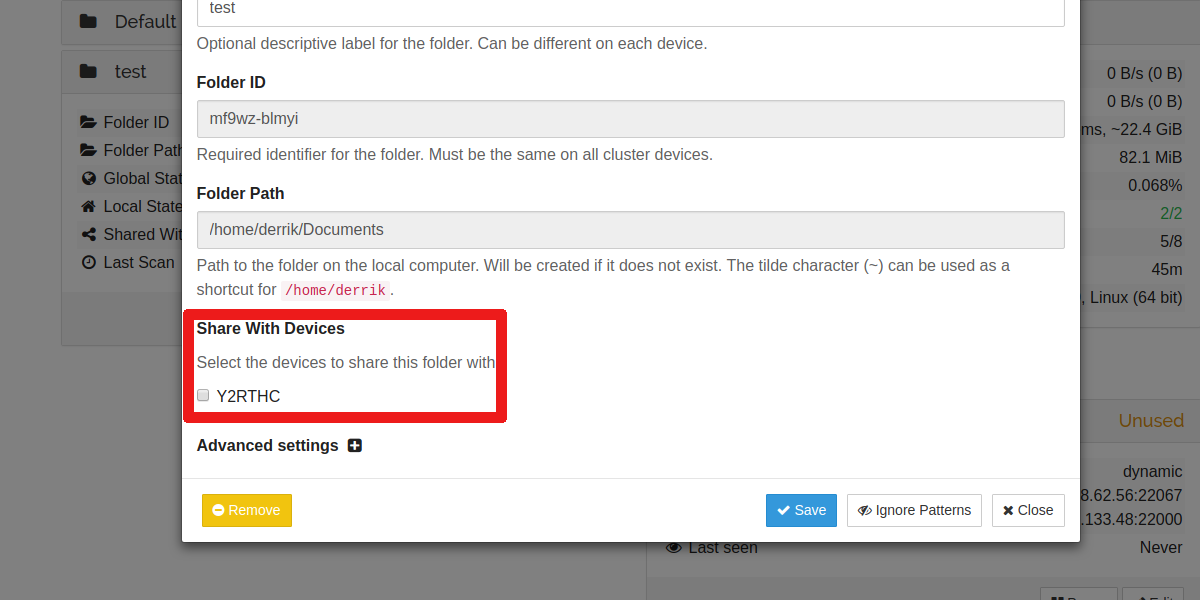
Go to the shared folder created earlier, and click the “edit” button. Look for the option to “Share with devices”. You’ll notice that the device you recently added is in this menu. Click the check box, and soon your shared folder, along with all its files will be synced to this device.
Conclusion
Those looking for a quick and easy way to keep files in sync files between Linux computers, or computers running other operating systems should take note of Syncthing. While the program isn’t exactly the first of it’s kind, the way it tackles the issue of file sync in such an easy-to-use way more than makes it stand out from other similar solutions. If you’re looking for a quick and easy file sync fix, look no further.
