How To Install Intel Video Drivers In Ubuntu
The Linux kernel is a wonderful thing. Unlike a lot of other operating systems, many different things are supported directly by the kernel. This means that it’s very easy to just install Linux on any PC and have it automatically work. Even the most unknown computer has some kind of Linux support. When it comes to great Linux support, Intel PCs are some of the best. Though the company doesn’t do everything open source, they’re by far the best of the three graphics companies. Intel users don’t have to install complicated proprietary blobs to fully utilize their PCs. Instead, most of this is taken care of through the operating system itself, and Linux respectively. That being said, the Intel video drivers in Ubuntu can be a little out of date, and sometimes even miss a few things. This is understandable, as every PC is different, and they can’t possibly detect everything. It is because of this, Intel has made their own video driver installation tool for the operating system.
Intel Video Driver Installer
Intel prides itself on focusing on open source technologies, and when it comes to graphics, Intel does not use proprietary video drivers. When a user installs their favorite Linux distribution (especially Ubuntu) video drivers are installed right away. That said, the versions of the drivers aren’t as up to date as they could be.

If you’re looking to get the absolute most up to date Intel video drivers on Ubuntu, your best bet is to just download the official driver install tool. Here’s how to get it running.
Ubuntu 16.04
The majority of Ubuntu Linux users (about 80-90%) tend to be LTS users. They don’t jump at every single release of Ubuntu, and upgrade. Instead, most people only upgrade between LTS releases. The Intel driver tool has support for the 16.04 LTS, but you’ll need to download version 2.0.2 of the installer. To install it, download the .DEB file to your PC.
With the package installed, open up a terminal and use the CD command to navigate to the Downloads folder.
cd ~/Downloads
Install the update tool with dpkg.
sudo dpkg -i *.deb
After installing the Debian package, you’ll need to correct any dependency issues that may arise. Use apt install -f to correct the dependencies.
sudo apt install -f
Ubuntu 17.04 and 17.10
The latest version of the Intel Video Driver tool (2.0.6) has support for Ubuntu 17.04. As of writing this article, users will not be able to install the 2.0.6 version of the package to the latest release of Ubuntu. If you’re still on 17.04, click here to download the package. Then cd into the Downloads folder and install it.
cd ~/Downloads
sudo dpkg -i *.deb

sudo apt install -f
Be sure to keep up to date with 01.org, as Intel will be releasing the latest version of the Video Driver Update Tool any day now. Don’t worry, Ubuntu (for the most part) takes care of your video driver needs on 17.10. So sit tight, and wait for the new version to come out. When it is out, follow the instructions above to install it.
Using The Video Driver Update Tool
When the Video Driver Update Tool is on your PC, launch it to get everything going. As you open it, it will scan your version of Ubuntu Linux to see if everything is compatible. Please keep in mind that other operating systems based around Ubuntu will fail and the driver tool will not work. Even though these operating systems can run the software it will install, it will fail because of the release name. This includes distributions like Linux Mint, Elementary OS and etc.
After the tool finishes checking everything, make sure there are no “no” messages, and that everything says “OK”. Then, click the “install button” to continue. From here, the tool will go out and get the absolute latest Linux video drivers from Intel, and install it on your Linux PC. Be patient as this may take a couple of minutes.
As soon as the tool finishes installing the drivers, close it and reboot your Linux PC. When you load it up, you’ll have the absolute latest Intel video drivers in Ubuntu.
Installing Other Intel Drivers
After installing the video drivers to Ubuntu, you may still be missing a driver or two. The most common thing that Ubuntu doesn’t install is the Intel micro-code. This is because it’s a closed-source driver firmware for CPUs. For the most part, not installing this software won’t be that big of a deal. That said, if you’re looking to install every single driver available for your PC, its a good idea to install it.
To start off, open Gnome search (or Unity Dash for those on 16.04) and type “drivers”. This should reveal and “additional drivers” icon. You’ll also be able to find this area by searching for “software & updates”.
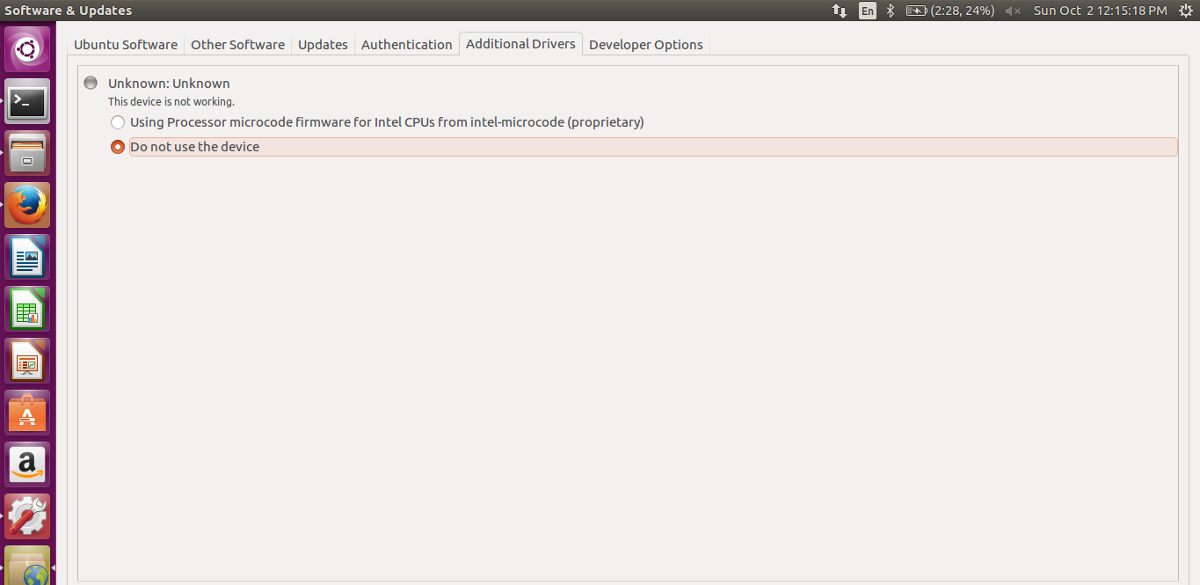
Once the driver tool is open, check the box next to “Intel Microcode” to install it to Ubuntu. This will take a bit of time, but once the software installs, reboot your PC. When you log back in, Ubuntu will be using the Intel Microcode firmware.
If you have an AMDGPU-PRO, check out how you can get the latest drivers for it on Linux.
