Clear Google Search History – Delete Your Search Data Quickly

If you want to delete search history on Google, you’re taking an important step to protect your digital footprint online. One bad search result in your history can leave a lasting impact on your personal and professional life, which is why taking control of your browsing history matters.
By doing so, you not only control the information that others can find about you, but you can also prevent targeted ads and improve the security of your personal data. We’ll walk you through the steps to delete your search history in Google below.
Step-by-Step Guide to Delete Search History on Google Desktop
Google collects and uses your search history to provide personalized experiences, such as relevant search results and tailored advertising. The information stored in your browsing history includes your search queries, visited websites, and even your location data.
While this may enhance your user experience, it may also pose risks to your privacy. Protecting your digital privacy starts with clearing your Google search history. This is a fairly simple process that you can follow from a PC, Mac, Chromebook, or other web-capable device. If you’re tightening up privacy across other platforms too, you may also want to block TikTok accounts you no longer want interacting with you.
Important: Google is actively updating its Search-service privacy settings, and button labels or menu layouts may look different from older guides or screenshots. If you don’t see the same menus described below, use one of these two reliable routes to reach your search history directly:
- Direct link: Go to myactivity.google.com/myactivity?restrict=search — this takes you straight to your Google Search activity, even if the old menu path has changed.
- Via Google Account: Open your Google Account > Data & privacy > History settings > Web & App Activity or Search history.
-
Sign in to your Google account
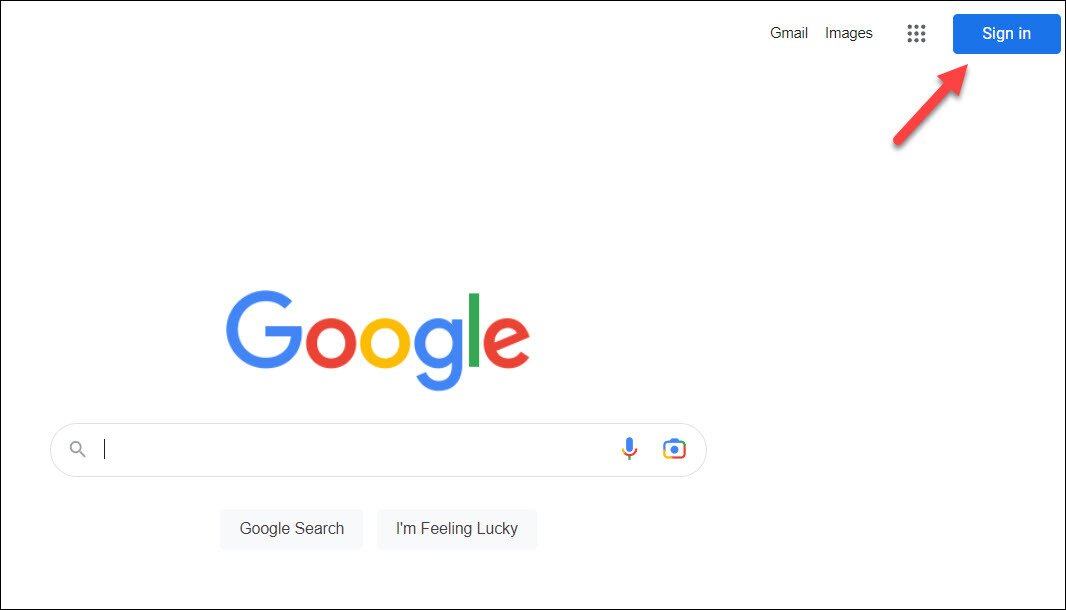
Head over to the Google website and sign in with your Google account credentials by pressing the Sign in button in the top-right.
-
Access your search history
Once you’ve signed in, select Settings in the bottom-right corner.
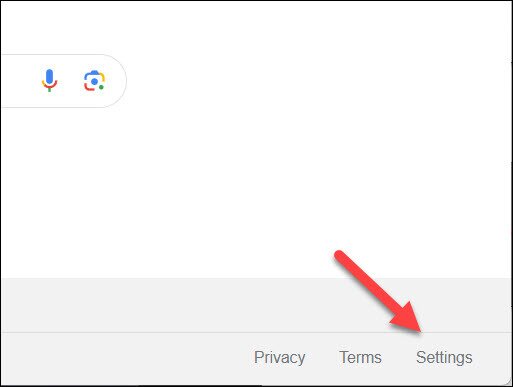
Select Search History from the pop-up.
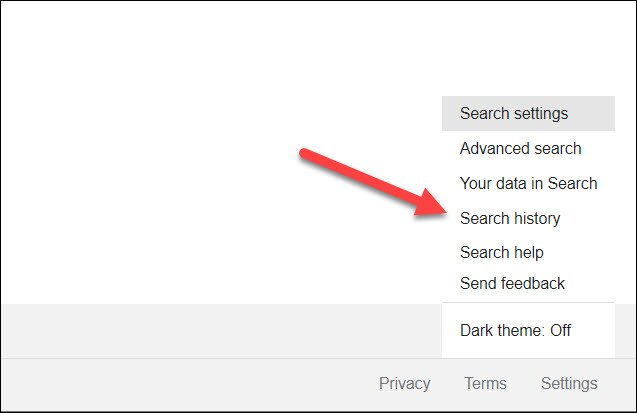
If this menu option isn’t visible, go directly to myactivity.google.com/myactivity?restrict=search or navigate via your Google Account > Data & privacy > History settings > Web & App Activity.
-
Delete your search history
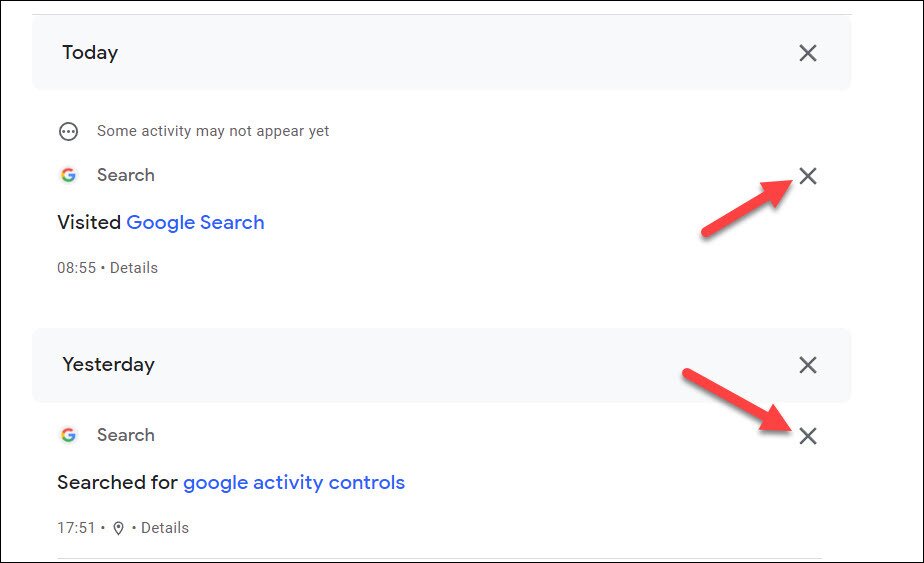
From the Search history page, you can delete search history entries individually, wipe specific time ranges, remove activity from a specific day, or clear your entire search history in one go. Here’s how:
- How to delete individual searches: Find the search item you want to clear and click the adjacent “X” icon to delete it.

- How to delete results from a specific day: On the My Activity page, find the day whose searches you want to remove. Next to that day’s heading, you’ll see a three-dot menu or a delete icon — click it and select Delete to remove all activity recorded on that day. On mobile in the Google app, the same option appears as a delete icon next to each day’s group of results.
- How to delete a custom date range: On desktop, go to My Activity (Search) and click the Delete button above your history. Select Custom range from the menu, then enter your start and end dates and click Delete to remove only activity from that window. On mobile in the Google app, tap your profile picture > Search history > Delete > Delete custom range, then enter your dates and confirm.
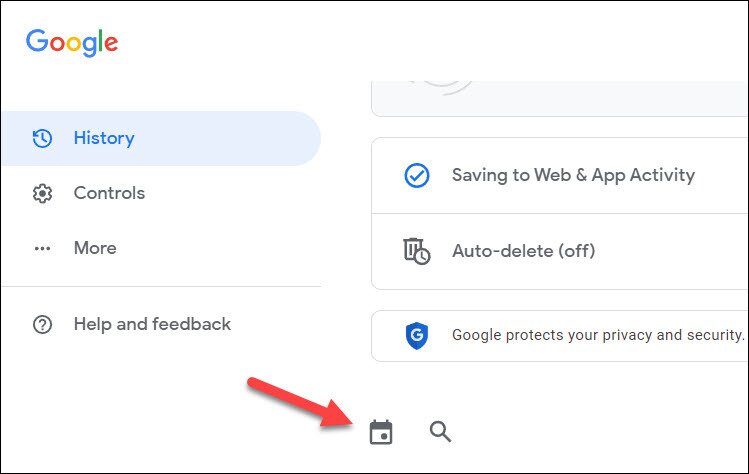
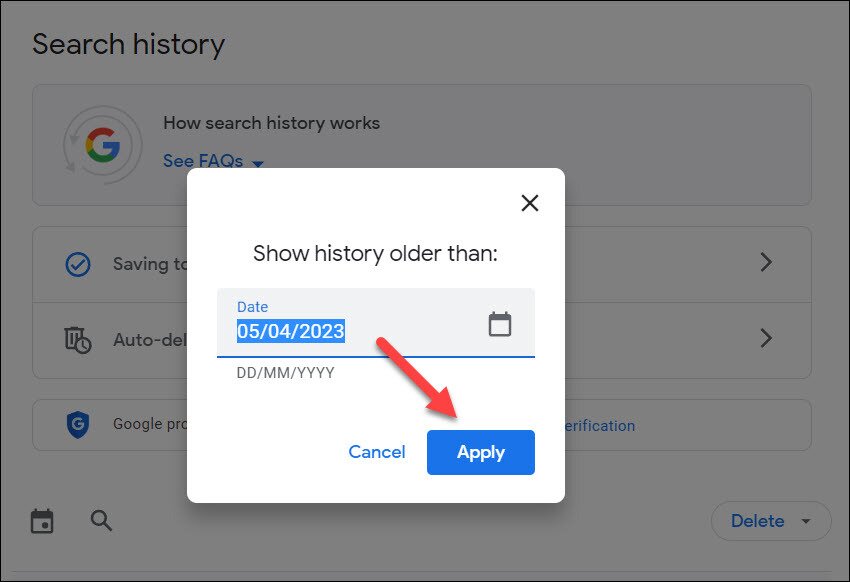
- How to delete results from specific time ranges: Click the Filter button above your history.

Choose an end date in the pop-up (the results will show everything before that date).

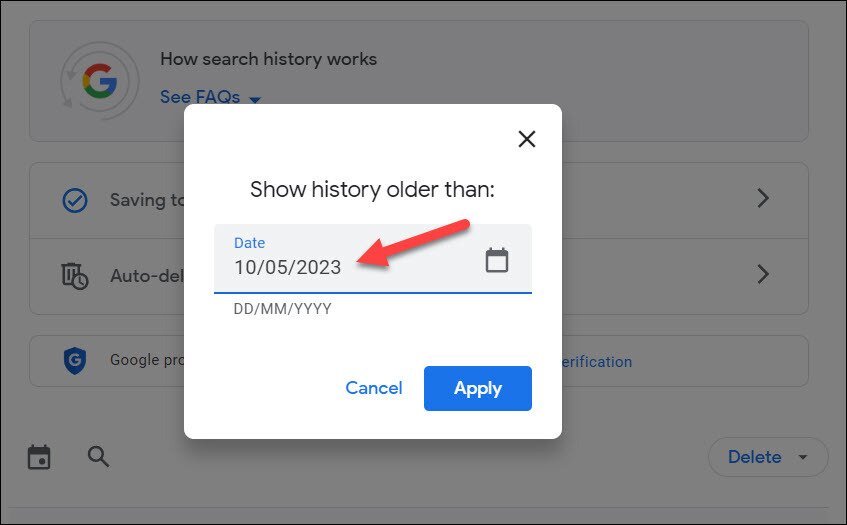
Press Apply.
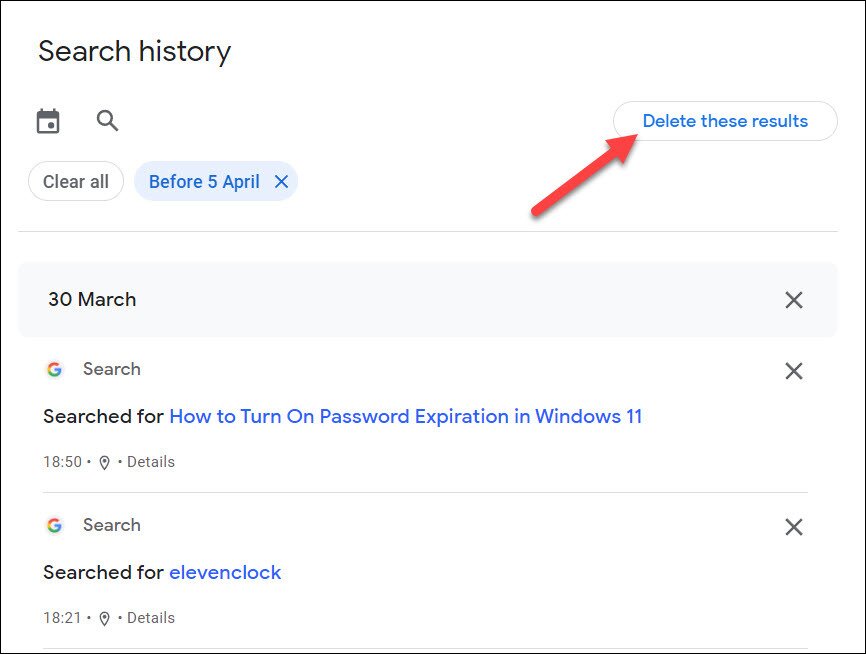
Once the results are filtered, press Delete these results.
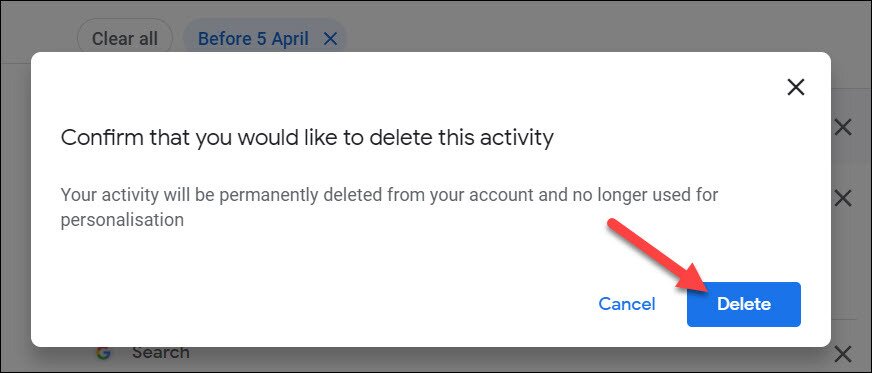
Confirm by pressing Delete in the pop-up box.
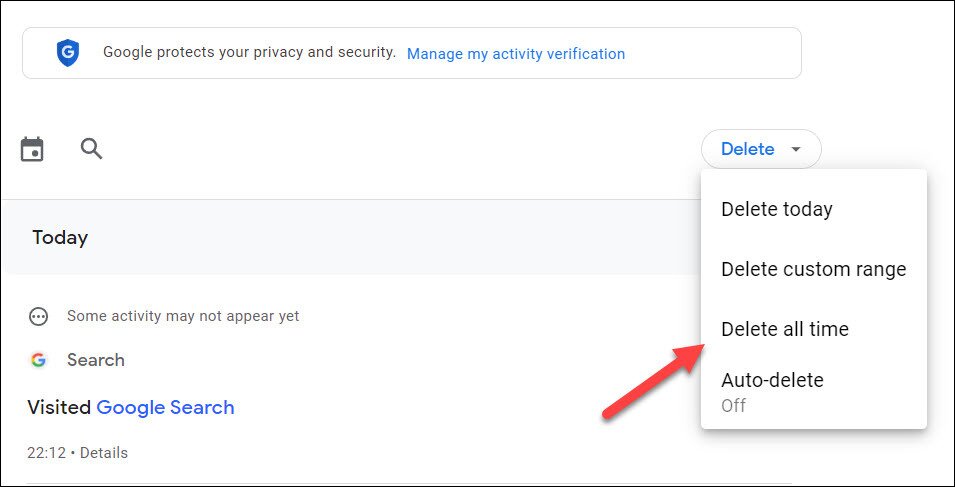
- How to delete all of your search history: Above your history, click the Delete button.

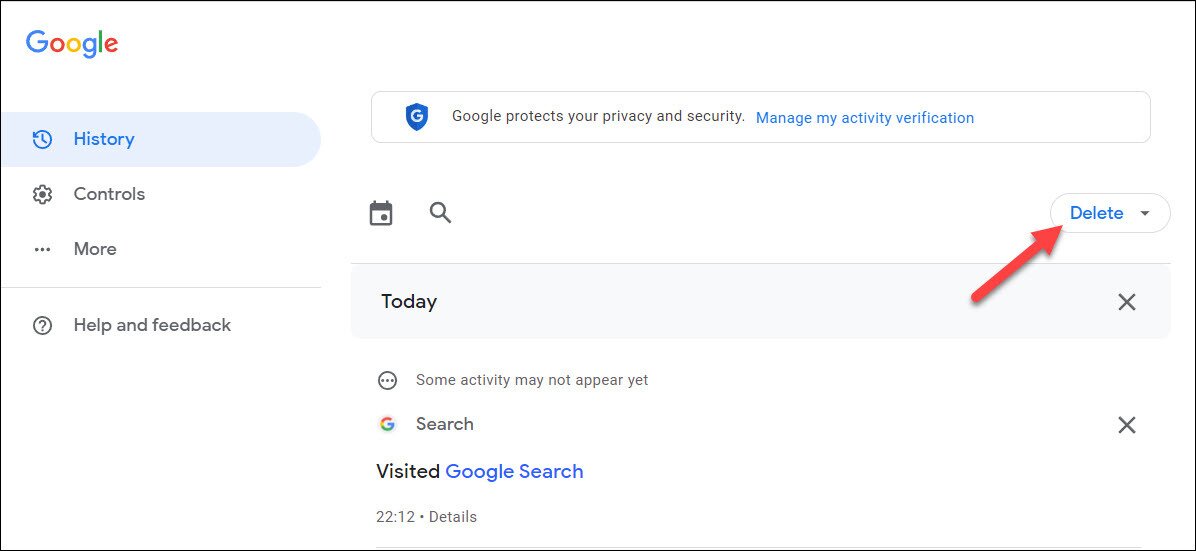
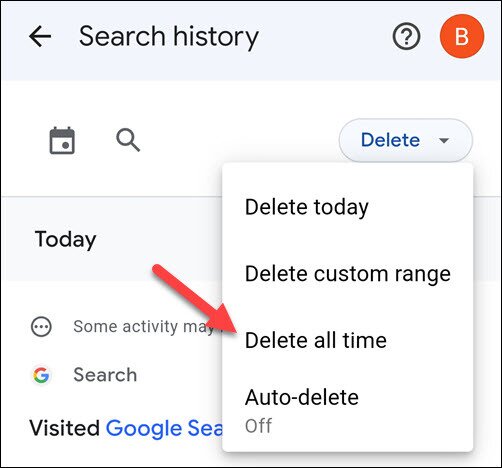
Select Delete all time from the menu to remove everything. Note that the Delete menu may also show quick options such as Today or Recent activity — these are handy shortcuts if you only need to wipe your most recent searches without touching older history.
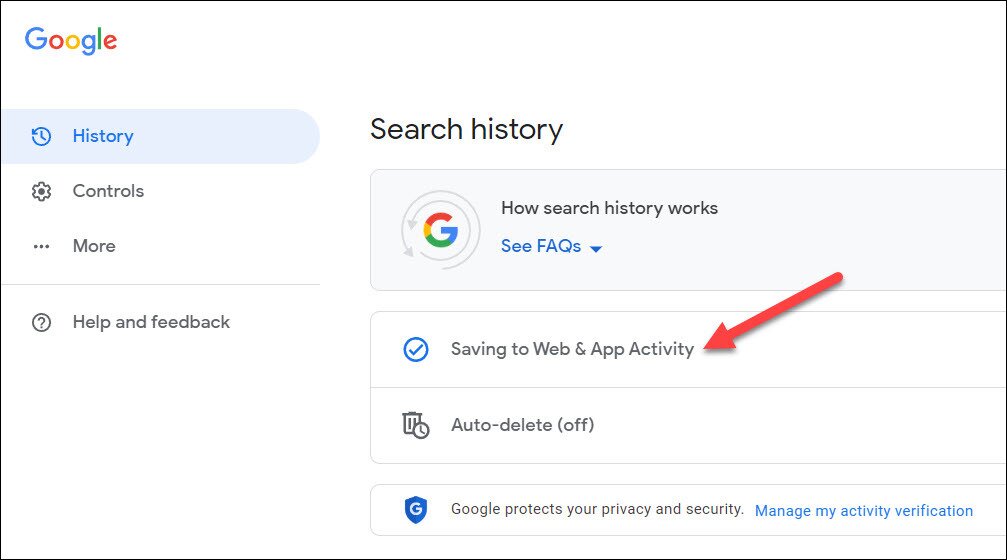
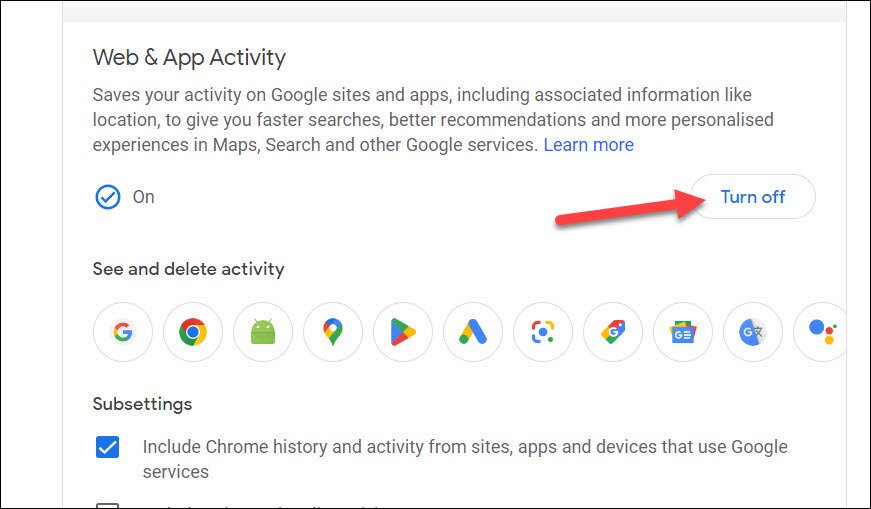
- How to turn off search history tracking: To turn off search history tracking, you’ll need to disable web and app activity for your Google account. On the search history page, press Saving to Web & App Activity at the top.

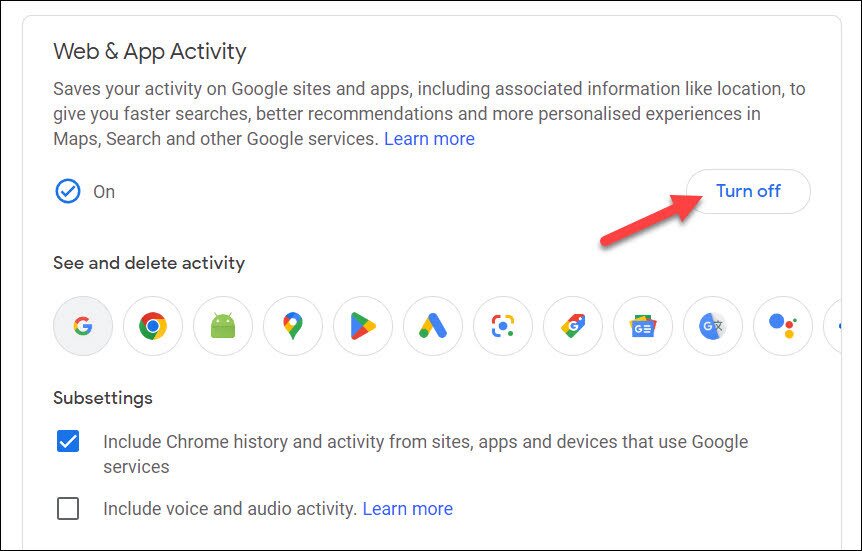
Next, press Turn off.

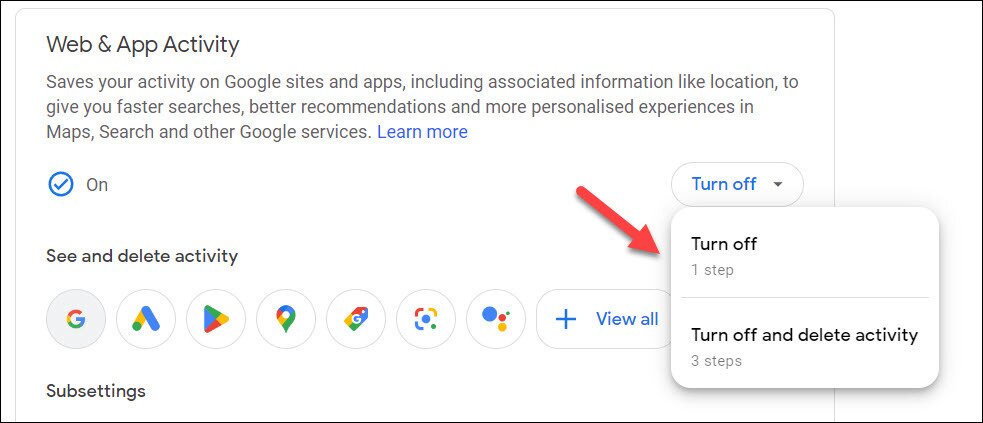
In the pop-up, press Turn off or Turn off and delete activity, depending on whether you want to remove your previous history or not.
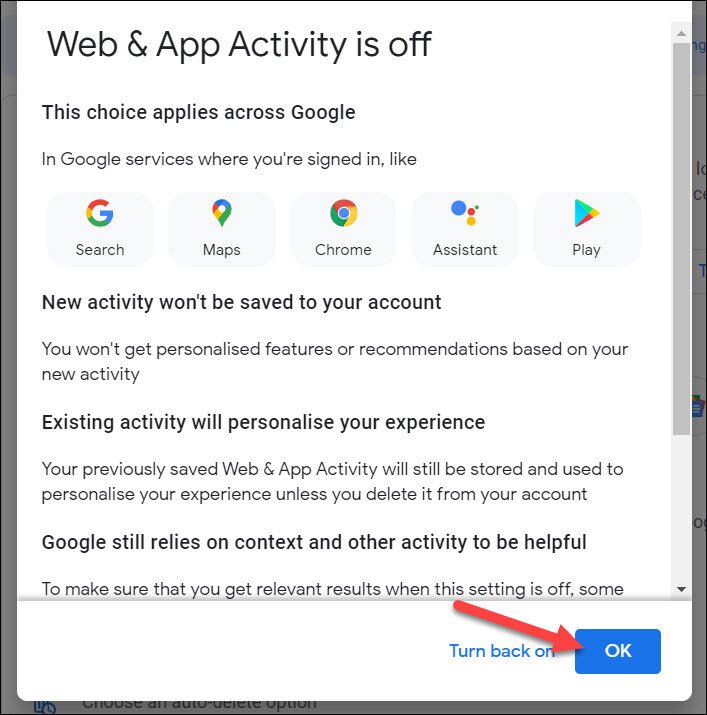
Google will confirm that your history has stopped—press OK to confirm and exit the menu.

How to Delete Search History on Mobile Devices
You can also delete search history using your Android, iPhone, or iPad devices. The steps are the same on each platform. Follow these steps to complete the process:
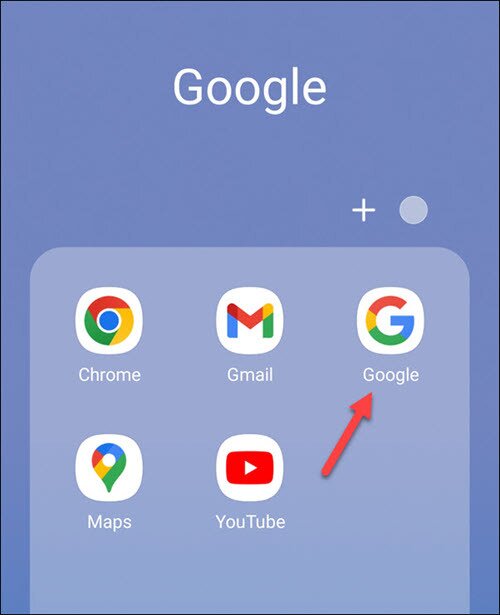
- Open the Google app.

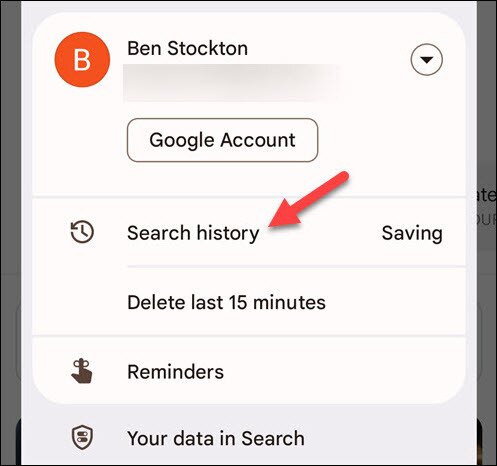
- Tap your profile picture or initials in the top-right.

- Choose Search History from the menu.

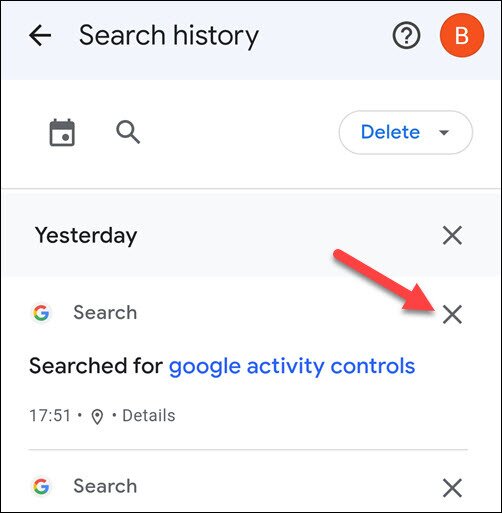
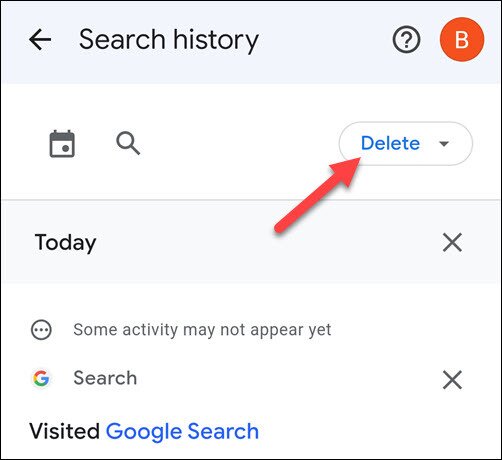
- Tap the delete (X) icon next to any individual results to remove that result from your history.

- Otherwise, tap Delete at the top.

- From the drop-down menu, select Delete all time to clear your history entirely.


With these steps, you’ve taken a significant step in safeguarding your digital footprint. Happy browsing!
What Happens When You Delete Search History on Google
Clearing your Google Account search history doesn’t mean all traces of your searches are gone. It’s important to understand what actually gets deleted — and what doesn’t — so you can clean up the right data sources. According to Google’s official support documentation, deleting from My Activity removes those items from your account but does not affect other stored data.
- Your browser history stays intact. When you delete search history from My Activity, it removes those entries from your Google Account, but it does not automatically clear your browser history. Pages you visited after clicking a Google search result will still appear in Chrome (or whichever browser you use) until you clear that separately. In Chrome, go to Settings > Privacy and security > Clear browsing data to remove that history.
- Signed-out and on-device searches are stored locally. If you were signed out of your Google account when you searched, those recent queries may still be stored locally on your phone or tablet rather than in your Google Account. Clearing My Activity won’t touch them.
- Recent searches in the Google app search bar. Suggestions that appear when you tap the Google app search bar can include on-device recent searches that are separate from your account history. To remove a specific query from that list, touch and hold the search suggestion, then tap Delete.
- Pages opened from search results remain in Chrome history. Even after you delete search history entries from My Activity, any pages you opened from those searches may still be visible in your Chrome browsing history. You’ll need to clear Chrome history separately to remove those entries.
The bottom line: choosing to delete search history from My Activity is a good first step, but for a thorough clean-up you should also clear your browser history and check for locally stored recent searches on your device.
Best Practices for Managing Your Browsing History
You shouldn’t just delete search history once — that’s not enough to stay in control of your data. There are other steps you can (and should) take to help you manage your Google history and avoid giving up too much of your personal data.
To help you, here are some best practices you can follow for regularly managing your search history on Google. This’ll help you to maintain privacy and control over your digital footprint.
1. Regularly clearing your search history
It’s a fairly obvious one, but you should make a habit of frequently choosing to delete search history on Google. This can help prevent your online activities from being easily accessed by others. It’s also a good idea to check your settings manually from time to time, just to make sure Google isn’t recording your data automatically.
To do this, follow these steps:
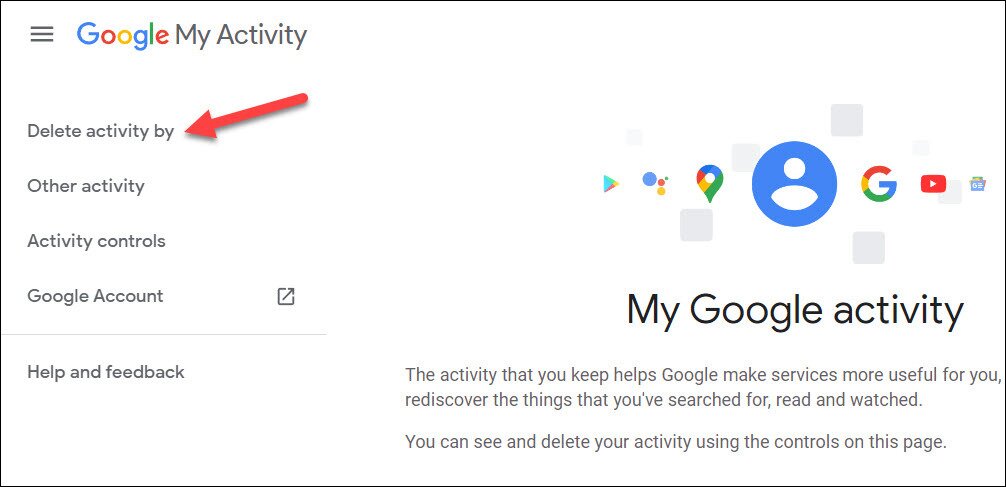
- Go to your Google My Activity page and select Delete activity by in the top-left.

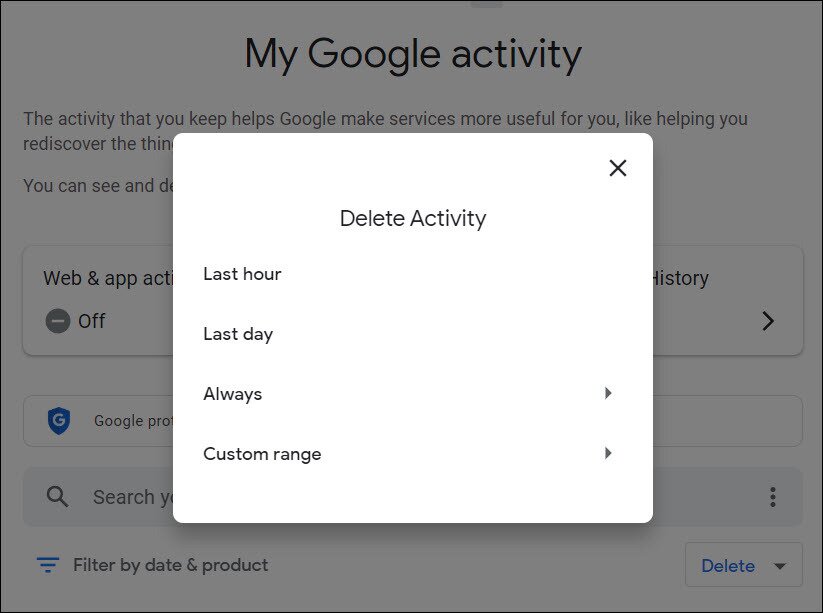
- Choose a time range from the Delete activity pop-up menu—the results will be deleted automatically once you select it.

2. Using incognito mode for private browsing
When you need to conduct sensitive searches or visit websites privately, use incognito mode. This prevents your activity from being saved to the search history in your Google account.
To open an incognito window in various browsers, follow the steps:
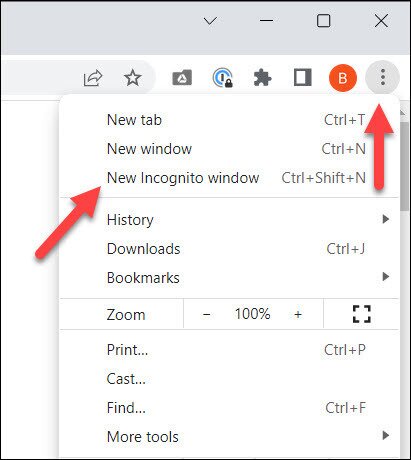
- Google Chrome: To use incognito mode in Google Chrome, press the menu icon > New Incognito window.

Alternatively, press Ctrl + Shift + N (Windows) or Cmd + Shift + N (Mac).
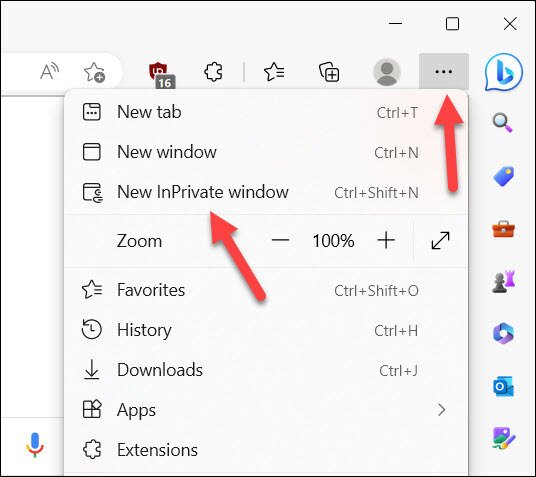
- Microsoft Edge: Press the menu icon > New InPrivate window.

Alternatively, press Ctrl + Shift + N (Windows) or Cmd + Shift + N (Mac).
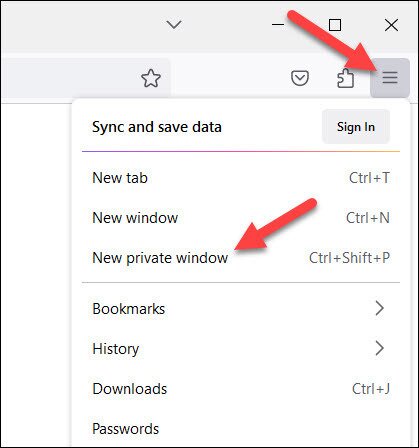
- Firefox: Press the menu icon > New private window.

Alternatively, press Ctrl + Shift + P (Windows) or Cmd + Shift + P (Mac).
Your browser isn’t listed? Don’t worry—the steps are the same (or similar) on most common web browsers.
3. Adjusting your search settings for privacy
You can enhance your privacy further by adjusting your Google search settings to stop all of your search results from being recorded.
To do this, follow these steps.
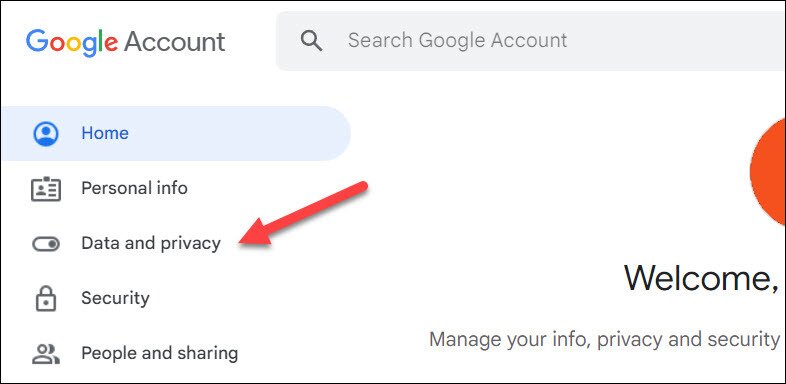
- Sign in to your Google account and select Data and privacy.

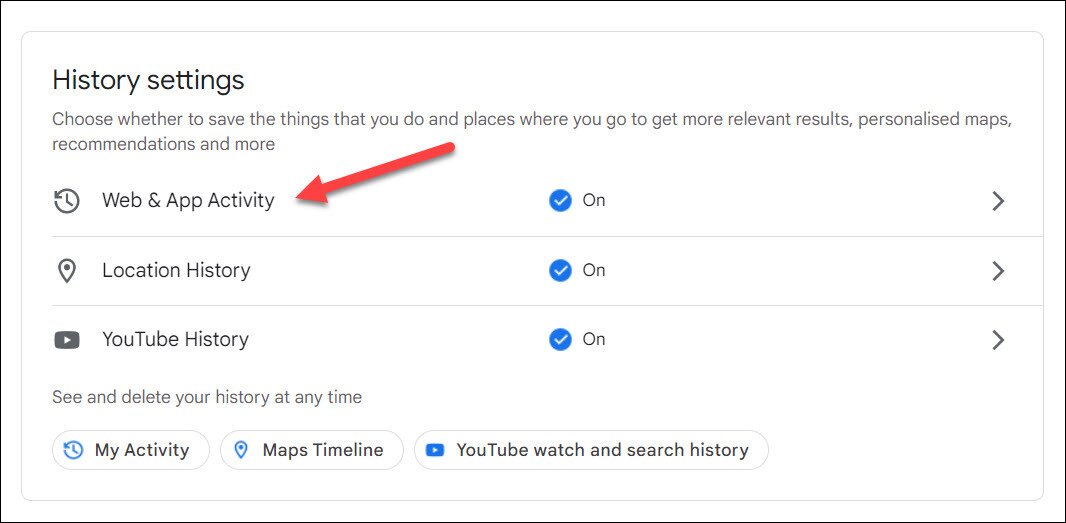
- Scroll to the History settings section and select Web & App Activity.

- Press Turn off to disable all web activity for your account.

- Alternatively, press Choose an auto-delete option and set a maximum retention period for your search results to be recorded.

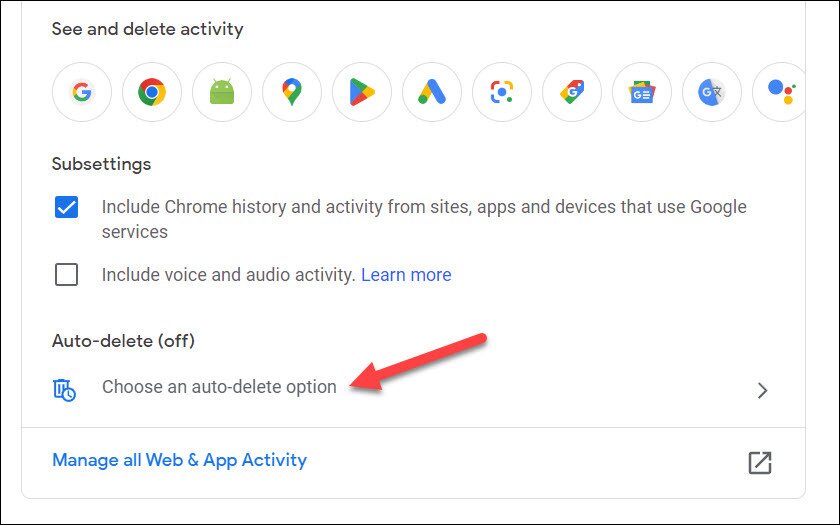
When you choose Auto-delete, Google gives you four specific retention options to pick from:
- 3 months: Google automatically deletes activity older than 3 months. This is the most privacy-focused auto-delete setting and is a good choice if you want personalized results without giving Google a long memory.
- 18 months: Activity older than 18 months is deleted automatically. This is Google’s default recommendation and balances personalization with a reasonable data limit.
- 36 months: Activity older than 36 months is deleted automatically. This keeps more of your history for personalization but gives Google a longer retention window.
- Don’t auto-delete activity: Google keeps your activity until you manually delete it. Only choose this if you actively manage your history yourself.
It also helps to understand the difference between the three main control options Google presents:
- Turn off: Stops Google from saving future search activity to your account. Your existing history is kept unless you delete it separately.
- Turn off and delete activity: Stops future saving and simultaneously deletes all activity already stored in your account. Use this if you want a clean break from saved history.
- Auto-delete: Keeps Web & App Activity turned on but automatically trims your history after the period you choose. This is the best middle-ground option for users who want some personalization but don’t want Google holding onto searches indefinitely.
4. Reviewing and managing your Google activity controls
Regularly review and manage your Google activity controls to ensure your privacy settings are up-to-date across the board—not just in your search results. It’s also a good idea to keep your Google account active so you can continue accessing those settings when you need them.
To check these settings:
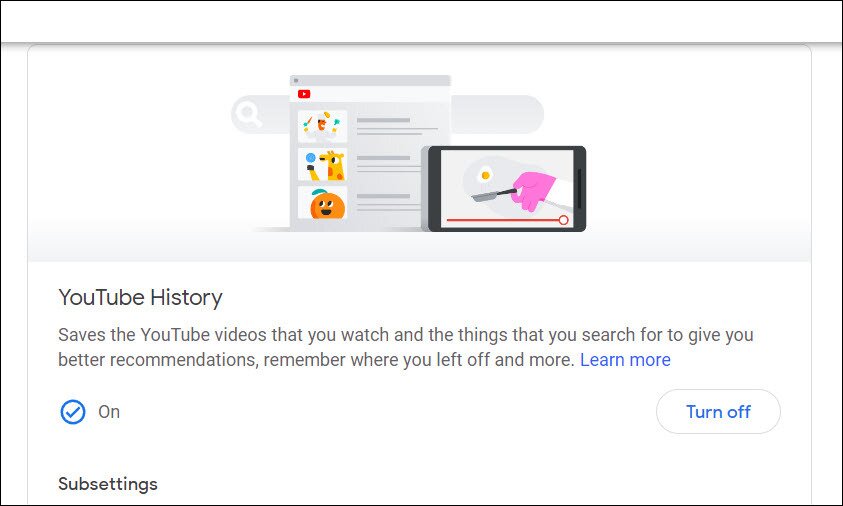
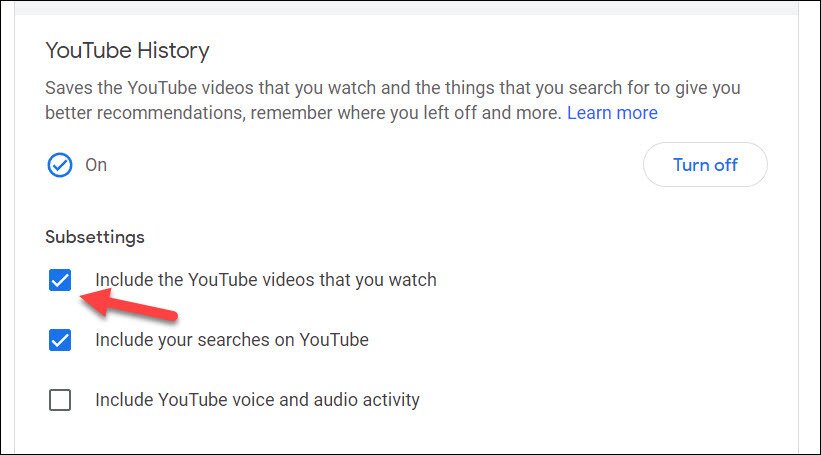
- Open your Google Activity controls page and scroll to various settings such as Location History or YouTube History.

- Press any of the Subsettings checkboxes to enable or disable certain functionality.