How to Stop Windows Updates
There are several reasons why you may want to stop automatic updates on Windows. They can be very disruptive if they suddenly interrupt you in the middle of something. They can affect bandwidth usage, cause update errors or blue screen update issues, and if you are dealing with leftover setup data, you may also want to remove upgrade installation files.
This guide will cover all ways to pause or disable Windows updates for both Windows 10 and Windows 11, and discuss the risks and benefits of adjusting these settings. If you want a Windows 11-specific walkthrough on how to stop updates, that guide can help.
Quick Comparison Table: Ways to Stop Windows Updates
Here is a brief overview of the different ways to adjust Windows Update settings. Whether you just want to pause updates or permanently disable updates, there are ways to do both. Here is a quick rundown of methods for anyone in a hurry:
| Method | Temporary/ Permanent | Windows 10 | Windows 11 | Home | Pro | Difficulty |
| Pause via Settings | Temporary | Yes | Yes | Yes | Yes | Easy |
| Disable via Services Manager | Permanent | Yes | Yes | Yes | Yes | Medium |
| Disable via Group Policy | Permanent | Yes | Yes | No | Yes | Medium |
| Disable via Registry Editor | Permanent | Yes | Yes | Yes | Yes | Advanced |
How to Pause Windows Updates Temporarily (Settings Menu)
This first method is an effective way to pause updates temporarily, so you can always toggle it back on when you’re ready, or let it run its course until the time period runs out. This is especially useful when you want to avoid interruptions to updates during important projects. Here are the steps:
How to pause updates if you’re using Windows 10:
- Go to Settings.
- Go to Update & Security.
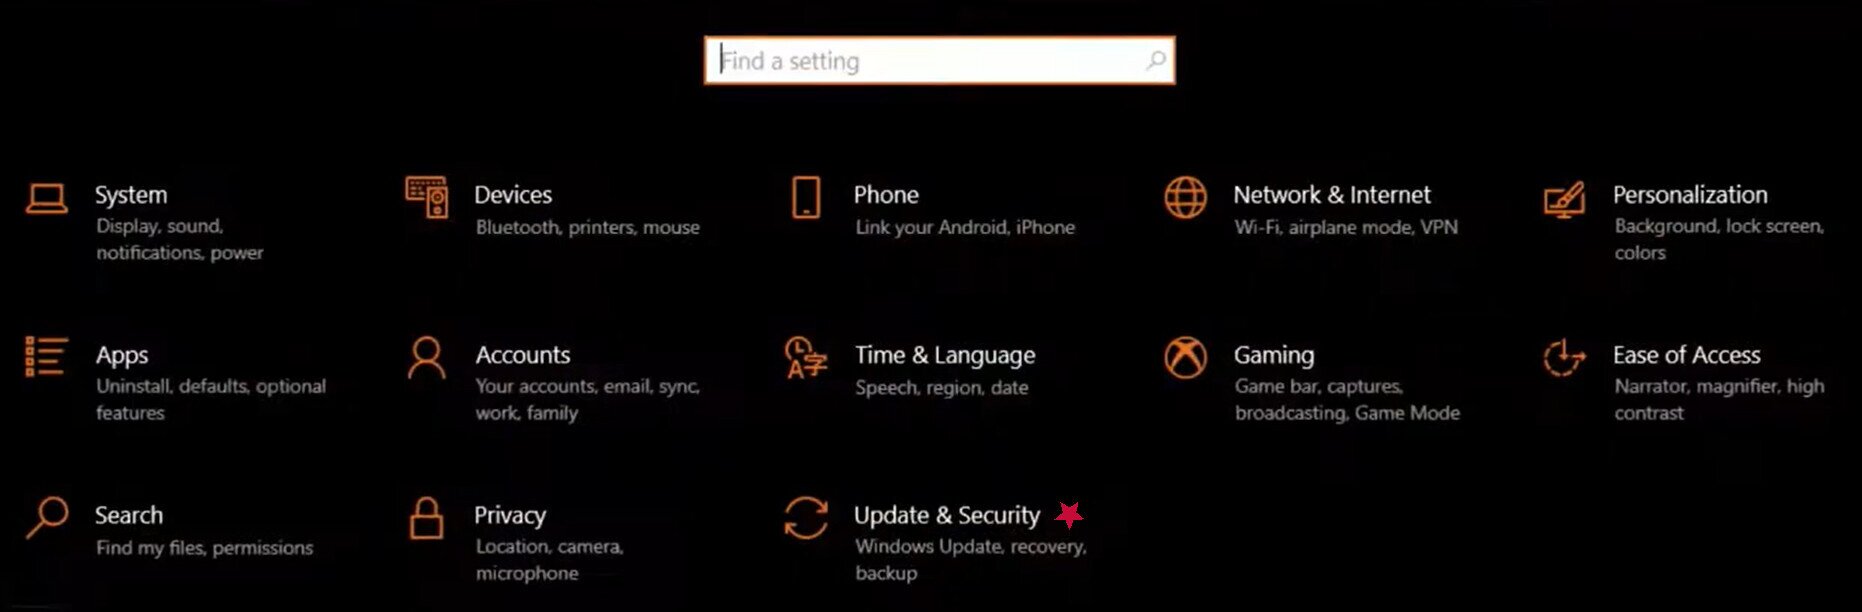
- Select Windows Update (on the left side of the screen).
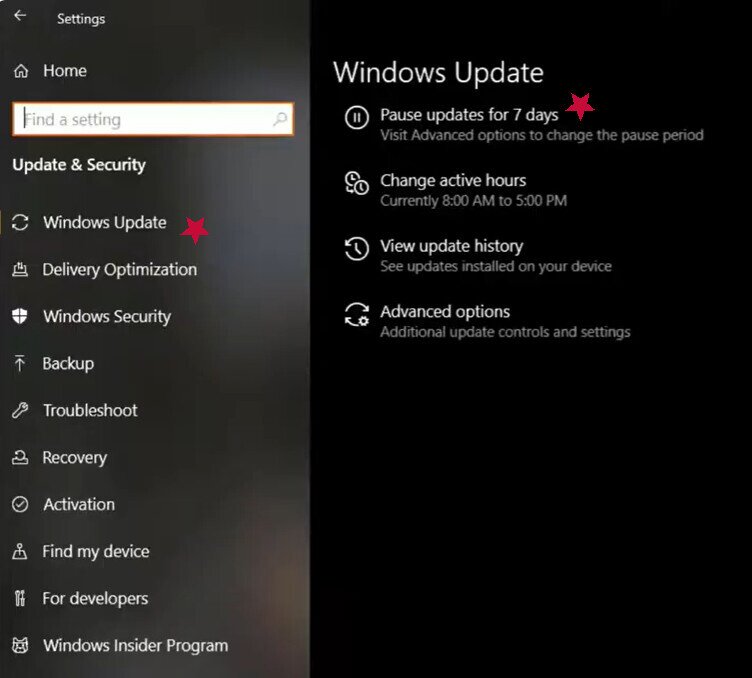
- From there, you can select Pause for 7 days.
- Another option is to go to Advanced Options (on the same screen) and fine-tune your Windows Update settings. For instance, you can disable Windows Updates for up to 35 days or pause until a specific date.
To resume updates on Windows 10:
- Go to Settings.
- Select Update & Security.
- Select Windows Update.
- Select Resume Updates.
Here are the steps for pausing updates on Windows 11:
- Go to Settings.
- Select Windows Update (on the lower left of the screen).
- From there, you have the option to pause updates with a dropdown menu of up to 5 weeks.
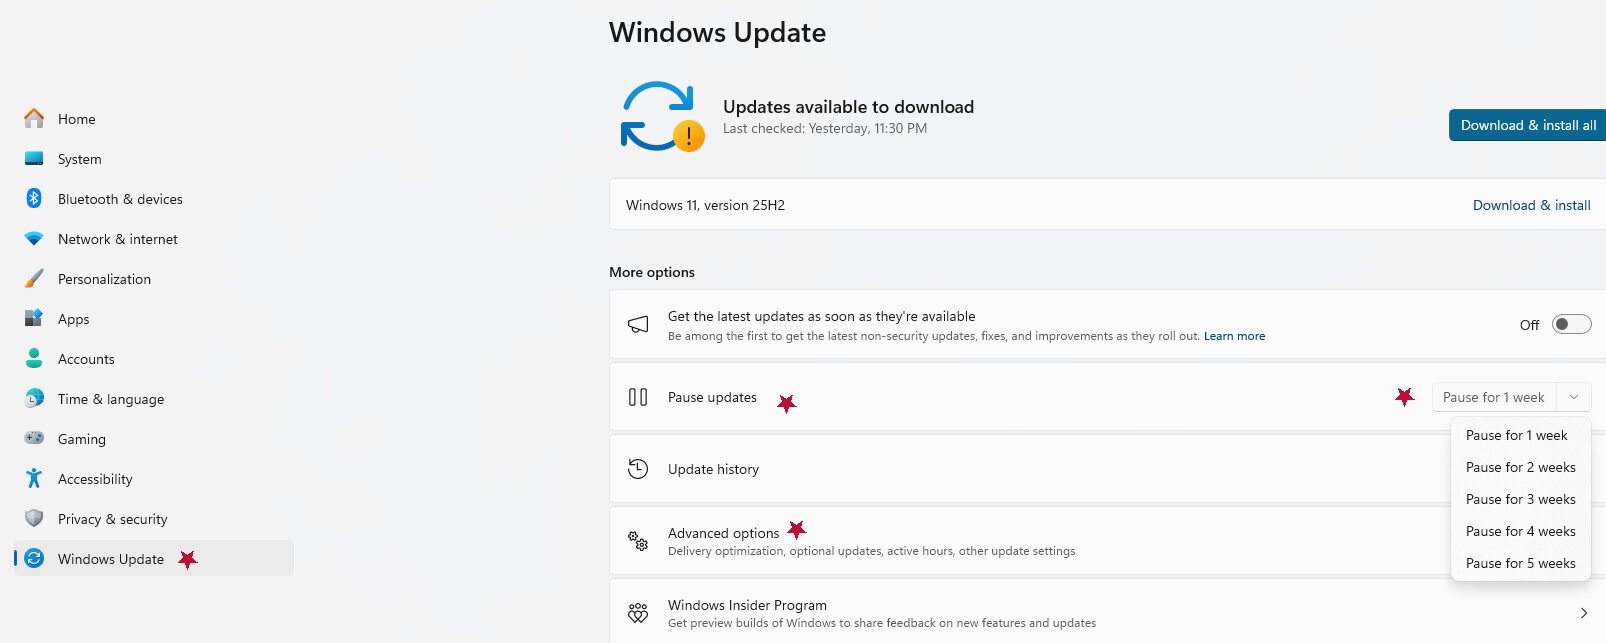
To resume updates on Windows 11:
- Open Settings.
- Select Windows Update.
- Select Resume Updates.
How to Permanently Disable Windows Update
If you want to permanently stop Windows 10 and 11 updates, you can do so through Windows Update Services Manager, through Group Policy Editor, or similar options. It also helps to factor in Windows 10 support ending before you decide how long to keep updates disabled. If you specifically want to stop Windows 11 updates, these methods can help, and you can also reverse them whenever you like. We’ll cover all of the required steps below.
Disable via Services Manager (services.msc)
How to stop updates for Windows 11 (& 10):
- Press the Windows key and the R key at the same time to bring up the Run window.
- Type services.msc in the empty field, then click Ok.
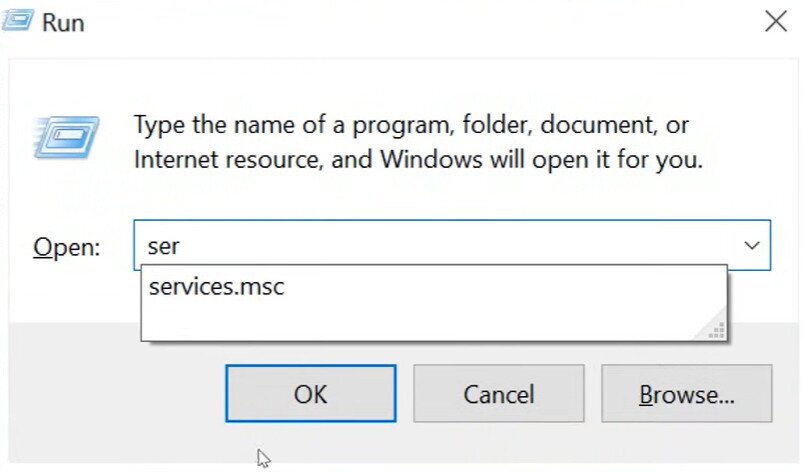
- The services manager window will appear.
- Scroll down through the options until you find Windows Update.
- When you find it, right-click and select Properties.
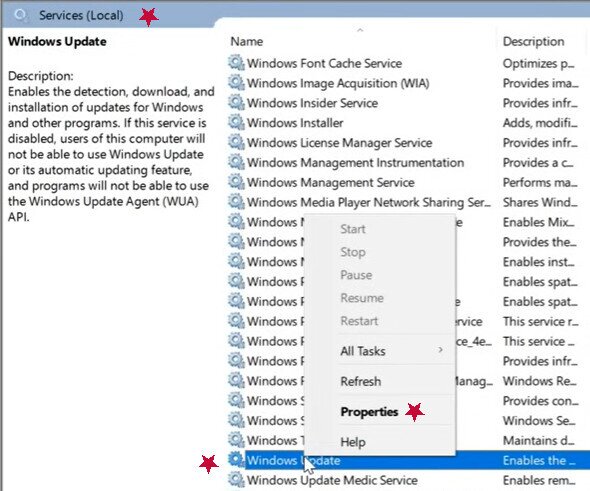
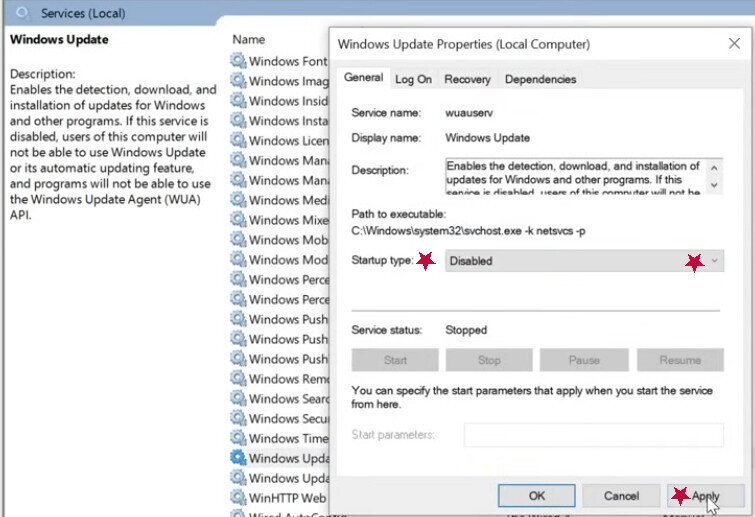
- On the new window that opens, click Stop and under Startup Type, select Disabled, then click Apply, then Ok.
To re-enable Windows Updates for Windows 10 and Windows 11:
- Press the Windows key and the R key at the same time to bring up the Run window.
- Type services.msc in the empty field, then click Ok.
- The services manager window will appear.
- Scroll down through the options until you find Windows Update.
- When you find it, right-click and select Properties.
- Set your Startup type to Manual or Automatic (depending on your preference).
- Select Start.
- Select Apply.
Disable Windows Update Medic Service
Now that you’ve disabled updates via Services Manager, you should know that Windows Update Medic Service can sometimes turn updates back on without your intervention. One way around this is todisable Windows Update Medic Service, which lets you permanently stop updates.
That said, it’s pretty common for users to be unable to do so, as some versions of Windows either don’t give access or require extra steps or third-party tools. Also, Medic Service has a habit of turning itself back on without permission quite frequently, which isn’t ideal. However, it can be helpful to know the steps so you can at least try to disable the service. With any luck, it will remain disabled.
For Windows 10:
- Press the Windows key and the R key at the same time to bring up the Run window.
- Type services.msc in the empty field, then click Ok.
- The services manager window will appear.
- Scroll down to find Windows Update Medic Service.
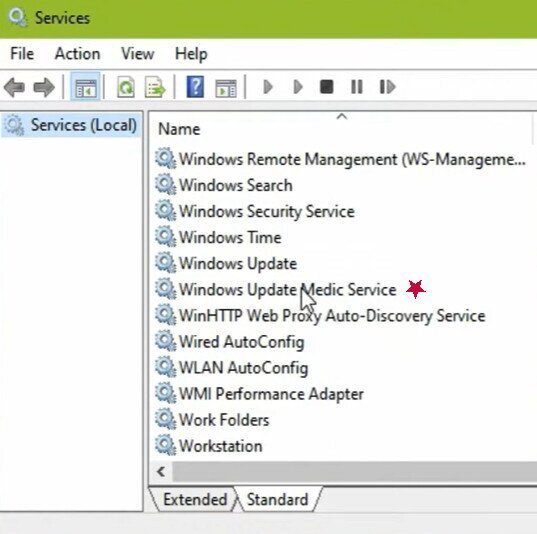
- Right-click and select Properties.
- Select Stop and switch the Startup type to Disabled (if this is an option for you).
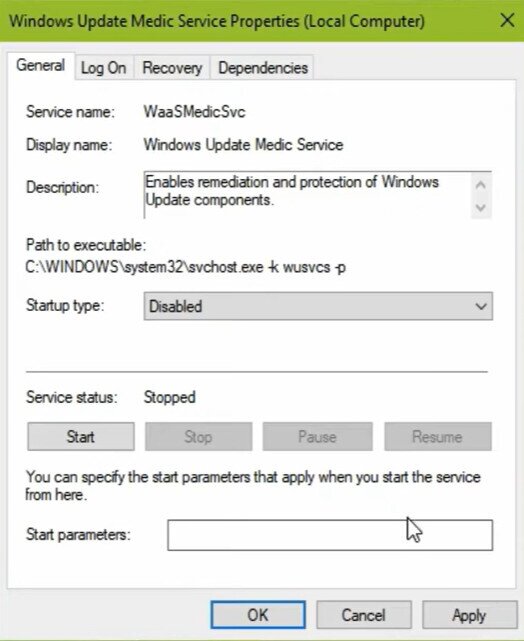
- Select Apply.
- Keep in mind that even if you go through these steps, you may still end up with a pop-up that says “Access Denied.“
Note: If you need to re-enable the Windows Update Medic service, follow the same steps, and once you are in Properties, select Automatic or Manual, selecting Apply/Ok as prompted.
For Windows 11:
The steps are pretty similar to those for Windows 10; however, in Windows 11, Windows Update Medic Service is listed as “WaasMedicSvc” in the Services Manager window. Here’s what you need to do:
- Press the Windows key and the R key at the same time to bring up the Run window.
- Type services.msc in the empty field, then click Ok.
- The services manager window will appear.
- Scroll down to find WaasMedicSvc.
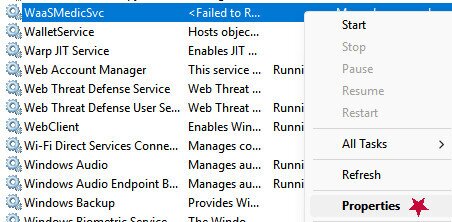
- Right-click and select Properties.
- Select Stop and then select Disabled, and click Apply.
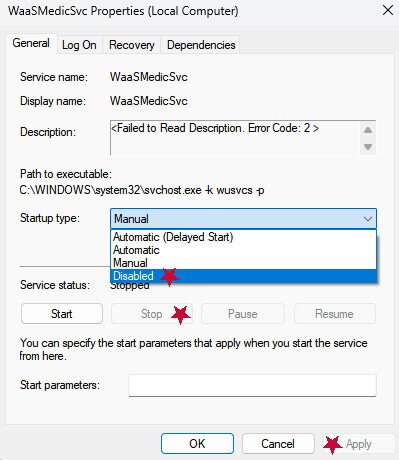
- Similar to Windows 10, there is a chance your access will be denied.
- If you need to re-enable WaasMedicSvc, follow the same steps and once you are in Properties, select Automatic or Manual, selecting Apply/Ok as prompted
Disable via Group Policy Editor (Pro Editions Only)
For Windows Pro users, you can use the Group Policy Editor to configure automatic updates.
Here’s how to disable via Group Policy if you’re using Windows 10:
- Select the Windows Start button and type GP Edit, which will bring up Edit Group Policy in the Control Panel. Select it.
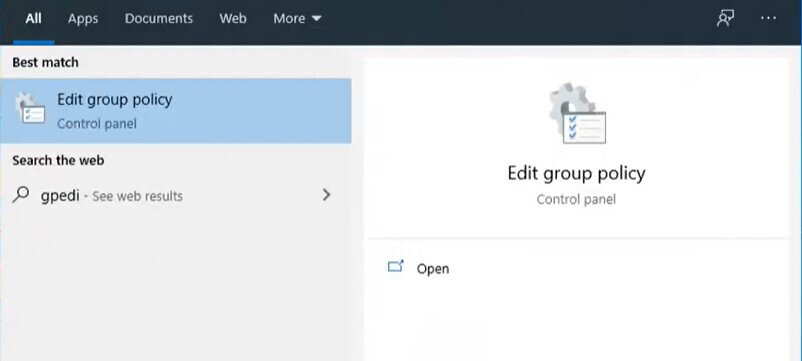
- This brings up the Local Group Policy Editor. On the left of this new window, go to Computer Configuration.
- Click on Administrative Templates.
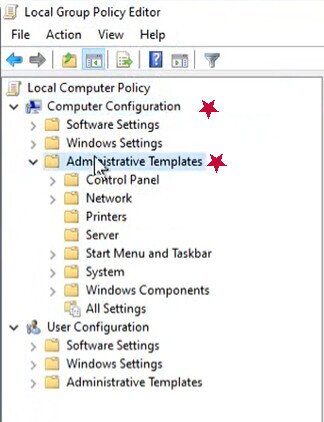
- Select Windows Components.
- Scroll down to select Windows Update.
- On the right-hand side of the Window, several options will appear. Double-click on Configure Automatic Updates
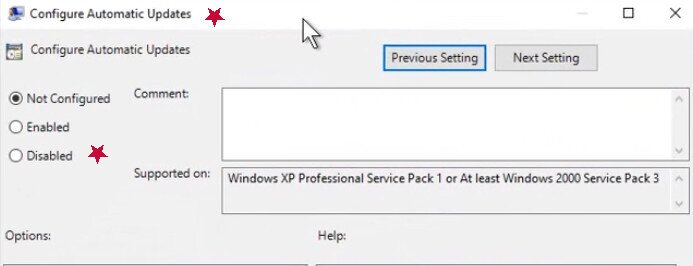
- A window will pop up. Select Disabled and then select Apply/Ok.
- Restart your computer to initiate the change.
Note: To revert to your original settings, follow the same instructions, and when you get to the step where you double-click Configure Automatic Updates, choose Not Configured or Enabled, select Apply, click OK, and then restart your computer.
For Windows 11 Pro:
- Push the Windows button and the R button at the same time to bring up the Run dialogue box.
- Input “gpedit.msc” without the quotes in the empty field, then push Enter.
- A pop-up will appear for Windows Group Policy Editor.
- Select Computer Configuration.
- Select Administrative Templates (you may need to double-click it).
- Double-click Windows Components.
- Double-click Windows Update.
- Depending on your version, you may see the option to choose Manage updates offered from Windows Update. Otherwise, you can probably just gain access from Windows Update.
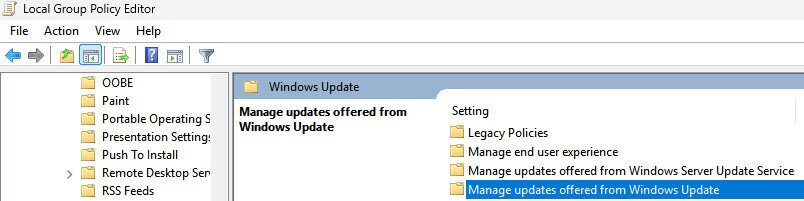
- Select Configure Automatic Updates and double click to open it, and then choose Disabled (hitting Apply and then OK).
Note: To revert to your original settings, follow the same instructions, and when you get to the step where you double-click Configure Automatic Updates, choose Not Configured or Enabled, then choose Apply, OK, and restart your computer.
Disable via Registry Editor (All Editions)
Registry Editor is another method to turn off updates for Windows. However, you will want to back up your registry beforehand so you have a fix if something goes amiss. Here’s how:
- Push the Windows key and the R key at the same time.
- Input regedit into the empty field.
- Push Enter.
- Select File.
- Select Export, choosing a location to save the registry (e.g., documents).
- Choose All under the Export range.
- Name your file something regarding registry backup (along with the date).
- Select Save. You should be able to restore your registry by double-clicking this file if needed.
Now that you have a registry backup, here’s how to disable updates for Windows 10 and 11 using the Registry