Change, Add, or Remove Keyboard Layouts in Windows 10
One of the first things that you need to do whenever you install a fresh new copy of Windows 10 on a PC is change the keyboard layout to match your preferences.
However, you don’t need to worry about making any mistakes during this time, since new layouts can be added later, while the current ones can be modified or removed entirely without any issues.

Adding new layouts and modifying current ones can be especially useful when you need to communicate with people that use an entirely different alphabet, such as Germans that use Ü. Windows 10 supports a wide range of input languages and regional keyboard configurations, making it easy to adapt your setup for different needs.
That is why we’ve created this article, so that we can show you exactly how you can change keyboard layout settings, switch between your current ones, or remove the ones that you don’t need anymore. For more details on supported languages, you can also refer to Microsoft’s official language settings guide.
How to Change Keyboard Layout in Windows 11
1. Add a new keyboard layout in Windows 11
Before you can add a keyboard layout in Windows 11, the associated language must already be installed on your system. If it is not, go to Settings > Time & language > Language & region, click Add a language next to Preferred languages, search for and select your desired language, choose the features you want to install, and click Install. Once the language is installed, return to Language & region to add the keyboard layout following the steps below.
Note that adding a keyboard layout does not change the Windows display language. However, if you later change the Windows display language, it may also change the active keyboard layout at sign-in.
- Press the Windows key to open the Start menu
- Go to Settings
- Select Time & language
- Click on Language & region
- Under Preferred languages, find the language you want to add a keyboard for
- Click the three-dot menu next to that language and select Language options
- Under the Keyboards section, click Add a keyboard
- Choose your desired layout from the drop-down list
Once added, the new layout will be available to switch to immediately.
2. Switch keyboard layouts in Windows 11
The quickest way to switch between installed keyboard layouts in Windows 11 is to press Windows key + Spacebar. This cycles through all available layouts without needing to use the taskbar at all.
You can also click the language or layout indicator in the taskbar (visible near the clock in the system tray area) and select your preferred layout from the pop-up list. If you have multiple layouts installed, this gives you a clear visual overview of your options before switching.
3. Remove a keyboard layout in Windows 11
- Press the Windows key to open the Start menu
- Go to Settings
- Select Time & language
- Click on Language & region
- Under Preferred languages, find the language whose keyboard layout you want to remove
- Click the three-dot menu next to that language and select Language options
- Under the Keyboards section, find the layout you no longer need
- Click the three-dot menu next to that layout and select Remove
Removed layouts can always be re-added later by following the steps above.
How to Change Keyboard Layout in Windows 10
1. Add new keyboard layouts
Before adding a keyboard layout, make sure the associated language is already installed on your system. To check, go to Settings > Time & Language > Language and look under Preferred languages. If the language you need is not listed, click Add a preferred language, search for and select your desired language, choose which features to install, and click Install. Once the language pack is installed, return to its Options to add the keyboard layout.
Keep in mind that adding a keyboard layout does not change the Windows display language. However, changing the display language can also change which keyboard layout is active at sign-in.
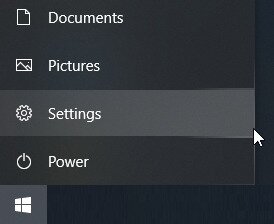
- Press the Windows key to open the Start menu
- Go to Settings
- It’s the cogwheel-shaped button in the Start menu

- It’s the cogwheel-shaped button in the Start menu
- Select Time & Language

- Choose Language
- Look under Preferred languages, and select your desired default language
- Click on Options

- Select Add a keyboard from under the Keyboard section
- Choose a new layout from the drop-down list

- Choose a new layout from the drop-down list
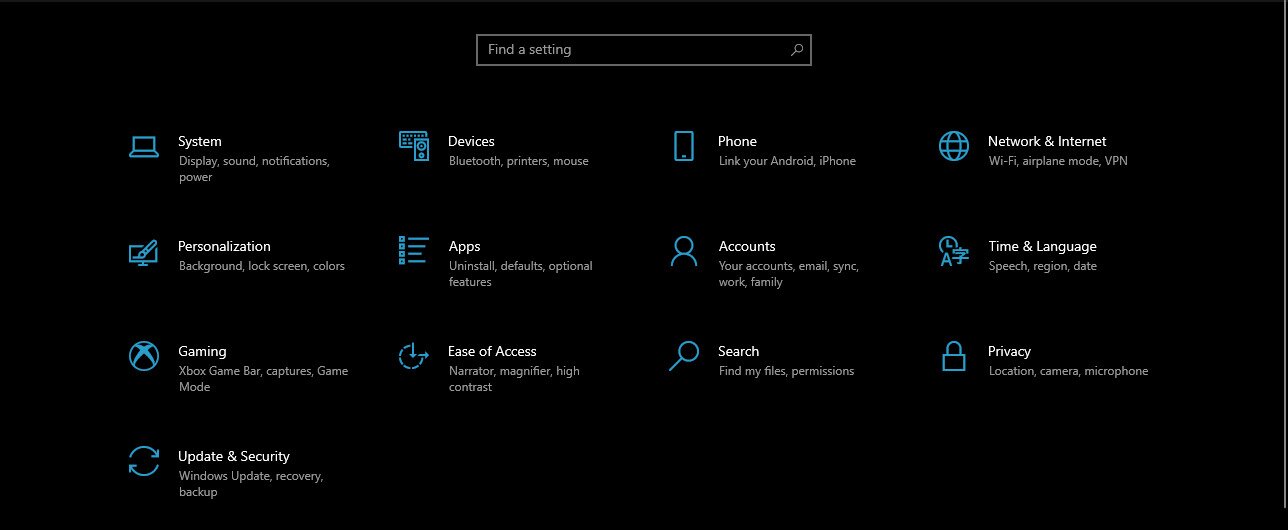
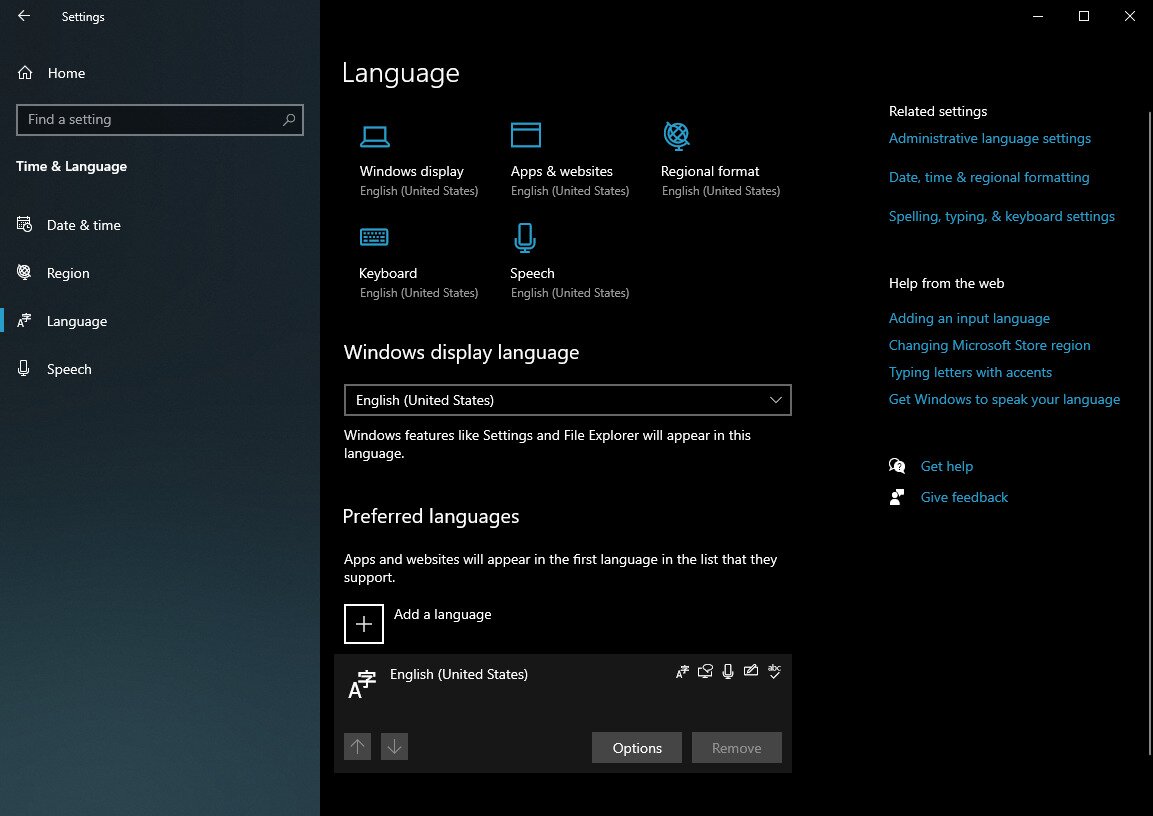
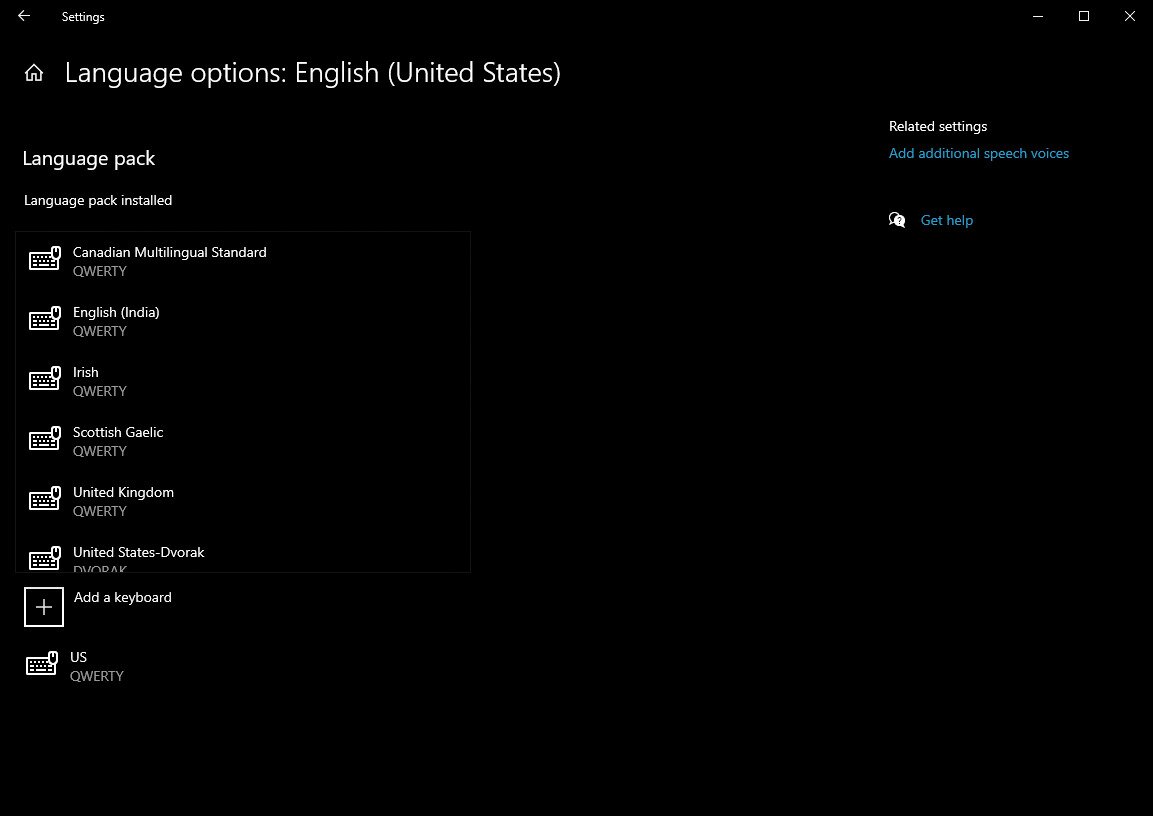
Once you’ve followed these steps, the new keyboard layouts will be added to your Taskbar, and you can easily switch between them afterwards. This is the recommended method to change keyboard layout settings for most users.
2. Switch and change keyboard layout in Windows 10
Keep in mind that the Input indicator in the Taskbar is only required if you want to switch layouts by clicking the taskbar icon. It is not required for switching layouts altogether — you can always use the keyboard shortcut Windows key + Spacebar to cycle through your installed layouts, and some systems may also have additional shortcuts such as Left Alt + Shift or Ctrl + Shift configured. If you do want to switch by clicking the taskbar icon and the Input indicator is not visible, you can enable it by following these steps:
- Press the Windows key to open the Start menu
- Go to Settings
- Choose Personalization
- Select Taskbar

- Click on the Turn system icons on or off option
- Enable the Input indicator slider by clicking it

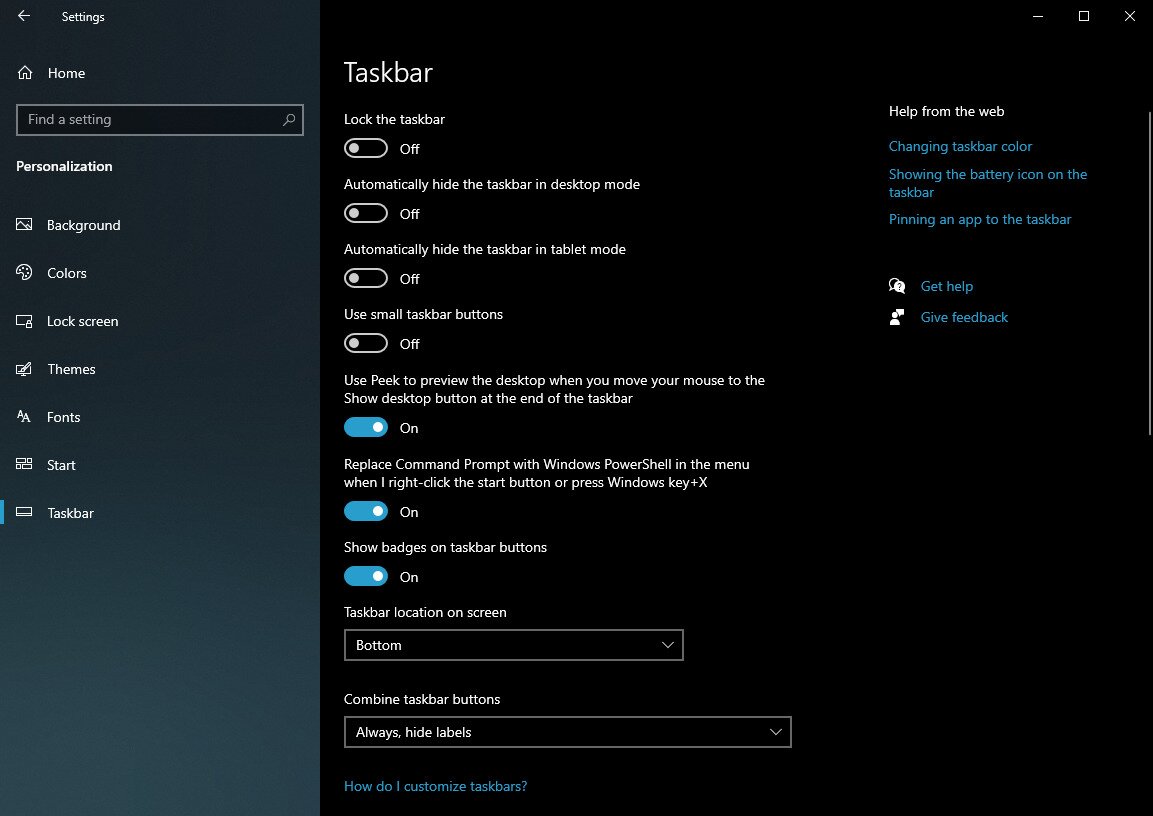
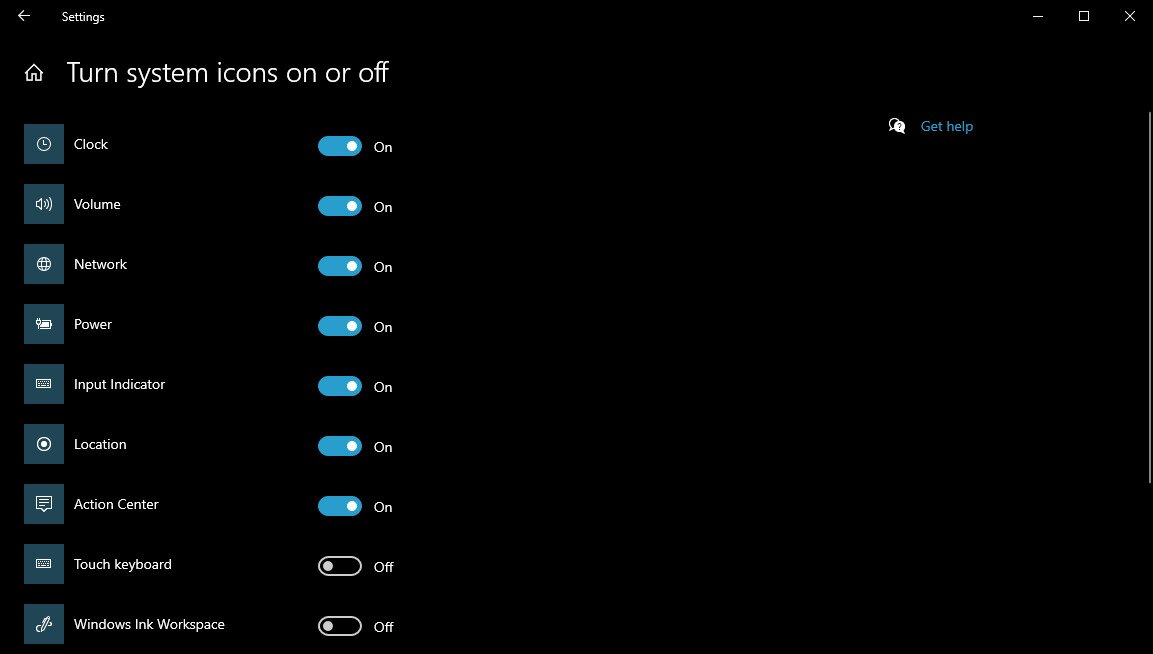
Once you’ve followed these steps, you’ll be able to see the Input indicator in the Taskbar, and you can then proceed to change keyboard layout on the fly between your different installed options:
- Look for the input indicator in your Taskbar
- Choose an alternative layout

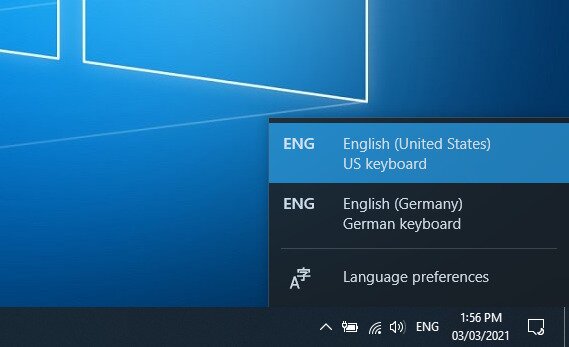
You can repeat the steps above in order to keep switching between your installed keyboard layouts. Note that you can also use the keyboard shortcut Windows key + Spacebar to quickly cycle through your available layouts without touching the Taskbar at all.
3. Remove keyboard layouts in Windows 10
- Press the Windows key to open the Start menu
- Go to Settings
- Select Time & Language
- Choose Language
- Look under Preferred languages, and select your desired default language
- Click on Options
- Select the layout you no longer need from under the Keyboard section
- Click on Remove

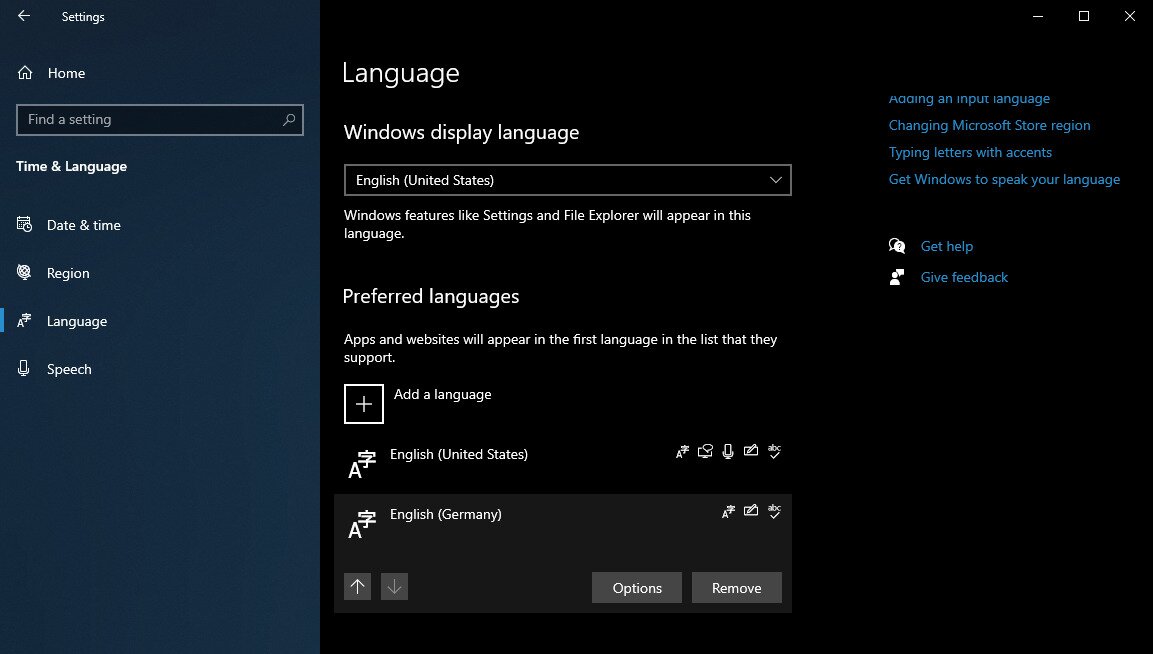
By following these steps, all selected keyboard layouts will be removed from your system. However, keep in mind that they can be added again later without a problem. It’s a good idea to periodically review your installed layouts and remove any that you no longer use, as this keeps your Input indicator menu clean and easy to navigate.
Set a Default Keyboard Layout and Stop Windows From Switching Automatically
If your keyboard layout keeps changing on its own, you are not alone — this is one of the most common complaints from users searching this topic. There are a few settings worth checking to lock down your preferred layout and prevent accidental switches.
Set your preferred default input method:
- Press the Windows key to open the Start menu
- Go to Settings
- Select Time & Language
- Choose Language
- Click on Keyboard
- Under Advanced keyboard settings, use the Override for default input method drop-down to select your preferred layout and pin it as the default
Remove duplicate or unneeded layouts:
Windows can switch layouts unexpectedly if multiple layouts are installed across different languages. Go to Settings > Time & Language > Language, click Options next to each of your installed languages, and remove any keyboard layouts you do not actively use. The fewer layouts installed, the less opportunity Windows has to switch away from your preferred one.
Disable or change input-language hotkeys:
Windows has built-in keyboard shortcuts — such as Left Alt + Shift or Ctrl + Shift — that can trigger a layout switch if pressed accidentally. To review or disable these:
- Go to Settings > Time & Language > Language > Keyboard > Advanced keyboard settings
- Click Input language hot keys
- Select the hotkey you want to change and click Change Key Sequence
- Set it to Not Assigned to disable it, or choose a different shortcut that you are unlikely to trigger by accident
Applying these three adjustments together will resolve accidental layout switching for the vast majority of users.
CONCLUSION: Keyboard Settings
This concludes our step-by-step guide on how to change the keyboard layout on the Windows 10 OS.
By following the steps precisely, as well as the screenshots, you should be able to effortlessly add new keyboard layouts, switch between the ones you already have, or remove the ones you no longer need.
Let us know if you found our article useful by leaving us your feedback in the section below.
