What Version of Windows Do I Have? 3 Ways to Check
If you’ve ever asked yourself “what Windows do I have?”, you’re not alone — and the answer is easier to find than you might think. Knowing how to check your Windows version is crucial for troubleshooting, software compatibility, and ensuring you have the latest security updates. This article provides a simple guide on how to check what version of Windows you have, so you can stay informed and keep your system running smoothly. Whether you’re using Windows 11, 10, 8, or even a future release, these steps will work.
Method 1: How to Find Out What Windows Do I Have Using the ‘About Windows’ Screen
One way to check your Windows version is through the About Windows screen. This isn’t a window you open often; in fact, this might be the first time you’ve seen it. Still, it’s easy to access and provides a quick look at your Windows version. Here’s how to get there:
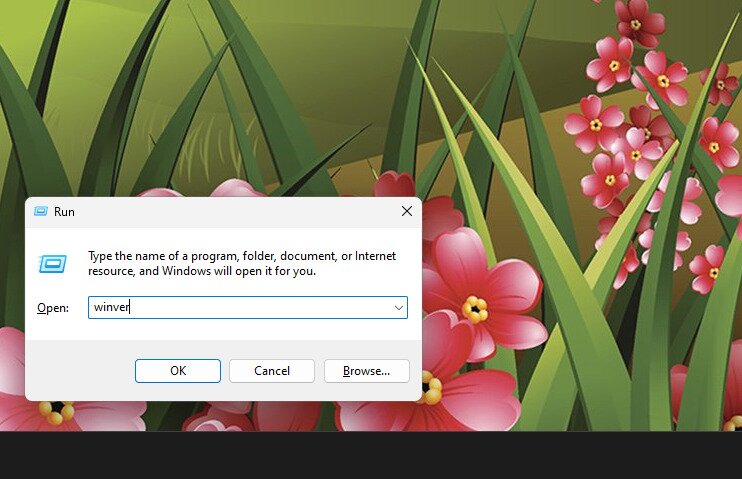
1. Press Win+R to open the Run dialog box.
2. Type winver and then press Enter. (It stands for Windows Version, if that helps you remember for next time.)
3. Read what you see. In our example, Windows 11 is displayed at the top, confirming the major release. You’ll also see the specific version number (such as 23H2) and the OS build number. Keep in mind that winver is primarily useful for quickly confirming your Windows release label and OS build number — it may display an edition name at the top, but it does not surface edition details in the same clearly labeled way that Settings or System Information do. If you need to confirm definitively whether you’re running Home, Pro, Enterprise, or Education, use Method 2 or Method 3 below.
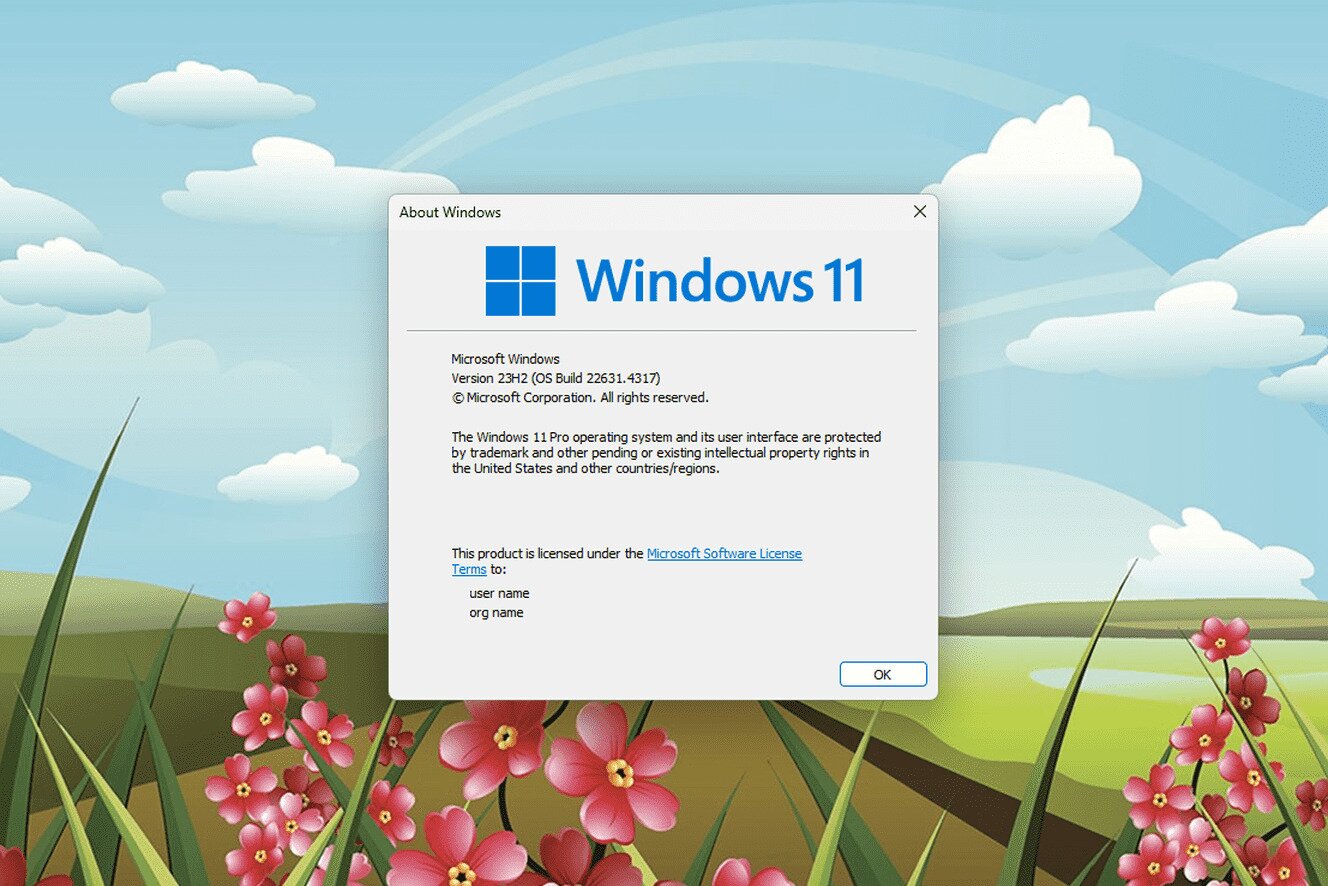
This method is one of the fastest ways to check what Windows do I have because it requires no navigation through menus — just a quick keyboard shortcut and a single command. It’s especially handy when you need to confirm your version in a hurry, such as before installing new software or applying a system update.
Method 2: Check What Windows Do I Have Using System Information
All modern versions of Windows include a built-in tool called System Information. As you’d expect by its name, it provides lots of information about your computer system. While both hardware and software details are included, the version of Windows tops the list, making it a reliable way to check your Windows version in detail.
If you ever need further assistance with troubleshooting or accessing built-in support options, you can also learn how to get help in Windows. Follow these steps to find out:
1. Search for system information in the Start menu, or enter msinfo32 into the Run box.
2. Ensure System Summary is chosen at the top.
3. On the right, look for the following key fields:
- OS Name — tells you the major Windows release, such as Microsoft Windows 10 Home or Microsoft Windows 11 Pro
- Version — shows the version and build number in a format like 10.0.22631 Build 22631. Note that this is not the same as the consumer-facing release label — msinfo32 does not display a label like 23H2 or 22H2 in this field. If you need that release identifier, use winver or Settings > System > About instead.
- System Type — tells you whether Windows is running as a 64-bit or 32-bit operating system, which matters when downloading software or drivers that require a specific architecture
For example, you might see: OS Name = Microsoft Windows 11 Pro, Version = 10.0.22631 Build 22631, System Type = x64-based PC. Taken together, those details answer almost every version-related question you’ll encounter — whether you’re installing enterprise software, following a support guide, or checking compatibility before an upgrade.
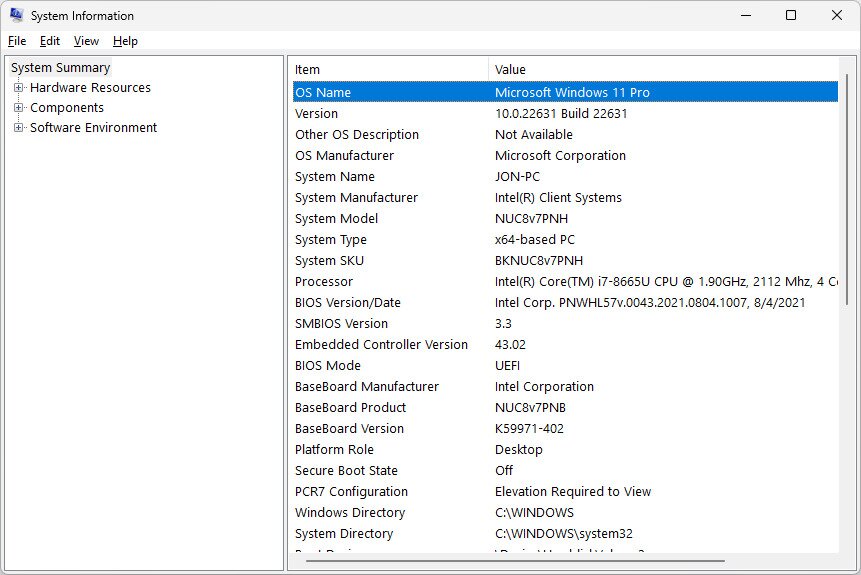
The System Information tool is particularly useful because it displays all of these details — OS name, build number, system type, and more — in one place. This makes it a great option when you need more than just the basic version number, for example when contacting technical support or verifying compatibility with enterprise software.
Bonus: Check Your Windows Version from the Command Line
If you prefer working in a terminal — or need to quickly copy version details into a support ticket or remote chat — you can retrieve your Windows version information directly from Command Prompt or PowerShell without opening any GUI tool. Open Command Prompt or PowerShell and run the following command:
systeminfo | findstr /B /C:"OS Name" /C:"OS Version"
This returns the installed Windows name and its version/build number in a plain-text format that’s easy to copy and paste. You can also launch winver or msinfo32 directly from the terminal by typing either command and pressing Enter — both open their respective windows instantly.
This command-line approach is especially handy during remote support sessions, when working in a terminal-heavy workflow, or any time you need a quick, copyable answer without clicking through menus. It’s a reliable way to confirm what Windows do I have without leaving the terminal environment.
Method 3: Check What Version of Windows I Have in Settings
If you prefer clicking through menus rather than using Run commands, the Settings app is the most straightforward path for most everyday users. This is also Microsoft’s built-in default route, and it surfaces the same key details — edition, version, and OS build — in a clean, readable layout. It works on both Windows 10 and Windows 11.
1. Open the Start menu and click the Settings icon (the gear icon), or press Win+I to open Settings directly.
2. Click System, then scroll down and select About.
3. Under the Windows specifications section, you’ll find:
- Edition — for example, Windows 10 Home or Windows 11 Pro
- Version — the feature update identifier, such as 23H2
- OS build — the precise build number, useful for support and troubleshooting
4. Just above that, the Device specifications section shows System type, which tells you whether you’re running a 64-bit or 32-bit version of Windows — important to know before downloading software or drivers.
This method requires no commands or memorized shortcuts, making it a practical first stop for anyone who wants a clear, at-a-glance summary of their Windows installation. No matter which approach you choose, all three methods reliably answer the question of what Windows do I have.
What the Results Mean — Edition vs Version vs OS Build vs System Type
Across winver, Settings, and System Information, you’ll encounter four key labels. They’re easy to confuse, but each one answers a different question — and knowing which is which saves time when troubleshooting or shopping for software.
- Edition — This tells you which tier of Windows you’re running: Home, Pro, Enterprise, or Education. Edition determines which features are available to you — for example, BitLocker drive encryption and Group Policy management are only available on Pro, Enterprise, and Education. Check your edition when a piece of software or a support guide specifies which Windows tier is required.
- Version — This is the feature update identifier, such as 24H2, 23H2, or 22H2. Windows 10 and Windows 11 both use this H1/H2-style naming (referring to the first or second half of the year the update was released). This is the value to check when troubleshooting update-related issues or verifying that you have a recent feature release installed.
- OS Build — The precise build number, such as 26100.x (Windows 11 24H2) or 22631.x (Windows 11 23H2). This is most useful when following detailed support documentation or filing a support ticket, as it pinpoints the exact state of your installation down to cumulative updates applied.
- System Type — Whether you’re running a 32-bit (x86) or 64-bit (x64) version of Windows. This matters when downloading software, drivers, or system tools, as many modern applications and drivers are distributed as separate architecture-specific packages.
To put it all together, a complete answer to “what Windows do I have?” might look like one of these examples:
- Windows 11 Pro, version 24H2, OS build 26100.x, 64-bit operating system
- Windows 10 Home, version 22H2, OS build 19045.x, 64-bit operating system
As a quick rule of thumb: check Edition for feature availability, Version and OS Build for troubleshooting and update status, and System Type for software and driver compatibility.
How to Check Your Windows Version on Windows 7, 8, and Older PCs
Not everyone is running Windows 10 or 11, and the Settings > System > About path described above simply doesn’t exist on older releases. If you’re working with an older machine, here’s how to find your Windows version depending on what you have installed. Note that Windows 10 and Windows 11 use H2-style version names (such as 23H2 or 24H2), while Windows 7 and earlier use Service Pack naming — so don’t be surprised if the terminology looks different on a legacy system.
Windows 8 and 8.1
1. Press Win+X to open the Quick Access menu, then click System. Alternatively, open Control Panel and click System.
2. If you’re on the Start screen, you can also search for PC info — this opens the same System panel without needing to navigate Control Panel manually.
3. In the System window, look for Windows edition near the top (for example, Windows 8.1 Pro) and System type under the Computer section to confirm whether you’re running a 32-bit or 64-bit installation.
Windows 7
1. Click the Start button, then right-click Computer and choose Properties.
2. In the System window that opens, look under Windows edition for your edition name — for example, Windows 7 Home Premium or Windows 7 Professional.
3. Also note the Service Pack level listed there (for example, Service Pack 1). On Windows 7, Service Pack level is the equivalent of the version identifier used on modern Windows — it tells you how current your installation is.
4. Under System, check System type to confirm whether you’re running a 32-bit or 64-bit version.
Windows Vista and Windows XP
1. Right-click Computer (Vista) or My Computer (XP) on the desktop or in Windows Explorer, then select Properties.
2. The System Properties panel will show your Windows version. On Vista, you’ll see the edition name (for example, Windows Vista Home Premium); on XP, you’ll typically see a version number and service pack level rather than an edition-style label.
3. If the System Properties panel feels cluttered or unclear, use winver as your primary fallback: press Win+R, type winver, and press Enter. This works on Windows XP, Vista, 7, 8, and 8.1, and returns a clean dialog showing your Windows version and, on older systems, your service pack level. Keep in mind that the Settings > System > About path is exclusively available on Windows 10 and Windows 11.
Frequently Asked Questions About What Windows Do I Have
Can I upgrade to Windows 11 for free?
Yes, if you have a compatible Windows 10 PC, you can upgrade to Windows 11 for free through Windows Update — no extra steps required. Microsoft will offer the upgrade automatically once your PC passes the compatibility check. You can review the official hardware requirements on Microsoft’s Windows 11 specifications page.
If your PC is not compatible with Windows 11, the standard free upgrade path will not be available; unofficial methods that bypass hardware requirements do exist, but they are not supported by Microsoft and are not recommended. Once you’ve upgraded, you can always check what Windows do I have again using any of the methods above to confirm the installation was successful.
What are the main differences between Windows 10 and Windows 11?
Windows 11 features a redesigned interface with a centered Start menu, updated icons, and new productivity features like Snap Layouts for managing multiple windows side by side. It also introduces updated security requirements — including TPM 2.0 and Secure Boot — along with performance improvements and better gaming features. It’s also worth noting that Windows Subsystem for Android, which once allowed Android apps to run on Windows 11, has been retired and is no longer available. Understanding which version you’re on helps you take full advantage of the features available to you.
Should I upgrade to Windows 11?
If your PC meets the system requirements, upgrading to Windows 11 is strongly worth considering — especially now that Windows 10 reached end of support on October 14, 2025. From that date, Windows 10 no longer receives free security updates or technical support from Microsoft, which means staying on it long-term carries real security risks.
If your PC is not compatible with Windows 11, it is worth exploring replacement hardware or another supported path rather than continuing to run an unsupported operating system without awareness of the risk. Either way, knowing what Windows do I have ensures you always have accurate information about your system before making any decisions.