How to Replace SSD in a Laptop: Step-by-Step Guide
Running out of storage space, dealing with sluggish load times, or staring down a drive that’s starting to fail — these are all solid reasons to learn how to replace SSD components in your laptop. The good news is that a laptop SSD replacement is one of the most accessible upgrades you can make, even if you’ve never opened a computer before. With the right preparation and a clear process, most people can complete the swap in under an hour and walk away with a machine that feels brand new.
This guide walks you through everything you need to know about how to replace SSD drives in a laptop — from checking compatibility and backing up your data, to physically swapping the drive and getting your operating system back up and running.
Quick Answer: How to Replace SSD in Your Laptop
The short version: power down, open the laptop, swap the drive, then clone or reinstall Windows
To replace the SSD in your laptop: Fully shut down and unplug the laptop, then remove the battery if it’s removable. Open the access panel or remove the bottom cover using a precision screwdriver. Locate the existing SSD — either a 2.5-inch SATA drive or an M.2 stick — and remove it by unscrewing any retention hardware. Slide or seat the new SSD into the same slot, secure it the same way the old drive was secured, and reassemble the laptop.
Power it on and enter BIOS/UEFI to confirm the new drive is detected. From there, either boot from a cloned copy of your old drive or boot from a Windows installation USB to perform a clean install. That’s the complete process in a nutshell. The sections below expand on each step with the detail you need to do it confidently and without losing data.
When You Should Replace Your Laptop SSD
Signs your current SSD is too small, too slow, or failing
The most common reason people look into how to replace SSD drives is running out of storage. If your drive is constantly at 90% or more capacity, your system will slow down noticeably — Windows needs free space to manage temporary files, updates, and virtual memory. A laptop that once booted in seconds can start taking several minutes when the drive is nearly full.
Beyond storage capacity, age and wear matter too. SSDs have a finite number of write cycles, and while most modern drives last many years under normal use, older or heavily used drives can develop read/write errors, cause unexpected crashes, or show warning signs in diagnostic tools like CrystalDiskInfo (Windows) or the built-in Disk Utility on macOS.
If your laptop is throwing errors or the drive health status shows anything other than “Good,” replacement becomes a priority rather than a preference. Some users also replace a functioning SSD simply to upgrade from a slower SATA drive to a faster NVMe drive, which can dramatically improve boot times and application launch speeds.
Replace vs upgrade vs add a second drive
It’s worth clarifying the difference between these three scenarios, because the process varies:
- Replacing your SSD means swapping the existing drive for a new one — typically because the old one is failing, too small, or too slow. This is the most common scenario this guide addresses.
- Upgrading from a smaller SSD to a larger one is technically the same physical process as replacing, but the motivation is storage expansion rather than failure. You’ll still need to clone or reinstall.
- Adding a second drive is only possible on laptops that have a secondary M.2 slot or an optical drive bay that can accept a drive caddy. If your laptop supports this, you can add storage without touching your primary drive at all.
Most laptops sold today have a single drive bay, so adding a second drive isn’t always an option. When in doubt, replacing and upgrading to a larger single drive is the most straightforward path.
Check SSD Compatibility Before You Buy
How to tell whether your laptop uses a 2.5-inch SATA or M.2 SSD
Before you buy a replacement SSD, you need to know exactly what type of drive your laptop supports. Buying the wrong form factor is the most common and easily avoidable mistake when you set out to replace SSD hardware in a laptop.
There are two main categories to understand:
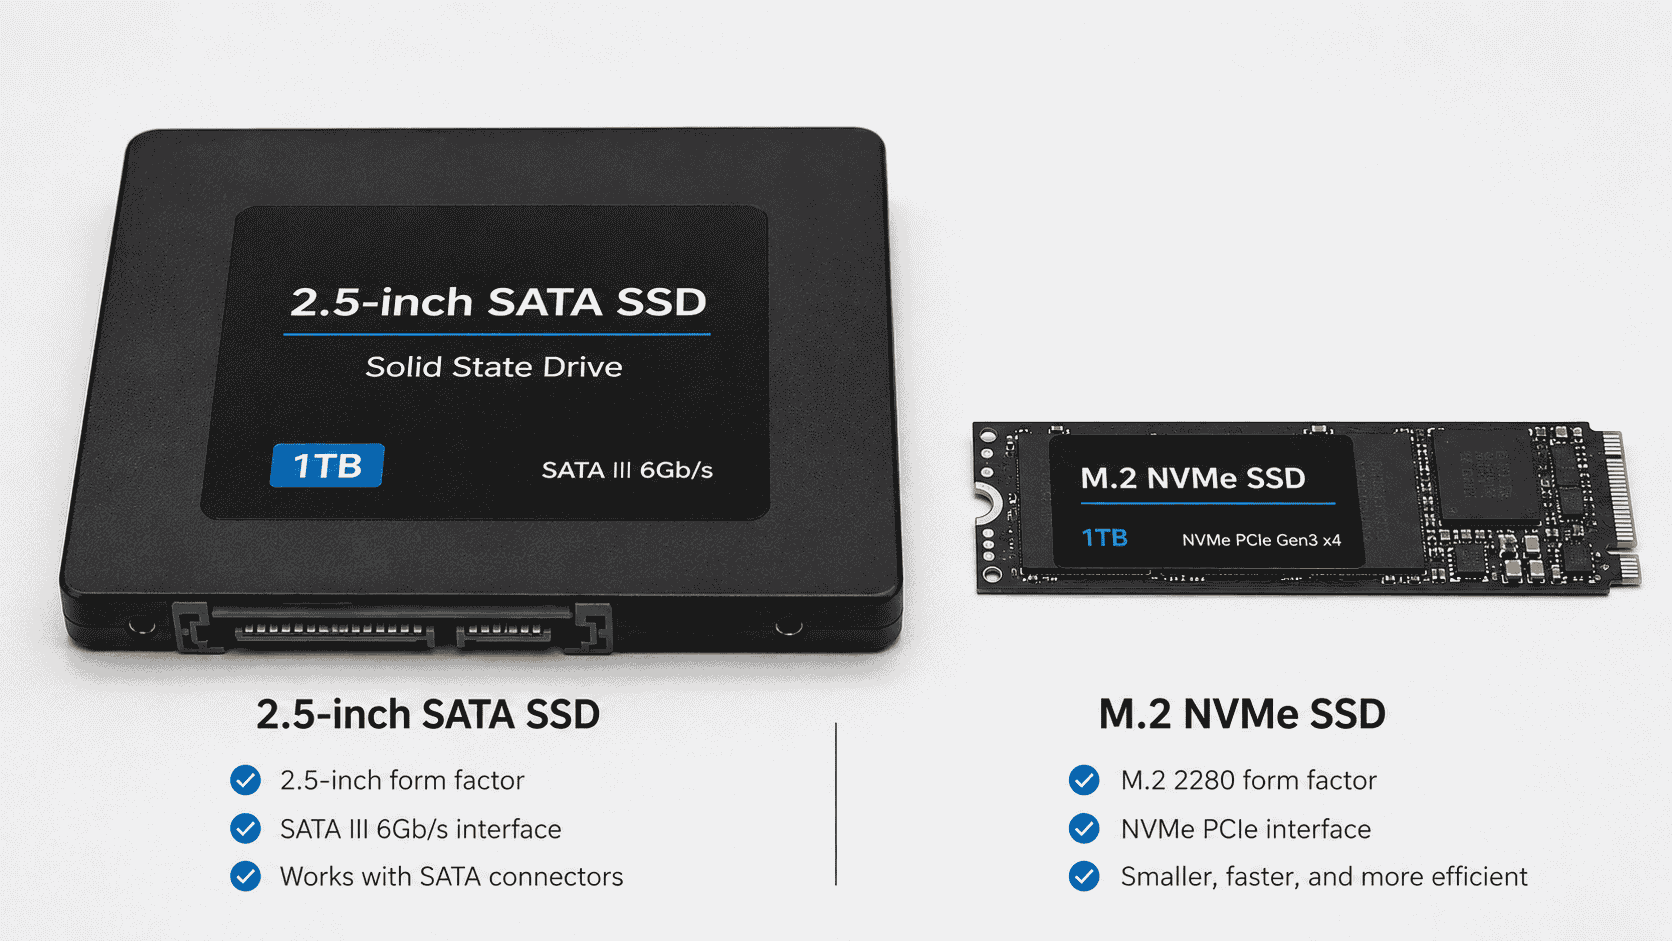
2.5-inch SATA SSDs are the older, larger format. They look like a small rectangular box, roughly the size of a stick of gum but thicker, and they connect via a SATA data and power connector. These are common in laptops made before 2017 or so, and in budget laptops even today.
M.2 SSDs are the slim, stick-shaped drives that slot directly into the motherboard. M.2 drives come in different lengths (2242, 2260, 2280 are the most common, with 2280 being standard in most laptops) and two different interfaces: SATA and NVMe. An M.2 SATA drive looks identical to an M.2 NVMe drive, but they perform very differently — NVMe is significantly faster.
Critically, not all M.2 slots support both interfaces. Some laptops only support M.2 SATA, some only NVMe, and some support both. Putting an NVMe drive into a SATA-only slot, or vice versa, will result in the drive not being detected.
To identify which type your laptop uses, you can:
- Search your laptop’s model number followed by “SSD type” or “storage specs”
- Check the manufacturer’s product page or support documentation
- Use a system information tool like CPU-Z or Speccy to read hardware details
- Open the laptop and look at the existing drive directly
How to confirm size, interface, and capacity support in your laptop manual
Your laptop’s user manual or service manual is the most reliable source of truth for SSD compatibility. Most manufacturers publish these documents on their support websites — search your model number plus “service manual” or “hardware maintenance manual.”
The manual will typically specify the supported M.2 key type (B-key, M-key, or B+M key), the supported interface (SATA, PCIe/NVMe, or both), and the maximum supported capacity. That last point matters more than many people realize: some older laptops have firmware limitations that prevent them from recognizing drives larger than a certain capacity, such as 2TB. Always verify the maximum supported size before buying a large-capacity drive.
What You Need Before Replacing a Laptop SSD
Tools, accessories, and optional cloning gear
The physical swap itself requires surprisingly few tools. Here’s what you’ll want to have ready:
- Precision screwdriver kit — Most laptops use small Phillips head screws (often #0 or #00), but some use Torx or pentalobe screws. A kit with multiple bit types covers all your bases.
- Plastic pry tool or spudger — For gently separating the bottom cover without scratching the chassis.
- Anti-static wrist strap — Optional but recommended, especially if you’re working in a carpeted or low-humidity environment. Static discharge can damage sensitive components.
- The new SSD — Confirmed compatible with your laptop’s slot, interface, and capacity limits.
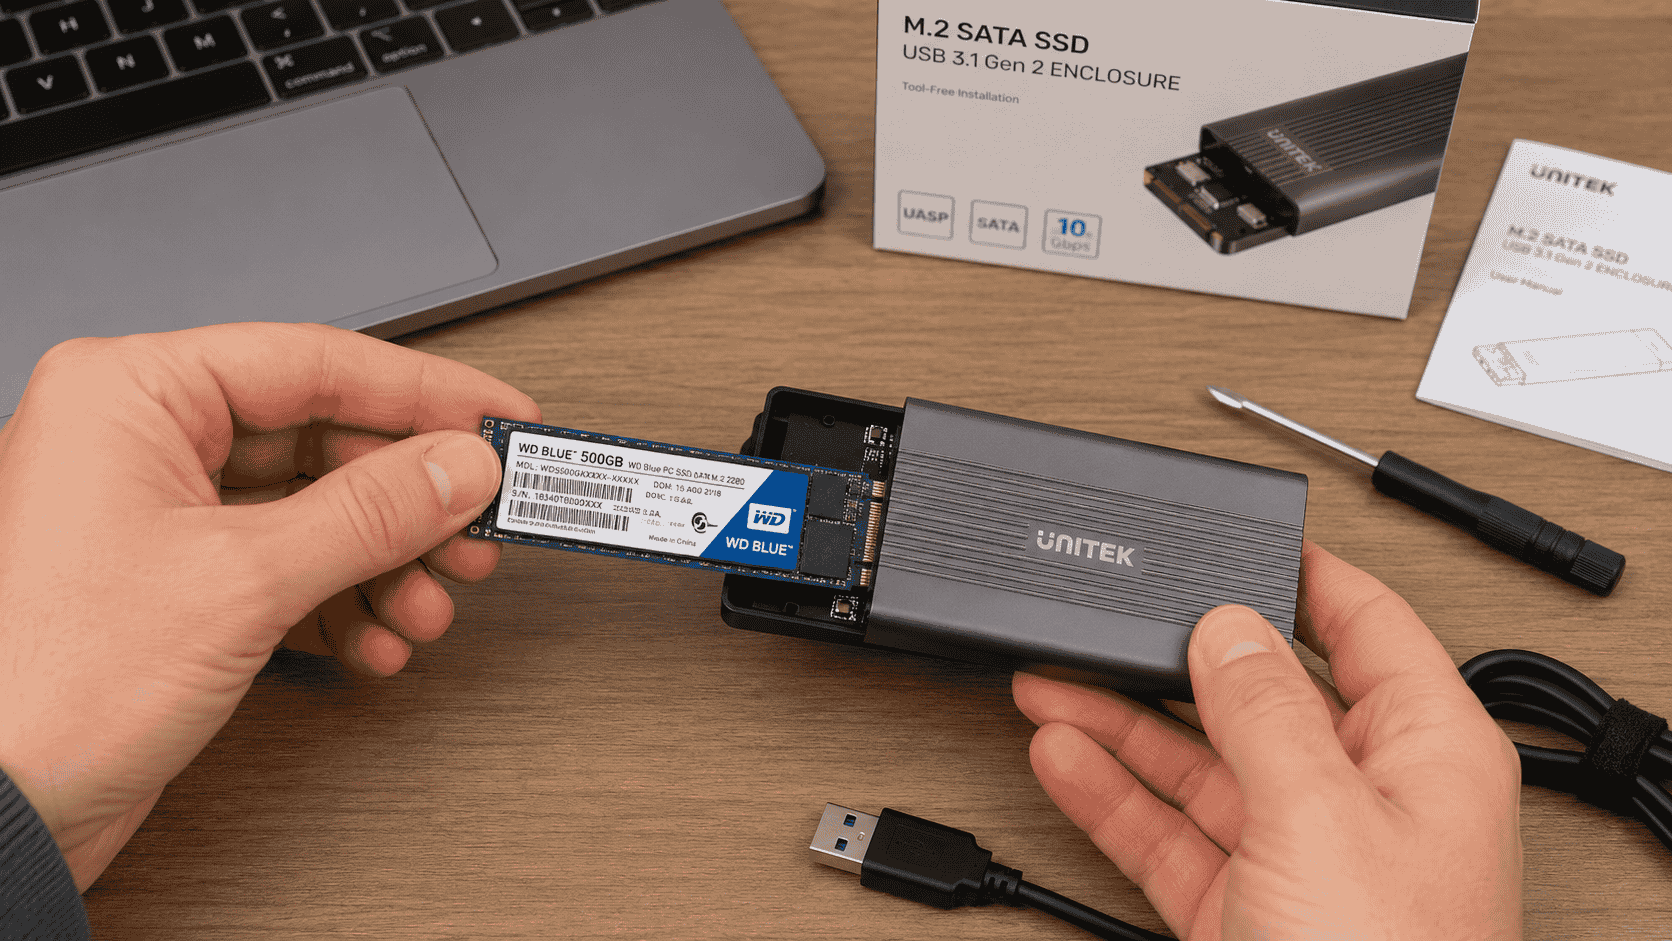
- External USB enclosure or M.2/SATA adapter — Only needed if you plan to clone your old drive before the swap. This lets you connect the new SSD via USB while the old one is still installed.
- USB flash drive (8GB or larger) — Needed if you’re doing a clean Windows install instead of cloning.
If your laptop’s SSD uses a mounting bracket, screw, or thermal pad, you’ll need to transfer those from the old drive to the new one. Check before you start so you’re not caught off guard mid-swap.
Back up your files and prepare for a safe swap
Regardless of whether you plan to clone or do a clean install, backing up your files before you start is non-negotiable. Drives can fail unexpectedly during the process, and having a current backup means you’re covered no matter what.
Back up to an external hard drive, a USB drive, or a cloud service like OneDrive, Google Drive, or iCloud. Pay special attention to files that aren’t automatically synced — documents on the desktop, downloads, local game saves, browser bookmarks, and any software license keys you’ll need to reactivate.
Once your backup is complete, fully power down the laptop — not sleep or hibernate, but a complete shutdown. Unplug the power adapter. If your laptop has a removable battery, take it out. These steps eliminate the risk of electrical damage to the drive or motherboard during the swap.
Option 1: Clone Your Old SSD Before Replacing It
When cloning is the best choice
Cloning is the process of creating an exact, sector-by-sector copy of your existing drive onto the new SSD. The result is a new drive that boots and behaves identically to your old one — same Windows installation, same apps, same settings, same files. Nothing is lost, and you don’t have to reinstall anything.
Cloning makes the most sense when:
- Your current Windows installation is clean and running well
- You have a lot of software installed that would be tedious to reinstall
- You want the fastest, least disruptive path to a larger or faster drive
If your current installation has accumulated years of bloat, driver conflicts, or performance issues, cloning carries those problems over to the new drive. In that case, a clean install might serve you better.
How to connect the new SSD externally and run cloning software
Because most laptops only have one drive slot, you can’t simply clone one internal drive to another — you need to connect the new SSD via USB while the old one is still running inside the laptop. This is where an external USB enclosure or adapter comes in.
The process looks like this:
- Place the new SSD into the external enclosure and connect it to your laptop via USB
- Open your cloning software of choice — Macrium Reflect Free, Clonezilla, and AOMEI Backupper are widely used free options. Some SSD brands (such as Samsung and Crucial) include their own free migration tools
- Select your current internal drive as the source and the new external SSD as the destination
- Run the clone and wait for it to complete — this can take anywhere from 20 minutes to several hours depending on how much data you have
During this step, continuing to use your laptop normally is not recommended. Let the clone run without interruption.
What a true bootable clone includes
Not all backup or copy operations create a bootable clone. A file-level backup copies your documents and folders, but it doesn’t replicate the partition structure, boot sector, or system-reserved partitions that Windows needs to start up. A true bootable clone replicates the entire drive at the sector level, including the EFI system partition and the Windows recovery partition.
When selecting cloning software, look for options that specifically advertise “bootable clone” or “disk clone” functionality — not just file backup. If the software only offers folder-level backup, it won’t produce a drive you can boot from.
Option 2: Replace the SSD and Do a Clean Windows Install
When a clean install makes more sense
A clean install wipes the slate completely. You start with a fresh copy of Windows on the new SSD, reinstall only the software you actually need, and migrate your personal files from your backup. The result is typically a faster, leaner system — especially if your old installation had accumulated years of unused programs, startup entries, and driver conflicts.
Choose a clean install when:
- Your current Windows installation is sluggish or unstable
- You’re moving to a significantly different hardware configuration
- You want a fresh start and don’t mind the time investment of reinstalling apps
What to back up first
Before doing a clean install, make sure you’ve saved everything that won’t survive a wipe:
- All personal files (documents, photos, videos, music)
- Browser bookmarks and saved passwords (export these manually or use a sync service)
- Software license keys for paid applications
- Game saves not stored in the cloud
- Email data if you use a local email client like Outlook or Thunderbird
- Any custom settings or configurations for creative or professional software
A clean install is a fresh start, which means anything not explicitly saved beforehand is gone. Take the time to be thorough.
How to Replace SSD in Your Laptop: Step-by-Step Physical Swap
Step 1: Shut down, unplug, and remove the battery if possible
With your backup complete and your new SSD ready, it’s time to do the physical swap. Start by performing a full shutdown — not restart, not sleep. Once the laptop is off, unplug the power cable. If your laptop has a user-removable battery (common on older models), pop it out now. For laptops with internal batteries, you’ll discharge any residual power after opening the case by holding the power button for 5–10 seconds with the charger unplugged.
Work on a clean, flat, non-carpeted surface. A wooden table or anti-static mat is ideal. Keep a small container nearby to hold screws so they don’t roll away.
Step 2: Open the access panel or remove the bottom cover
Some laptops have a dedicated SSD access panel on the bottom — a small removable door secured by one or two screws. Many modern laptops require you to remove the entire bottom cover, which is typically held in place by a ring of small screws around the perimeter.
Remove all visible screws and set them aside in order if they’re different sizes. Use a plastic pry tool to gently work around the seam between the cover and the chassis — start at a corner and work your way around. Avoid using metal tools here, as they can scratch the finish or damage the clips that hold the cover in place. Some covers also have hidden screws under rubber feet or stickers, so check carefully before forcing anything.
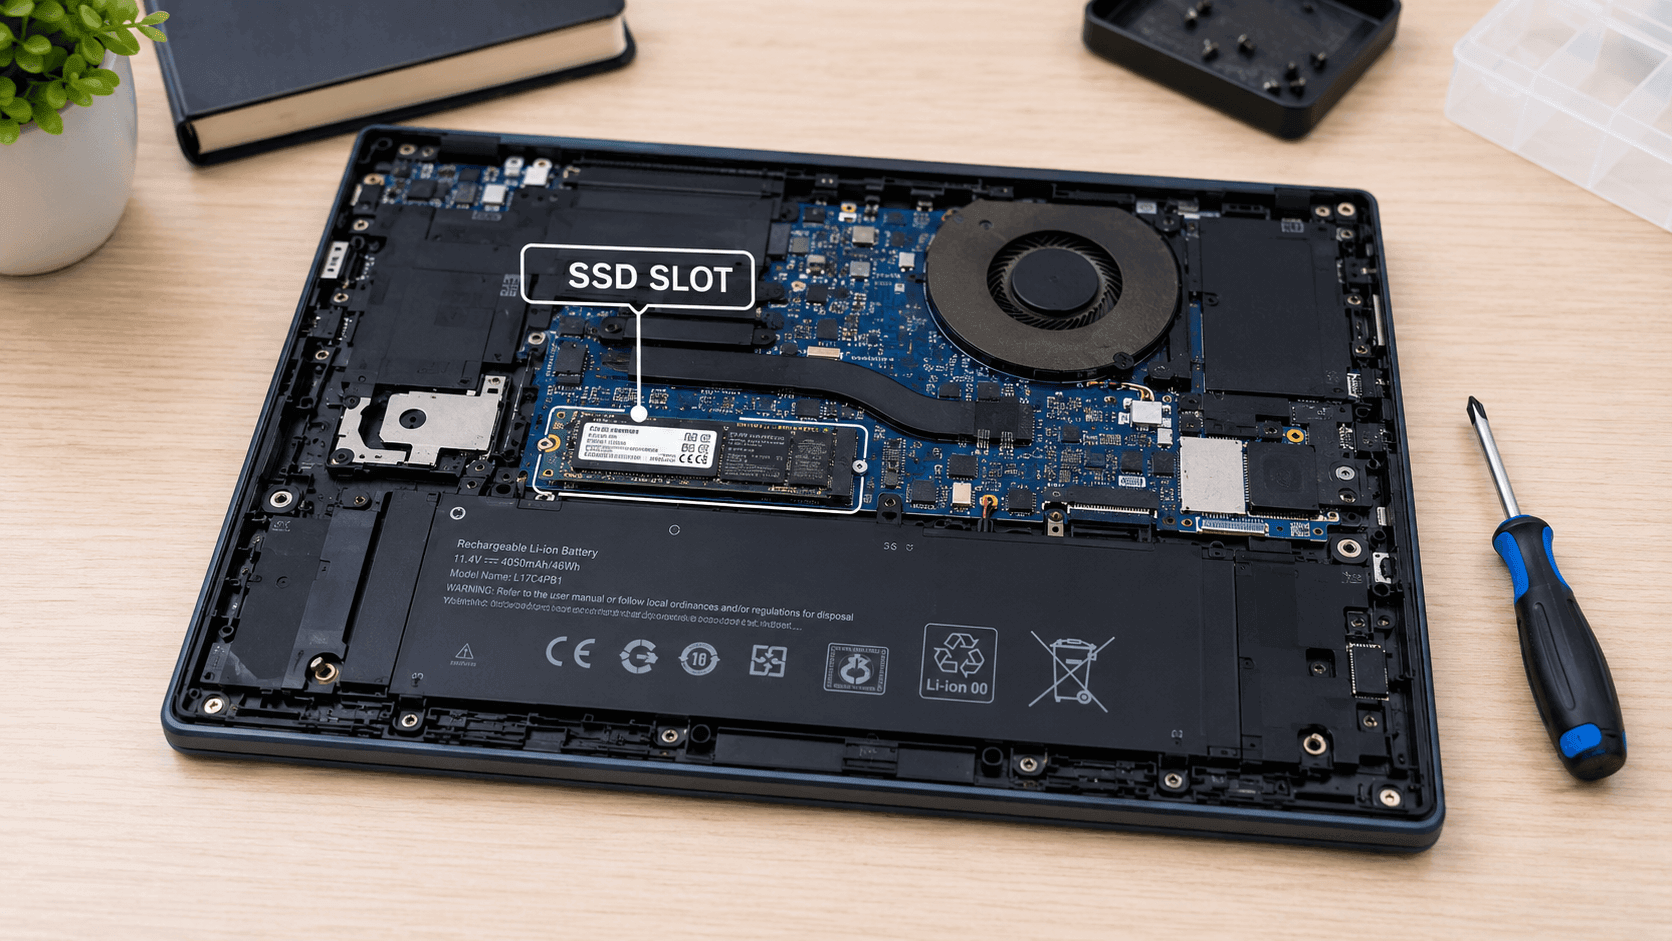
Step 3: Locate and remove the existing SSD
Once the cover is off, you’ll see the internal components. The SSD will either be a rectangular box connected via a SATA cable (2.5-inch drive) or a small stick seated in an M.2 slot on the motherboard.
For a 2.5-inch SATA drive: Disconnect the SATA cable from the drive, then remove any screws or brackets holding it in place. Slide the drive out of its bay.
For an M.2 drive: There’s typically a single small screw at the far end of the drive. Remove that screw, and the drive will pop up at a slight angle — usually around 30 degrees. Slide it straight out of the slot. Note the orientation: the notch on the connector edge should match the key in the slot.
Pay attention to any thermal pads, brackets, or spacers attached to the drive. You’ll need to transfer these to the new SSD.
Step 4: Install the new SSD in the same slot and secure it
Installing the new drive is the reverse of removal. For an M.2 drive, align the notch on the connector with the key in the slot and slide the drive in at the same angle it came out — typically about 30 degrees. Press it down flat against the motherboard and replace the retention screw. Don’t overtighten; snug is enough.
For a 2.5-inch drive, slide it into the bay, reconnect the SATA cable, and replace any brackets or screws. Avoid touching the gold connector contacts on either the drive or the slot — oils from your fingers can interfere with the connection. If the old drive had a thermal pad or bracket, transfer it to the new SSD now before securing it.
Step 5: Reassemble the laptop
With the new SSD seated and secured, replace the bottom cover. Line up the clips around the perimeter and press gently but firmly until you hear them click into place. Replace all the screws you removed, working from the center outward to ensure even pressure. Reinstall the battery if you removed it, and plug the charger back in.
What to Do After Installing the New SSD
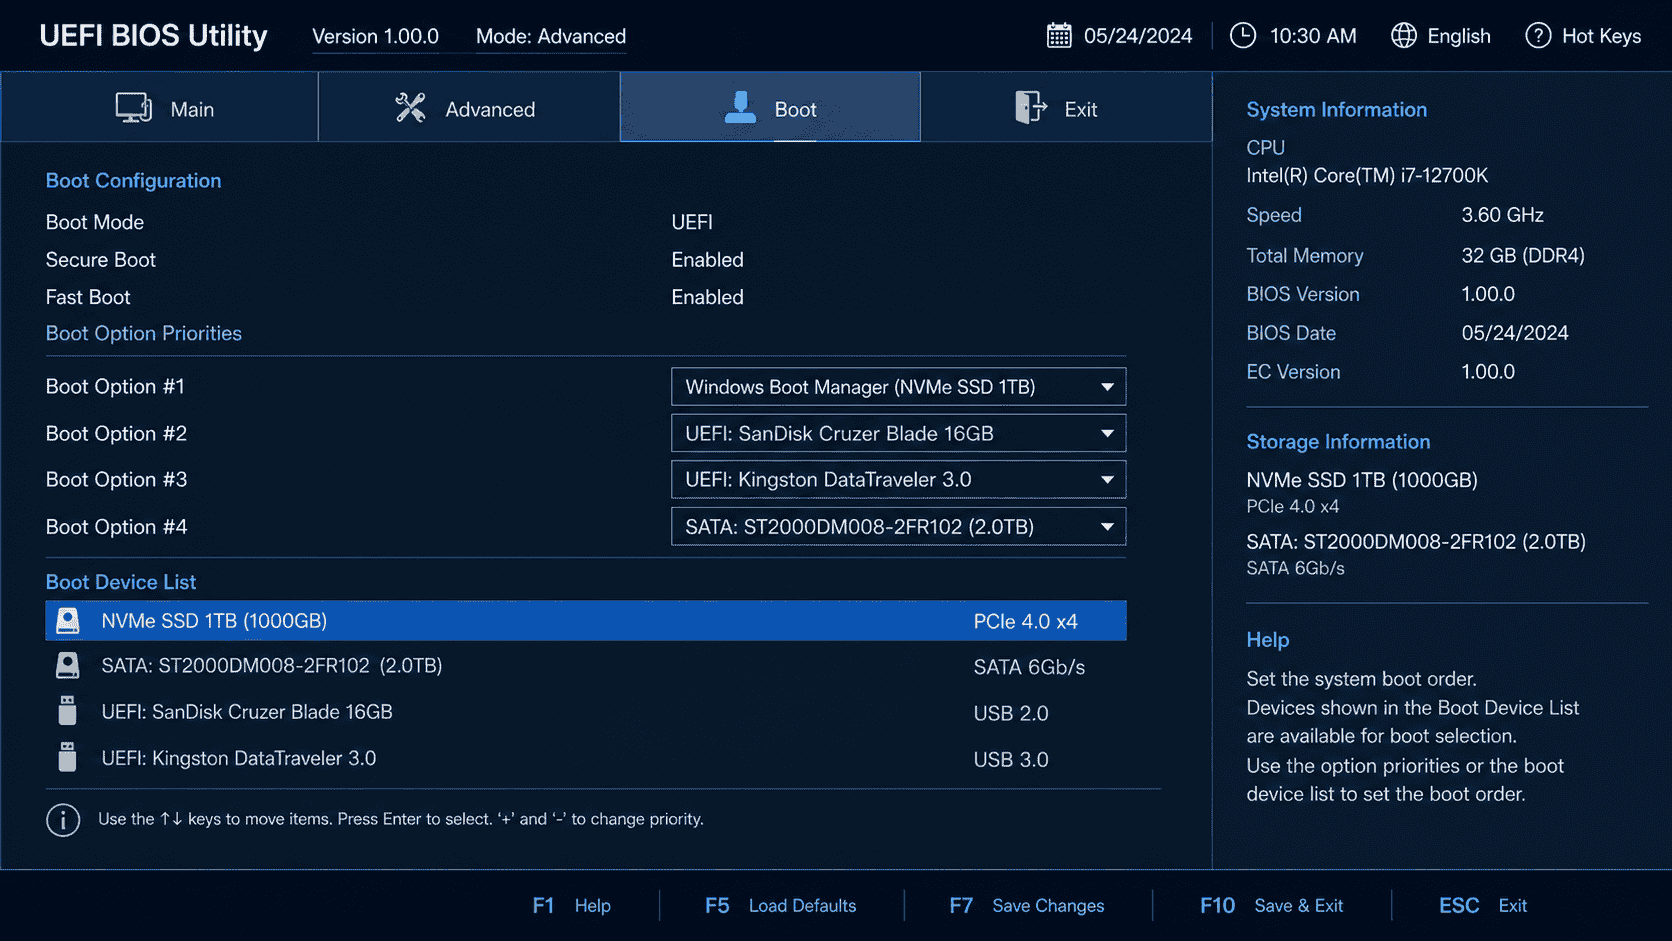
Check BIOS or UEFI to confirm the SSD is detected
Before you do anything else with software, verify that your laptop’s firmware actually sees the new drive. Power on the laptop and immediately press the key that opens BIOS or UEFI — this is typically F2, F10, Delete, or Escape, depending on the manufacturer. The correct key is usually displayed briefly on screen during startup, or you can look it up by searching your laptop model plus “BIOS key.”
Once inside BIOS, navigate to the storage or boot section. Your new SSD should appear listed by name or model number. If it shows up, you’re in good shape — close BIOS and proceed to the next step. If it doesn’t appear, don’t panic yet. Check the troubleshooting section below before assuming the drive is defective.
While you’re in BIOS, it’s also worth confirming that the boot mode is set correctly. If you’re installing Windows 10 or 11 fresh, you’ll want UEFI mode enabled and Secure Boot on (unless your installation media requires Legacy/CSM mode). If you’re booting from a cloned drive, the settings should already match whatever your old drive used.
Boot from the cloned drive or install Windows
If you cloned your old drive before the swap, this step is straightforward. With the new SSD detected in BIOS, save and exit, and let the laptop boot normally. The cloned drive should start Windows exactly as your old drive did. The first boot may take slightly longer than usual as Windows adjusts to the new hardware — this is normal. Once you’re on the desktop, verify that your files, applications, and settings are all intact.
If you’re doing a clean Windows install, insert your bootable USB drive, restart the laptop, and press the key that opens the boot menu (often F12 or F11). Select the USB drive from the list and follow the Windows Setup prompts from Microsoft. When you reach the partition selection screen, you’ll see the new SSD listed as unallocated space. Select it and click Next — Windows will create the necessary partitions automatically.
The installation typically takes 20 to 30 minutes, after which Windows will walk you through the initial setup process. After a clean install, reconnect to your Wi-Fi network and let Windows Update run fully before installing any other software. This ensures your drivers and system files are current before you start adding applications on top.
Expand partitions or verify available storage if you upgraded to a larger SSD
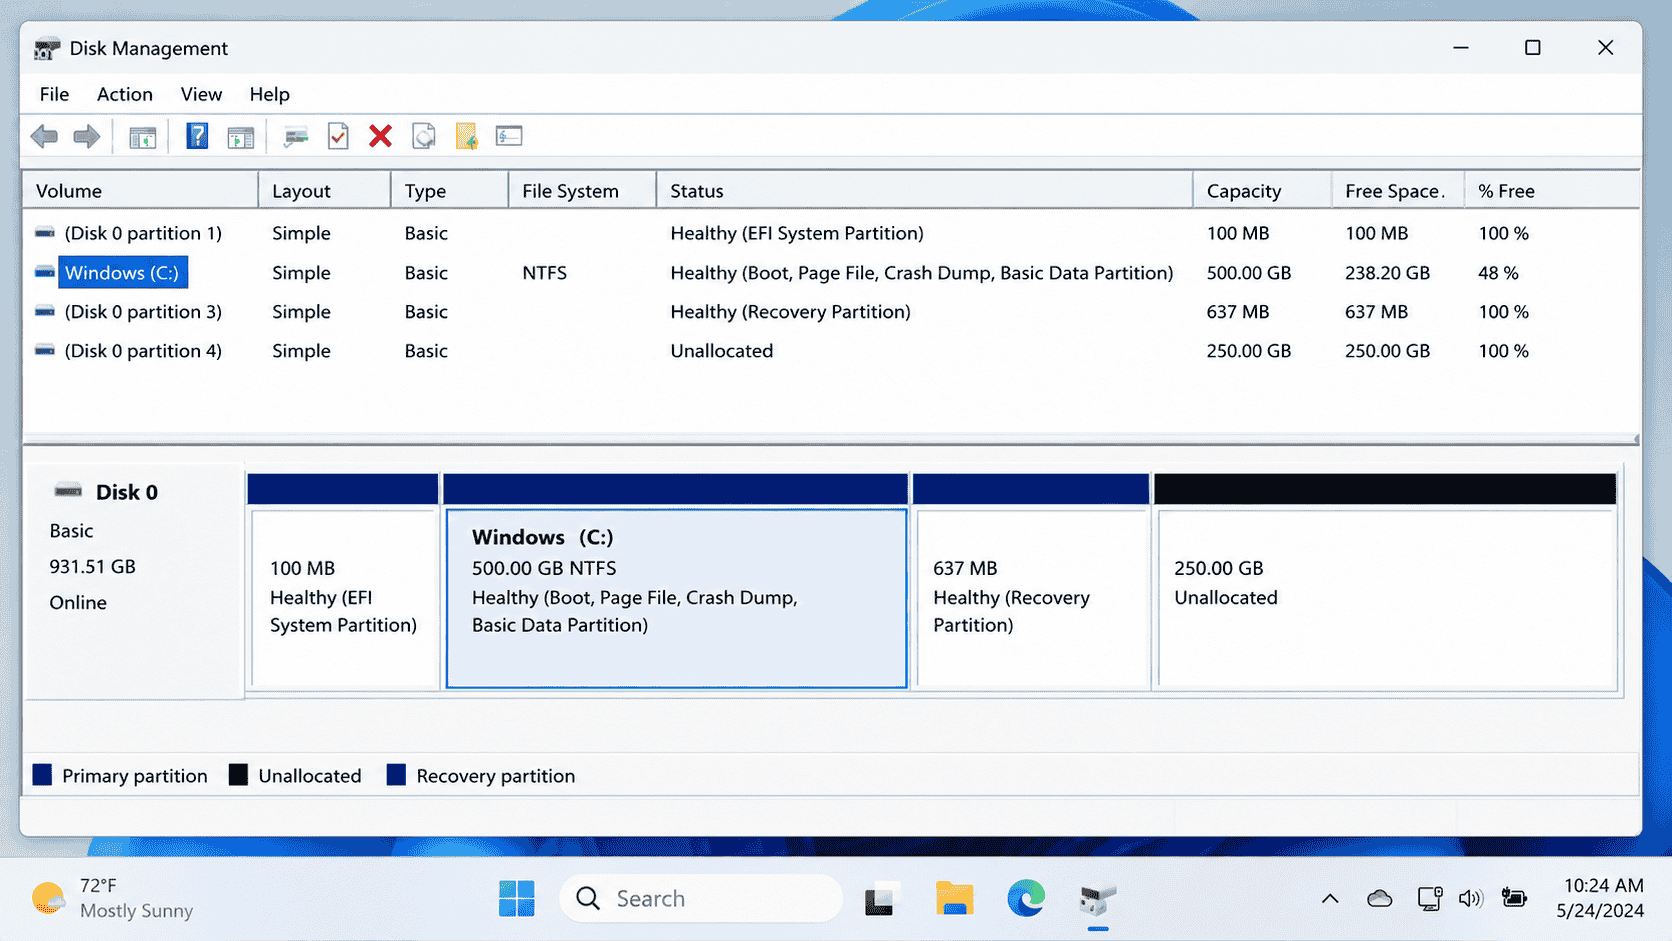
If you cloned a smaller drive onto a larger one, there’s one extra step that many people overlook: the cloned partition won’t automatically expand to fill the new drive’s full capacity. You’ll likely end up with a partition that matches the size of your old drive, plus a chunk of unallocated space sitting unused.
To fix this, open Disk Management (right-click the Start button and select it from the menu). You’ll see your SSD listed with the main Windows partition and the unallocated space beside it. Right-click the main partition and select “Extend Volume,” then follow the wizard to absorb the unallocated space into the existing partition. The process takes only a few seconds and doesn’t require a restart.
If Disk Management won’t let you extend the partition directly — sometimes a recovery partition sits between the main partition and the unallocated space — you can use a free third-party tool like MiniTool Partition Wizard to move or resize partitions more flexibly. This is a common situation after cloning, and it’s easy to resolve once you know to look for it.
Troubleshooting Common Problems When You Replace SSD Hardware
New SSD not detected
If your laptop doesn’t detect the new SSD in BIOS, work through these possibilities before assuming the drive is defective:
Check the physical connection first. Power down, reopen the laptop, and reseat the SSD. M.2 drives in particular need to be fully inserted before the retention screw is tightened — if the drive is even slightly misaligned in the slot, it won’t make contact. Remove it, reinsert it carefully, and make sure the notch aligns with the key in the slot.
Verify the interface compatibility. If you installed an NVMe drive in a laptop that only supports M.2 SATA, the drive won’t appear. Double-check your laptop’s specifications against the drive you purchased. The physical connector may fit, but the electrical interface must also match.
Check for a BIOS update. Some laptops require a firmware update to recognize newer, higher-capacity SSDs. Visit the manufacturer’s support page, search your model number, and check whether a BIOS update is available. If one exists and your laptop is running an older version, update it and then check again whether the drive is detected.
Try the drive in another device. If you have access to another laptop or a desktop with a compatible slot, test the new SSD there. If it’s detected elsewhere, the issue is with your laptop’s slot or settings. If it’s not detected anywhere, the drive may be defective and eligible for a replacement under warranty.
Laptop will not boot after cloning
A cloned drive that won’t boot is frustrating, but it’s usually fixable. The most common cause is a mismatch between the boot mode the clone expects and what BIOS is currently set to. If your old drive used UEFI boot and your BIOS is now set to Legacy/CSM (or vice versa), the drive won’t start correctly. Go into BIOS, check the boot mode setting, and toggle it to match what your old installation used.
Another common cause is that the cloning software didn’t properly copy the EFI system partition or the boot sector. Some free cloning tools handle this better than others. If the drive boots to a black screen or a “No bootable device” error, you can often repair the boot record using Windows Recovery.
Boot from a Windows installation USB, select “Repair your computer” instead of installing, navigate to Troubleshoot > Advanced Options > Startup Repair, and let Windows attempt to fix the boot configuration automatically. If Startup Repair doesn’t resolve it, the most reliable fallback is to treat the situation as a clean install — format the new drive and install Windows fresh, then restore your files from your backup.
Wrong SSD type, loose connection, or missing mounting hardware
Buying the wrong SSD type is the most common pre-swap mistake, and the fix is simply to return the drive and order the correct one. If you’re unsure whether you bought the right type, compare the drive in hand against your laptop’s service manual specifications before opening the packaging — most retailers accept returns on unopened drives.
A loose connection is easy to miss but simple to fix. If the laptop detects the drive intermittently or shows read/write errors shortly after installation, power down and reseat the drive. For M.2 drives, make sure the retention screw is snug. For 2.5-inch SATA drives, check that the SATA connector is fully pressed in on both the drive and the motherboard side.
Missing mounting hardware — the small screw that holds an M.2 drive flat, or the bracket that secures a 2.5-inch drive — is worth tracking down before you close the laptop. Without it, the drive can vibrate or shift slightly during use, leading to intermittent connection issues. If the screw is missing from your laptop, it’s an M2 standoff screw (a common size), and you can find replacements at electronics stores or online for very little cost.
What to Do With Your Old SSD
Reuse it in an external enclosure or keep it as a backup
Unless your old SSD was failing, there’s no reason to throw it away. A functioning drive — even a slow or small one — has plenty of useful life left in a different role. The most practical option is to place it in an external USB enclosure, which turns it into a portable external drive. Enclosures for both 2.5-inch SATA and M.2 drives are inexpensive and widely available, and the installation is usually tool-free.
Once it’s in an enclosure, you can use the old drive for file backups, transferring data between computers, or storing media that doesn’t need to live on your main drive. If the drive is in good health, it’s a genuinely useful accessory rather than electronic waste.
If the drive was showing signs of failure before you replaced it, don’t rely on it for anything important. You can still put it in an enclosure and use it for low-stakes storage — transferring files you don’t mind losing, for example — but don’t use a failing drive as your only backup copy of anything valuable.
Before repurposing the old drive, consider whether you want to wipe it. If your old Windows installation is still on it, your personal files and account information are still accessible to anyone who connects the drive to a computer. Use a tool like DBAN, Eraser, or the built-in “Reset this PC” option in Windows to securely wipe the drive before handing it off, selling it, or recycling it. Simply deleting files or formatting the drive through Windows Explorer is not sufficient to prevent data recovery.
Frequently Asked Questions
How do I replace the SSD in my laptop?
To replace the SSD in your laptop, fully shut down the machine and unplug it, then open the bottom cover using a precision screwdriver. Locate the existing SSD — either a 2.5-inch SATA drive or an M.2 stick — remove the retention hardware, and slide the old drive out. Insert the new compatible SSD into the same slot, secure it the same way, and reassemble the laptop. Power it on, confirm the new drive appears in BIOS, then either boot from a cloned copy of your old drive or install Windows fresh from a USB drive.
How to replace the SSD in my laptop?
The process starts before you ever open the laptop: confirm which SSD type your laptop supports (2.5-inch SATA or M.2, and if M.2, whether it’s SATA or NVMe), then back up all your data. Shut down completely, open the case, swap the drives, and reassemble. After powering back on, either restore from a clone or install Windows from a bootable USB. The full process to replace SSD hardware typically takes under an hour for most laptops once you have the right tools and a compatible drive in hand.
Can I replace my laptop SSD myself?
Yes, replacing a laptop SSD is one of the most beginner-friendly hardware upgrades you can make. Most laptops require only a small Phillips head screwdriver and a plastic pry tool, and the process doesn’t require any soldering or advanced technical knowledge. The main things to get right are buying a compatible drive and backing up your data before you start. Many laptops also have YouTube teardown videos specific to their model, which can be a helpful visual reference alongside written guides.
How do I upgrade my laptop SSD without losing data?
The safest way to upgrade without losing data is to clone your existing drive onto the new SSD before swapping them. Use an external USB enclosure to connect the new drive to your laptop while the old one is still running, then use cloning software — such as Macrium Reflect Free, AOMEI Backupper, or the migration tool included with your SSD brand — to create a bootable sector-level copy. Once the clone is complete, swap the drives and boot from the new one. Your files, applications, and settings will all be exactly where you left them.
Do I need to clone my SSD before replacing it?
No, cloning is one option but not a requirement. If you’re comfortable doing a clean Windows install, you can simply replace the drive and reinstall Windows from a bootable USB. A clean install often results in a faster, leaner system, especially if your old installation had accumulated years of software and settings. The trade-off is that you’ll need to reinstall your applications and restore your files from a backup, which takes more time than cloning. Cloning is faster and more convenient; a clean install gives you a fresher start.
Can I replace a laptop SSD with a larger SSD?
Yes, as long as the new drive uses the same form factor and interface as the original. You can replace a 256GB M.2 NVMe drive with a 1TB or 2TB M.2 NVMe drive, for example, provided your laptop’s firmware supports the larger capacity. Most modern laptops support drives up to 2TB without issue, but some older models have firmware limitations — check your laptop’s service manual or manufacturer support page to confirm the maximum supported capacity before purchasing.
How do I know which SSD is compatible with my laptop?
Start with your laptop’s model number and look up the service manual or hardware specifications on the manufacturer’s support website. You’re looking for the drive form factor (2.5-inch or M.2), the M.2 key type if applicable, the supported interface (SATA, NVMe/PCIe, or both), and the maximum supported capacity. System information tools like CPU-Z or Speccy can also read your current drive’s details. When in doubt, search your laptop model number alongside “compatible SSD” — many SSD brands and retailers publish compatibility databases.
What should I do after installing a new SSD in my laptop?
After installing the new SSD, enter BIOS to confirm the drive is detected before attempting to boot. If you cloned your old drive, boot normally and verify your files and applications are intact, then use Disk Management to expand the partition if you upgraded to a larger drive. If you’re doing a clean install, boot from your Windows USB, install Windows onto the new drive, run Windows Update fully, and then restore your files from your backup. Either way, take a few minutes to confirm everything is working correctly before putting the laptop back into regular use.
Will replacing my laptop SSD make it faster?
It depends on what you’re replacing and what you’re replacing it with. Upgrading from a traditional hard drive to any SSD will produce a dramatic improvement in boot times and application load speeds. Upgrading from an older SATA SSD to a modern NVMe SSD will also yield noticeable gains, particularly for tasks that involve large file transfers or sustained read/write operations. However, if your laptop already has a healthy NVMe SSD and your slowdowns are caused by insufficient RAM, an aging processor, or software issues, a new SSD alone may not resolve the problem.
Do I need to reinstall Windows after replacing my laptop SSD?
Not necessarily. If you clone your existing drive onto the new SSD before swapping them, Windows transfers along with all your files and settings, and you can boot directly into your existing installation without reinstalling anything. You only need to reinstall Windows if you choose to do a clean install, if your clone fails to boot, or if you’re replacing a drive that was already failing and couldn’t be cloned. Windows 10 and 11 are also generally good at reactivating automatically after a drive swap if your license is linked to a Microsoft account.
Conclusion
Knowing how to replace SSD drives in your laptop is a genuinely achievable skill for most people, and the payoff is significant — more storage, faster performance, or a drive that isn’t on the verge of failure. The key to doing it right comes down to three things: buying a drive that’s actually compatible with your laptop, protecting your data before you touch anything, and following the physical swap carefully so nothing gets damaged in the process.
Whether you go the cloning route for a seamless transition or opt for a clean Windows install to start fresh, both paths lead to the same result: a laptop that works better than it did before. The cloning approach saves time on setup; the clean install saves you from carrying old problems forward. Neither is wrong — it depends on the state of your current installation and how much time you want to invest.
If you’ve made it through this guide, you have everything you need to replace SSD hardware in your laptop with confidence. Back up your data, confirm your drive compatibility, take your time with the physical steps, and verify the drive is detected in BIOS before assuming anything has gone wrong. Most laptop SSD replacements go smoothly on the first try, and the ones that don’t are almost always fixable with a bit of troubleshooting.