How to Remove Section Breaks in Word: Easy Steps to Follow
A section break is a very handy tool for separating blocks of text or unifying them under one type of formatting. However, some types of documents are better off without them, making all the text align under one section. Knowing how to remove section breaks in Word is a useful skill that can save you time and keep your documents clean and consistent.
Microsoft equips users with different options to remove section breaks in Word, each of which we will go through in this guide. Got a few minutes? Read on below to find out.
How to Remove Section Breaks in Word Manually
With this method, you can set section breaks and all hidden formatting markers to appear on your document and then delete the unnecessary ones. This is the quickest approach when you only need to remove a specific section break rather than all of them at once. To do this,
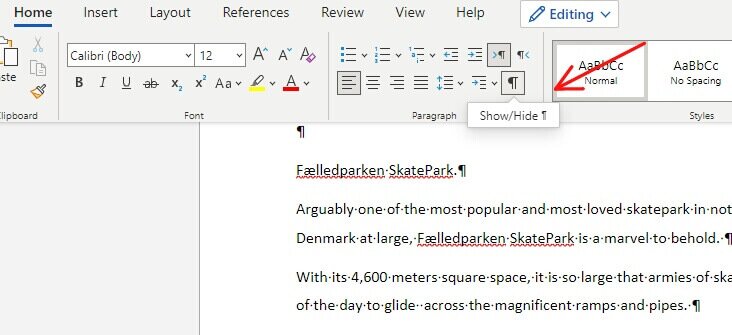
- Go to the Home tab and then Show/Hide Editing Marks. Enabling this option will make all formatting symbols and paragraph marks pop up on your current document.
- On Windows, place your cursor just before the section break and press the Delete key on your keyboard to remove it. On Mac, place your cursor just before the section break and press Backspace/Delete; alternatively, click to select the section break itself and press Delete if Word allows the selection. This works for Continuous, Next Page, Even Page, and Odd Page section breaks.
Quick Note: You won’t be able to remove section breaks unless you turn off Track Changes, so ensure it’s disabled. To do so, go to the Review tab, click the Track Changes drop-down, and select Track Changes to disable it.
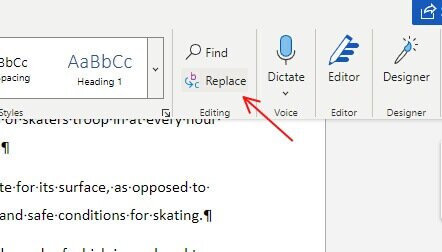
- Alternatively, go to the Home tab again if you’d prefer to remove all section breaks at once.
- Select Replace to open the Find and Replace dialog box
- In the Find and Replace dialog box, click More in the bottom corner to expand the window
- Go to the bottom of the page and select the Special drop-down.
- Next, select Section Break from the options.
Quick Note: Ensure the Replace With text box is empty. Otherwise, delete any texts you find therein, as leaving them will replace the section breaks instead of removing them.
- You’ll see ^b in the Find What text box. Select Find Next till you get to the section break you want to remove
- Once you’ve found it, click Replace to complete the removal
- You can also click Replace All to remove all section breaks in the target document altogether.
How to Remove Section Breaks in Word Using the Microsoft VBA Module
Visual Basic for Application (VBA) is a great utility tool that you can harness to remove section breaks in Word, and it’s just as simple to use with the following steps. This approach is especially useful when you need to clear section breaks from a large document in bulk. According to Microsoft’s official documentation, section breaks control the layout and formatting of sections, so removing them will merge the formatting of the surrounding sections.
- Press Alt + F11 keys to launch Microsoft Visual Basic for Application
- Once you’re in the window, click Insert and then Module
- Next, copy and paste the following codes in the module to remove all section breaks in a Word document:
Sub DeleSectionBreaks()
Selection.Find.ClearFormatting
Selection.Find.Replacement.ClearFormatting
With Selection.Find
.Text = “^b”
.Replacement.Text = “”
.Forward = True
.Wrap = wdFindContinue
.Format = False
.MatchCase = False
.MatchWholeWord = False
.MatchByte = False
.MatchAllWordForms = False
.MatchSoundsLike = False
.MatchWildcards = False
.MatchFuzzy = False
End With
Selection.Find.Execute Replace:=wdReplaceAll
End Sub
- Press F5 on our keyboard or click the Run button to run the codes.
This method removes all the sections from an open document in bulk. It is particularly handy when dealing with long reports or merged documents that contain many section breaks throughout.
How to Remove Section Breaks in Word on Mac and Word for the Web
The steps above are primarily written for Word on Windows, but the process works a little differently depending on your platform. Here is how to handle section breaks on macOS and Word for the web.
On macOS:
- Go to the Home tab and click Show/Hide (the paragraph mark icon ¶) to reveal all formatting marks, including section breaks.
- Locate the section break you want to remove. You will see labels such as Section Break (Next Page) or Section Break (Continuous) in the document.
- Place your cursor just before the section break and press Backspace/Delete to remove it. If Word allows you to click and select the section break itself, you can select it and press Delete instead.
In Word for the Web:
- Go to the Home tab and enable Show/Hide to make section breaks visible in your document.
- Place your cursor just before the section break marker and press Delete on Windows or Backspace/Delete on Mac to remove it.
- Note that Word for the web has more limited formatting controls than the desktop app, so some section break types may behave differently. If a break cannot be deleted directly, try opening the document in the full desktop version of Word to remove it.
Regardless of platform, the removal process is the same for all section break types — Continuous, Next Page, Even Page, and Odd Page — once you can see and locate them with Show/Hide enabled.
Final Notes on How to Remove Section Breaks in Word
There you have it! That’s all you need to know about how to remove section breaks in Word. However, keep in mind that section breaks are not the same as page breaks. If you’re trying to delete unwanted Word pages, you will usually need to remove extra content or page breaks instead. The latter only moves the content from a page after a break to the next page, without affecting the document’s formatting or layout settings. Understanding the difference between these two types of breaks will help you make better decisions when editing and formatting your documents.
Before you delete a section break, it is important to understand what will change when you do. When you delete a section break, Word merges the two sections into one, and the section that was before the break adopts the formatting of the section that came after it — not the other way around. This means the following settings in the preceding section can change unexpectedly: headers and footers, page numbering style, margins, column layout, page orientation, and other section-level layout settings.
If your goal is simply to continue the same header, footer, or page numbering across sections, you do not necessarily need to delete the break at all. Instead, go to the header or footer area, and use the Header & Footer > Link to Previous option to connect the sections without removing the break.
If you do need to remove the section break, it is a good idea to first make the formatting of the section after the break match the section before it. That way, when Word merges the two sections and applies the following section’s formatting, your document layout stays consistent and nothing breaks unexpectedly.
