How To Set Up Seafile On Linux
Need a great syncing tool for your Linux server that works fast, and supports clients on multiple platforms? Check out Seafile on Linux. It’s an enterprise-grade file syncing solution that makes it easy to transfer data from place to place over LAN, as well as the internet.
Installation
Due to how many different types of Linux server operating systems are out there, the developers have opted to make a generic “Linux installer”. To set up Seafile on Linux, open up a terminal and use the wget download tool to download the latest package.
64 bit:
wget https://download.seadrive.org/seafile-server_6.2.3_x86-64.tar.gz
32 bit:
wget https://download.seadrive.org/seafile-server_6.2.3_i386.tar.gz
After grabbing the server software, you’ll need to extract the archive that it’s packed in. Do this with tar.
tar xvzf seafile-server_*.tar.gz
Running the tar command with those letters will unpack the entire archive, extract it, and place it in the same folder it was downloaded to. From here, you’ll need to use the CD command to enter the extracted archive directory.
cd seafile-server_6.2.3_x86-64
or
cd seafile-server_6.2.3_i386
As mentioned before, the Seafile server software is a generic installer. Instead of packaging for various Linux distributions, the developers have included several different shell scripts that the user can run to get everything going. To view all of the individual shell scripts included inside of the directory, use the ls command.
ls
To filter out the shell scripts specifically, consider combining the ls command with a wildcard, and the .sh file extension:
ls *.sh
Set Up
There are many different scripts to run. For most users, the script to run is “setup-seafile.sh”. If you’d like to set up the server software with SQL, rather than the default settings, try running “setup-seafile-mysql.sh”. Do keep in mind that the default setup script is best for most users, and the other scripts are meant for advance users who specifically want more control over their server. Check out the Seafile website for more information.
Start the installation with:
sudo sh setup-seafile.sh
The first part of the process is to name your Seafile server. Under “What would you like to use as the name of this seafile server?”, enter the name for your server. Press the enter key to continue.
Next, you’ll need to specify the LAN IP address of the server. Use the command below to locate the IP address of the host machine, then input it into the prompt in the terminal.
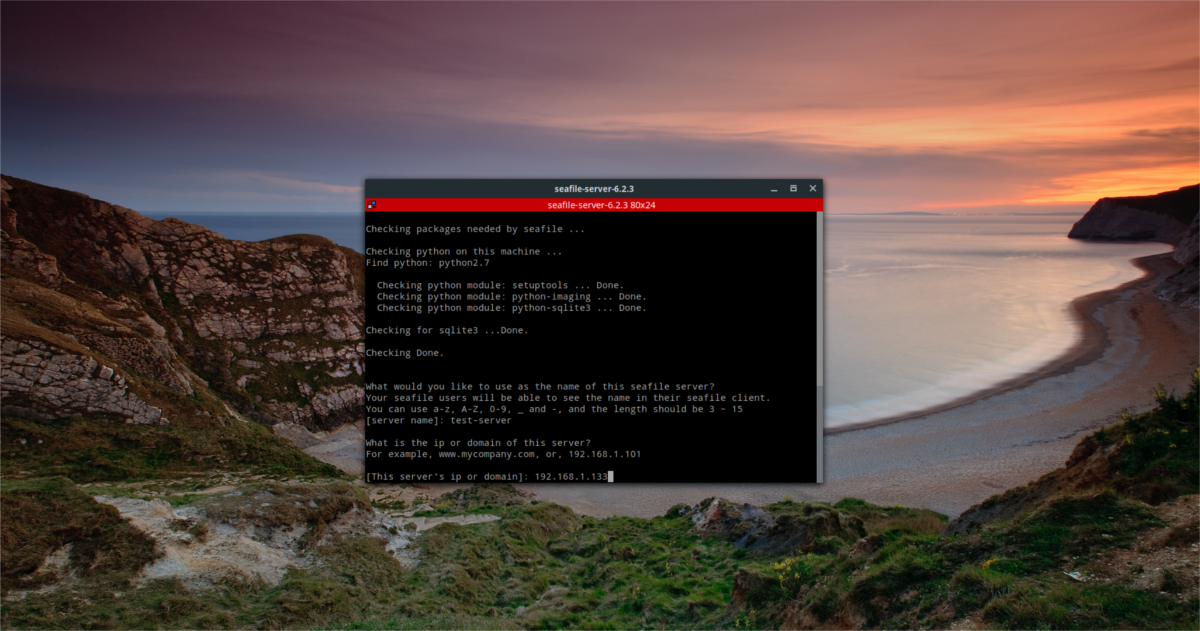
Note: you may need to open a separate terminal to do this.
ip addr show | grep "inet 192.168"
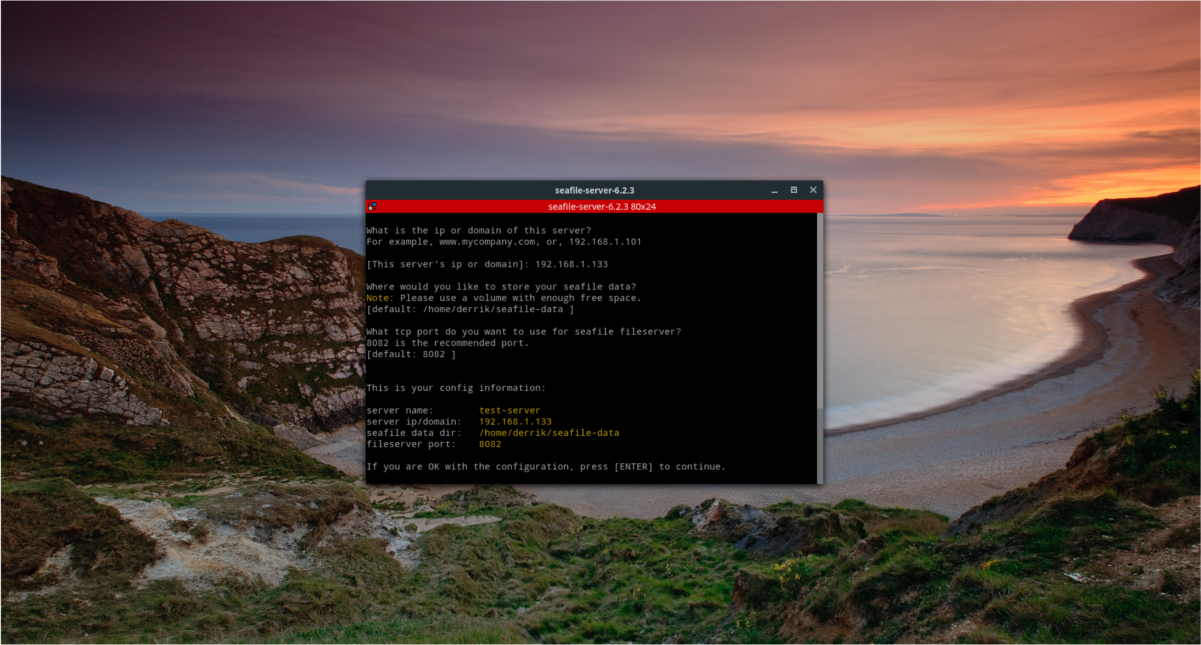
In the third step, the script asks the user to specify where Seafile should save all of the data it syncs. By default, this directory is ~/seafile-data. For most users, this will do. If you’d like to change it, specify the path to the location in the installer.
If you’d like to change the default port that the server software operates on, the next page will let you do that. Otherwise, press enter to use the default ports and move on to the next step.
When the server software has been installed and configured, the script will print out the IP, server name, port, etc, and ask if “this is OK”. Read it over, and press the enter key to move on through the installation.
Seafile is installed. To run the server, do the following:
./seafile.sh start
To stop the server, do:
./seafile.sh stop
Restart the server with
./seafile.sh restart
Installing Sync Clients
Along with the server software, users can also install the Seafile sync tool to their Linux PC’s as well. Officially, the GUI sync tool supports Ubuntu, Debian, Fedora, Arch Linux, as well as RHEL/CentOS. To install it, choose your operating system and follow the command instructions.
Note: If you use an operating system other than the ones listed below, you’ll need to use the generic version of Seafile-GUI instead. Download it here.
Ubuntu Instructions
The Seafile sync software is compatible with Ubuntu and distributed via a PPA, rather than a downloadable Debian package file. This is a good choice, because it allows the developers to regularly distribute software updates to the software running on your server. To Install the software to your Ubuntu machine, open up a terminal and do the following:
sudo add-apt-repository ppa:seafile/seafile-client
sudo apt-get update
sudo apt-get install seafile-gui
Debian Instructions
Like Ubuntu, Debian has a software repository to deliver Seafile. This software repository has support for Debian 7, 8 and 9. To add the Seafile software repository to your Debian machine, first open up a terminal and gain root access using su.
When you’ve got root access, add the repo key to your system to ensure that Debian will install the software. Then, choose your version of Debian and use the command below it to automatically add the software source to your machine.
sudo apt-key adv --keyserver hkp://keyserver.ubuntu.com:80 --recv-keys 8756C4F765C9AC3CB6B85D62379CE192D401AB61
Debian 7
echo deb https://deb.seadrive.org wheezy main | sudo tee /etc/apt/sources.list.d/seafile.list
Debian 8
echo deb https://deb.seadrive.org jessie main | sudo tee /etc/apt/sources.list.d/seafile.list
Debian 9
echo deb https://deb.seadrive.org stretch main | sudo tee /etc/apt/sources.list.d/seafile.list
After adding the new software source to Debian, update the software sources and apt cache. Once the update finishes, install Seafile sync client to the system with:
sudo apt-get install seafile-gui
Fedora Instructions
sudo dnf install seafile-client
Arch Linux Instructions
The official Seafile sync software is in the Arch Linux AUR. Follow our guide here to learn how to install software from the AUR to get it going.
Setting Up Seafile Sync
To sync with your Seafile server, you’ll need to log in the credentials into the sync client.
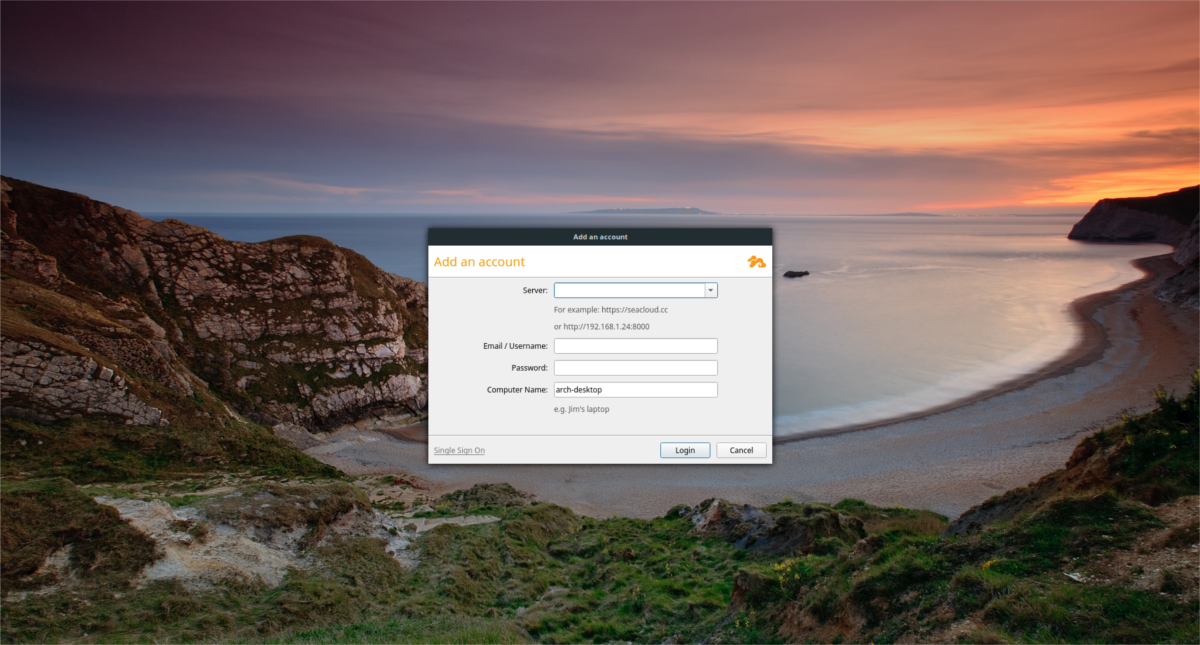
Open the client, and enter the server information. Start out with the IP address and port number. Use the IP address entered into the installer earlier, and add the default port number. For example:
https://192.168.1.133:8082
Next, open a terminal, and enter the Seafile setup folder from earlier.
cd seafile-server_6.2.3_x86-64
or
cd seafile-server_6.2.3_i386
Run the “reset-admin.sh” script to set up a user.
sudo sh reset-admin.sh
Enter your email address, and set the password. Then go back to the sync client, and enter that as your login information. If the information is correct, the sync client will log in. From here, start syncing all your data by placing files and folders into /home/username/Seafile/
