Every Fix for ERR_TUNNEL_CONNECTION_FAILED Error
If you are a Google Chrome browser user, there is a good chance you have encountered the ERR_TUNNEL_CONNECTION_FAILED error message. This common error can pop up when trying to access a website and prevent you from browsing the Internet, especially if you’re using a proxy or VPN connection.
In this article, we have gathered all the effective fixes and you will have access to everything you need to know about this specific error.
What Does ERR_TUNNEL_CONNECTION_FAILED Mean?
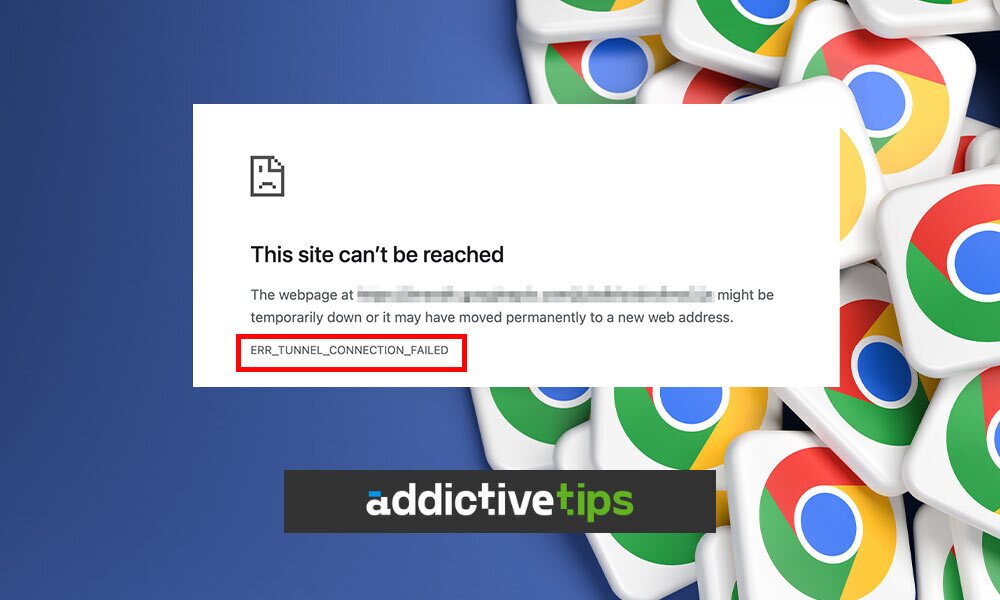
ERR_TUNNEL_CONNECTION_FAILED means that the Chrome browser is unable to establish a tunnel connection with the target website. A tunnel connection is an encrypted link between a user’s device and a web server to allow secure data transmission.
This connection is usually used when the user utilizes a proxy server or VPN to increase the privacy and security of the connection. So when the tunnel transmission doesn’t work properly, you will see this error.
Since the error is about the tunnel connection, it’s not necessarily related to your internet connection. The issue can be related to the target website itself or some misconfigurations along the way to connect to the website.
What Causes this Error Message to Appear on Chrome?
Multiple factors can cause this error to appear on Chrome including:
- Incorrect Proxy Settings: Misconfigured proxy settings on the operating system or the browser can lead to this error message.
- DNS Connection Issues: The error could be caused by a Domain Name System (DNS) issue that prevents proper network resolution.
- VPN Interference: Some VPN protocols and settings can go against browser or system settings and force traffic through blocked or restricted servers.
- Firewall or Antivirus Issues: Your system’s firewall or antivirus can detect a proxy or VPN connection as a potential security risk and block the tunnel connection.
- Issues with the Target Website: If the website you’re trying to visit is down or configured in a way to block proxy or VPN connection, you might get the error message.
- Browser Cache and Cookies: Corrupted cookies or cache can lead to problems with the target website and prevent the connection from being established.
- ISP Restrictions: This is rare but your Internet Service Provider (ISP) may be the culprit here. ISPs can prevent tunnel connections by blocking proxies and access to certain websites.
Best Solutions to Fix the ERR_TUNNEL_CONNECTION_FAILED Error
Here are the most effective solutions you can try in order to get rid of this error:
1. Check the Proxy Settings
If you are using a proxy, you can first try to check the proxy settings. To do this, follow these steps:
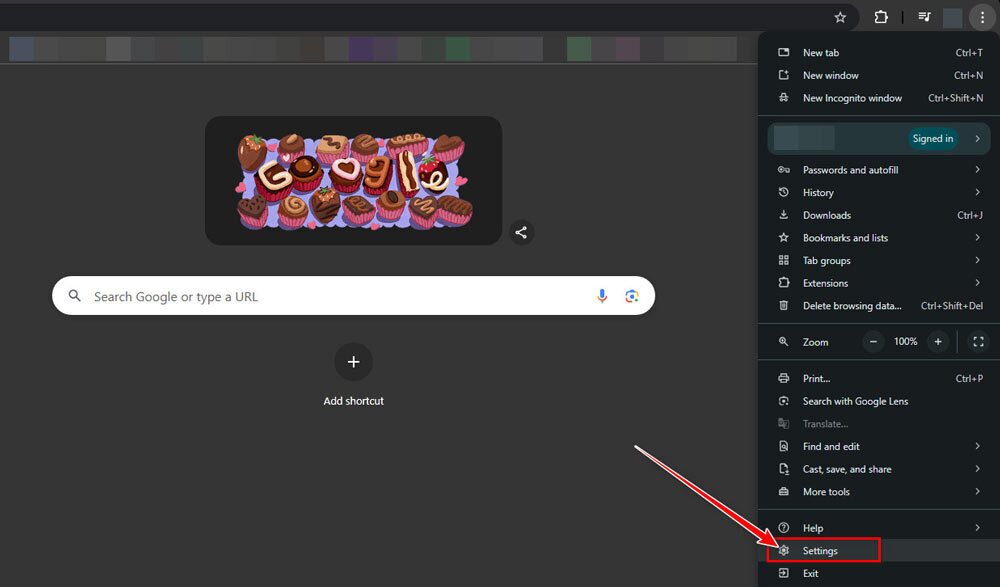
- Open your browser and click on the three dots icon in the top right corner. Then select Settings.
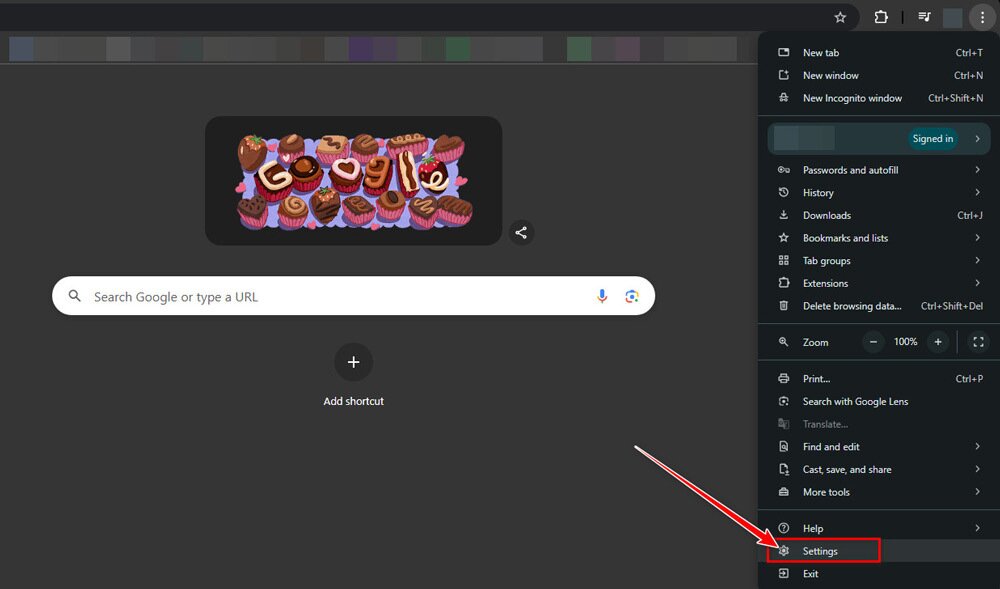
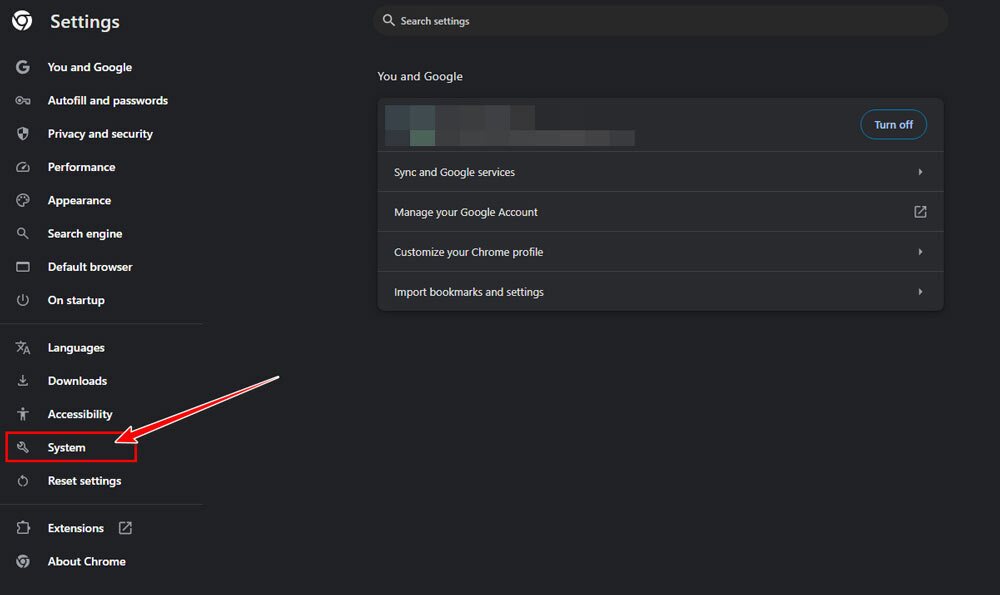
- Now from the left menu, select System.
- Next, select Open your computer’s proxy settings.
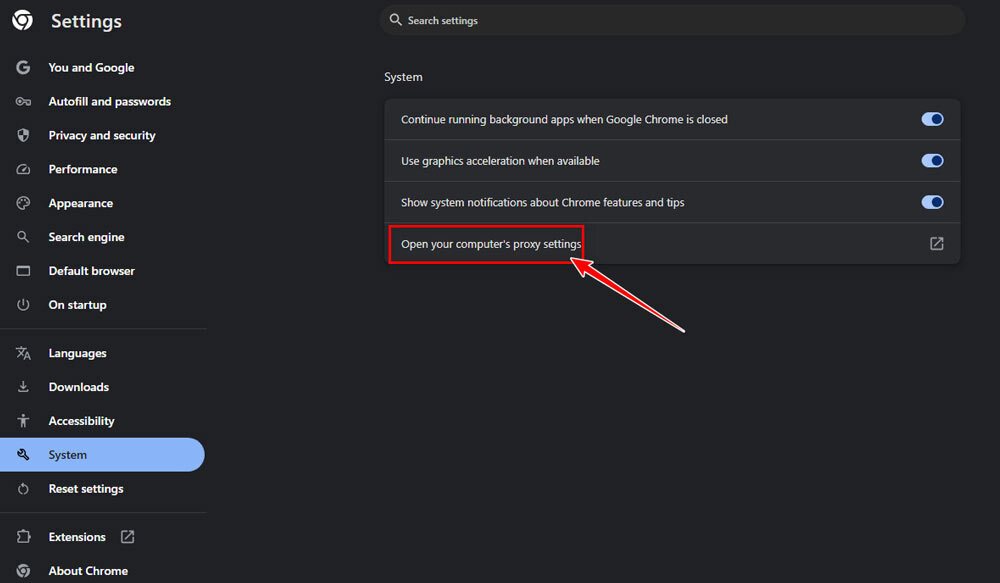
- If you have set the proxies automatically, try turning off Automatically detect settings and then turn it on again.

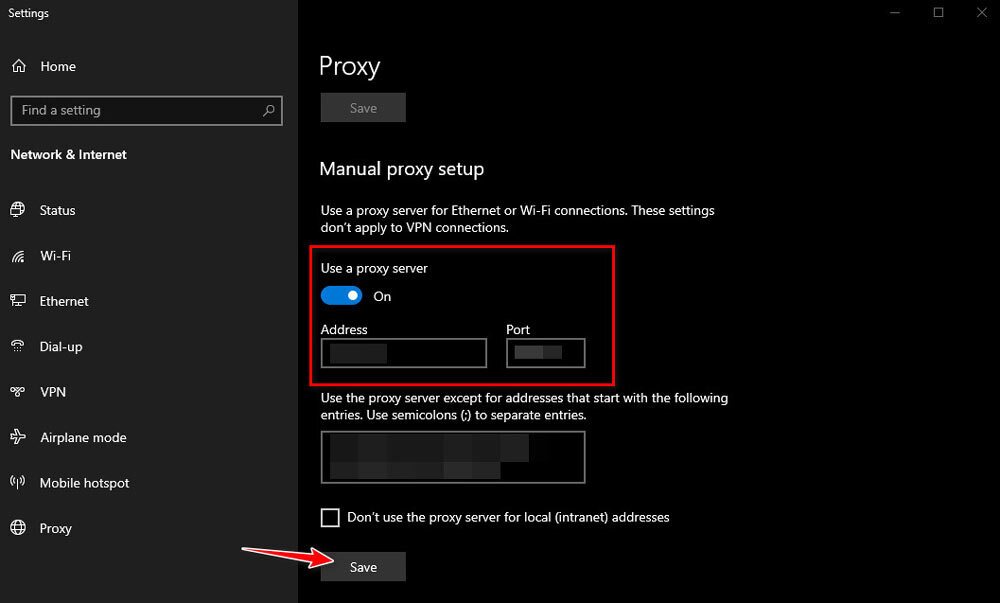
- If you are using proxies manually, scroll down a bit and check if the address and port are correct. Then, toggle off Use a proxy server and then toggle it on again. Finally, click on Save. Now, see if the issue is fixed. If not, try turning off the option for once.
If you are on Mac, follow these steps:
- Open System Preferences and then select Network.
- Select the connection you are currently using (Wi-Fi or Ethernet) and then select Advanced.
- Now, in the Proxies tab, you can check the proxy settings to see if the correct proxy is active. Finally, select OK and Apply.
2. Change the VPN Settings or Disable it
If you are using a VPN software or extension, try disabling it and see if it solves the problem. If it fixes the issue, next time try to use a different VPN server or another protocol.
3. Clear Browser Cache and Cookies
Clearing your browser’s cache and cookies can be a quick fix for this error. Here’s how to do this:
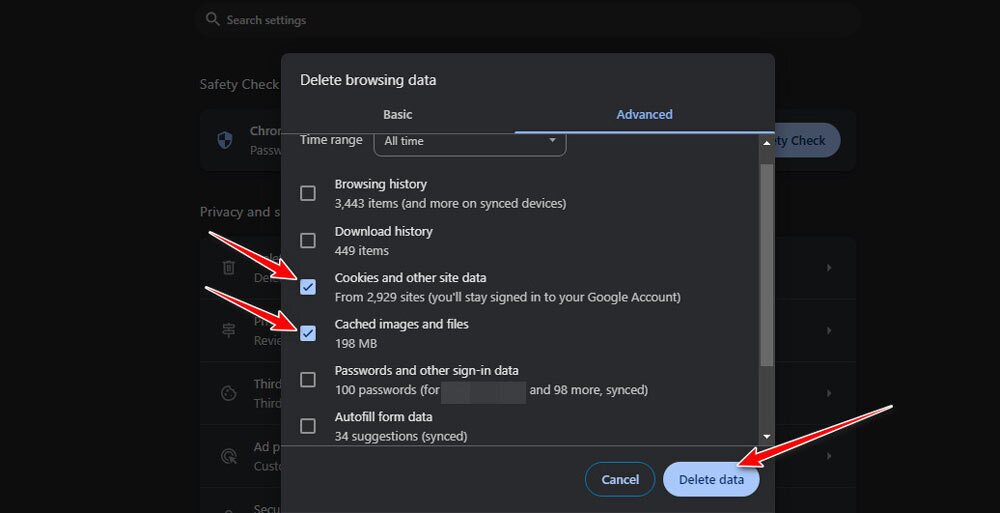
- When the Chrome browser is open, press these three keys at the same time: Ctrl + Shift + Delete.
- Now, the advanced history settings page is open. Check the box for both Cookies and other site data and Cached images and files. Then, click on Delete data.
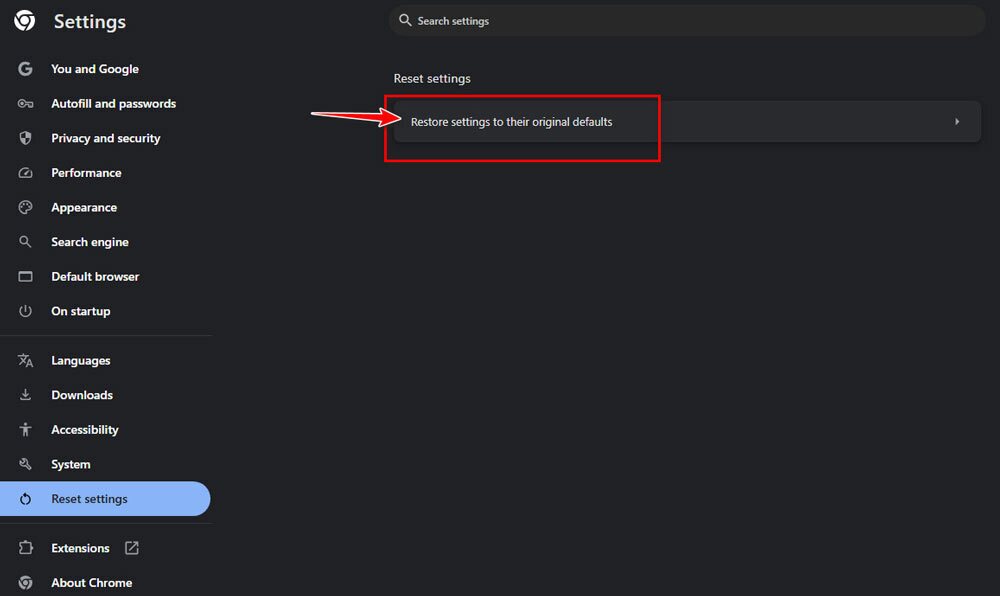
4. Reset Chrome Settings to Default
Another easy fix for this issue can be resetting your Chrome settings. This doesn’t require reinstallation of the browser. To reset it, follow these short steps:
- Open the browser, and click on the three dots icon in the top right corner. Then select Settings.
- Now select Reset Settings from the left menu.
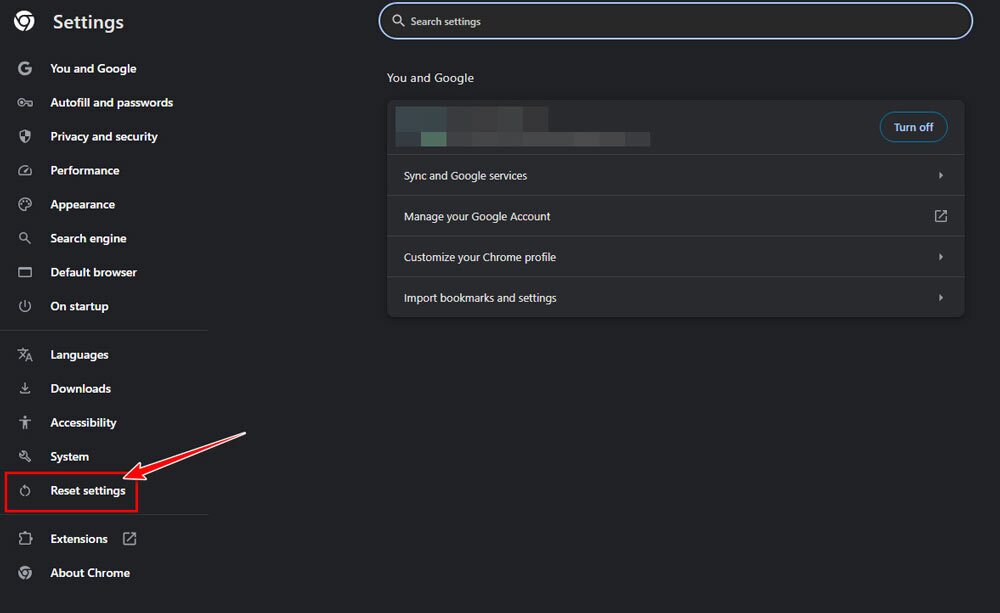
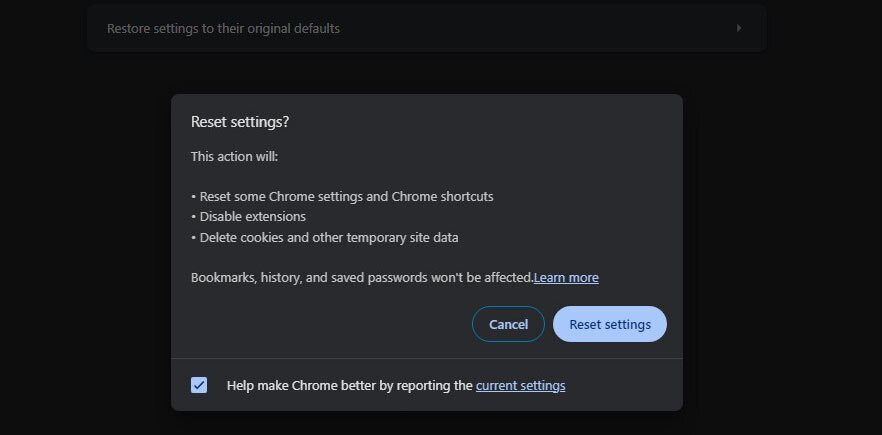
- Simply click on Restore Settings to their original defaults.
- Now confirm the action by selecting Reset settings.
5. Change the DNS Server
The role of the Domain Name System (DNS) is to translate domain names to IP addresses readable by computers. If the default DNS experiences slowdowns or other issues, this can make the error message appear. Therefore, changing the DNS server can fix the issue.
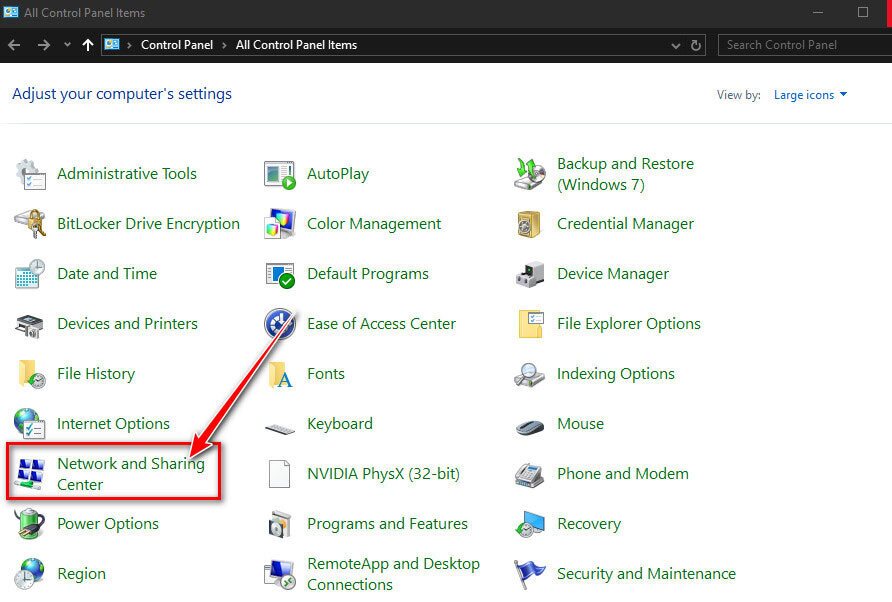
Follow these steps if you are a Windows user:
- Open the Control Panel and select Network and Sharing Center.
- Now, click on your current connection.
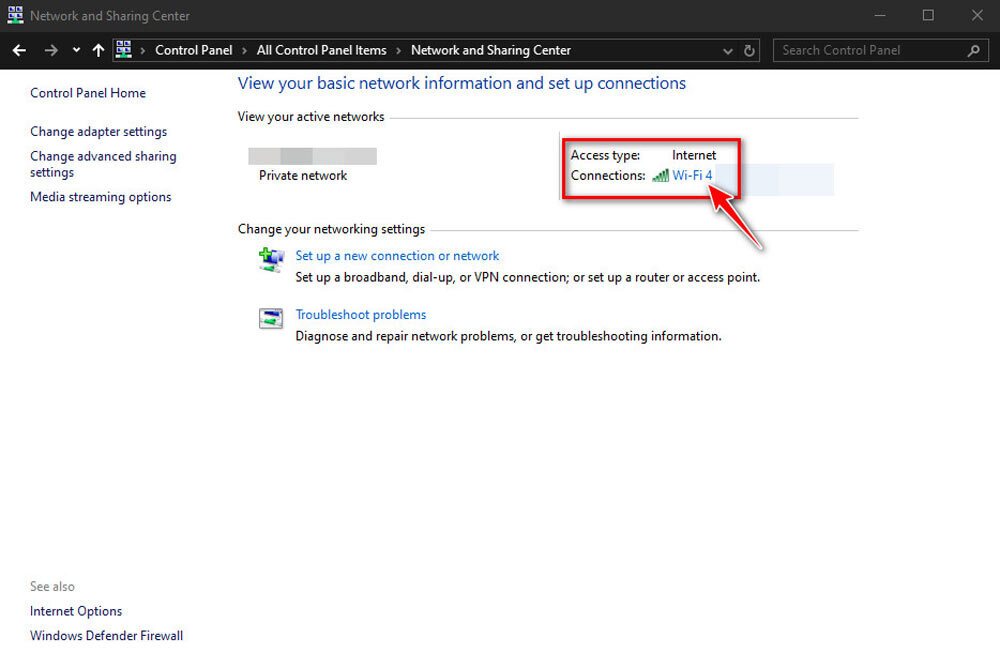
- On the opened page, click on Properties.
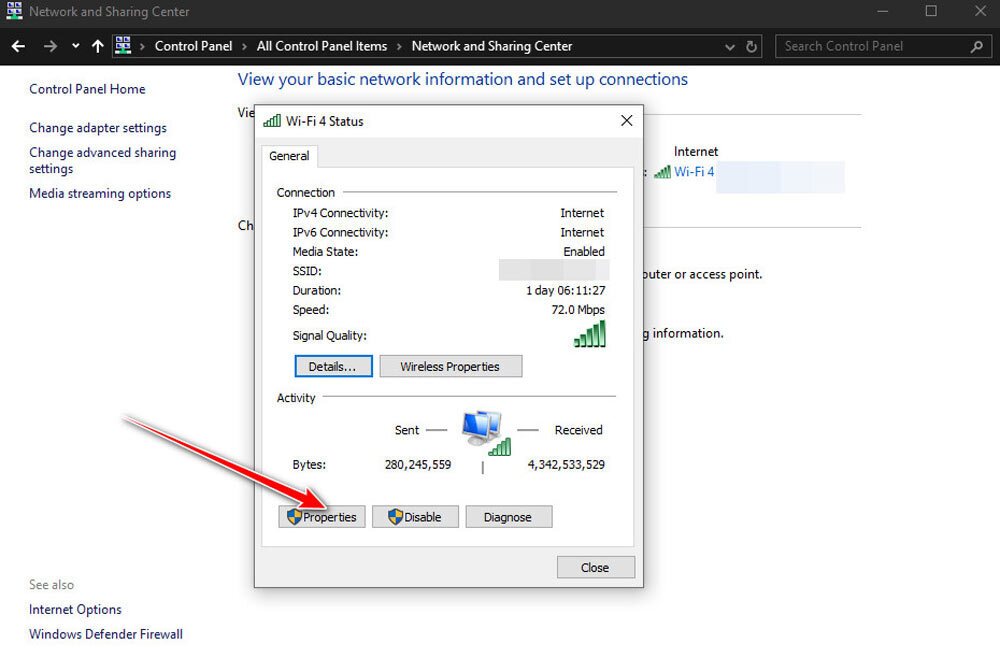
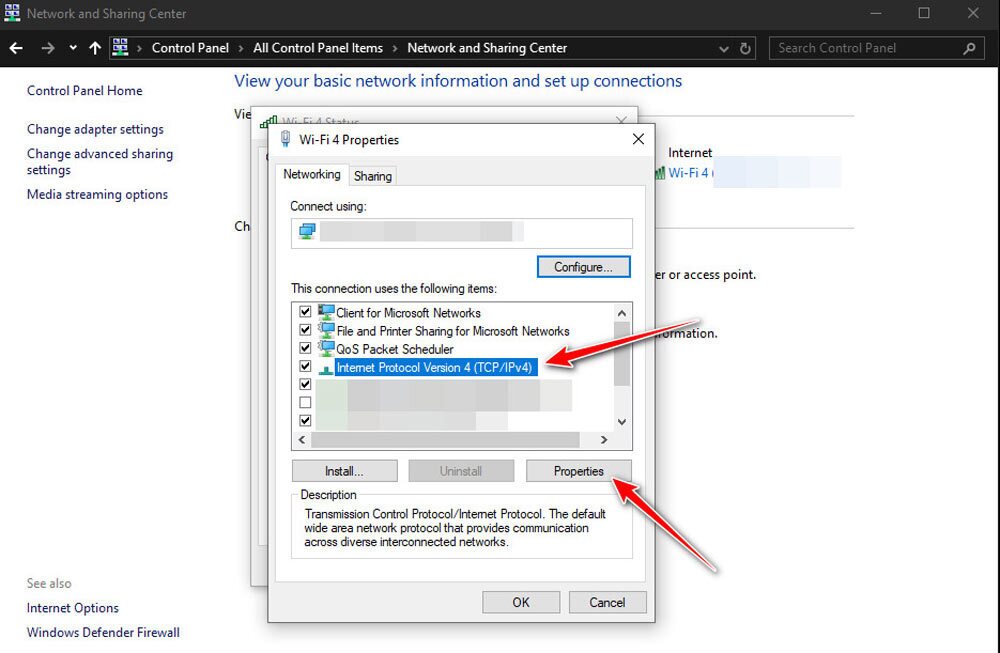
- Now, select Internet Protocol Version 4 (TCP/IPv4) and then click on Properties.
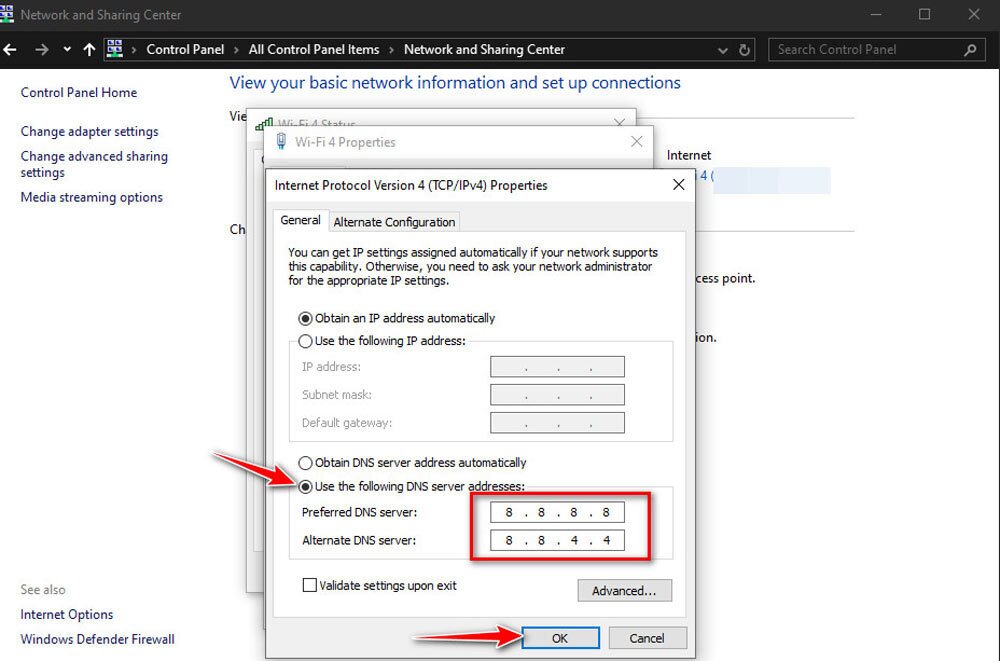
- On the new page, toggle on Use the following DNS server addresses and enter the preferred DNS server and alternate DNS server. A couple of the best free DNS servers include:
- Google Public DNS – Primary: 8.8.8.8 – Secondary: 8.8.4.4
- Cloudflare DNS – Primary: 1.1.1.1 – Secondary: 1.0.0.1
After entering the addresses, click on OK and see if the issue is fixed.
If you are a Mac user, follow these steps:
- Open System Settings, and select Network.
- Select your current network connection and click on Advanced.
- Go to the DNS tab and click on the + button to add a new DNS server.
- Enter your preferred DNS server address.
- Select OK, and then Apply to confirm the changes.
6. Flushing the DNS Cache and Renewing the IP
Misconfigured network settings on your system can be the source of err_tunnel_connection_failed error. To fix this, you should reset the network setting which involves renewing your IP address and flushing the DNS cache. Thankfully, there is a simple way to do this:
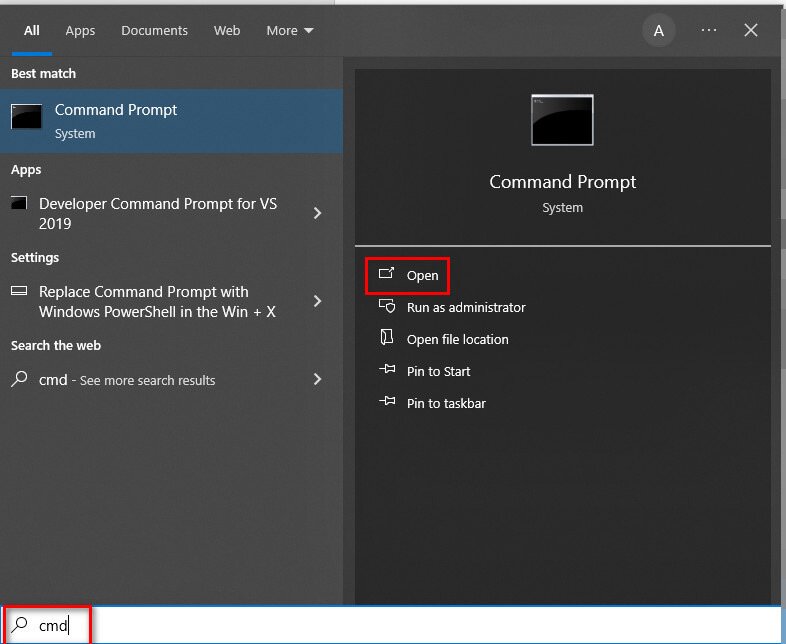
- Press the Windows button on your keyboard and type CMD. Then, click on Open.
- Now, type the following 3 lines of command one by one, pressing Enter on your keyboard after each one:
- ipconfig /flushdns
- ipconfig /release
- ipconfig /renew
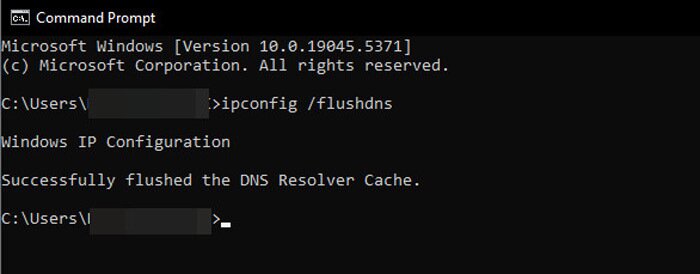
- Restart your system and see if you can now access the target website with the browser.
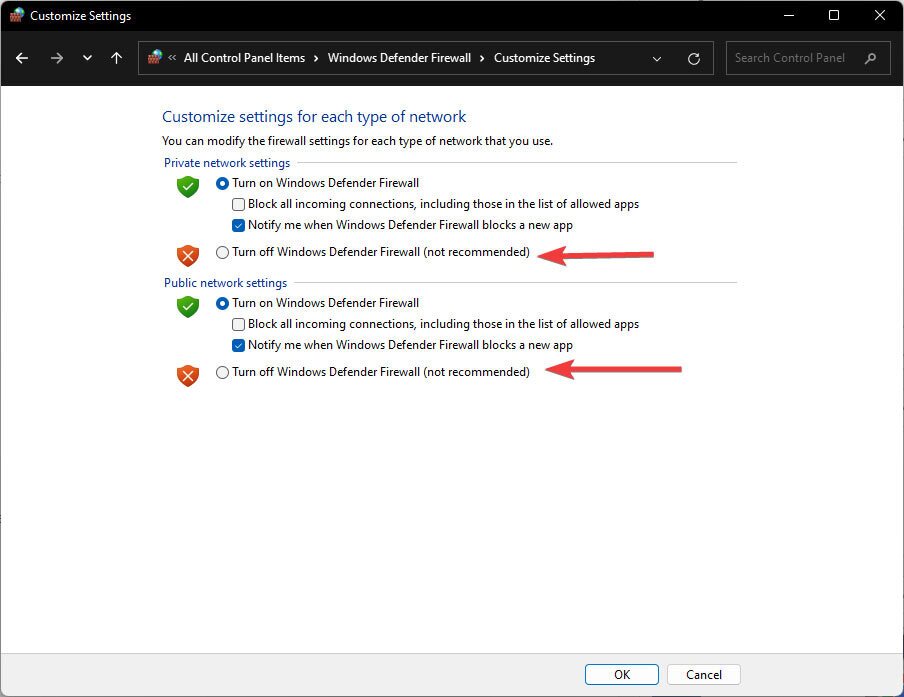
7. Check Your Firewall or Antivirus
If other solutions don’t work, it’s time to check your system’s firewall or antivirus. Sometimes, security software can be overly protective and cause problems for networks, VPNs, and proxies. Try to disable them temporarily to see if it is actually the cause of the issue. To do this:
- Go to Control Panel.
- Then, open Windows Defender Firewall.
- From the left menu, click on Turn Windows Defender Firewall on or off.
- Now, select both Turn off Windows Defender Firewall options.
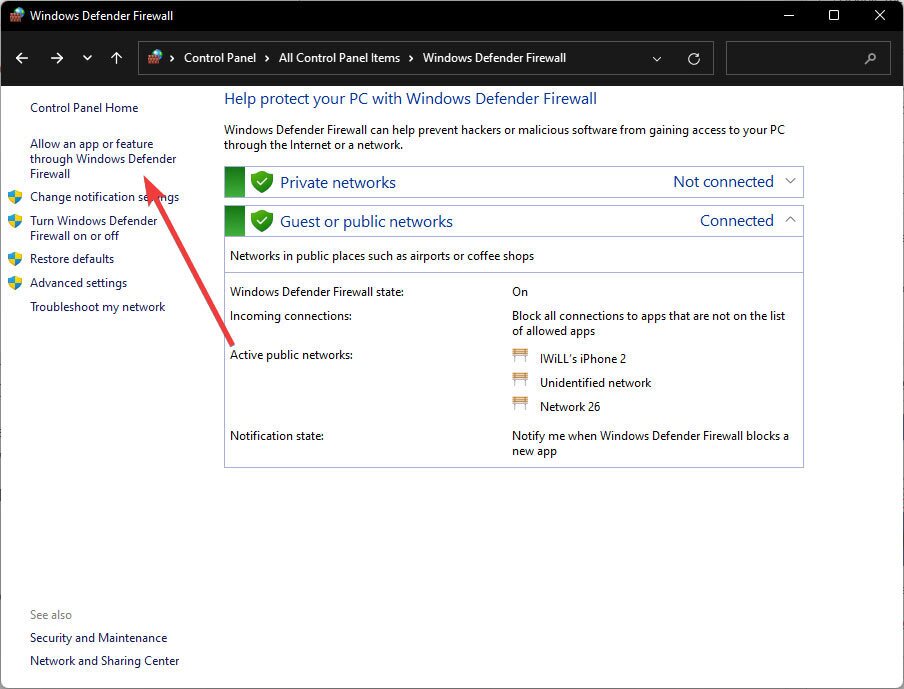
If this solves the issue, see if there is an update for the firewall or antivirus. Having the latest security settings and getting rid of outdated security measures can fix the issue for good. If your software is updated and it still blocks your access, add Chrome to your firewall or antivirus exception list by going to Allow an app or feature through Windows Defender Firewall in the Windows Defender Firewall window.
Note: Only try this fix if you’re sure the target websites and proxies or the VPN are reliable.
Equivalent Errors in Other Browsers
If your main browser is something other than Chrome, you can get a different error message for the err_tunnel_connection_failed issue. However, most Chromium-based browsers such as Opera display the same error message. Here are equivalent error messages on other popular browsers:
- Mozilla Firefox: The proxy server is refusing connections.
- Microsoft Edge: Can’t connect to the proxy server.
- Safari: Safari can’t connect to the server.
So if you encounter these error messages, you can try out the same solutions explained in this article to fix it.
Say Goodbye to ERR_TUNNEL_CONNECTION_FAILED
Frequently Asked Questions
Can VPNs cause this error?
Yes, some VPN connections interfere with tunnel connections. So, switching to other VPN servers or protocols can resolve the issue.
Does this error only appear in Chrome?
The specific ERR_TUNNEL_CONNECTION_FAILED error only appears in Chrome and some other Chromium-based browsers. However, most browsers have equivalent error messages related to the same issue.
Why does the ERR_TUNNEL_CONNECTION_FAILED error occur on my work network?
Corporate networks usually use proxies and have specific settings that can lead to misconfigurations. This increases the chance of encountering the error.
How can I prevent this error from appearing in the future?
Using proper DNS settings, keeping your system updated, and avoiding unnecessary proxy configurations can keep your browser away from this error.