Gmail Keyboard Shortcuts to Master – The Ultimate Guide You Need
If you’ve ever used the Internet and all that it has to offer, you’ve probably heard about Gmail. Not only that, but you probably also have a Gmail account that you use for professional purposes such as job interviews, official virtual meetings, and business-related contact information. We’ve all had that one embarrassing email address and some of us were unfortunate enough to include it in our CVs, but Gmail brought a totally different vibe to the email game.
So it’s not exactly difficult to see why people rallied around Gmail, embraced it warts and all, been through the emotional rollercoaster that was the release of Inbox, only to see it put down a while after, and stuck with this service. It’s simple, incredibly fast, and it provides all of us with a lot of features that can greatly simplify our work.

Gmail smart management features
For instance, you can label your emails and thus create your own customized way to organize messages in Gmail. Furthermore, you can configure and use automated filtering, such as sending certain emails to spam based on their content or the contact that tries to contact you, as well as auto-labeling emails, and even replying to messages automatically.
However, one specific Gmail feature seems to take the cake in all regards: shortcuts. When you started using your PC for the very first time, you probably struggled to find each key on your keyboard, but by now you’re probably a wizard and know how to select the entirety of a document, copy it, paste it in a new file, save it and close the editor in a matter of seconds.
The same goes with Gmail; in the beginning, you were probably prodding around trying to find its weak and sweet spots, but now you should already know how to use keyboard shortcuts to manage and sort your email messages in one swift motion. The fact that you can translate those shortcuts within a browser (which we all know comes with its own set of shortcuts) is nothing short of amazing, and that’s precisely what we’re gonna focus on today.
Unfortunately, not everybody knows about Gmail’s ability to save you a lot of time by using keyboard shortcuts directly in your browser. And for good reason, too, seeing as Gmail’s keyboard shortcuts aren’t enabled by default, making it necessary for you to activate them in order to start using them. Furthermore, it’s not exactly a walk in the park to find and enable them, since Google hid them well between two layers of settings.
Don’t worry, though, as we’ll gladly walk you through the process of enabling your Gmail shortcuts and offer you some tips on using them as efficiently as possible so that you can boost your Gmail organization skills in no time. It goes without saying that in order to start, you’ll need a working Internet connection, a web browser, and a Gmail account. If everything is in order, let’s begin.
How to enable Gmail shortcuts?
- Launch your favorite web browser
- Go to your Gmail inbox
- Click the gear-shaped button in the top-right corner of the screen
- Click the See all settings button to go to the full configuration screen

- In the configuration screen, remain in the General tab
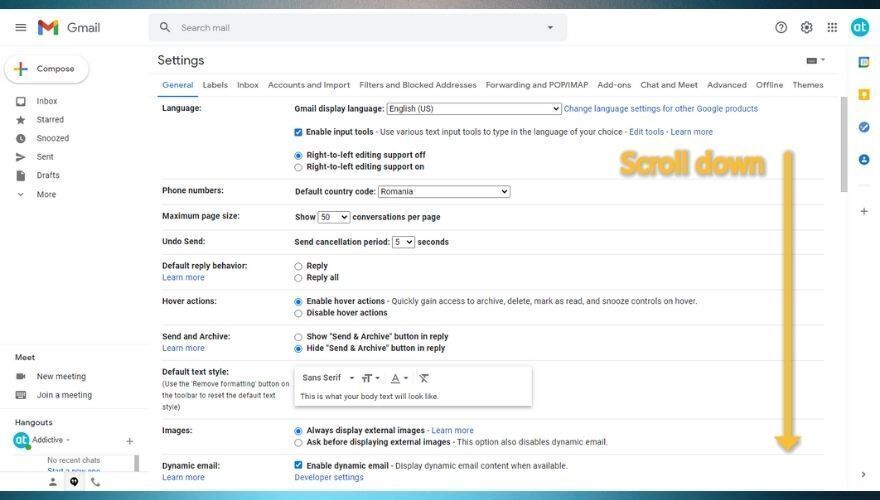
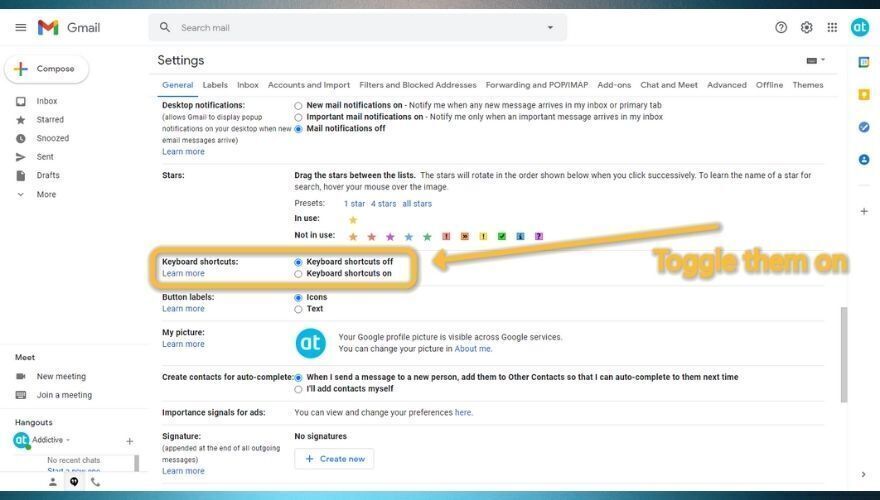
- Scroll down until you see the Keyboard shortcuts option (easy to miss)

- Click the Keyboard shortcuts on radio button

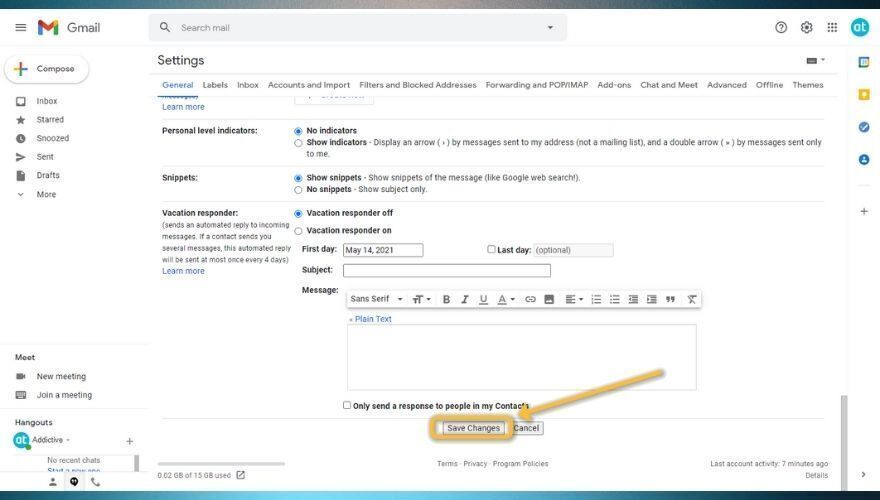
- Scroll down to the bottom of the page
- Click the Save Changes button

- Go back to your Gmail inbox

That’s all it takes to enable Gmail’s keyboard shortcuts on your system. Just like we’ve said earlier, it’s a bit difficult to find the option, let alone knowing it exists, especially if you have no prior experience with this email client. However, if you follow our instructions you should be able to toggle them on your Gmail client without a hiccup.
The reason why we keep saying they’re difficult to enable (obviously, experienced users should have absolutely no trouble identifying and enabling keyboard shortcuts) is the fact that you have to go past two layers of settings (quick settings and the main configuration screen), and even after doing that, the option is so tiny and in a section that’s overcrowded with other settings, that it’s really easy to miss.
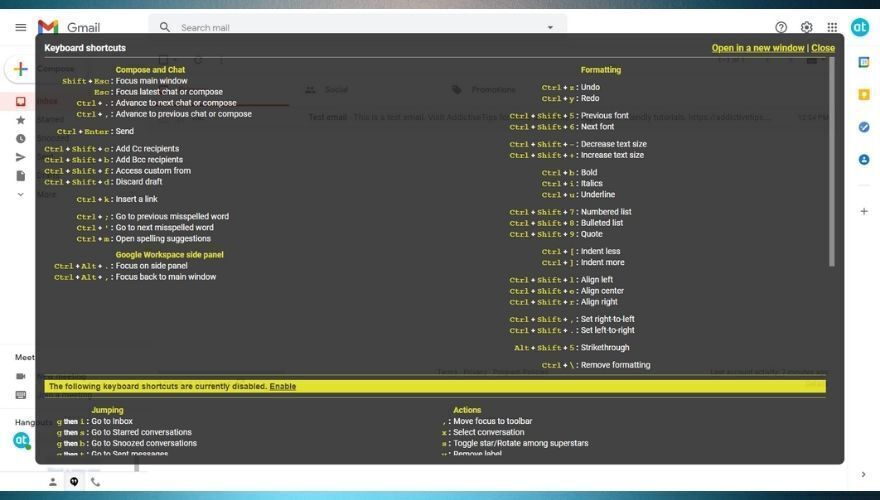
Once you’ve enabled the keyboard shortcuts successfully, you should head back to your Gmail inbox and test their functionality by pressing the Shift + / (?) key combination on your keyboard. If you’ve done everything right, you should now see an overlay of all the Gmail keyboard shortcuts you’re able to use within your client. Notice that some of them are not available, but you can quickly toggle them on by clicking the Enable button. But before you do that, let us focus on the most important shortcuts you can use for the moment.
Gmail keyboard shortcuts cheat sheet
In this section, we’ll try to include some of the most important shortcuts you could find in Gmail so you don’t have to spend time looking around for them or familiarizing yourself with them.
- Shift + ? – Help
- Shift + Esc – Main window focus
- Esc – Focus on latest compose or chat
- Ctrl + . – Go to next chat or compose
- Ctrl + , – Go to previous chat or compose
- Ctrl + Enter – send message/email
- Ctrl + k – Insert URL
- Ctrl + Shift + b – Add BCC recipients
- Ctrl + Shift + c – Add CC recipients
- Ctrl + Shift + d – Draft discard
- Ctrl + Shift + f – Access custom From
- Ctrl + Alt + . – Side panel focus
- Ctrl + Alt + , – Main window focus
- Ctrl + ‘ – Go to next misspelled word
- Ctrl + ; – Go to previous misspelled word
- Ctrl + m – Display spelling suggestions
- Ctrl + z – Undo
- Ctrl + y – Redo
- Ctrl + Shift + 6 – Next font
- Ctrl + Shift + 5 – Previous font
- Ctrl + b – Bold
- Ctrl + i – Italic
- Ctrl + u – Underline
- Alt + Shift + 5 – Strikethrough
- Ctrl + Shift + + – Increase font size
- Ctrl + Shift + – – Decrease font size
- Ctrl + Shift + 7 – Create a numbered list
- Ctrl + Shift + 8 – Create a bulleted list
- Ctrl + Shift + 9 – Insert a quote
- Ctrl + Shift + l – Align the text to the left
- Ctrl + Shift + r – Align the text to the right
- Ctrl + Shift + e – Align the text to the center
- Ctrl + [ – Decrease indentation
- Ctrl + ] – Increase indentation
- Ctrl + Shift + . – Set left-to-right
- Ctrl + Shift + , – Set right-to-left
- Ctrl + \ – Clear formatting
You can use the list above as a starting point or a reference sheet, but if you want to learn more about Gmail shortcuts, feel free to scroll down. We’ll tell you more about the shortcuts above, provide you with examples of where it’s best to use them, and even give you troubleshooting tips for some of the most stubborn of them. For your convenience, we’ll organize the shortcuts in relevant categories, so that you can find them easier and in a timely fashion.
Before we start, we must make a special shortcut mention that doesn’t fit in any other category: the Shift + / or ? shortcut. This is one of the most useful ones, as it can pull you out of several sticky situations. Whenever you find yourself unable to remember a shortcut, you can either come to this article if you need more clarification or for a quick reminder you can use Shift + / or ? while you’re in your Gmail client.
Doing so will display an overlay consisting of numerous shortcuts you can find and use in Gmail, provided that you already activated keyboard shortcuts as we’ve instructed you before. This overlay is split into two main sections. The two sections are currently nameless, but judging by the fact that the first section consists of shortcuts that are enabled by default, and the second has only disabled shortcuts that are bundled together, we’re gonna go ahead and say that the lower part of the overlay consists of more advanced shortcuts that are reserved for Gmail power users.
The interesting thing about this overlay is that you can use it to reach an official Google support article that comprises more useful information about these shortcuts, along with tips and tricks, recommendations, and a bunch of extra details. Using the Shift + / key combination is also a quick way to determine if you’ve already activated keyboard shortcuts for your Gmail client or not.
Shortcuts for composing email and chatting
1. Shift + Esc
This shortcut will help you focus on your main window instead of the message you’re composing. It can come in handy especially if you’re receiving a lot of email messages and you have to switch back and forth between composing a message and your inbox in order to sort your messages properly.
Note that it also works if you’re in a chat screen and need to shift the focus momentarily on the main screen and perform some email management tasks there (for instance, labeling newly-arrived emails or sending them to a certain folder before resuming your chat).
2. Esc
Pressing the Esc button on your keyboard while you’re composing a message or engaged in a chat with someone should let you cycle between the main window and the message you’re composing or the active chat window. However, if you’re already on the chat screen or composing an email and you press this button, you’ll notice that this actually closes the active window.
For that reason, you should only use the Esc button if your focus is on the main window. For obvious reasons, you should pair this shortcut with the Shift + Esc one we’ve mentioned above. If you want to switch quickly between Gmail’s main screen and composing an email or chatting with your buddies without closing the chat or sending your email to the draft, Shift + Esc and Esc are your safest bet.
3. Ctrl + , and Ctrl + .
If you’re multi-tasking in Gmail and composing several email messages at once or composing an email and chatting with someone, these two shortcuts will help you cycle through the email composing and chat screens without reaching for your mouse.
The Ctrl + . will shift your focus to the next email composition screen or chat, while the Ctrl + , keyboard shortcut will let you access the previous ones in the blink of an eye. For this to work, make sure that your focus is on at least one of the active elements you’re trying to switch between. Using the Esc shortcut can help you bring them in focus, as we’ve explained above.
4. Ctrl + Enter
This shortcut enables you to send an email message without moving your mouse cursor over the Send button and clicking it. As we’re sure you probably know already, sending an email is different than sending an instant message, seeing as with IM using the Enter key on your keyboard usually sends the message, whereas using the Enter key while composing an email just adds a new line.
If you’re not exactly a big fan of the mouse and love keeping both of your hands on the keyboard for as long as possible, we wholeheartedly suggest you learn the Ctrl + Enter shortcut as it can help you send an email in a matter of seconds. Just make sure you’ve proofread everything and that you didn’t forget to add any attachments.
5. Ctrl + Shift + c or b
If you’re working in a corporate environment, you probably encountered at least a few times before CCs and BCCs within your emails, and maybe you even got instructed on how to use these two fields and who to include in them on various occasions. In this case, the Ctrl + Shift + c and Ctrl + Shift + b keyboard shortcuts are your friends.
Using Ctrl + Shift + c will add a new CC recipient to your email while using the Ctrl + Shift + b shortcut will add a new BCC recipient. It’s quite easy to remember, considering that the shortcut triggering keys (b and c) give away the type of recipient that will be added (i.e. b for BCC, c for CC).
6. Ctrl + Shift + f
This shortcut is actually a bit confusing, as it seems to do nothing on its own, and you’d be somewhat right to think that. If you bring the help overlay into view, you’ll see that Ctrl + Shift + f‘s description is ‘Access custom from’, which may be looking like a typo, but it’s not.
You see, one of Gmail’s awesome features is that it allows you to use its email services with your custom domain for free. However, in order to use it like that, you must buy a domain name, set up a custom email address, and configure Gmail to work with that custom domain.
After doing so, you should able to switch between your Gmail address and your custom email address by simply using the Ctrl + Shift + f keyboard shortcut.
7. Ctrl + Shift + d
By default, Gmail will save emails that you write but never get the chance to finish. For instance, if you’re composing an email and hit the Esc key by accident, Gmail will be a sport about it and send it in to a special folder called drafts, thus giving you the chance to revise your message, add to or subtract from it, and send it later, if you need to.
However, sometimes you may not want your email to be saved as a draft for various reasons. For instance, you may be formulating an angry follow-up email to one of your contacts who didn’t respond to your last few emails, and just as you’re about to finish up, you receive the much-awaited reply. Naturally, you don’t want to send the follow-up anymore, nor do you want to save it to your drafts.
In this case, pressing Ctrl + Shift + d on your keyboard will close your email composition screen and discard the draft, so you don’t have to worry about it going anywhere else.
8. Ctrl + k
If you need to insert a link into your email and customize various aspects of it, you should use the Ctrl + k keyboard shortcut without any hesitation. If you’ve ever used a word processor, you should probably know that Ctrl + k is the standard shortcut you can use to insert a link into a fragment of text.
You can go two ways about this: either you use the shortcut on an empty part of your email, or select a fragment of text that you want to turn into a hyperlink and use the shortcut after performing the selection. You’ll notice that for the latter, the ‘Text to display’ field will be already filled in and all you’ll have to do will be to add the actual link or email address.
You can also click the ‘Test this link’ button after inputting the URL in the designated box to check if your link is actually working as it should.
9. Ctrl + ; and Ctrl + ‘
If you use spelling suggestions (yes, Gmail also has this feature), you should really learn about these two keyboard shortcuts. We understand that most of the time proofreading can be a pain, seeing as you always seem to spot misspelled words and various other mistakes moments after you already sent the email, so turning a spell-checker on could actually be a great thing.
With the spell checker turned on, using Ctrl + ; will move your cursor to the previous misspelled word in your phrase, while using the Ctrl + ‘ key combination on your keyboard will show you the next misspelled word in the queue. It’s a quick, hassle-free way to perform a quick scan of your text before you press the Send button (or use the Ctrl + Enter keyboard shortcut, for that matter).
10. Ctrl + m
Misspelling a word is something that we all did at least a few times before, so using a spell-checker to prevent this kind of easily avoidable mistake is not exactly rocket science. As we’ve explained before, you can use keyboard shortcuts to quickly jump between misspelled words like a pro.
However, when it comes to actually performing a correction on the words, you may want to use some spell suggestions in case you’re not feeling like correcting the misspelled words all by yourself, manually. You can hover your mouse cursor over the word you want, and see some potential spelling suggestions for the word you’re trying to type into your email, but you want to be slicker and faster, you can also use the Ctrl + m keyboard shortcut for the same result.
11. Ctrl + Alt + . and Ctrl + Alt + ,
If you’re already some sort of wizard as far as Google products go, you probably already work with multiple products at the same time. If you have no idea what that means, notice that at the bottom-right corner of your Gmail client lies a small arrow that you can click on. Doing so will open a side menu with additional Google products.
By default, this section includes Google Calendar, Keep Notes, Tasks, and Contacts. However, you can add more by clicking the + button and browsing the Google Workspace Marketplace.
Either way, you can launch either one of these products in the side panel and use them in conjunction with Gmail, at the same time and in the same window. If you want to switch from and to the side panel, you can either use your mouse cursor, or you can use keyboard shortcuts.
Pressing the Ctrl + Alt + . key combination on your keyboard will shift the focus on your side panel (and consequently the app you’re using in your side panel) while using the Ctrl + Alt + , keyboard shortcut will change the focus back on your main window.
Shortcuts for formatting your text
1. Ctrl + z and Ctrl + y
These two keyboard shortcuts are almost universal and if you have any previous experience with operating a computer or working with programs such as graphic editors, word processors, or text editors, you probably know how to undo your actions without using your mouse or deleting the content you generated.
To be more specific, you can use the Ctrl + z and Ctrl + y keyboard shortcuts if you want to undo or redo any actions within Gmail. That includes adding and removing recipients from your messages, inserting or removing attachments, and even typing words or entire phrases in your messages.
Ctrl + z will take you back one step, but you’ll have to experiment with this keyboard shortcut if you want to discover its efficacy, especially when typing text into your email messages. You can notice that sometimes using Ctrl + z deletes only a bunch of letters from your word, while other times it can remove entire words or fragments of your phrase.
Using the Ctrl + y keyboard shortcut should redo your actions, as in canceling the effects of the Ctrl + z key combination you may have applied earlier. For instance, if Ctrl + z doesn’t work as it should, or it removes too much content from your message, you can safely use Ctrl + y to undo the effects of the Undo keyboard shortcut.
2. Ctrl + Shift + 5 or 6
Sick and tired of the vanilla Gmail experience and the default font? You probably already know that Gmail is awesome enough to let you customize the way you send your emails (and obviously the way your recipients receive and view them) by changing the default font. Granted, the selection of fonts it has to offer at the time being isn’t exactly impressive, but it’s definitely a feature worth having and checking out.
Although you can easily change fonts by accessing the font dropdown menu whenever you’re composing an email, you can also use keyboard shortcuts to cycle through available fonts without removing your hands from your keyboard (you know, so you can keep the flow while typing).
Thus, it’s worth noting that using the Ctrl + Shift + 5 shortcut while you’re composing an email will jump to the previous font available in the combo menu while using the Ctrl + Shift + 6 key combination on your keyboard will jump to the next available font.
3. Ctrl + Shift + – or +
If changing fonts isn’t exactly your thing, but you’re still looking for various ways to customize the aspect of your email, you’ll be glad to learn that Gmail also enables you to change the size of your text. As with fonts, you can use your mouse and change the default font size by choosing your favorite option from the Size menu.
Alternatively, if you’d prefer a quicker approach that would enable you to keep a steady flow while typing and not use the mouse, you can use the Ctrl + Shift + – key combination on your keyboard to decrease the font size or Ctrl + Shift + + to increase it. Note that unlike text processors or other programs where you can customize font size by typing a number, Gmail only supports descriptive sizes.
As a result, you’ll only be able to switch through 4 predefined sizes: small, normal, large, and huge.
4. Ctrl + b
One of the most commonly-used keyboard shortcuts in various text processors is Ctrl + b. If you have any previous experience with such software solutions, you probably already know the functionality of this keyboard shortcut, which is to change the text type to bold. If you have no idea what we’re talking about, using Ctrl + b in Gmail will make the text you select thicker.
You can use Ctrl + b as a toggle or as a one-time modification, as follows: if you use it without selecting any text, anything you type after activating the shortcut will be bold until you toggle it off. However, if you first select a portion of your text and hit the Ctrl + b key combination on your keyboard, you will only make the selected text bold.
5. Ctrl + i
Just like Ctrl + b, the Ctrl + i keyboard shortcut is quite popular, given that a whole lot of programs let you use it to convert text from regular to italic without having to click the ‘I’ button in the text customization toolbar. If you never worked with a text editor or word processor before, know that Ctrl + i makes the text slope in order to emphasize a certain fragment of the text.
It’s worth mentioning that you can combine multiple text types by applying these styles one on top of the other. For instance, you can bold the text by using Ctrl + b, and then use Ctrl + i to italicize the already bolded text. Ctrl + i works the same as Ctrl + b: you can use it without selecting text to toggle it or apply it to selected text in order to italicize only the fragment you’ve highlighted.
6. Ctrl + u
Ctrl + u is yet another keyboard shortcut that lets you modify the text by using a special version of the font you’re currently using by drawing a line under the words you’ve selected. Much like Ctrl + b and Ctrl + i, you can use Ctrl + u to emphasize specific parts of your text and make it more visible to your recipient.
Furthermore, you can also use the Ctrl + u Gmail keyboard shortcut without selecting any text fragment, which will toggle the underline feature on and will automatically apply the style to everything you write or paste until you toggle it off. If you only want to apply it to a specific part of your text (that you already wrote), just select that text fragment and press the Ctrl + u key combination on your keyboard.
7. Alt + Shift + 5
The last keyboard shortcut on our list that lets you use a special version of your current font is Alt + Shift + 5. Although rarely used in formal environments, this key combination on your keyboard still has a lot of purposes, as it allows you to run a straight line through text, striking it right through the middle.
Using Alt + Shift + 5 to cross out certain parts of your message body can come in handy if you’re trying to correct a bunch of details without removing the context altogether. This is mainly used to signal a change in the original document, while also allowing the reader to view the original information that is no longer valid.
As with the shortcuts we’ve explained above (bold, italic, underline), you can use Alt + Shift + 5 (strikethrough) either on an empty canvas, which will turn any word you type or paste from that moment onward into a strikethrough version of itself, or you can highlight a part of your text and summon the strikethrough feature through the shortcut, which will only affect the selected text.
8. Ctrl + Shift + 7
This one may feel a bit more difficult than the other keyboard shortcuts we’ve presented in our guide above, and it’s also a bit less intuitive. Let’s face it, it’s easy to remember that Ctrl + b makes your text bold and that using Ctrl + c will copy the content of your Gmail messages, but Ctrl + Shift + 7 says nothing to us in this regard.
However, it does let you perform a useful operation: you can use it to create numbered lists directly in the body of your email message. You can either create a list from scratch or highlight a fragment of your text and use this keyboard shortcut on your selection to turn it into a list consisting of numbered items.
9. Ctrl + Shift + 8
Yet another half-confusing keyboard shortcut that doesn’t speak volumes on its own is Ctrl + Shift + 8. If you already know the fact that you can use Ctrl + Shift + 7 to create numbered lists, it should come as no surprise to you when you find out that Ctrl + Shift + 8 can help you generate bulleted lists directly on your text, without having to lift your hands from the keyboard.
As before, you can either use the Ctrl + Shift + 8 key combination at the beginning of the list and build it as you go, or you can turn a fragment of your text into a bulleted list by simply highlighting it and using this keyboard shortcut.
10. Ctrl + Shift + 9
Unlike the previous two keyboard shortcuts we’ve presented above, Ctrl + Shift + 9 doesn’t help you to create a list in your text or turn a fragment of your Gmail message into a list of some sort. What you can achieve using Ctrl + Shift + 9 anywhere in the body of your message is inserting a quote or transforming a fragment of your message into a quote.
However, one thing it does share with the keyboard shortcuts above is its dual operation mode. You can either press Ctrl + Shift + 9, type your quote, and hit the Enter button once you’re done, or you can highlight a portion of your text after you finish typing it and transform it into a quote on the spot. There’s no need to close the quote block by using the keyboard shortcut again, as simply hitting the Enter button enables you to close the quote block.
11. Ctrl + [ and Ctrl + ]
As we’re sure you’re already aware of, a well-formatted email message can go a very long way, so it makes sense to use everything in your toolbelt to make sure that your Gmail message looks sharp before you send it to your recipients. Although you can mess around with font and size settings, as we’ve explained above, there is also another way you can achieve great results in this regard: changing indentation.
By default, Gmail will start email messages from the leftmost part of the page and will continue going on until the very end of the page, or until you hit that Enter button on your keyboard. However, if you know a thing or two about indentation and have a knack for designing a perfectly proportioned message, you can toy with Gmail’s indentation settings.
Although you can do that by using your mouse and clicking the appropriate buttons in the text toolbar, you can also make use of Gmail’s keyboard shortcuts to achieve the same results without having to move your hands away from the keyboard even for a second. You can use the Ctrl + ] key combination on your keyboard to increase indentation and the Ctrl + [ one to decrease it.
12. Ctrl + Shift + l, or e, or r
You probably understand why properly adjusting a text in your email message can make it not only more attractive at first sight, but also easier to read, and an email that can be read easily is more likely to help you convey your message entirely, without your recipient skipping over essential parts of your message.
Hopefully, you’ve already read about how changing indentation can help you turn a dull-looking email message (this especially goes for lengthy ones) into a version of itself that has a more pleasant look and therefore can be read more easily. The same principle applies to text alignment, and luckily for you, Gmail provides you with support for this feature.
If you want to change the default alignment of the text, all you have to do is use Ctrl + Shift + l to align it to the left, Ctrl + Shift + e to align it at the center of the page, and Ctrl + Shift + r to change the alignment to the right. It’s entirely possible to do that using your mouse and clicking the appropriate button in the text toolbar, but using keyboard shortcuts is simply faster.
13. Ctrl + Shift + . and Ctrl + Shift + ,
You probably know already that while most languages are written from the left to the right, there are some languages that are written from the right to the left. If you need to write an email message that uses the right-to-left text orientation, you can easily do so in Gmail, as it provides you with native support for this.
Although you can simply use the alignment shortcuts we’ve described just above, you may find it easier to type a message directly by using the right-to-left text orientation tool, especially if your native language uses this writing mode.
Unlike some other features on our list that can be simply summoned by typing the keyboard shortcuts straight into the body of the email message, changing from left to right and vice-versa requires you to activate the feature beforehand. Fortunately, doing so can be accomplished fairly easily. All you have to do is click the gear-shaped button, select the See all settings option, click the ‘Right-to-left editing support on’ radio button, then scroll down and click the Save Changes button.
Once you do so, you can easily change text typing orientation by using Ctrl + Shift + . for left-to-right and Ctrl + Shift + , for right-to-left.
14. Ctrl + \
When it comes to formatting an email message in Gmail, it’s very easy to overdo it, which can be way worse than not touching formatting features at all. Although you can trace your steps back and remove formatting options one by one, such as un-bolding text, de-italicizing fragments, removing strikethroughs, and setting indentation back to zero, there’s a faster way to revert your document to its original state by using a keyboard shortcut.
Pressing the Ctrl + \ key combination on your keyboard will remove all formatting options you’ve applied to your text at once, so you don’t have to undo formatting until you reach the look you prefer. This shortcut can come in handy especially if you went overboard and applied all sorts of formatting options to your text, making it virtually unreadable for your recipients.
Gmail power user shortcuts
If you’re already familiar with the shortcuts we’ve mentioned and described above, you should take the leap and consider enabling the advanced shortcuts, as well. Although you won’t likely use all of them, given that there are simply too many to remember, there are some that might significantly increase the speed at which you operate Gmail.
Note that simply enabling keyboard shortcut support in Gmail is not enough in order to activate the advanced shortcuts, and you’ll have to perform an additional couple of steps. With the keyboard shortcuts enabled from the comprehensive settings menu, go to the main screen of your Gmail client, and press the Shift + / key combination (the ? symbol).
Notice that there’s some text that’s placed on a yellow stripe, which informs you that some keyboard shortcuts are disabled by default. Click the Enable button at the end of this piece of informative text to activate disabled shortcuts and scroll down to check them out.
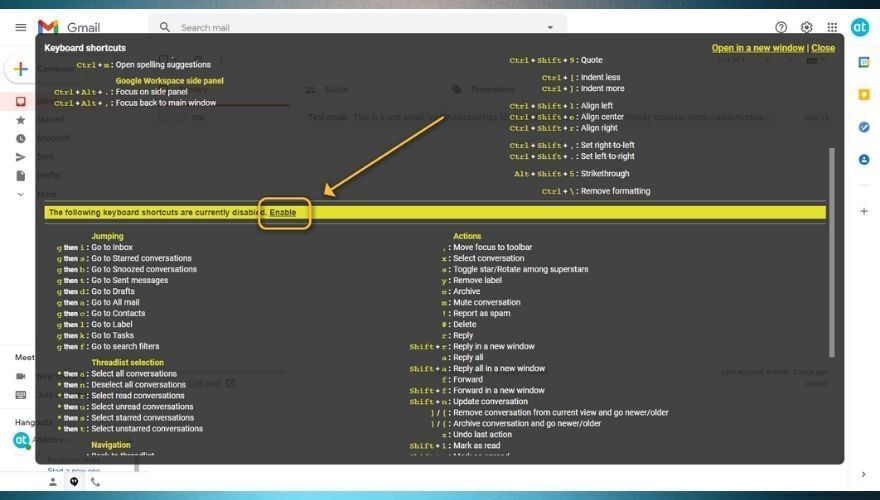
As you can see, there are more than just a few advanced shortcuts you can activate and use to power up your Gmail management skills. For the purpose of being thorough, we’ll give them a quick mention in our guide and organize them by purpose in the following section. Note that some keys are meant to be pressed at the same time, which we signaled with the + symbol. However, some of these shortcuts are meant to be pressed one at a time, which we’ve included with a ‘key a then key b’ notation type.
Jumping
- g then i – Lets you jump quickly to your inbox
- g then s – Navigates to your Starred Conversations folder
- g then b – Heads to your Snoozed Conversations folder
- g then t – Jumps to your Sent messages folder
- g then d – Lets you jump to your Drafts folder
- g then a – Quickly heads to All mail
- g then c – Enables you to navigate quickly to your Contacts
- g then l – Navigates to your Label
- g then k – Opens Tasks
- g then f – Enables you to access search filters quickly
Navigation
- u – Brings you back to the thread list
- k – Goes to a newer conversation
- j – Goes to an older conversation
- o or Enter – Opens a conversation or collapses/expands a highlighted conversation
- p – Lets you read your previous message
- n – Lets you read your next message
- g then n – Lets you navigate to the next page
- g then p – Lets you navigate to the previous page
- ` – Goes to the next section of your inbox
- ~ – Goes to the previous section of your inbox
Thread list selection
- * then a – Selects all the conversations in the thread list
- * then n – Deselects all the conversations in the thread list
- * then r – Selects all the read conversations in the thread list
- * then u – Selects all the unread conversations in the thread list
- * then s – Selects only starred conversations in the thread list
- * then t – Selects only unstarred conversations in the thread list
Application
- / – Performs a search through your mail
- ? – Opens the keyboard shortcut help dialog where you can check out all the shortcuts
- q – Performs a search through your contacts
- c – Opens the Compose screen
- d – Opens the Compose screen in a tab
- . – Opens the ‘More Actions’ menu
- v – Lets you access the ‘Move To’ menu
- l – Lets you access the ‘Label as’ menu
Actions
- , – Shifts the focus to the toolbar
- x – Selects a conversation
- s – Stars a conversation or rotates among superstars
- y – Removes a label from a message
- e – Lets you archive an email quickly
- m – Mutes the highlighted conversation
- ! – Reports the selected message as spam
- # – Deletes contacts or email messages
- r – Lets you reply to the currently selected message
- Shift + r – This lets you reply to the currently selected message in a new window
- a – Lets you reply to all the recipients of an email message
- Shift + a – This lets you reply to all the recipients of an email in a new window
- f – Lets you forward an email message quickly
- Shift + f – This allows you to forward the currently selected email message in a new window
- Shift + n – This lets you update the conversation instantly
- ] – Lets you remove the conversation from its current view and go to a newer one
- [ – Lets you remove the conversation from its current view and go to an older one
- } – Lets you archive the current conversation and go to a newer one
- { – Lets you archive the current conversation and go to an older one
- z – Undoes the latest action you performed
- Shift + i – Marks the currently highlighted email message as read
- Shift + u – Marks the currently highlighted email message as unread
- _ – Marks only a part of the selected message as unread
- + or = – Marks an email message as important
- – – Marks an email message as not important
- ; – Lets you expand the entire conversation
- : – Enables you to collapse the entire conversation
- b – Snoozes an email and reminds you to follow up on the selected message
- Shift + t – Adds the entire conversation to Tasks
Hangouts
- h then m – Display the Hangouts menu
- h then a – Display Hangouts that you have archived
- h then i – Display all Hangout requests
- h then c – Shift the focus on the list of conversations
- h then p – Opens the Phone section of Hangouts
Gmail shortcuts – CONCLUSION
All things considered, if you’re trying your best to master Gmail and all that it has to offer, you probably won’t get too far without enabling and making use of its keyboard shortcuts, as they can greatly simplify the way you interact with this email client and speed up the operations you want to perform.
Note that while some of the most common shortcuts you can use in Gmail are enabled by default once you toggle the ‘Keyboard Shortcuts’ support on, the more advanced ones are still disabled by default and you’ll need to activate them through the keyboard shortcut help dialog, which you can summon by using the Shift + / key combination.

Great article, but how do I disable a shortcut. E.g. shortcut 7 alt+shift+d discards a message. But in Apple Mail, alt+shift+d sends the message..
.d
Great extra tip and thank you for sharing. This is a great post so clear and easy. Need to share this post now.