Access Windows Server with RDP: A Comprehensive Tutorial
To access Windows Server with RDP remotely, enabling Remote Desktop Protocol is a great choice. With RDP, you can connect to your server over LAN and the internet using several methods covered in this guide. Setting up RDP is incredibly useful, especially for those who need to access Windows Server from a remote off-site location. In this guide, we’ll go over how to set up RDP on your Windows Server and how to connect to it remotely.
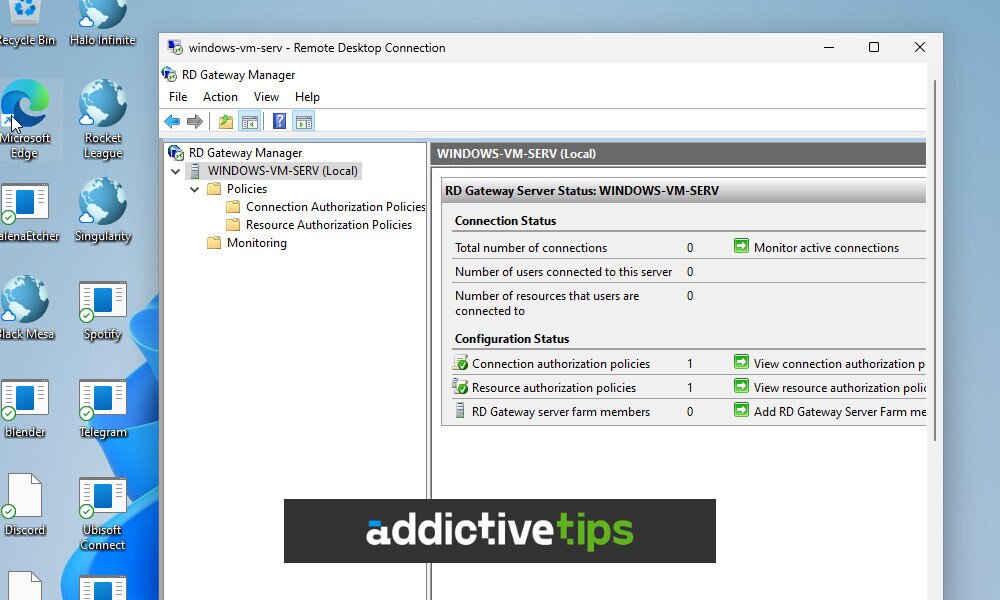
How to set up a Remote Desktop Connection to access Windows Server with RDP
Before you start clicking through Server Manager, run through this quick checklist to avoid the most common connection failures:
- Administrative rights: You need to be logged in as an administrator on the server to enable RDP. Standard accounts cannot turn on this feature.
- Server must be on and reachable: The server needs to be powered on and accessible on the network before any RDP connection can be established.
- Windows Firewall rule: Enabling RDP through Server Manager usually creates the built-in “Remote Desktop” firewall rule automatically. However, if connections still fail after setup, open Windows Defender Firewall and verify the “Remote Desktop (TCP-In)” rule is enabled for the correct network profile.
- User account permissions: The account used to connect must be a member of the local Administrators group or the Remote Desktop Users group on the server. You can add users by clicking “Select Users” in the Remote Desktop settings.
- Domain controller and policy consideration: If the server is a domain controller or is subject to Group Policy, users may also need the “Allow log on through Remote Desktop Services” right. You can find and configure this under Computer Configuration > Windows Settings > Security Settings > Local Policies > User Rights Assignment. Missing this right is the most common reason users see the error “you need the right to sign in through Remote Desktop Services.”
Once you’ve confirmed the above, you’re ready to enable Remote Desktop. To enable Remote Desktop on your Windows Server, you need to open the Server Manager application by searching for it in the Windows Start Menu. Once Server Manager is open, select “Local Server” in the left-hand sidebar to access your Windows Server settings. Look for “Remote Desktop” in the “Properties” area; by default, it is disabled. To enable Remote Desktop, click on the “Disabled” option to open the Remote Desktop menu.
In the Remote Desktop menu, select “Allow remote connections to this computer.” Additionally, select “Allow connections only from computers running Remote Desktop with Network Level Authentication (recommended).”
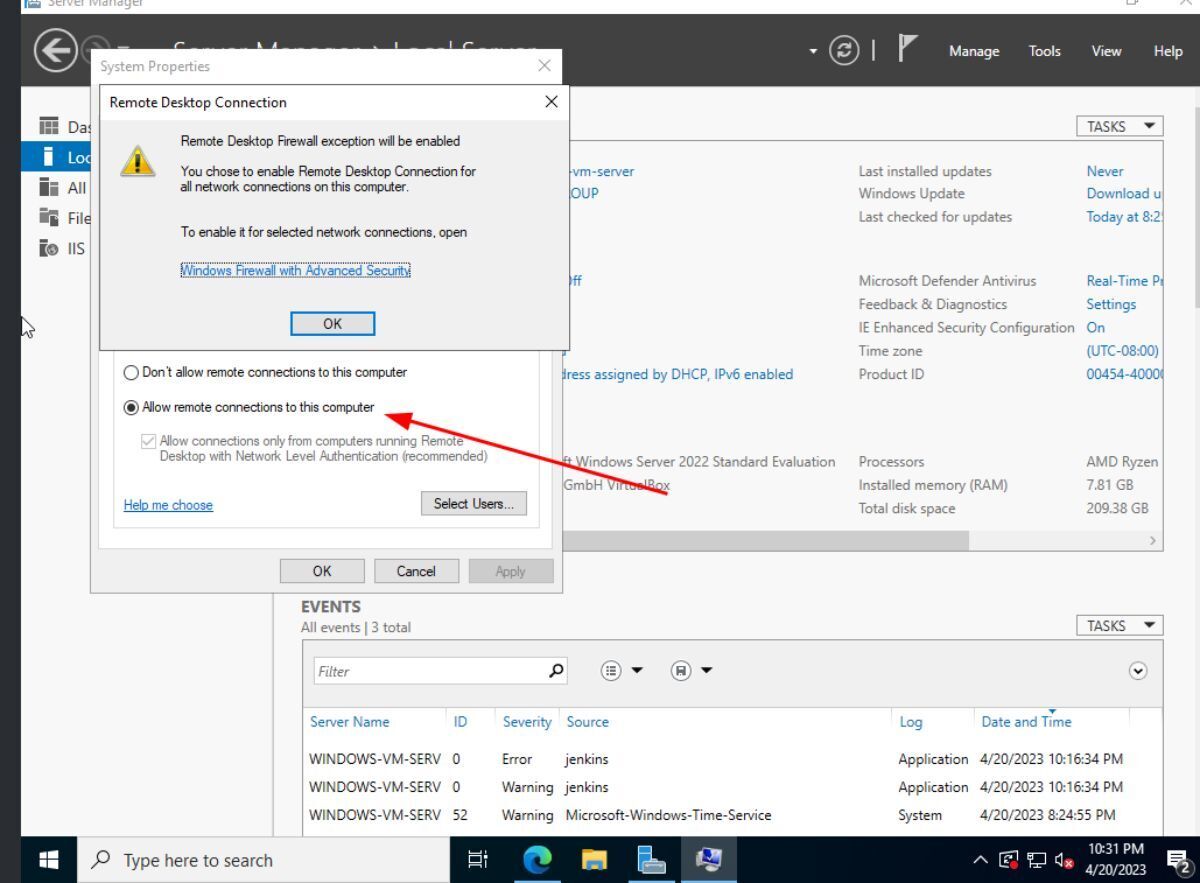
Click on the “Select Users” button to add the user account(s) you wish to allow to connect over RDP. Ensure each user you add has a strong and memorable password, then click “OK.”
Finally, click on the “Apply” button to save the changes made to your Windows Server.
Basic RDP vs Remote Desktop Services (RDS)
It’s important to understand what enabling Remote Desktop on Windows Server actually gives you before going further. Turning on Remote Desktop is designed for remote administration and supports a maximum of two simultaneous administrative sessions by default. This is perfectly adequate if one or two administrators need to manage the server remotely.
If your goal is to support more than two concurrent users, deliver shared desktops to many people at once, or publish specific applications to remote users, you need a full Remote Desktop Services (RDS) deployment — not just the Remote Desktop feature. A proper RDS setup requires additional role services (such as RD Session Host) and the appropriate RDS Client Access Licenses (CALs) from Microsoft.
Installing RD Gateway, which is covered in the next section, does not increase the two-session administrative limit on its own. RD Gateway controls how users reach the server over the internet — it does not change the number of users the server can host simultaneously. Keep this distinction in mind so you plan the right solution from the start.
How to set up an RDP gateway
To allow LAN users to access the server desktop, you can set up Remote Desktop access via the server manager and add users. When it comes to reaching your Windows Server from outside the local network, there are three common approaches, and they are not equally secure:
- VPN first, then RDP (recommended): Connect the client device to your network using a VPN, then use RDP as if you were on the LAN. The RDP port never needs to be exposed to the internet, and all traffic is encrypted by the VPN tunnel. This is the best option for most small and medium environments.
- Remote Desktop Gateway (recommended): RD Gateway wraps RDP traffic inside HTTPS (port 443), requires an SSL certificate, and allows you to enforce connection and resource authorization policies. It is a solid choice when a full VPN is not practical or when you need centralized access control for multiple users.
- Port forwarding / NAT TCP 3389 directly (least secure): Some network setups forward the public internet directly to port 3389 on the server. While this works, it exposes RDP to the entire internet and is a well-known target for brute-force attacks. Only consider this as a last resort, apply strict firewall source-IP restrictions, and pair it with a strong account lockout policy.
Microsoft and security researchers consistently recommend VPN or RD Gateway over direct port exposure. If you decide that an RD Gateway fits your needs, the steps below walk you through installing and configuring it.
Note: Setting up an RDP gateway is optional, and it should not be set up unless you are certain that you need it.
To install the RD Gateway role, begin by launching the Windows Server Manager app.
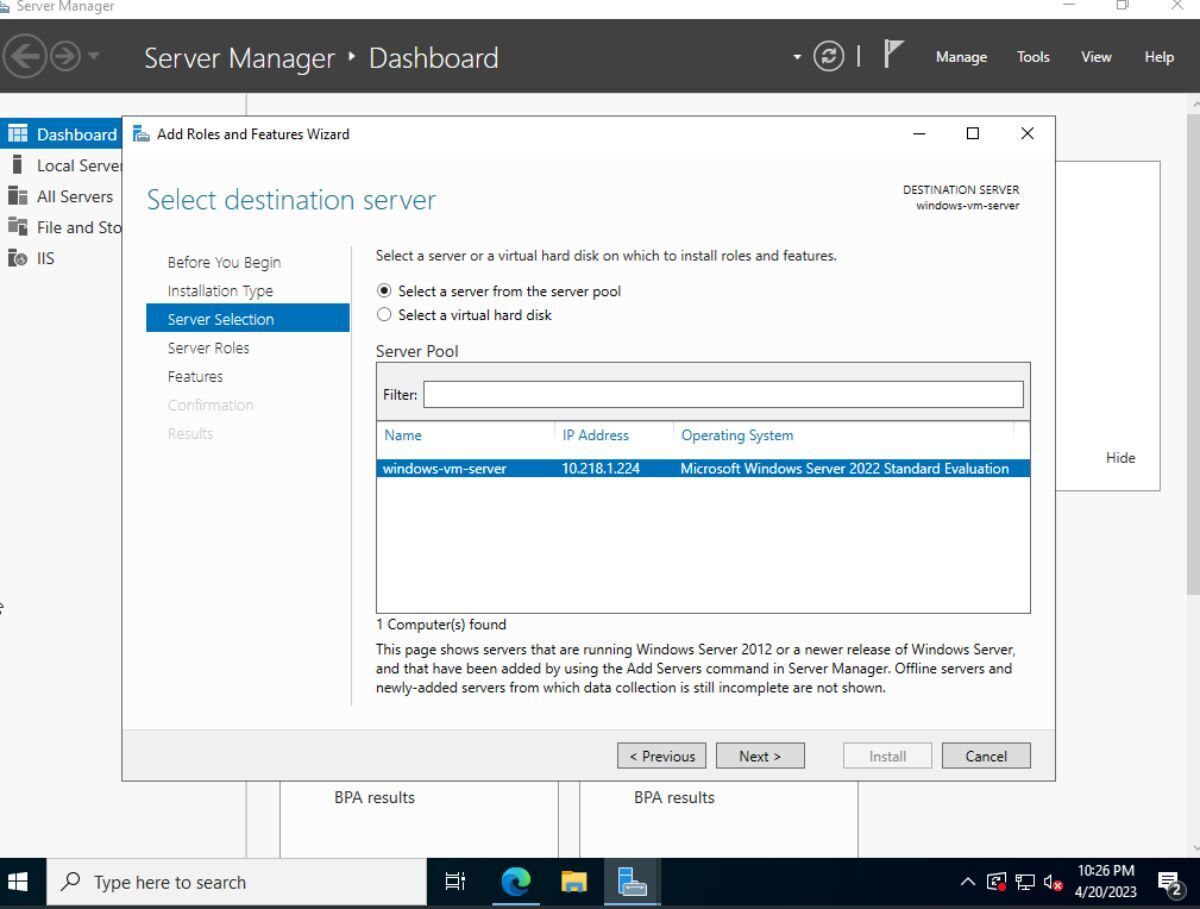
Once the app is open, choose “Add Roles and Features.” In the left-hand sidebar, click “Server Selection.” Then, select your server and click “Next.”
Once you have selected your server, navigate to “Server Roles” and choose “Remote Desktop Services.” Click the “Next” button to proceed.
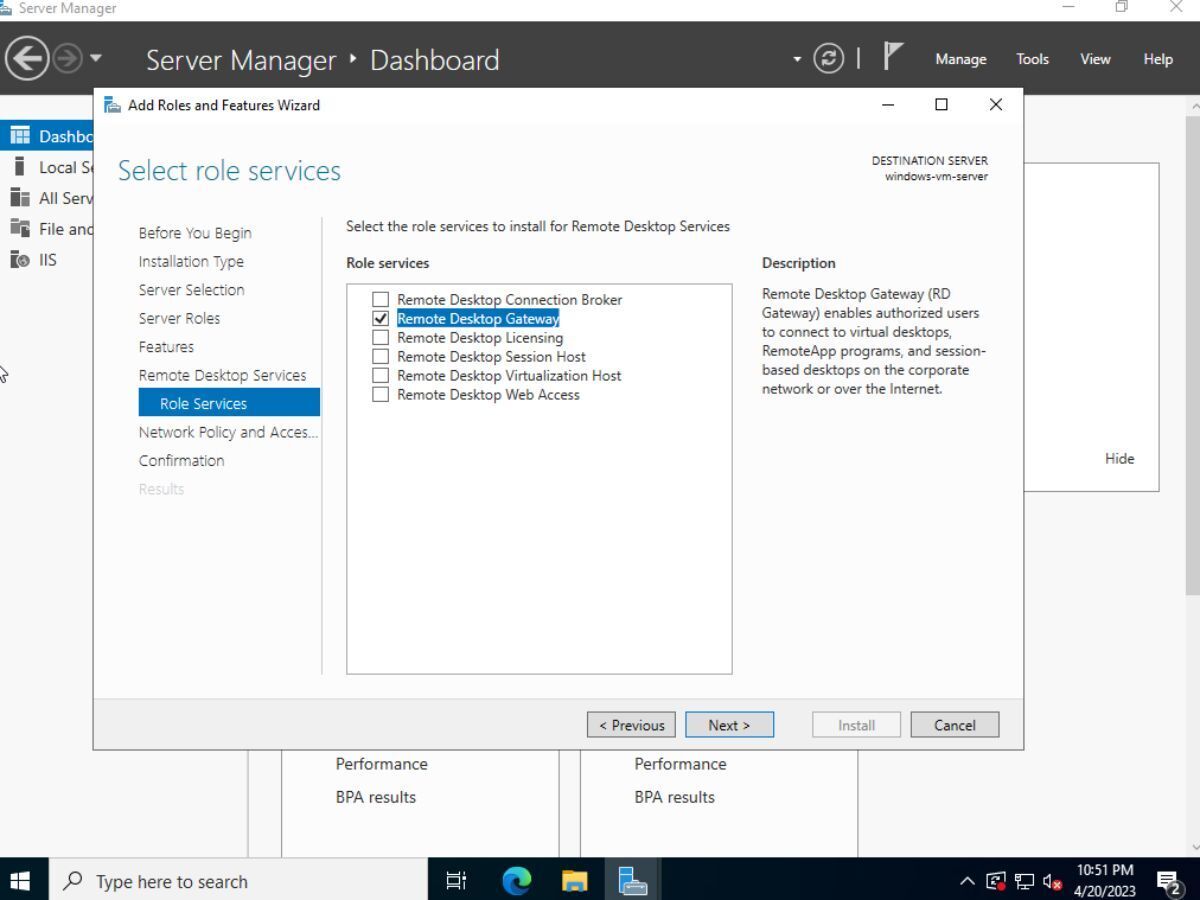
Skip over the “Features” section and click “Next.” You will then be prompted to configure “Remote Desktop Services.” Under “Role Services” for “Remote Desktop Services,” select “Remote Desktop Gateway” from the list. Click the “Next” button to proceed. On the “Confirmation” page, review the outline and then click the “Install” button to install the RDP gateway role.
Configuring your RDP gateway to access Windows Server with RDP over the Internet
After setting up the RDP gateway role, open the “Remote Desktop Gateway Manager” by searching for it in the Start menu. Once the program is open, right-click on your server and select “Properties.”
In the “Properties” window of Remote Desktop Gateway Manager, click the “SSL Certificate” tab. Then, select the “Create Self-Signed Certificate” option to generate a self-signed certificate for the RD Gateway server. According to Microsoft’s Remote Desktop Services documentation, using a trusted SSL certificate is strongly recommended for production environments to ensure secure connections.
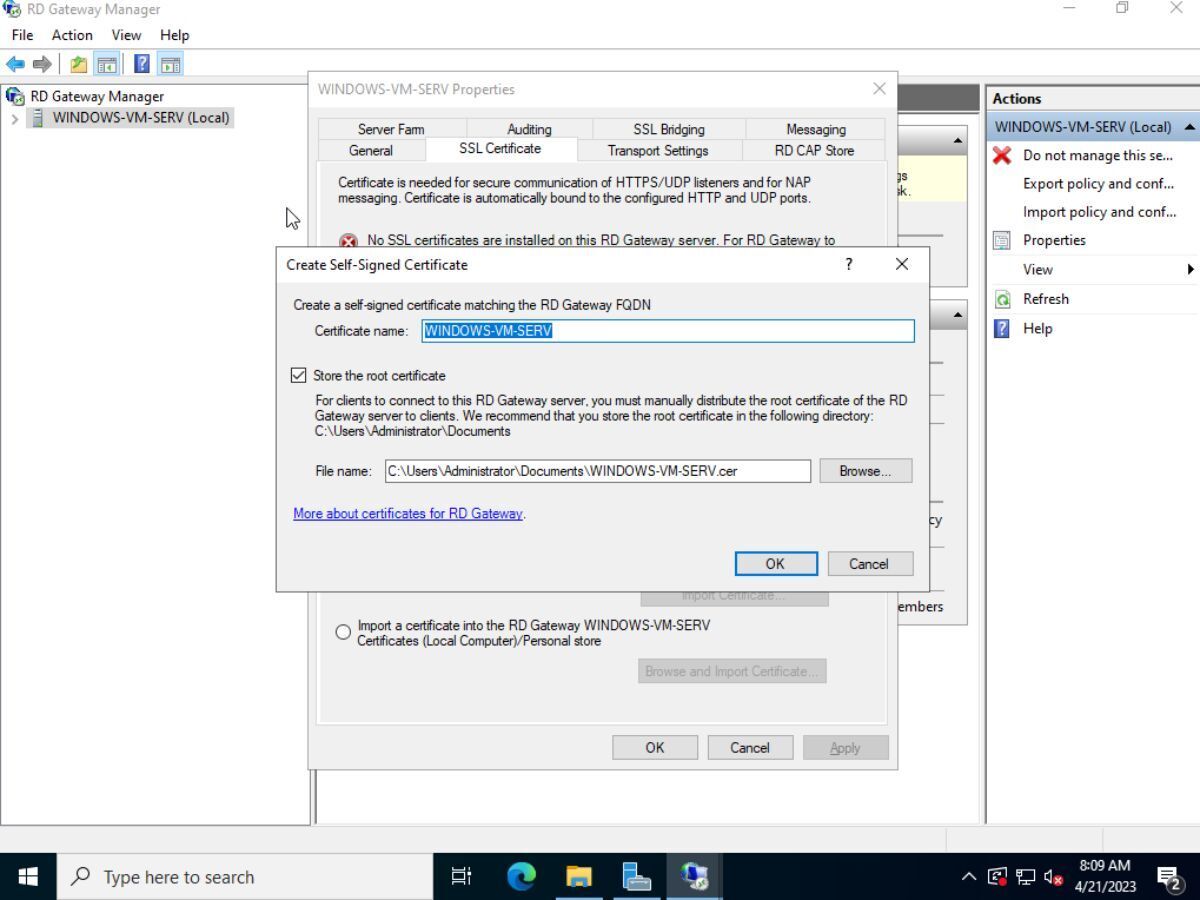
After creating the self-signed certificate, go back to the “SSL Certificate” tab and select the “Select an existing certificate” option. This will allow you to choose the self-signed certificate you just created.
Once you’ve created your SSL certificate, close the properties window. Then, select your server in RD Gateway Manager. After selecting your server, look for “Configuration Status” and select “Create Connection Authorization Policy.” You can then configure your connection policy and specify the group.
To view the groups on your Windows Server, open a PowerShell window and enter the following command:
Get-WmiObject -Class Win32_Group -Filter "LocalAccount='True'" | Select Name
Once you’ve configured your connection authorization policy, do the same for “Resource Authorization Policies.” When you have finished configuring everything, close the RD Gateway Manager.
Secure RDP before you expose it to the internet
Exposing RDP to the internet without hardening it first is one of the most common ways Windows Servers get compromised. Work through these practical safeguards before you go live:
- Keep Network Level Authentication (NLA) enabled: NLA requires users to authenticate before a full Remote Desktop session is established, which blocks unauthenticated access to the login screen and reduces the server’s exposure to exploits.
- Use strong, unique passwords on all RDP-enabled accounts: Weak or reused passwords are the primary way brute-force attacks succeed against exposed RDP endpoints.
- Keep Windows Server and your RDP clients updated: Several critical RDP vulnerabilities (including BlueKeep) have been patched over the years — staying current closes those doors automatically.
- Restrict firewall source IPs where possible: Instead of allowing any source address to reach RDP or your RD Gateway, limit inbound rules to known IP ranges or your VPN’s egress address whenever your setup allows it.
- Prefer VPN or RD Gateway over direct port exposure: As covered above, neither method puts the RDP port directly on the public internet, which dramatically reduces the attack surface.
- Add MFA on your VPN or RD Gateway: Multi-factor authentication means a stolen password alone is not enough to get in — most modern VPN solutions and RD Gateway configurations support MFA via RADIUS or Azure AD.
- Set an account lockout policy: Configuring a lockout threshold (for example, five failed attempts) through Group Policy slows brute-force attempts significantly and buys time for you to detect and respond to an attack.
How to connect to and access Windows Server with RDP
RDP clients are available on virtually every major platform, so you are not limited to connecting from a Windows PC. On any platform, you will need the same core details: the server’s hostname or IP address, a valid username, the account password, and — if you are connecting through an RD Gateway — the gateway’s hostname and your gateway credentials.
Here is a quick overview of the client options available to you:
- Windows: The built-in Remote Desktop Connection app (mstsc) is the most full-featured option. Press Windows key + R, type mstsc, and press Enter to launch it.
- macOS: Download the free Microsoft Remote Desktop app from the Mac App Store. Add a new PC, enter the server hostname or IP, and connect.
- iPhone and iPad: Install the Microsoft Remote Desktop app from the Apple App Store. The interface is touch-optimized and supports RD Gateway connections under the Gateway settings for each saved PC.
- Android: Install Microsoft Remote Desktop from Google Play. The setup is the same as iOS — add a PC, enter your server details, and configure a gateway if needed.
- Browser-based access: If your environment includes the RD Web Access role as part of a full RDS deployment, users can reach published apps and desktops through a web browser without installing a client.
To connect from a Windows PC using mstsc, follow these steps. First, press the Windows key + R on your keyboard to open the Run dialog box. Then, type “mstsc” and press Enter to launch the Remote Desktop Connection app.
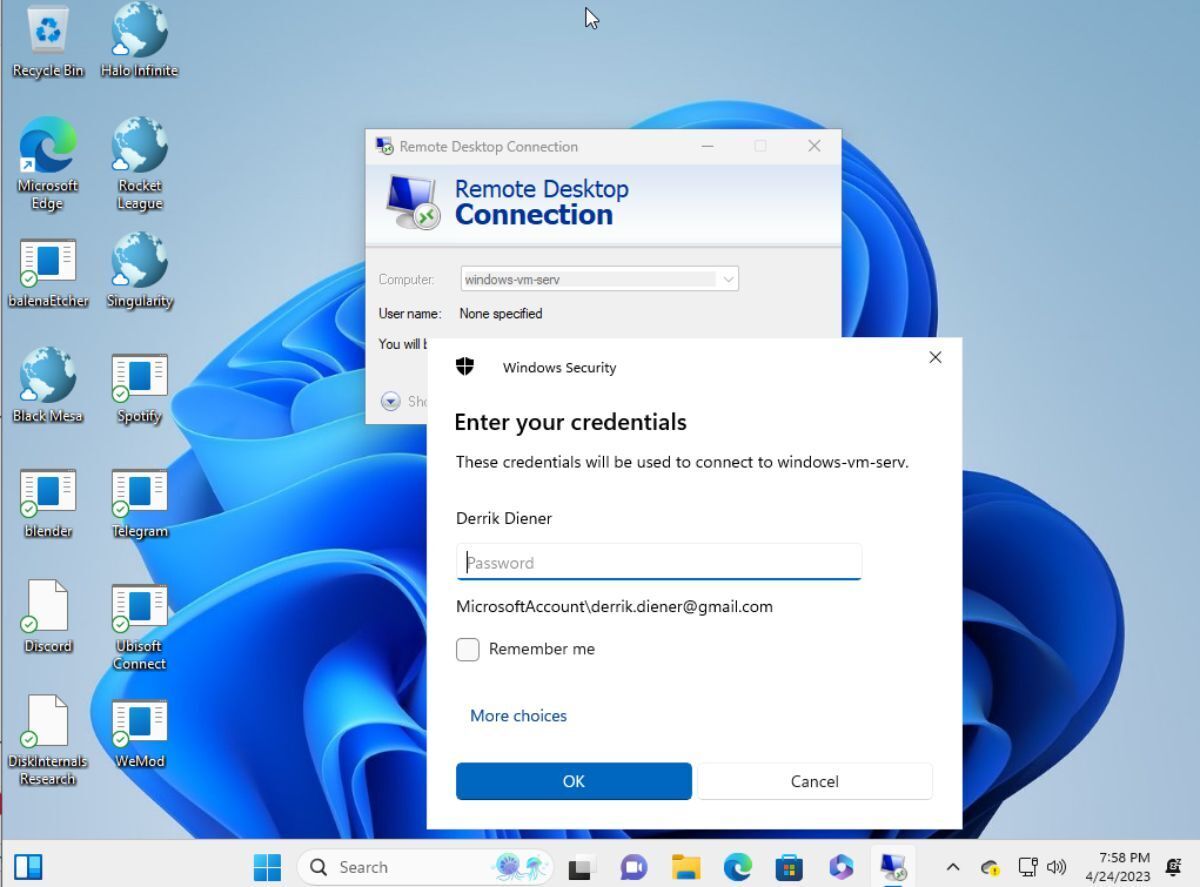
In the Remote Desktop Connection tool, enter the Windows Server hostname or IP address. Click “Show Options” to view the “User name” field, then enter a username from the Windows Server. Next, click the “Connect” button to establish a connection to your Windows Server via RDP on Windows.
