How To Disable Driver Signature Enforcement In Windows 10
Windows is not exactly synonymous with security. It tires, and it tires hard but PCs are subject to almost every imaginable digital malady such as malware burrowing its way into your kernel under the guise of harmless software. As a counter-measure, Windows attempts to keep your system secure by having hardware manufacturers digitally sign their drivers and have them verified by Microsoft for mass distribution. If you are a developer looking to install an older driver, or a self-made driver, or a custom tweak that is unlikely to be signed you won’t be able to. In order to install an unsigned driver, you need to disable driver signature enforcement.
We should mention that this is risky and should only be done if you trust the developer of the driver. The following approach will allow literally any driver to be installed on your system. So the risks are yours to bare.
Solution 1 – Disable Driver Signature Enforcement Through Recovery
If you are using Windows 10 that does not have the anniversary update or later, you have an easy solution ahead of you. Open the Settings app and go to the Update and Security group of settings.
Go to the Recovery tab and click ‘Restart Now’ under the Advanced Startup section.
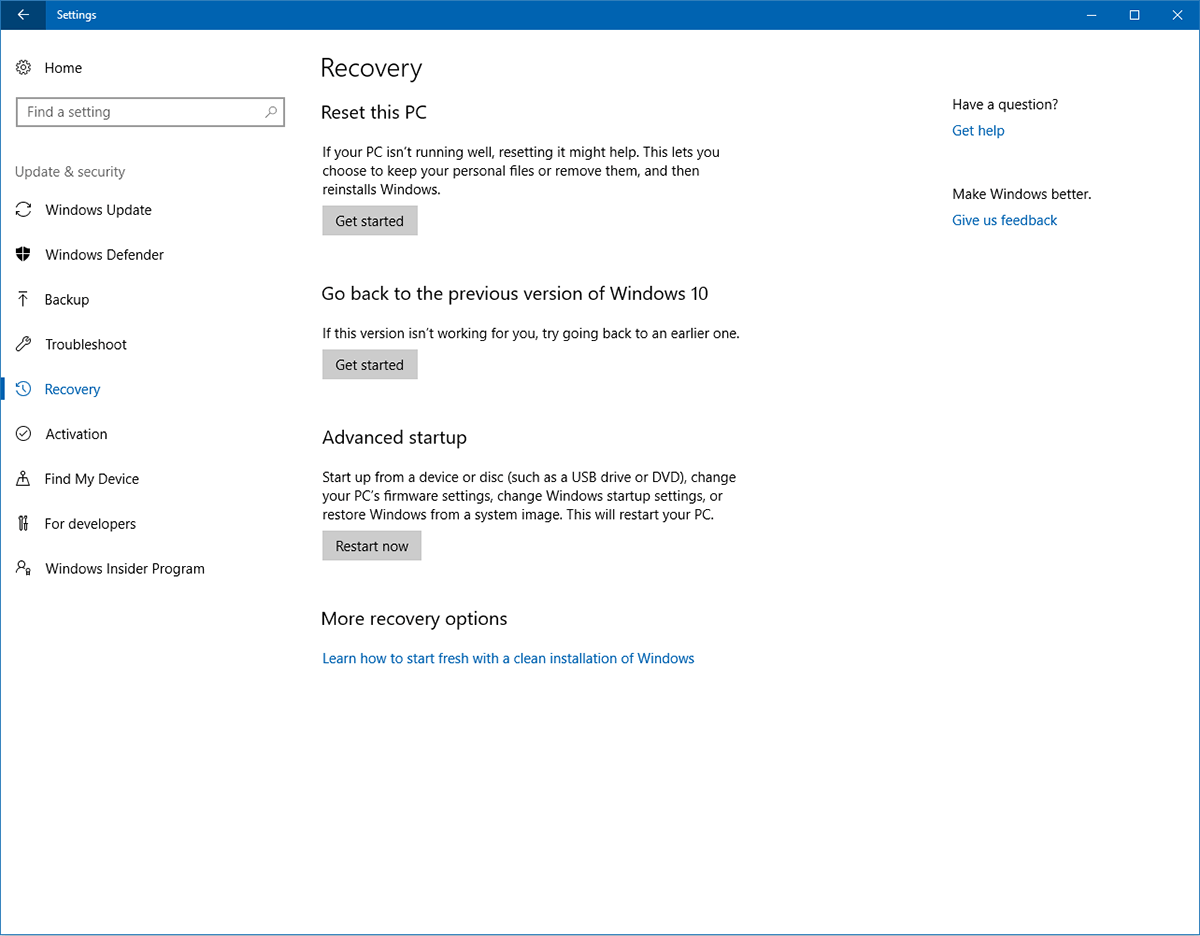
When you system restarts, click ‘Troubleshoot’ on the screen. Select ‘Advanced Options’, and click ‘Startup Settings’. Click Restart again. On the Startup Settings screen press 7 /F7 to disable driver signature enforcement.
Solution 2 – Run in Test Mode
Windows 10 comes with a Test Mode. This feature is also called Test Signing Mode. This lets developers experiment on their systems without having to circle back to Microsoft with every simple test. Driver signatures are not enforced in Test Mode.
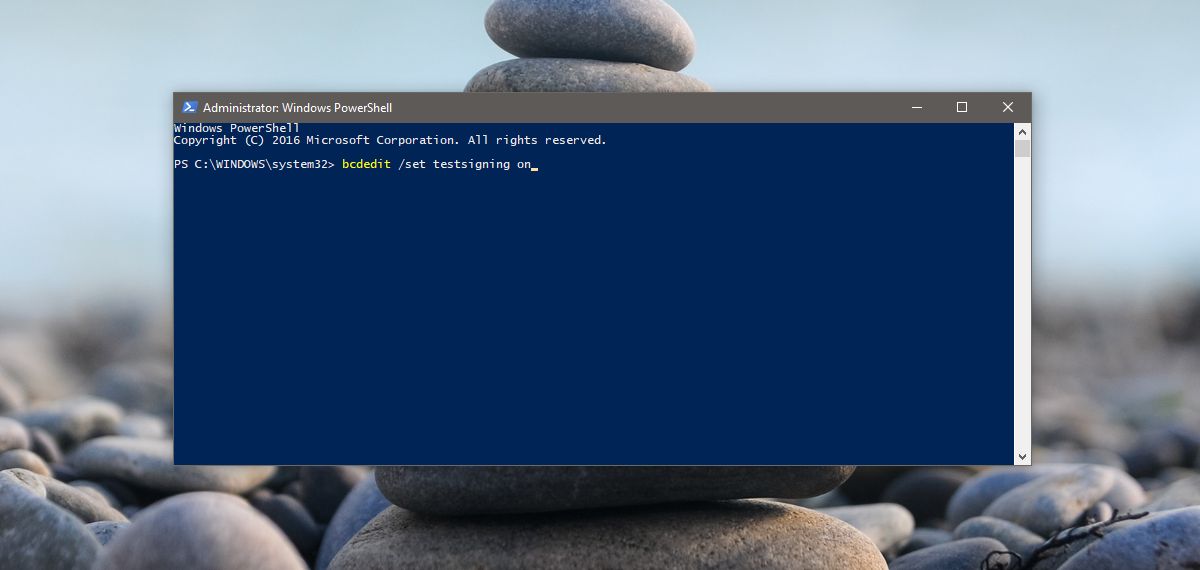
To run Windows 10 in Test Mode, you will need to access the command prompt with administrative privileges. In the Windows 10 search bar, type in Command Prompt and right-click the desktop app result. Select ‘Run as administrator’ from the context menu.
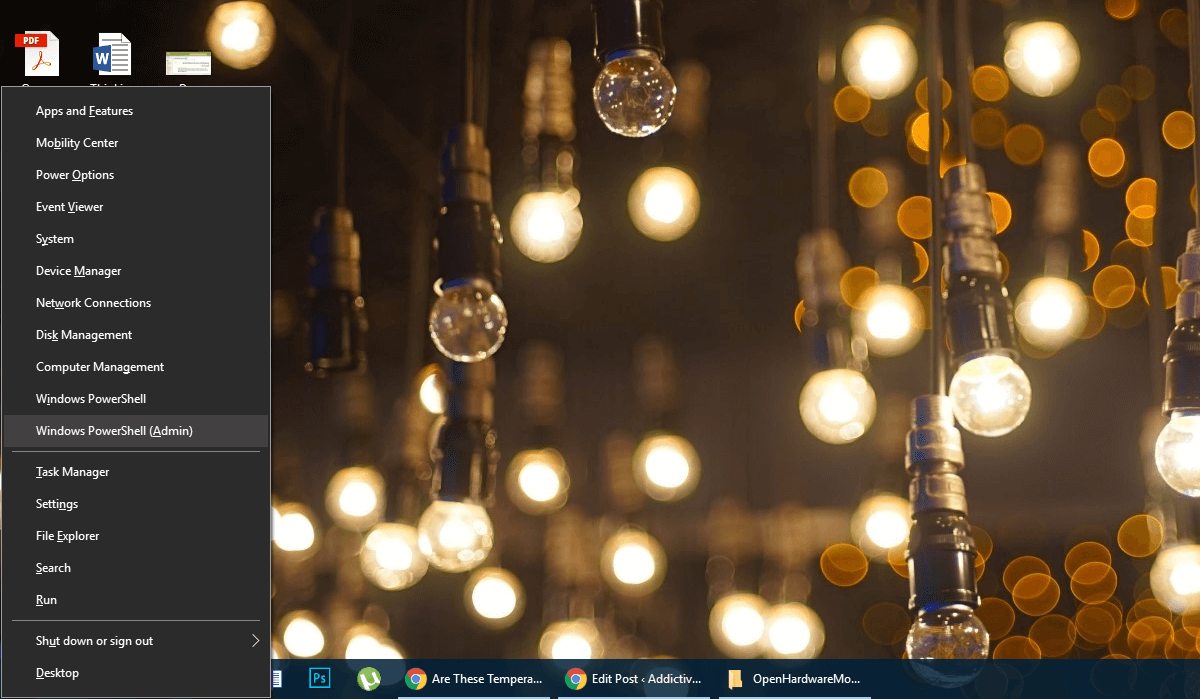
You can also run Test Mode from PowerShell. Tap the Win+X keyboard shortcut, and select ‘Windows PowerShell (Admin) from the power user menu.
Enter the following command;
bcdedit /set testsigning on
If you see an error message ‘protected by Secure Boot policy’, you are likely stuck because Secure Boot is enabled in your UEFI firmware (for the purposes of our guide, UEFI and BIOS are the same thing). If you get this error, go to Solution 3.
If you did not see an error message, then you just have to restart your computer and you will enter ‘test mode’. You will know that you have succeeded once you see a ‘Test Mode’ watermark in the bottom right corner of your screen.
Exit Test Mode
Once you are ready to leave test mode, press Win + x and select ‘Windows PowerShell (Admin)’ and now write (or copy/paste) the following.
bcdedit /set testsigning off
Restart your computer and you will boot into Windows normally.
Solution 3 – Turn off Secure Boot
Since Windows 10’s Anniversary Update, there have been additional counter-measures that prevent you from turning off secure boot. If you got an error running Solution 2 of this guide, then you’ve encountered one such counter measure. To turn off secure boot, you need to access the Advanced Boot Options menu.
On the Start menu, hold down the Shift key and click the Power button. Select ‘Restart’ from the power options. Click ‘Troubleshoot’. Then, click Advanced options and then UEFI Firmware Settings. Click Restart and you will be taken to the BIOS/UEFI interface.
Go to ‘Security’ and then turn off ‘Secure Boot’. Once you have done this. Return to the command prompt in Admin mode (exactly as mentioned in Solution 2).
Enter the following command;
bcdedit.exe /set nointegritychecks
If the ensuing BSoD (blue screen of death) triggers are too much for you to handle and you wish to disable this liberty. Return to the command prompt (admin) and enter.
bcdedit.exe /set nointegritychecks off
If you are done with this, once and for all, follow steps 1 through 5 in solution 3 again. This time, turn Secure Boot on. Everything should return to working condition. You should not run your system continuously in this state. You should also avoid installing anything unnecessary with secure boot turned off.

It does not work on Windows 10 Creator update :(.
I was tried above given 3 methods, on my Windows 10 Creator update but it doesn’t Disable driver signature, if you know another method or any suggestions please help me…. Thanks.