How To Disable The Touch Screen On A Two-In-One Windows 10 Laptop
Touch screen laptops have been around a while but it was Windows 8 and 10 that made them somewhat more common than they were before. Windows 10 is built for both a normal desktop or laptop but also for a touch interface. It works best if you’re using a Surface Pro but it works reasonably well with a touch screen laptop as well. If you’ve bought a touch screen laptop and found the touch interface to be lacking you can disable it all-together. Here’s how.
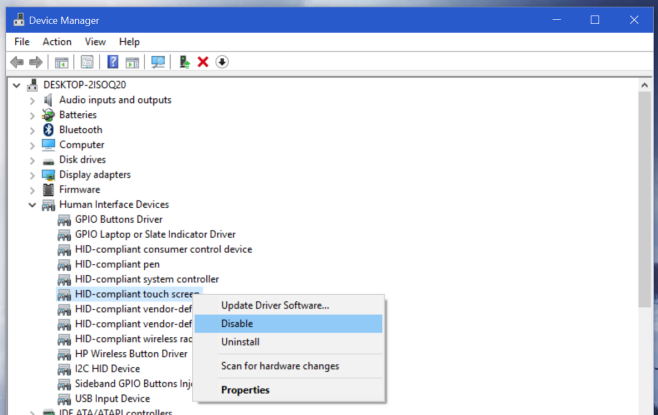
The touch screen works only because you have the right driver installed for it. Removing the driver is of course a very drastic move that we wouldn’t recommend unless your touch screen is broken or you absolutely hate it beyond recourse. The simpler option is to disable the driver that runs the touch interface. To do so, open Device Manger and look for the Human Interface Devices section. Expand it and look for the driver that is for the Touch Screen. It will very likely contain the phrase ‘Touch Screen’ in the name.

Right-click it and select ‘Disable’ from the context menu. The touch interface of your screen will no longer work nor will any other devices that you use to interface with the screen. You will be left with an ordinary display. If you feel like reversing this at any point, simply return to the Device Manager and enable this driver again.
As mentioned earlier, disabling the driver is a better option than uninstalling it but if that’s the route you want to go, make sure you have the driver backed up somewhere and/or that you know where you can download it again should you need. Once you have the driver backed up, right-click it in the Device Manger and select the ‘Uninstall’ option.
