SFC Scan Windows 10/11 – Repair Corrupted System Files
Whenever you are experiencing PC issues, the most common troubleshooting solution that anyone should try is to make use of their OS’s built-in tools. Running sfc /scannow — the System File Checker command — is one of the first steps you should take when Windows starts behaving unexpectedly.
For example, if you’re experiencing generic Windows 10 errors, system corruptions, or anything of the sort, the System File Checker is and should be, your go-to solution.
What Is The System File Checker
The System File Checker, also known as the sfc.exe is a utility that has been with the Windows OS since Windows 98, although it served a different purpose compared to nowadays.
Starting with Windows Vista, the System File Checker was included in the Windows Resource Protection (WRP), allowing it to protect not just typical data, but also registries, and critical system files.
Windows users of today can use the System File Checker to scan, detect, and restore any data that may have been destroyed or deleted due to malware, corruption, or user misuse. For more serious issues like blue screen errors, you may also need additional system file repairs. fix PFN list corrupt with system repairs. If you’re dealing with a specific stop code, these KMODE crash repair steps may also help.
How Does the sfc /scannow Command Work?
Ever since the SFC was included in the WRP, any changes that are applied to any of Windows’ core system files will be detected by the SFC, and the modified file is restored by using a cached copy located in the Windows folder itself.
Because of this, whenever you encounter any form of data loss or corruption, it’s best to use the sfc /scannow tool first, before performing an actual System Restore.
How Do I Run the System File Checker?
The System File Checker was made to be extremely easy to access and use, especially since you’re expected to use it in conditions where maybe a lot of Windows’ higher functions may no longer be available.
As such, here is how you can trigger a full System File Checker scan:
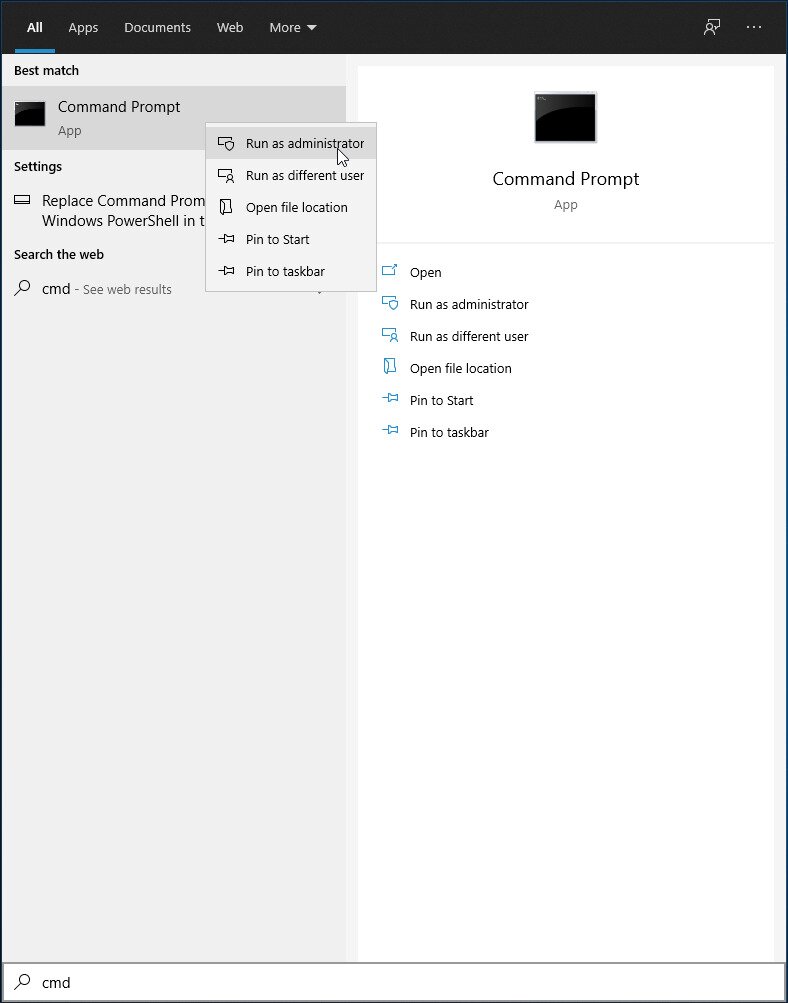
- Press the Windows key to open the Start menu
- Type in cmd and launch the Command Prompt using Run as administrator

- Depending on what you want the SFC to do, you can type in one of these 2 lines in the Command Prompt:
sfc /scannow- Use this if you want the SFC to detect and repair any missing or corrupted data

- Use this if you want the SFC to detect and repair any missing or corrupted data
sfc /verifyonly- Use this if you want the SFC to detect any missing or corrupted data

- Use this if you want the SFC to detect any missing or corrupted data


Once you’ve started running either of these scans, all you need to do is wait for the process to complete.
Keep in mind that sfc /scannow scans protected Windows system files only — it does not scan personal files, documents, or all data stored on the drive. Scan time is influenced more by your system speed, disk health, and the condition of the Windows component store than by how many personal files you have saved on your PC.
Run DISM Before sfc /scannow (and After Failed Repairs)
On Windows 10 and Windows 11, sfc /scannow pulls replacement files from the Windows component store. If that component store is itself damaged, SFC will fail to repair what it finds. Running DISM first fixes the component store so SFC has good files to work with.
- Open an elevated Command Prompt (Run as administrator)
- Run the following command and wait for it to complete — it may take several minutes:
DISM /Online /Cleanup-Image /RestoreHealth
Once DISM finishes, rerun sfc /scannow to let SFC repair any remaining protected file issues using the now-healthy component store.
If DISM returns a source error, you can point it to a known-good repair source — either a mounted Windows ISO or an install.wim file — using:
DISM /Online /Cleanup-Image /RestoreHealth /Source:C:\RepairSource\Windows /LimitAccess
Replace C:\RepairSource\Windows with the actual path to your mounted ISO or install.wim source that matches your Windows version and edition. Microsoft’s official documentation on the sfc command provides additional syntax options and details for advanced scenarios.
What sfc /scannow Results Mean
When sfc /scannow finishes, Windows Resource Protection will display one of several messages. Here is what each one means and what you should do next:
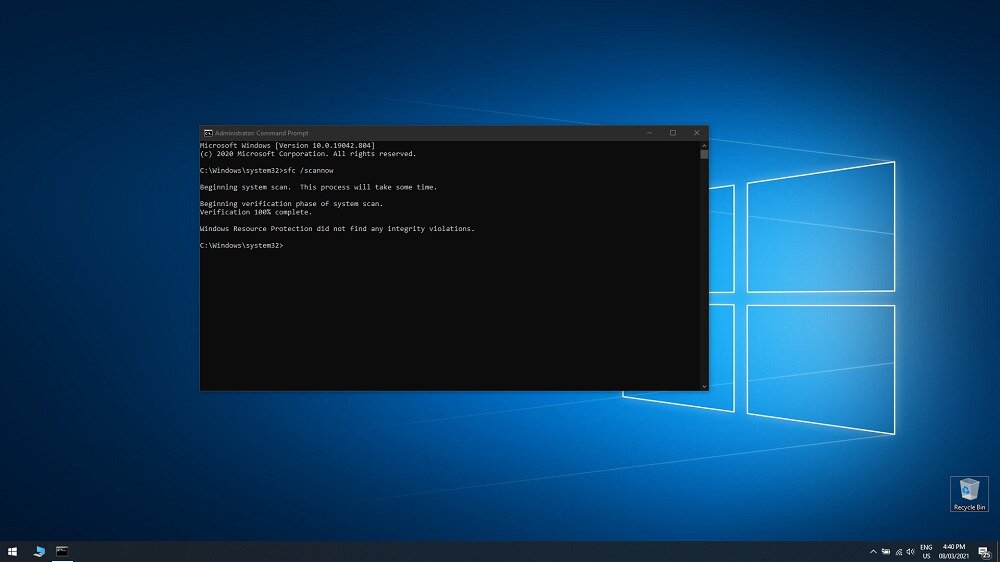
- Windows Resource Protection did not find any integrity violations — No protected system file issues were detected. Your system files are intact.
- Windows Resource Protection found corrupt files and successfully repaired them — SFC fixed the problems. Restart your PC and test to confirm the issue is resolved.
- Windows Resource Protection could not perform the requested operation — SFC was unable to run the scan properly. Try running it in Safe Mode or from Windows Recovery Environment (see the section below).
- Windows Resource Protection found corrupt files but was unable to fix some of them — Run
DISM /Online /Cleanup-Image /RestoreHealth, then rerunsfc /scannow. If files still cannot be repaired, review the CBS log as described below.
How to Read the SFC Log File
If SFC could not repair certain files, you can extract the relevant log entries to your desktop for a closer look. In an elevated Command Prompt, run:
findstr /c:"[SR]" %windir%\Logs\CBS\CBS.log >"%userprofile%\Desktop\sfcdetails.txt"
This creates a text file called sfcdetails.txt on your desktop listing every file SFC flagged and whether it was repaired or not. You can use those file paths to manually replace unfixable files from a healthy Windows installation or ISO.
Run SFC in Safe Mode or Windows Recovery
If Windows is unstable, will not boot normally, or SFC returns “Windows Resource Protection could not perform the requested operation,” you have two practical fallback paths.
Option 1: Run sfc /scannow in Safe Mode
- Boot into Safe Mode (hold Shift and click Restart, then go to Troubleshoot > Advanced Options > Startup Settings > Restart, and press 4 or F4)
- Once in Safe Mode, open Command Prompt as administrator
- Run
sfc /scannowas normal
Option 2: Run an Offline SFC Scan from Windows Recovery
If Windows will not boot at all, you can run SFC from a Windows installation drive or the Windows Recovery Environment (WinRE):
- Boot from Windows installation media or enter WinRE
- Open Command Prompt from the recovery options
- Run the offline scan with the following syntax:
sfc /scannow /offbootdir=C:\ /offwindir=C:\Windows
Note that drive letters can shift in WinRE, so your Windows partition may not always be C:. Use diskpart or dir commands to confirm the correct drive letter before running the scan.
CONCLUSION: System File Checker
That’s pretty much everything there is to know about the System File Checker and the sfc /scannow command.

Remember that the System File Checker is a core component of the Windows OS, and its repair rate is quite high, so whenever you experience data corruption on your PC, try using it first.
Have you ever tried using the SFC to solve a PC issue? If so, let us know how that went for you by leaving us your feedback in the comments section below.

im loving your blog and tips, please keep it up man! Pleas add more about blogging/wordpress