Share Large Files – Create Your Own File Sharing Server
If you need to share large files with friends or colleagues without relying on third-party hosting services, there is a smarter way to do it. Almost a month back we covered 10 Free File Hosting Services To Store Your Files — online services you can use to upload and share files. But what if you want to share multiple files that are all heavy in size? And what if you don’t want to waste your time uploading everything? It is better to convert your computer into a file sharing server. In this way, your friends can access your files directly over the internet without any third-party service. HFS (HTTP File Server) is a great open-source software that makes this all possible, featuring a clean web interface and a setup process that anyone can follow.
Best Ways to Share Large Files (and When HFS Is the Right Choice)
Before diving into HFS specifically, it helps to know which method suits your situation. There is no single best way to share large files — the right choice depends on how often you share, how big your files are, whether recipients need an account, and how much control you want over privacy.
1. Cloud transfer links (one-off sends)
Services like WeTransfer, Smash, and similar browser-based tools let you upload a file and send a download link without the recipient needing an account. Setup takes seconds and requires no technical knowledge. Free tiers commonly cap transfers around 5 GB, while business plans often push that to 100–250 GB, and some services market no hard transfer limit at all. The trade-off is that your file leaves your machine and lives on someone else’s server, at least temporarily. These services are best for sending large files quickly to someone you trust when privacy is not a major concern.
2. Shared cloud folders (ongoing collaboration)
Platforms like Google Drive, Dropbox, and OneDrive let you create a shared folder that multiple people can access over time. Recipients typically need an account, or at minimum a link with view or download permissions. Storage limits vary by plan, and files are stored on the provider’s servers indefinitely until you remove them. This method works best for teams or recurring file exchanges where keeping everything in sync matters more than keeping files off third-party servers.
3. Self-hosted sharing with HFS (files stay on your PC)
HFS turns your own computer into the server, so your files never leave your machine. There are no upload wait times, no storage quotas, and no subscription fees. However, this approach requires some router and firewall configuration, a stable internet connection with reasonable upload bandwidth, and a willingness to troubleshoot if something does not connect. HFS is the right choice if you are comfortable with basic network setup, want full control over your data, and need to share files that are too large or too numerous for cloud transfer limits. If you are behind carrier-grade NAT or have a slow upstream connection, cloud transfer links will be more reliable for remote recipients.
How to Share Large Files Using HFS

HFS turns your PC into a fully functional web server, allowing anyone with your IP address to browse and download files directly from your machine. You can also use this software to access your remote files over the network, making it a versatile tool for both local and internet-based file transfers.
It gives you full control over connections and is highly customizable. You can control bandwidth usage, set up an HTML web template, monitor active connections in real time, and much more. Because it converts your computer into a full server, you don’t have to upload your files to third-party online services at all — your files stay on your machine and are served directly to whoever needs them.
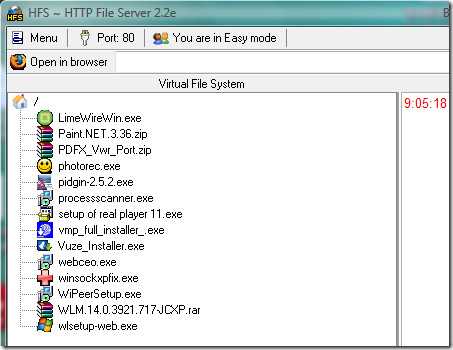
One of the biggest advantages of HFS is that you don’t need to install anything. Just download the executable, click to run it, and you can start sharing within an instant. There is no complex configuration wizard or lengthy setup process to work through.
Once HFS is running, it displays the address others can use to reach your server — but how that address works depends on who is connecting. On your local home or office network, recipients can reach your server using your PC’s local IP address (for example, 192.168.1.x) or its hostname, followed by the HFS port number (port 80 by default). Over the internet, however, remote recipients need your public IP address — not your local one — plus the correct port forwarded through your router. You can find your public IP by searching “what is my IP” in any browser. Be aware that many home users are behind carrier-grade NAT (CGNAT) or face ISP restrictions that block incoming connections entirely, even when HFS is running and port forwarding is configured. If remote access matters, always test your link from a device on a different network — such as your phone on mobile data — because a test from inside your home Wi-Fi will succeed even when the server is not reachable from the public internet.
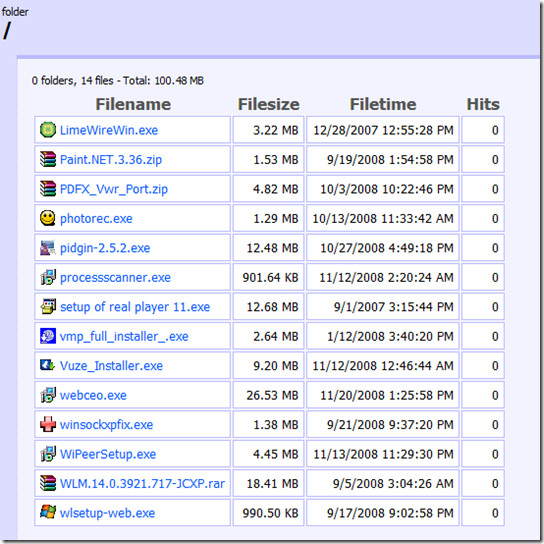
For further security, you can add a password to protect your shared files, ensuring that only people you trust can download them. The web interface also shows the number of hits per file, which makes it easy to see which file is being downloaded the most and helps you monitor activity on your server.
Setting Up Port Forwarding to Share Large Files Over the Internet
Port forwarding is the step that makes your HFS server reachable from outside your home network. It is also the step where most users run into problems. Follow this walkthrough carefully, and refer to the troubleshooting checklist at the end if something does not work.
Step 1: Assign your PC a static local IP address
Your router assigns local IP addresses dynamically by default, which means your PC’s local IP can change after a reboot and break your port forwarding rule. Prevent this by either setting a static IP address in your Windows network adapter settings, or — more conveniently — setting a DHCP reservation in your router’s admin panel. A DHCP reservation ties your PC’s MAC address to a fixed local IP so the router always gives it the same address without manual configuration on the PC itself.
Step 2: Choose a port for HFS
HFS uses port 80 by default, but port 80 is commonly blocked by ISPs for residential connections. Choose an alternative port in the HFS settings — something in the range of 8080 or 8888 works well and is less likely to be blocked. Note the port number you choose, as you will need it for the next steps.
Step 3: Create a port forwarding rule on your router
Log in to your router’s admin panel (usually reached at 192.168.1.1 or 192.168.0.1 in a browser). Navigate to the port forwarding section — it may be labelled Port Forwarding, Virtual Server, or NAT depending on your router model. Create a new rule that forwards your chosen port (for example, TCP port 8080) to the static local IP address of the PC running HFS. For router-specific instructions, this site has guides organized by router make and model.
Step 4: Allow the port through Windows Firewall
Windows Firewall may block incoming connections to HFS even after port forwarding is set up on the router. Open Windows Defender Firewall, go to Advanced Settings, select Inbound Rules, and create a new rule that allows TCP traffic on your chosen port. HFS may prompt you to allow access automatically when it first runs — if you dismissed that prompt, add the rule manually.
Step 5: Find your public IP address and share it
Search “what is my IP” in any browser to find your current public IP address. Share the full address with recipients in the format http://[your-public-IP]:[port] — for example, http://203.0.113.45:8080. They can paste this directly into any browser to reach your HFS interface.
Step 6: Set up dynamic DNS if your public IP changes
Most home ISPs assign a dynamic public IP that can change periodically. If you plan to share files regularly, sign up for a free dynamic DNS service such as No-IP or DuckDNS. These give you a fixed hostname (for example, yourname.duckdns.org) that automatically updates to point to your current public IP. Share the hostname instead of the raw IP address and your link will keep working even after your IP changes.
Step 7: Verify from outside your network
Once everything is configured, test the link from a device that is not on your home Wi-Fi — your phone on mobile data is the easiest option. If the HFS interface loads, your server is publicly accessible. If it does not, work through the troubleshooting checklist below before sharing the link with anyone.
Troubleshooting checklist
- Double NAT: If your ISP provides a modem-router combo and you have a separate router connected to it, you may have two layers of NAT. You will need to either bridge the ISP device or forward the port on both devices.
- CGNAT (carrier-grade NAT): Some ISPs — particularly mobile broadband and certain cable providers — place many customers behind a shared public IP. In this case, no amount of port forwarding will make inbound connections work. Contact your ISP to ask whether you have a dedicated public IP, or switch to a cloud-based transfer method instead.
- ISP-blocked ports: Port 80 and sometimes port 443 are blocked on residential connections by many ISPs. If you are using port 80, switch to a higher port number in HFS settings and update your router rule to match.
- Windows Firewall blocking HFS: Check your inbound firewall rules and confirm the rule for your chosen port is enabled and set to Allow the Connection.
- Wrong IP in the forwarding rule: Confirm the local IP in your router’s port forwarding rule exactly matches the current local IP of the PC running HFS. Open Command Prompt and run ipconfig to check.
- Testing from inside your network: A test from your own Wi-Fi will show the server as reachable even when it is not accessible from the internet. Always test from a different network or use a tool like canyouseeme.org to check from outside.
A note on upload speed and performance: Your home internet upload speed is the hard ceiling on how fast recipients can download from your HFS server. If your upload connection is 10 Mbps, a recipient downloading a 10 GB file will need roughly two hours at best. If multiple people download simultaneously, that bandwidth is shared between them. For large files and multiple recipients, a fast upload connection makes a significant practical difference.
It is also worth noting that HFS supports virtual file system organization, meaning you can present files and folders to your visitors in a custom structure without actually moving files around on your hard drive. This is particularly useful when you want to share large files from multiple locations on your computer in a single, organized view.
Security and Privacy Checklist Before You Share
Running HFS means exposing a port on your PC directly to the public internet. That is a meaningful security decision, not just a technical one. Before you share your server address with anyone, work through the following checklist to reduce your risk.
- Share only a dedicated folder: Never point HFS at your entire hard drive or your user profile folder. Create a dedicated folder specifically for sharing and add only the files you intend to distribute.
- Set a strong, unique password: Use HFS’s built-in password protection and choose a password you do not use anywhere else. Share it with recipients separately from the server link.
- Keep permissions read-only: Unless you specifically need recipients to upload files to you, set folder permissions to read-only. Allowing uploads from anonymous internet users is a significant security risk.
- Enable HTTPS if possible: Newer versions of HFS support TLS configuration. If you set this up, connections to your server are encrypted in transit, which prevents anyone on the same network from intercepting downloads.
- Monitor active connections and logs: HFS shows active connections in real time. Check this regularly while your server is running so you can spot unexpected access.
- Cap bandwidth if needed: Use HFS’s bandwidth limiting feature if you do not want file sharing to consume your entire upload connection during normal use.
- Stop the server when the transfer is finished: Do not leave HFS running indefinitely. Once your recipients have downloaded what they need, close the server and remove or archive the shared files. An open server is an open attack surface.
- Avoid sharing highly sensitive files without encryption: Unless you have configured HTTPS and strong password protection, treat HFS as a convenience tool rather than a secure vault. For highly sensitive documents, consider encrypting the files themselves before adding them to the shared folder.
It is worth comparing this to what cloud transfer services provide by default. Many of these platforms include password protection, link expiry dates, encryption at rest and in transit, and granular recipient access controls out of the box. With HFS, all of that responsibility falls on you as the server operator. That is not a reason to avoid HFS — it is a reason to take the setup seriously. When configured carefully, HFS gives you strong control and genuine privacy because your files never touch a third-party server. When configured carelessly, it can expose your PC to the open internet in ways that are hard to detect and easy to exploit.
Overall, the software is easy to set up and works great without a glitch. Whether you need to share large files for a project, distribute media to a group, or simply give a friend access to a folder on your PC, HFS handles it all reliably. Give it a try and you will end up creating your own file sharing server in no time. Enjoy!

HFS is a very powerfull and simple utility. Very good at work for ex. because files stays on the Lan, so nothing goes on the Internet.
It is the site that conatain good coverage to many of general. Thanks
If a HTTP file server is not an option, there’s always 2large2email (http://www.2large2email.com/). With it, you can share your large files of up to 2gb in size with others via the internet.