How to Install Minecraft Mods
Minecraft is hugely popular for good reason. The game’s possibilities grow with your creativity. If you’re wondering how to install Minecraft mods, you’ve come to the right place — mods step in wherever the base game does fall short.
Minecraft modifications let you fix bugs, optimize graphics and gameplay, or change things within the world, like adding new enemies or creatures. If you also want to turn off auto-jump, improve your blast furnace setup, tweak your blank map setup, brush up on Minecraft stonecutter basics, get started with Minecraft glass crafting, or learn Minecraft cheat commands, those are other simple ways to fine-tune how Minecraft plays. Mod developers are everyday people with knowledge of Java programming and modding tools, creating mods for fun, profit, or both. Some sell their creations, but many are free. We’ll go over all the steps for PC’s, consoles, and mobile devices, including what mod launchers to use and how to install Minecraft mods on each platform.
Choose the Right Mod Loader First
Before you download anything, it’s important to understand that Java Edition mods are loader-specific. A mod built for one loader will not work with a different loader, even if it targets the same Minecraft version. Getting this wrong is the most common reason mods fail to load, so confirm your loader before anything else.
Here are the three main loaders you’ll encounter today:
- Forge: One of the oldest and most widely supported loaders. Many popular mods are built for Forge. Install Minecraft Forge, then select the Forge profile in the Minecraft Launcher.
- Fabric: A lightweight, fast-updating loader that has become very popular. Fabric mods need Fabric Loader installed, and most also require Fabric API as a dependency — a second mod file you place in the same mods folder alongside your other mods.
- NeoForge: A newer fork of Forge that is increasingly common. NeoForge mods usually require NeoForge and may not work on standard Forge, even if they share the same Minecraft version.
The simple decision flow:
- Check the mod page and confirm which loader it requires (Fabric, Forge, or NeoForge).
- Install that loader before copying any mod files.
- In the Minecraft Launcher, select the matching profile for your loader before clicking Play.
A mod can match your Minecraft version exactly and still fail to load if you’re running it on the wrong loader. Always verify the loader requirement first.
How to Install Minecraft Mods on Windows
For the sake of simplicity, our recommendation is to install Minecraft via a mod launcher app called Forge. Most of our instructions will involve the use of this app. Follow these steps to learn how to install Minecraft mods on a Windows PC:
Step 1: Download Software from Minecraft Forge
Install Minecraft Forge, which lets you run mods on your PC. Be sure to match the version of Forge to the version of Minecraft you have. You’ll find your Minecraft version on the list on the left of the screen, which will then bring up the recommended version of Forge to install.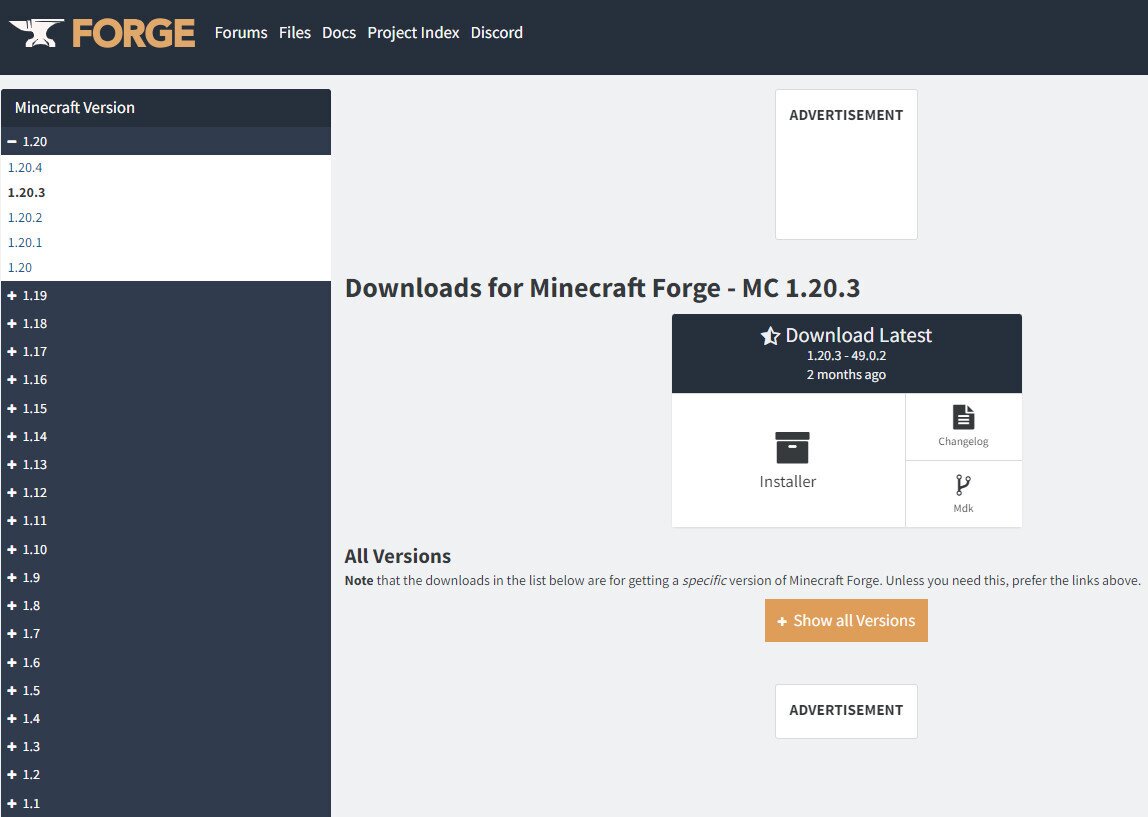
Tip:
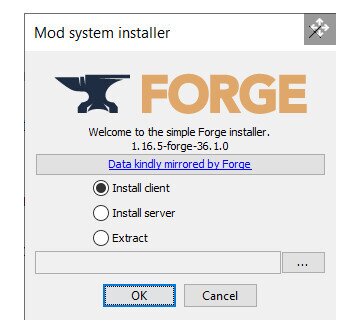
- When the Forge Mod System Installer appears, after downloading, be sure to select “Install client,” not Install server or extract. Then click ok

Step 2: Download Mods
Before you download any mod, run through this compatibility and safety checklist. Most failed installs happen at this stage, not the copy-paste stage, so take a moment to verify each of the following:
- Confirm the mod is for Minecraft Java Edition. Bedrock mods and Java mods are not interchangeable.
- Confirm the mod supports your exact Minecraft version. A mod built for 1.20.1 may not work on 1.20.4, even if the versions seem close.
- Confirm the mod matches your loader. Check the mod page for its listed loader — Fabric, Forge, or NeoForge — and make sure it matches what you’ve installed. A version match alone is not enough if the loader is wrong.
- Check for required dependencies. Many Fabric mods require Fabric API as a separate download. Without it, the mod won’t load. The mod page will list any required dependencies — download those too and place them in the same mods folder.
- Download only from trusted repositories. Modrinth and CurseForge are the two most widely used sources in the Minecraft modding community. Both display loader type, supported Minecraft versions, and dependency information on each mod page, which makes it much easier to verify compatibility before downloading.
- Expect a .jar file. Java mods are distributed as .jar files that you place directly in your mods folder. Be cautious of any unexpected executable installers — a legitimate Java mod should not require one.
- Don’t download anything you haven’t verified is safe. The Minecraft community should have warnings or recommendations.
- It’s not uncommon for your computer to try to block your mod download, due to the file types, etc. You’ll need to allow access, once again, after you’re sure it is a trustworthy mod.
Also, if you’re playing Minecraft at school or work, see our Minecraft unblocked at school guide to make sure your mods work without network restrictions.
Step 3: Create a Mods Folder and Save the Mod to that Folder
Find and open the mods folder from your base version of Minecraft. If you can’t find it, you can create a new one.
Copy and paste your new mod to this folder
If you need help finding the mod folder, here are the steps:
- Open File Explorer on your computer to find your mods folder
- Open View
- Be sure to toggle on the “Hidden items” under the “Show/Hide” section
[file:hidden; alt:Windows show and hide panel] - Go to “Your PC,” found in File Explorer, and open Local Disc (C:)
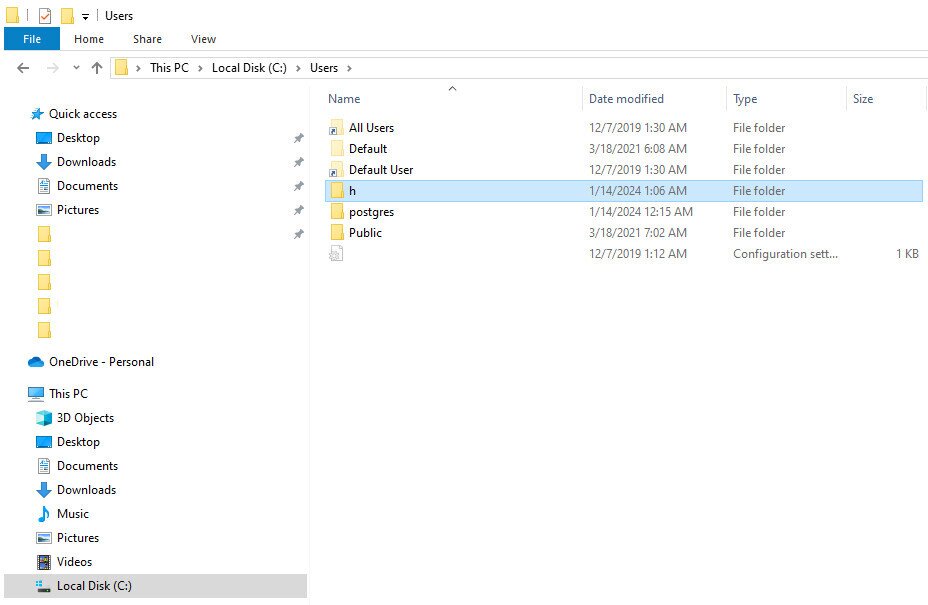
- Open the Users folder
- Open your user folder (you might have the name of this customized)
![Windows users folder]()
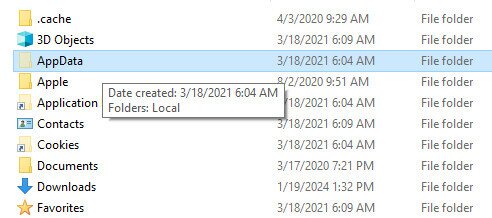
- Open the AppData Folder

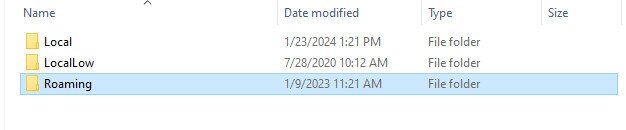
- Open the Roaming Folder

- Open the .minecraft Folder
- Look for the mods folder
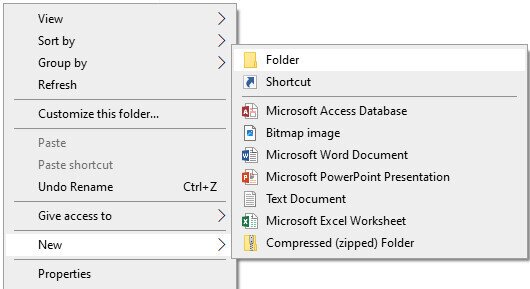
- If you don’t see one, right click your mouse, select New, and then select Folder
![Windows new folder]()
- Rename the new folder, mods
- Copy and paste your new mod/s to this folder
Step 4: Minecraft Launcher and Forge
After you’ve finished the installation process for Forge and your mods, do the following:
- Open Minecraft Launcher
- Choose Forge from the bottom left corner menu
- Select Play
![Minecraft play screen]()
- On the main menu, select Mods, if you see the option to
- You may find the Minecraft Launcher warns you about safety features not working due to the mods, which is common. You can always select “don’t warn me again about this installation”
- If you can’t connect to servers or encounter issues, check if Minecraft Realms down is affecting online play or connectivity before troubleshooting your mods.
How to Install Minecraft Mods on macOS
To install Minecraft mods on a Mac, you follow the same first two steps listed above for Windows. Download Minecraft Forge and also your mods.
After you’ve completed Step 1 and Step 2 from the previous section, go to Step 3:
Step 3: Find or Create Mods Folder
- After you’ve downloaded your mods, open your Finder icon, the blue and white square face at the bottom of your screen

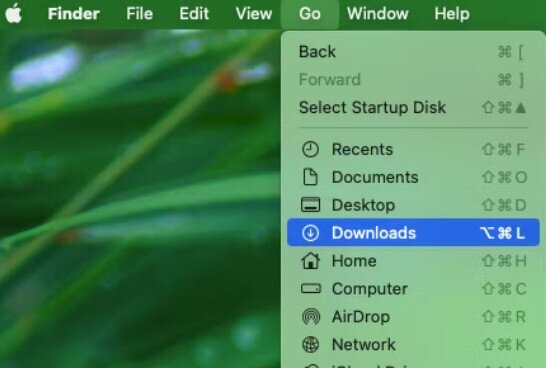
- Click Downloads, unless you saved the mod file to a different location, in which case you’ll need to go there instead
![Mac downloads]()
- Select your mod file and press Command + C to copy it
- Navigate to the Go menu at the top of your screen
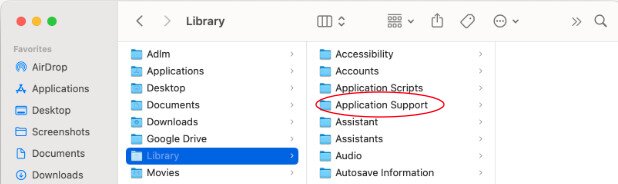
- Press and hold the Option key on your keyboard as you click Library from your Go menu
- Several options should appear. Select and open Application Support
![Mac application support]()
- Select and open the Minecraft folder
- Open the mods folder. If you don’t have one, create one by clicking File (at the top menu bar) and then select New Folder, naming it mods
- Once you’re in the mods folder, open the Edit menu at the top of the screen
- Select Paste to paste the mods to the folder
Step 4: Open the Mods
- Go to Finder
- Click Applications
- Double Click on the Minecraft icon
- In the Minecraft menu you’ll see a green Play button. Next to it is a drop down menu to select options from
[file:play; alt:Minecraft play button] - Click on the Forge profile, which will have your mods
- Click Play to enjoy your installed mods
Troubleshooting Mods That Don’t Load or Crash Minecraft
If Minecraft crashes on startup or your mods simply don’t appear in-game, don’t panic. Most issues come down to a small number of fixable causes. Work through these checks one at a time:
- Confirm the correct launcher profile is selected. Open the Minecraft Launcher and make sure you’ve chosen the profile that matches your loader (for example, the Forge profile if you’re using Forge mods). Launching with the default Java profile will not load any mods.
- Confirm the mod file is a .jar and is inside the mods folder. The mod must be an unzipped .jar file placed directly in the mods folder, not in a subfolder inside it.
- Confirm the mod matches both the installed loader and the Minecraft version. A Fabric mod will not load on a Forge profile, and a mod built for 1.20.1 will typically not work on 1.21, even if everything else looks correct.
- Check for missing dependencies. If a Fabric mod requires Fabric API and that file isn’t also in the mods folder, the mod will fail to load. Read the mod’s description page carefully for any listed requirements.
- Isolate conflicts by removing mods one at a time. If you’ve added several mods at once and Minecraft won’t start, remove them from the mods folder one by one — restarting after each removal — until the game loads. The last mod you removed before it worked again is the likely culprit.
- Review crash logs. When Minecraft crashes on startup, it generates log files. Check the latest.log file or look inside the crash-reports folder inside your .minecraft directory. The log will usually name the mod causing the problem and give a reason.
- Consider using a modpack or custom profile. If you’re installing many mods, setting up a separate custom profile — or using a pre-built modpack through a launcher like CurseForge or Modrinth — keeps your modded setup isolated from your main installation and makes conflicts much easier to manage.
How to Install Minecraft Mods on Consoles
Since consoles run the Bedrock version of Minecraft, Java-style mod loaders like Forge and Fabric are not available on these platforms. Bedrock does not support Java .jar mods. However, Bedrock does have its own form of customization through add-ons, which include resource packs and behavior packs.
These are created by a mix of third-party creators and Mojang-affiliated developers, and many are available through the in-game Marketplace. They work within Bedrock’s existing framework, which means they are generally less extensive than Java mods, and many are paid rather than free.
Since consoles use the Bedrock version, you’ll need to use add-ons if you want customizable options, rather than installing mods. Here’s how to install Minecraft mods and add-ons on consoles:
- Launch Minecraft
- Go to Marketplace, on the main menu
- You can choose things like Texture Pack, Mash-up Pack, etc.
- You can use your credit card or Minecoins to make your purchase
How to Install Minecraft Mods on Mobile Devices
If you play Minecraft on your Android or iOS device, you can use mods, but mobile devices only have the Bedrock version of the game. That means you’ll need to purchase add-ons through the Marketplace, or you can look for third-party apps that allow you to install Minecraft mods that are compatible with the game’s pocket edition.
How to Install Minecraft Mods on Android
Handheld versions of Minecraft don’t have access to the same Java mods you’ll find on PC. Standard Java mods do not run natively on Bedrock for Android — the editions are not compatible, and no app can change that. What third-party apps can offer are tools for Bedrock add-ons, maps, skins, and resource packs.
Before we go on, you should know that the Pocket Edition of Minecraft that we’ll be referring to has actually been discontinued and replaced with Bedrock.
Many in the community still refer to the mobile formats as Pocket Edition. You’ll especially find this in the names of third-party mobile apps. Don’t let it confuse you — they still work with Bedrock. Just think of the names as slightly interchangeable in these cases. Here are some apps to try when you want to install Minecraft mods on Android:
- Blocklauncher: An Android app widely used to apply add-ons and modifications to the Minecraft mobile versions. Note that this app is older and may not reflect the latest Bedrock updates, so verify it is current before using it.
- Mods for Minecraft PE: A free Minecraft launcher tool that lets you install add-ons, resources, and similar Bedrock-compatible content.
Installing Minecraft Mods on iOS Devices
Like Android, iOS devices use the Bedrock version of Minecraft, though it’s also often erroneously called PE. You can use add-ons from the Marketplace, but otherwise you’ll need to use third-party apps. Here are some places to start when installing Minecraft mods on iOS:
- Mods for Minecraft PE: This is the same app we mentioned for the Android, only it’s made for iOS
- Mod-Master for Minecraft PE: This is a free utility launcher that provides add-ons, textures, servers, skins, mods, etc.
- Mods, Skins for Minecraft PE: Besides a very to-the-point name, this app also provides maps, add-ons, and shaders
What is a Minecraft Mod?
Mods are packages of software that reach into the game’s code to change the game’s functions, such as fixing bugs and glitches, increasing player options, adding themes or aesthetics, or any other number of customizable ideas. Understanding what a mod is will help you make better decisions when you install Minecraft mods for the first time.
Mods can be massive expansions or small changes. When the vanilla version of the game (the base game) is updated, the creator of the mod must likewise keep it up to date, or it may cease to function. It can be a lot of work to keep up with all these changes.
The last thing to know about Minecraft mods is that they only work with the Java edition. The Bedrock version of the game has a variation of mods called “Add-ons” that are officially designed by the game’s creators, Mojang Studios. For the most part, we’ll be specifically referring to the Java edition and the independently created mods in this article. It’s important to know the difference, especially because there are limitations with Java. For instance, Java is only available to play on Windows, Mac, and Linux.