How To Add Custom Tiles To Quick Settings In Android
Android 6.0 and later has a neat Quick Settings panel in the Notifications shade. The Quick Settings panel comes with a few preset toggles that let you toggle Bluetooth, WiFi, and screen orientation lock. Android has not made the Quick Settings panel OS exclusive and users can add or remove tiles to them. To add custom tiles, users need to download an app that will add the tile they want. These apps are available in abundance in the Google Play Store. Here’w how you can add custom tiles to Quick Settings In Android.
Find The Right App
Open the Google Play Store app and search for quick settings. The results will feature a long list of apps that add tiles to the Quick Settings panel. This will include but are not limited to tiles for the weather, timers, and the camera. Download the app that adds the tile you want. These apps may or may not appear in your app drawer.
Add To Quick Settings
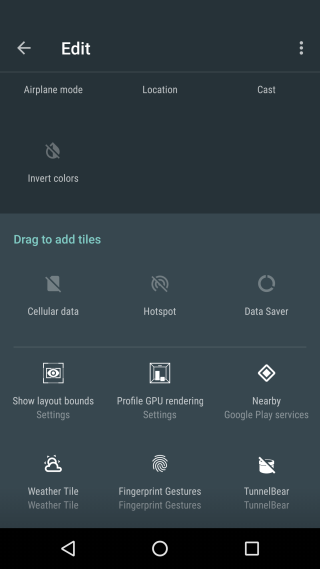
Pull down the Notifications shade all the way. Tap the edit button, the lone pencil icon, next to the user badge to enter edit mode. The Quick Settings tile will divide into two sections. Under the ‘Drag to add tiles’ section, look for the tile you just installed via an app. Drag & drop it on to the panel of added tiles. Once added, tap the tile in the Quick Settings panel to run it.
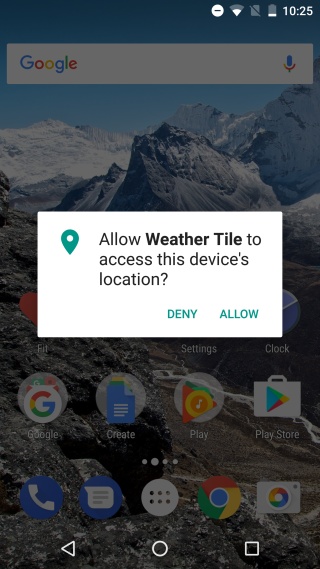
Some tiles, like a weather tile or camera tile, might ask for additional permissions to run. The Weather tile asks for permission to use your location. A camera tile will likely want permission to access the camera. Grant it permission to get it running.
That’s all it takes. In order to add custom tiles to quick settings, you are dependent on an app. You can’t just add any app of your choice as a tile to the Quick Settings panel which is understandable.

嗨、我是Feeey 偶然看到你的博客,很棒哟,我会常来的。我的博客http://www.feeey.com