How To Take Screenshots In Recovery & AROMA On Android
A lot of Android enthusiasts use custom recoveries such as TWRP and ClockworkMod for flashing ROMs and mods, taking and restoring full device backups, and even managing their files using the full-featured AROMA file manager. And while most users wouldn’t really need to take screenshots in recovery mode, us bloggers, developers of custom recoveries and AROMA-based apps, as well as designers of recovery themes need this functionality often to showcase what they’re reviewing or working on. In what follows, we will guide you through the process of easily taking screenshots of your Android device while it is booted in recovery mode, regardless of what custom recovery it’s running.
Unlike when you’re booted into Android normally, the standard Volume Down + Power button combination doesn’t work for snapping a screenshot in recovery. Previously, Android SDK’s DDMS tool used to work just fine for the purpose, but that’s no longer been the case since the past few updates.
The only working solution that I’ve been aware of so far was to manually grab the raw framebuffer data and then process it using the ffmpeg command-line tool to get the required image. However, there’s a serious caveat with this solution: it isn’t a single, universal command for all Android devices, because different devices and recoveries use different pixel formats for their framebuffer, and the command also needs be tweaked to factor the device’s native resolution and a stride factor in the raw image. I have personally been through the nightmare of spending hours trying to figure out these parameters for some of my devices when writing some of my guides involving recovery screenshots.
What we’re about to see is an awesome little tool by XDA Member makers_mark that gets the job done for you while keeping all such complications in the background.
Meet Recovery Screenshot
Recovery Screenshot is a script (only available for Windows as of this writing) that utilizes ADB and ffmpeg to pull the raw framebuffer from your device and then process it accordingly to present you with the screenshot in PNG format.

Before you can start snapping recovery screenshots, you must configure the tool for your device. So, let’s get started.
Settings Things Up
Before you proceed, make sure you’ve rebooted your device into recovery mode, connected it to your computer via a USB cable, and installed the necessary drivers for it.
Download Recovery Screenshot and extract the contents of the downloaded ZIP file to any convenient location on your computer. Next, launch the tool using the RUNrs.bat file in the folder. The script will present you with the following options:

Select the first option, i.e. make a configurations setting by pressing 1. You will then be asked for your device’s screen dimensions in pixels. Make sure you enter the shorter dimension as width and the longer one as height.

Recovery Screenshot will then pull the framebuffer from your device, process it in several pixel formats with ffmpeg, and put the processed PNG files into a ‘Pixel_formats’ folder inside the folder where you extracted the tool.

Now go to the Pixel_formats folder and check out all those images. You’ll notice that most of them look funny, which is perfectly normal; they were processed using a pixel format different from that of your device. What you need to look for here is the image that looks right, note its name (which is the name of its pixel format), and press any key to continue.

If you’ve found the correct image in the folder, go ahead and press 1 to finalize your settings. If you didn’t get lucky this time though, just hit 2 and the tool will try out even more, less commonly used formats. In that case, look again in the same folder for the dozens of new images added there, and make a note of its name when you find the correct one.

After you’ve found the correct pixel format, enter it on the next screen exactly as you see it in the name of the correct file (without the .PNG extension). For example, in our testing using the Nexus 5, the correct image was rgb0.png and hence the correct pixel format was rgb0.

After you input the correct pixel format for your device and hit Enter, you’re done with the configuration – it’s now time to start snapping those recovery screenshots. Your settings are saved and you will no longer need to configure the script for the same device when launching it again.
Capturing Screenshots in Recovery
After the initial configuration is complete, you’re given the following options whenever you launch the tool.

What might seem confusing here would be the presence of three options for grabbing the framebuffer. Explaining how Android’s double framebuffer system works is beyond the scope of this guide, and the image you’re looking for could be in either of the framebuffers, so it’ll be a good idea to go for the third option each time, i.e. getting both framebuffers. Just hit 3, and Recovery Screenshot will start pulling and processing both the framebuffers for you.

The resulting processed image files will be placed in a subfolder inside the script’s main folder, and given a name based on the current date. The images inside will be named based on the current time, as well as the framebuffer (upper or lower).

Note that when you try to capture a different device’s screenshots, you might need to configure the tool again. To do that, just hit 4 on its main screen to reset your settings and start over. The fifth option i.e. the manual mode doesn’t involve having a device connected in recovery mode, and can be used to manually specify your settings and process any raw image file as source.
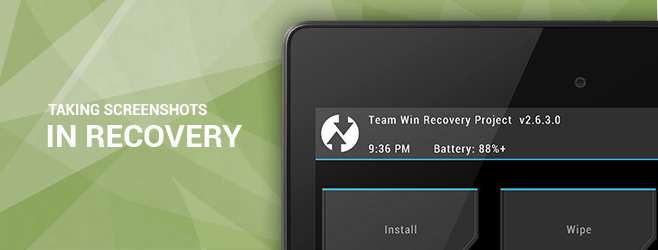
A Few Results
Here are a few screenshots captured in recovery mode using the script. The first one is TWRP recovery’s home screen, the second one shows flashing progress, while the third one is the AROMA File Manager.


Again, while it isn’t for everyone since casual users and even most power users will never need to capture recovery screenshots, Recovery Screenshot can prove to be a lifesavers for people like me who previously had to go through the hassle of manually pulling framebuffers and processing raw images with ffmpeg commands each time we needed to review a custom recovery or AROMA script.
Download Recovery Screenshot from XDA-Developers
