How To Gain Permanent Root on T-Mobile G2 / Desire Z without ADB
This is a guide for permanently rooting a T-mobile G2 with Visionary / gfree without the use of ADB. First we use visionary program to achieve the temporary root, followed by gfree to gain permanent root. This procedure has been tested on G2 but should also work with Desire Z as well.
Powered by the Qualcomm processor, HTC Desire Z also known as the T-Mobile G2, is one of the best slider keyboard Android phones available in the market. The procedure of permanently rooting the phone is a two step process. The first step involves the Visionary program (named after the phone HTC Vision / G2) to achieve temporary root and then followed by gfree to achieve permanent root. In case you have done an OTA upgrade to version 1.72 then first downgrade the firmware to the original flash ROM. The credit for this guide goes to XDA Forum Senior Member ianmcquinn.
Disclaimer: Please follow this guide at your own risk. AddictiveTips will not be liable if your device gets damaged or bricked during the process.
Instructions:
- The first step is to install Terminal Emulator and a file manager from the Marketplace, such as, Astro file manager.
- Now insert the SD card to your computer and unzip the “root_files.zip” file (download link given at the bottom of this post) to this SD card (a directory will be created called root_files on the card). When done, unmount the SD card from your computer. Make sure that all the extracted files are directly inside the root_files folder and not in another subfolder inside it.
- Enable unknown sources (under Settings –> Applications) and USB Debugging (under Settings –> Applications –> Development).
- Using the file manager (we are using Astro file manager), navigate to the root_files directory on the SD card (created in step 2), and select “com.modaco.visionaryplus.r14.apk” to install the Visionary app.
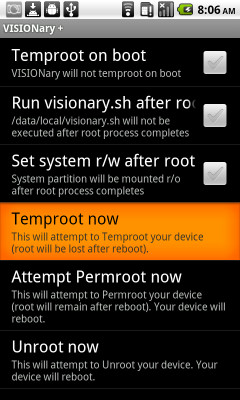
- Launch the Visionary app and click on “Temproot now”. Leave the other settings unchecked.
![Visionary Desire Z Visionary Desire Z]()
![Temp Rooting Desire Z Temp Rooting Desire Z]()
- Start the terminal app and type the following commands:
$ su

# cp /sdcard/root_files/perm_root   /data/local/perm_root

# chmod 777 /data/local*

# /data/local/perm_root
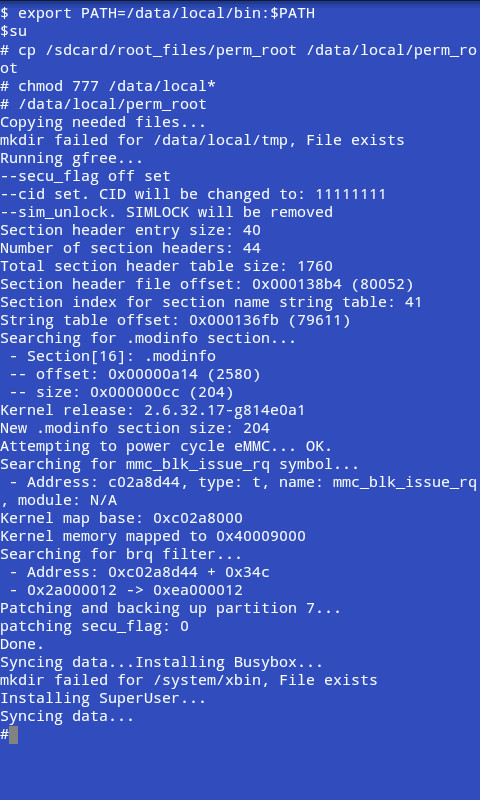
Here is the terminal output of these commands that you should see during this process.
The first command changes the rights to super user, the second command copies files to the directory /data/local/perm_root, the third command changes the rights of files in data/local, and the last command launches the script.
As the program is executed you will see a number of messages scroll by. Once you are returned to the prompt in terminal, you will have permanent root, as well as subsidy unlock and Super CID. Your phone is now rooted and you can verify having permanent root by holding the Volume down while powering on the phone (see S-OFF in the first line of the bootloader) or by installing SuperUser app from Android market.
(https://addictivetips.com/app/uploads/2011/01/root_files.zip) Download root_files.zip


Does this work after OTA Gingerbread update or does the G2 have to have or be downgraded to Froyo?
Stuck on the black screen. :/ Anybody??
When I run the visionaryplus. The screen goes dark and I can not pass this I have to give a home to go from there. what was going on? I can do?
Did u get it to work?
Sam problem here. Would not recommend this tutorial
my screen just goes black after i start temp root….seen everybody else’s comments, how did u get past this?
THANK YOUUUU 😀
Thanks. Works great.
Having trouble at step 6.
So when I open the terminal emulator and I see ($ export PATH+= ect…) I tried to type in the commands but when I start the first segment (su) it is fine on the second segment I press enter to go to the nxt line and I get permission denied.
I just did it. Temp root, and enter the commands EXACTLY as described.
OK Im reading every1’s reviews ADB is a little to complicated for this phone….. but reading here i guess its not neccesary to downgrade phone?
I have a question, Once it gets to the last syncing data do you let it do its thing? or is your phone rooted i waited ten mins and nothing changed on it, so i figured it was rooted?
worked for me. Did it all from the phone. Downloaded zip file. Extracted it to new folder on SD card which i called root_files (as per above), did all the other bits and worked first time! thanks!
Worked without any problem. thanks.
no need to pull the card from the phone though – you can mount the phone over USB and copy files using computer file manager.
for anyonehaving an issue make sure the folder you created when moving the root files to your SD card is Root_Files not Root Files there needs to be _ <<<<<<<(underscore) in the file name or it's not going to see the folder when you move on to the later steps!
LOVE IT!!!! super easy thanks a lot
Worked like a charm, and easy too. Thanks a bunch. Been looking over the webz for a minute for a way that didn’t require X, Y, and Z. This is about as simple as it gets. Do you know how to unpack a zipped file? Then you can do this, cuz that’s about the most complicated part haha.
Thanks again.
Everything went exactly as detailed and I’m rooted on my G2 but now my AVG Anti-Vurus tells me that VISIONary + is a virus. Has anyone else experienced this and once rooted does VISIONary + need to remain installed?
Thank you so much! I wasn’t able to get ADB working, but this worked perfectly, and now my G2 is permanently rooted 🙂 I will recommend this article to anybody who needs to permanently root their G2. Again, thanks a bunch!
Success! Thank you!
My Tmobile G2 is permanent root, and guys come on is very easy, just follow all parts of this tutorial.
ONLY METHOD THAT WORKED! tried 4 others. ty.
THIS WORKED!!!!!!!!!!!!!!! FINALLY!!!!!!!!!!!!!!!!!!!!! mytouch 4g =)
THIS WORKED!!!!!!!!!!!!!!! FINALLY!!!!!!!!!!!!!!!!!!!!!
Exploit detected on the file.
Your antivirus detected a false positive.
DONE!! thanks, easy to execute if you have decent knowledge on how work a pc
the root_files.zip is a broken file i cant unzip it at all….HELP ME, HELP ME PLS!…..i can hear the roms calling me to try them…
no…but really pls…i need help cus i really wana know what the whole fuss is about…
also, just there’s no question, yes i did transfer the zipped files over to the sd card directly
also when entering the chmod code line, is the end supposed to be /local/* or /local*
i was able to temp root my g2, but when i put in the first two code lines, i got this response:
cp: cannot stat ‘/sdcard/root_files/perm_root’: No such file or directory
can anyone plz help!
I am having the same exact issue, did you ever get it fixed?
I’m having the same problem after I type in su command
can anyone tell me what i am doing wrong
i’m not sure what issues TotoHU maybe having, but i just did this one my G2. Worked without any complications.
Thanks for the guide!!
Does not work for me. After I tap on ‘Temproot now’ the screen gets black and phone hangs for 1-2 minutes. Then I get back to mai screen, but then the Terminal app refuses superuser rights. When typing su the response is ‘permission denied’.
I get the same issue. Have not found a solution yet.
same here
So has anyone found a solution to this? cause i’m having the same problem.
Same probs here
You need to downgrade your phone to android version 2.2