Use Tailscale in Docker containers on Linux
Tailscale enables users to create their virtual network using WireGuard. This makes system administration on Linux easier by allowing access to host services from anywhere, without the need to open ports. Here’s how you can integrate Tailscale in Docker containers.
How to read the Tailscale Docker compose file
The easiest way to deploy a Docker container with built-in Tailscale support is by using Docker Compose. Docker Compose allows you to craft a recipe, enabling you to define everything before deployment. In this guide, we’ll base all of our work on the compose file example provided below.
version: "3.7"
services:
  tailscale:
    image: tailscale/tailscale:latest
    container_name: tailscale
    hostname: your-service
    environment:
      TS_AUTHKEY: AUTHKEY_HERE
    volumes:
      - ${PWD}/tailscale/state:/var/lib/tailscale
      - /dev/net/tun:/dev/net/tun
    cap_add:
      - net_admin
    restart: unless-stopped
  myservice:
    image: myserviceimage
    network_mode: service:tailscale
    depends_on:
      - tailscale
In this compose file, several configurations are noteworthy:
- tailscale: Defined as a service, using the tailscale/tailscale:latest image with the hostname set to tailscale.
- environment: Specifies the Tailscale authorization key for automatic login to the Tailnet.
- hostname: is defined as “your-service.” This hostname can be customized to reflect what service you are setting up.
- volumes: Maps
${PWD}/tailscale/stateto/var/lib/tailscale, where${PWD}represents the current working directory. It also maps/dev/net/tunto the container, facilitating virtual networking through the TUN/TAP device driver. - cap_add: Adds the
net_admincapability, granting the container network administration privileges. - restart: unless-stopped: Configures Docker to restart the container automatically unless manually stopped.
- myservice: Acts as a placeholder for your custom Docker service, demonstrating how to integrate it with Tailscale.
- network_mode: Configures “myservice” to use the Tailscale service’s network, ensuring proper network configuration.
- depends_on: Ensures that “myservice” will only start after the Tailscale service is up and running.
How to configure the Tailscale Docker compose file
Now that we’ve reviewed how the compose file works, let’s create an example service based on it. To start, open up a terminal. Once in a terminal, use the mkdir command to create a new folder.
mkdir -p ~/docker-composers/
After creating the new folder, create the “tailscale-compose” subfolder. This is the directory we’ll be working in.
mkdir -p ~/docker-composers/tailscale-compose/
From here, use the touch command to create the docker-compose.yml file.
touch ~/docker-composers/tailscale-compose/docker-compose.yml
Next, open up the compose file in the Nano text editor, and place in the following code:
version: "3.7"
services:
  tailscale:
    image: tailscale/tailscale:latest
    container_name: your-service
    hostname: tailscale
    environment:
      TS_AUTHKEY: AUTHKEY_HERE
    volumes:
      - ${PWD}/tailscale/state:/var/lib/tailscale
      - /dev/net/tun:/dev/net/tun
    cap_add:
      - net_admin
    restart: unless-stopped
  myservice:
    image: myserviceimage
    network_mode: service:tailscale
    depends_on:
      - tailscale
Next, you’ll need to save your edits to the compose file. To save in the Nano text editor, press Ctrl + O on the keyboard.
How to customize the Tailscale Docker compose file
To customize the Tailscale Docker compose file, start by opening it up in the Nano text editor (if you don’t have it open already.) Once it is open, find “myservice:,” and erase it, along with everything below it.
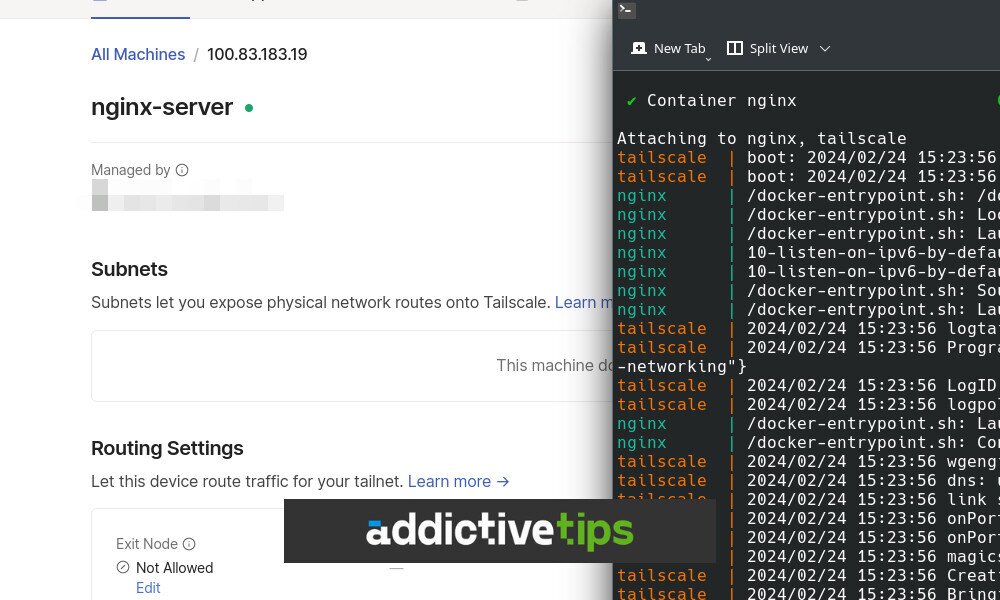
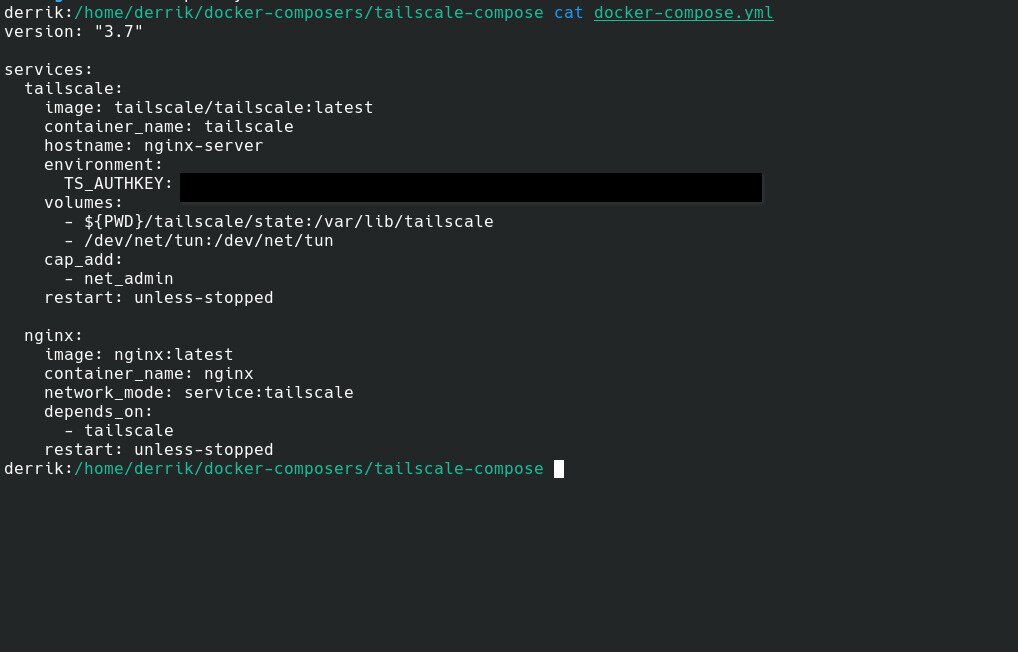
You can replace everything with your custom service when you’ve erased everything. In this example, we’ll set up a basic Nginx server. Always ensure that your custom service includes network_mode: service:tailscale or it will not ineract with your Tailnet.
version: "3.7"

services:
  tailscale:
    image: tailscale/tailscale:latest
    container_name: tailscale
    hostname: nginx-server
    environment:
      TS_AUTHKEY: AUTHKEY_HERE
    volumes:
      - ${PWD}/tailscale/state:/var/lib/tailscale
      - /dev/net/tun:/dev/net/tun
    cap_add:
      - net_admin
    restart: unless-stopped

  nginx:
    image: nginx:latest
    container_name: nginx
    network_mode: service:tailscale
    depends_on:
      - tailscale
    restart: unless-stopped
When you’ve finished making the edits, it should look like the example above. From here, save the edits in Nano using the Ctrl + O keyboard combination.
How to get a Tailscale auth key
You now need to set up a Tailscale authorization key for the container. Without this key, you will not be able to deploy your container on the Tailnet quickly. To start, go to tailscale.com, and log into your admin dashboard.
After accessing your admin dashboard, find “Settings,” and select it. Then, choose “Keys.” Finally, click “Generate auth key,” and generate your auth key.
When you’ve successfully created your auth key, go back to the Docker compose file and replace “AUTHKEY_HERE” with your key. Save your edits when done by pressing Ctrl + O.
How to deploy the Tailscale Docker compose setup
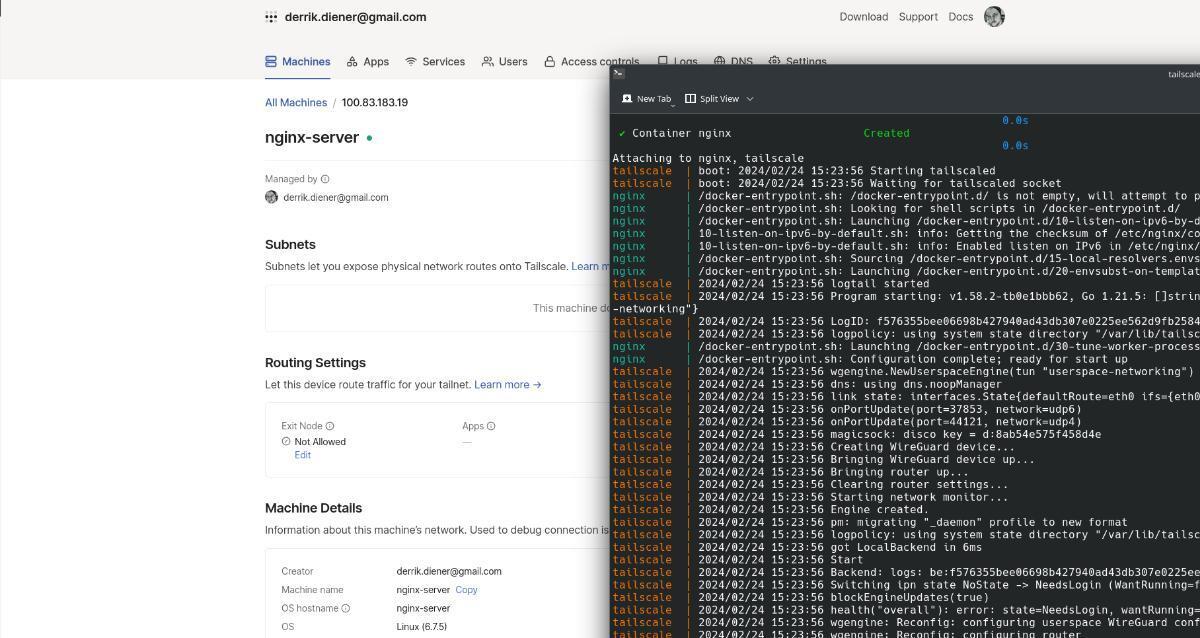
Deploying your Docker container is straightforward now that all the hard work is encapsulated in the compose file. To deploy, follow these steps. First, open a terminal window. Once the terminal is open, navigate to the ~/docker-composers/tailscale-compose/ directory using the cd command.
cd ~/docker-composers/tailscale-compose/
After you’ve navigated to the directory, you can easily deploy your Tailscale-powered Docker container with the docker compose command.
sudo docker compose up -d
If you need to take down the container, simply execute the docker compose down command.
