How to Access BIOS on Any Windows PC or Laptop Easily
BIOS is the basic input/output system that every laptop and desktop on the market comes packaged with. You normally don’t have to use it if you’ve got Windows installed. In fact, there’s little reason to need to access it in the first place. That said, it’s not something that you never need to change. The BIOS (or modern UEFI) contains system settings that you might need to change on occasion. For example, the BIOS is where you change your first boot device. It’s really easy to access BIOS on your PC. When you boot into your system, you need to tap a specific key. You must tap it before you see the Windows boot logo. The only tricky part is knowing which key to tap. The key differs from system to system so we’re going to attempt to compile a list of these keys for every available PC there is.
Make sure you don’t have Fast Startup enabled on Windows. You might have to use the Fn key in addition to the other function keys when you’re trying to access BIOS.
Acer
Tap the F2 key repeatedly (or hold it) as you power on your Acer laptop or desktop to access BIOS. On some models, Del also works for desktop motherboards.
ASUS
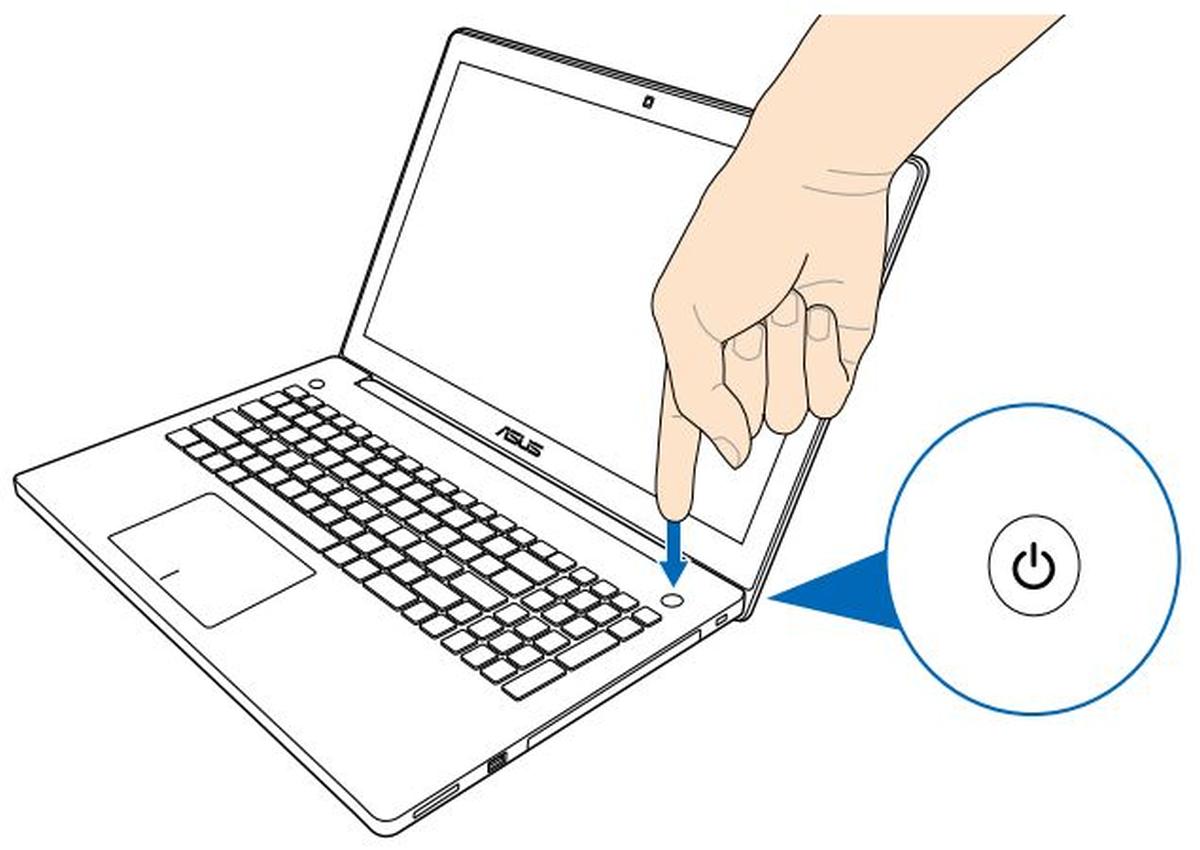
F2
Hold down the F2 key and then press the Power button. Keep holding down the F2 key until you see your BIOS screen (Image courtesy ASUS Support page).
Del Key
If the F2 key doesn’t take you to your BIOS, try the Del (Delete) key. Tap it when you boot, or hold it down as you power on to get to your BIOS (common on ASUS desktop motherboards).
Dell
The BIOS key on a Dell laptop or desktop is usually F2. Turn on your PC and tap the F2 key repeatedly. Some models also show F12 for the one-time boot menu.
HP
The key to access BIOS differs from one HP product to another. They have not standardized this and there are quite a few keys you will have to try.
Escape + F10
The most common path is the Esc key. Turn on your laptop and tap the Esc key to open the Startup Menu, then press F10 to enter BIOS Setup (HP guide).
F10
On some HP laptops, tapping the F10 key directly at startup will take you into BIOS.
F2
Tap F2 at boot to open a diagnostic/secondary menu that may point to BIOS.
F6
If the above combinations don’t work, try F6 or check the on-screen Startup Menu for the correct key.
Lenovo
Lenovo laptops and desktops use a few different keys depending on the model.
F1
If you own a Lenovo ThinkPad or some ThinkCentre desktops, tap the F1 key when you see the Lenovo splash screen to get to your BIOS menu (you’ll often hear a short beep).
F2
On IdeaPad and consumer models, use F2 on system startup (sometimes Fn + F2).
Novo Button
Many IdeaPads include a small pin-hole Novo button that opens a menu with options for BIOS, Boot Menu, and System Recovery. Look along the left or right edge near the power port (Lenovo Novo button).
Samsung
Boot your system and wait for the Samsung logo to appear. Tap the F2 key to access BIOS. The BIOS screen may differ from one model to another but the key to access it is typically the same.
Sony
Sony had some great looking laptops back in the day. They had quite the rich line so naturally you can expect some variation on how to get to your BIOS.
F2 + Power Button
If you own a series S or Z Sony Vaio laptop, hold down the F2 key and then press the power button to turn on your system. Do not release the F2 key until you get to your BIOS.
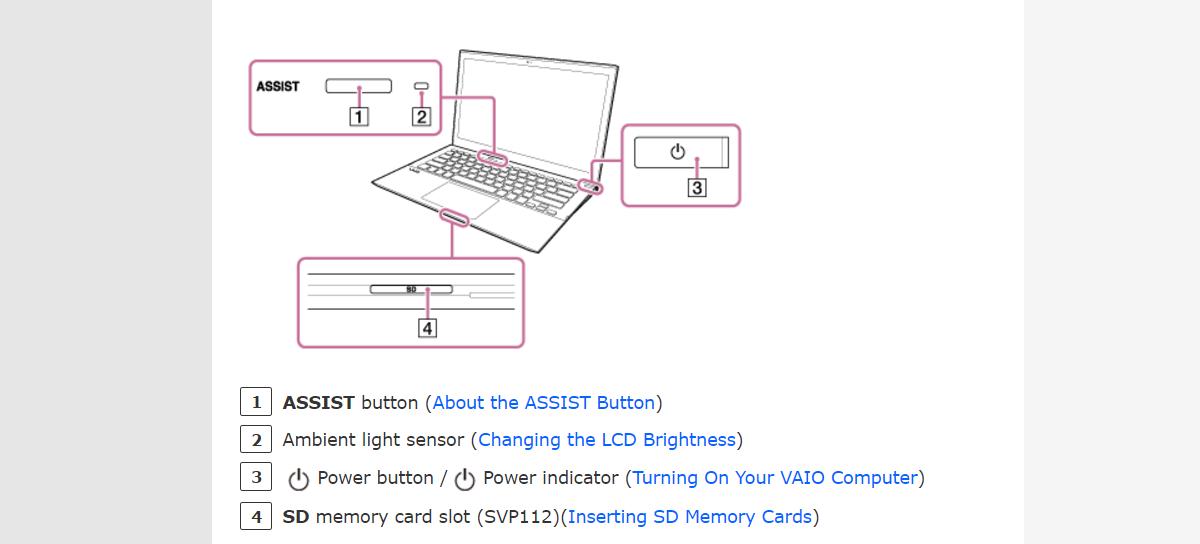
Assist Key
Turn on your system and tap the Assist key to get to your BIOS. The Assist key is a special key that you won’t find on other laptops. You might not even have it on all Sony laptops but if your model does have the Assist key, it can take you straight to your BIOS. It’s present on several Vaio Z/Flip models.
Toshiba
F2
Tap the F2 key to access BIOS on your Toshiba laptop.
F12
If the F2 key doesn’t work, reboot and tap the F12 key to open the boot menu, which often links to BIOS settings.
Microsoft Surface
Shut down your Surface. Press and hold the Volume Up button, then press and release the Power button while still holding Volume Up. Release Volume Up when the UEFI screen appears (Surface UEFI guide).
Custom desktops & common motherboard keys
For self-built PCs, the motherboard vendor decides the key. The most common are Del (MSI, Gigabyte/Aorus, many ASUS boards) and F2 (ASRock/ASUS). If you miss the prompt, restart and try again.
Windows 10 and Windows 11 Settings
Method 1: Shift + Restart (works on Windows 10/11)
Hold down the Shift key and click Restart on the power menu. This will show the Advanced startup options instead of booting to your desktop. Go to Troubleshoot > Advanced options > UEFI Firmware Settings, then select Restart to boot into your BIOS.
Method 2: From Settings (Windows 11)
Open Settings > System > Recovery, then under Advanced startup click Restart now. After the blue screen menu appears, choose Troubleshoot > Advanced options > UEFI Firmware Settings, and select Restart (Advanced startup options).
Note: The UEFI Firmware Settings option appears on systems using UEFI. Very old systems with legacy BIOS may not show this item. If you’re new to working with BIOS and UEFI, check out our computer firmware overview to understand the basics of how this low-level software controls your hardware.

If you still can’t get into BIOS
- Use a wired USB keyboard (some wireless/Bluetooth keyboards don’t work before Windows loads).
- Perform a full shutdown first (
Shift+Shut down) to avoid Fast Startup skipping the key window. - Power on, then immediately start tapping the key once per second until the setup screen appears.
- Check your model’s manual or support page for the exact key.
What’s New in This Update
- Fixed Acer section text and clarified that some Acer desktops also use Del.
- Added Microsoft Surface instructions with Volume Up + Power method and support link.
- Expanded Lenovo guidance to include the Novo button and ThinkPad/ThinkCentre key differences.
- Added a new section for custom desktops & motherboard keys (ASUS/MSI/Gigabyte/ASRock).
- Updated Windows 11 path: Settings > System > Recovery > Advanced startup, plus retained Shift+Restart method.
- New troubleshooting checklist for when the BIOS key isn’t working (USB keyboard, full shutdown, timing tips).
Last updated: 27 October 2025

Thank you! I have been working on the problem for 3 days. All I have to say is “AWESOME”! My problem is solved.