Give Your Windows 8 Desktop A Makeover With Rainmeter & RocketDock
I’ve always wanted to customize my Windows 7 desktop using Rainmeter to add some interesting look and feel to it, and RocketDock to get rid of the taskbar. But it has never been possible to totally neglect the taskbar, only due to the start menu, which held so many applications in place. In short, I gave up on the idea of customizing my desktop. But since Windows 8 has replaced the Start menu with the Start Screen, I can continue with the customization, and you too can learn how it’s done!
The apps you’ll need are Rainmeter and RocketDock, download links are given at the bottom of this article. In fact, we have covered Rainmeter before, so refer to that guide as well.
Let’s clean up the desktop first. Right click on desktop, navigate to View, and then click Show Desktop Icons.

This will hide all the desktop icons (if you haven’t done so far). This way, the icons won’t interfere in our customization process. And since we’ll be using RocketDock (and the Start Screen) for launching apps, we won’t need the desktop icons anyway.
Install Rainmeter (installation is pretty straightforward). When installed, double click the icon in the system tray to bring up Rainmeter manager. Here, you can load or unload skins, and customize them as well. I’ll be using DeviantArt to download most of the Rainmeter skins used in this guide.

Some Rainmeter skins come as executables (with the .rmskin extension) and are installed easily using Rainmeter Skin Installer (which opens up as soon as you open the skin).

Some skin packs however, come zipped in a folder, and have individual skins in them, and they have to be placed in your Rainmeter directory though, usually in a ‘Rainmeter’ folder in the Documents Library. Click the skin that you want (from the package). Here I want to copy the Network skin (I don’t want anything else from this one).

Paste it in your Rainmeter directory.

Open the Rainmeter manager by double clicking its icon in the system tray. Note that the newly copied skin might not show up immediately. Click ‘Refresh all’ so that it appears.

Before applying skins, we need to get rid of the not-so-attractive skins that come bundled with Rainmeter. Right click on a skin and click ‘Unload Skin’ to remove it. Do this for all others as well.

Now we are ready to download new skins and get rid of the taskbar completely. Before doing that, we’ll see what it is currently holding for us. There are a lot of unused items in the system tray, and we definitely don’t want all of that. So we can download better alternatives for the things that we really need.
A battery meter. It’s something that laptop users have to see every once in a while. It would be great to have a stylish looking battery meter on your desktop. I’ve used this battery meter skin (it’s called Coffee Battery) for Rainmeter. It works as advertised, and displays the status of the battery quite accurately.

Oh, the great clock. Your partner for the good and bad times. There’s not a particular clock that I’d recommend. Just search for Rainmeter clocks on DeviantArt, and there will be a variety of clocks to choose from. Here’s the one that I used (Cowon Clock).

Similarly, you can add more skins like a CPU monitor,

and a Weather skin.

Instead of adding skins one by one, you can find an all-in-one package. Such packages have all the useful skins built right in, so that you won’t have to download them individually. Remember that there are so many alternatives to the aforementioned skins. You can choose which one you want, it’s all based on your personal preference (and that’s the beauty of it). Skins can be configured to stay always on top of other windows, and you can also set the level of transparency. Right click any skin to have a look at the options, try playing with the options to see what happens. Using Rainmeter can give you functionality that you wouldn’t otherwise get in windows 8 easily. For instance, you can add a power control panel to the desktop which will let you sleep, shutdown or hibernate your computer in just a couple of clicks (Windows 8 doesn’t let you do that easily!).

Now we’re done with Rainmeter. Install RocketDock, and after installing, open RocketDock Settings.

Check “Minimize windows to the Dock” and press OK.

This way, you won’t be dependent on the taskbar to switch between the minimized windows (and you can also use Switcher). You have successfully got rid of the taskbar. Now it isn’t useful anymore, we can hide it.
Right click the taskbar, click ‘Lock the Taskbar’, and drag it to the left of the screen (or to the right- I like it at the left, but it doesn’t matter anyway because it’s going to be hidden).

Now right click on it, click Properties, and check ‘Auto-hide the taskbar’. And if you think there’s something that always needs to be done from the taskbar, it’s just a mouse-hover away!

Now to get some RocketDock skins. Just like everything else, you can find plenty of RocketDock skins from DeviantArt. Download a skin; it will be downloaded as a zip, most probably (sometimes it could be a rar or 7z archive). Extract it, and copy the skin in the Skins folder inside your RocketDock folder (usually installed in Program Files in any drive that you specified during installation). Once copied, open RocketDock settings and click the Style tab. Click the “Theme” drop down and find the name of the skin that you just copied.

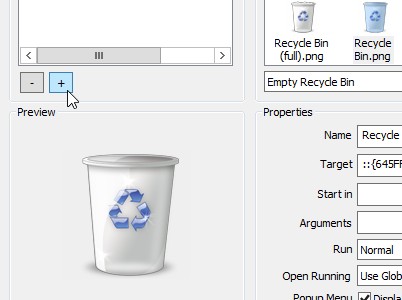
Now add icons, and you can get several RocketDock icons over at DeviantArt or even on RocketDock’s site. It doesn’t matter where you save the icons, as long as you can remember the path where you saved them. To change an icon, right click it and click Icon Settings.

Click the + button to add a new directory containing the icons (remember where you saved the downloaded icons?)

Browse to the required directory and click OK.

Now select the directory from the left pane of the window, and click the icon that you want to apply. Click OK when you’re done.

You can change all RocketDock icons this way. RocketDock has several other options you can set to suit your liking. For more information, refer to the RocketDock documentation.
Finally, it’s time to set a wallpaper that suits the overall look and feel of the desktop. Also adjust the Rainmeter skins to blend them in with the wallpaper.

And here it is, my Windows 8 desktop in its full glory (but I guess I’m too bad at customizing!)
Congratulations, you’ve learned how to customize your Windows 8 desktop like a pro. Now it’s up to you how you make your desktop look. There are unlimited possibilities, so be creative. Feel free to share your customized windows 8 desktops in the comments!

I’m amazed that MSFT provide such a ghastly interface, without making it easy for the user to change or improve it. I suppose it’s the legacy of the man of no taste – he thought the purple dinosaur was the coolest thing ever.
rocketdock hasnt been updated for a long time – its not compatible with 64bit windows….a lot of people are moving to 64bit these days….unfortunately I havent seen any good replacements..
I’m using it on W7 x64 for three months now, haven’t had a single problem with it.
It works on my 64-bit w8.1 – so it’s compatible if not native.
Thanks for the tips. What “CPU monitor” and “Power Control Panel” skin did you use??
hey love your site but i am really not interested in windows 8 tips yet, still loving 7 (on and off!) yet when i try your search feature for “windows 7” it does not function very well, ie provide most recent to most ancient, first entries i see are dated 2009.. any chance of improving this area of your site?
I’ve been using Rainmeter and RocketDock for a while.
My desktop: http://i.imgur.com/Z8syn.jpg
Still on Windows 7, but with a bit of customization, the taskbar can look good.