How to Change Language in Windows
If you want to learn how to change language in Windows, we’ve got you covered. Whether you’re multilingual and want to use your computer in a language you’re more comfortable with, or you want the opportunity to practice a new one through immersion, we’ll walk you through it. We’ll cover changing your system language and keyboard layout, and answer the most common FAQs.
How to Change Language in Windows 10 and Windows 11
Here, we’ll cover changing language settings in Windows 10 and 11, including installing a language pack and related steps. While the instructions for Windows 11 and 10 are similar, we’ll list them separately for clarity. Also, keyboard layouts can be changed, which we will cover further in this article.
First, however, you’ll need to know how to install a language pack, if your preferred option isn’t already available on your Windows device.
How to Install a Language Pack for Windows 10
You can check whether the language you want to change to is already supported, eliminating the need to install a language pack. Here’s how:
- Go to Start.
- Go to Settings.
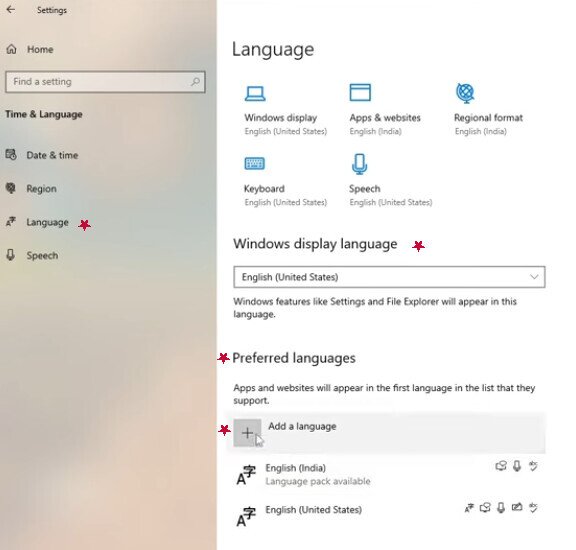
- Go to Time & Language.
- Go to Language.
- In this window (underneath “Preferred language“), you should see all of the languages that are currently installed on your computer.
- If it’s not there, you can install a language pack. Be sure your computer is connected to the internet and save/close any apps or other unnecessary programs running.
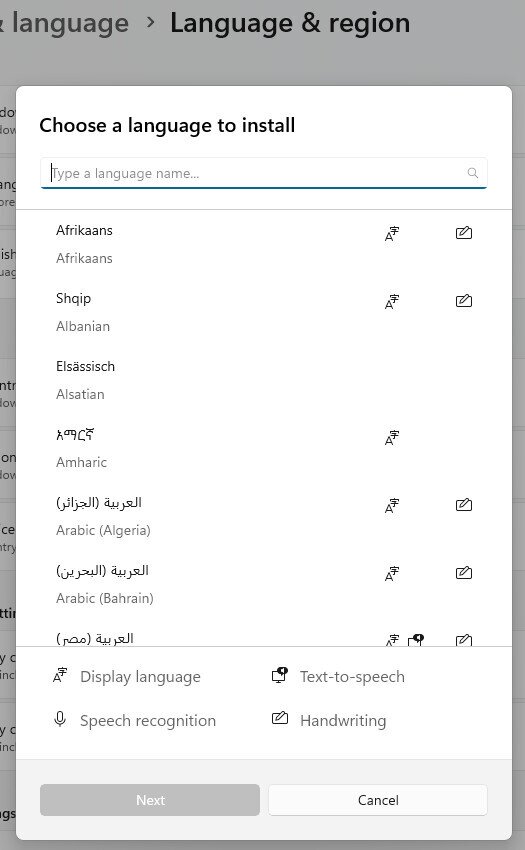
- While still in the Language window, look under “Preferred language” to find the “Add a language” option. Click it, and a “Choose a language to install“ window will pop up.

8. Input the language you want in the search bar and choose it from the options that appear. Then click Next.
9. Make sure the Install language pack box is checked. You can also choose to select “Set as my Windows display language” to activate the new language on your computer. Otherwise, we’ll cover that option in the next section.
10. When you’ve chosen all of your optional language features, such as text-to-speech, click Install.
11. Once it has been installed, the new language will now show up under the Preferred language section. If you choose to set it as your display language, you’ll see an alert that says, “Setting Windows display language, Windows needs to sign you out in order to fully apply the new language. Continue?” Choose “Yes, sign out” or sign out manually to apply these changes.
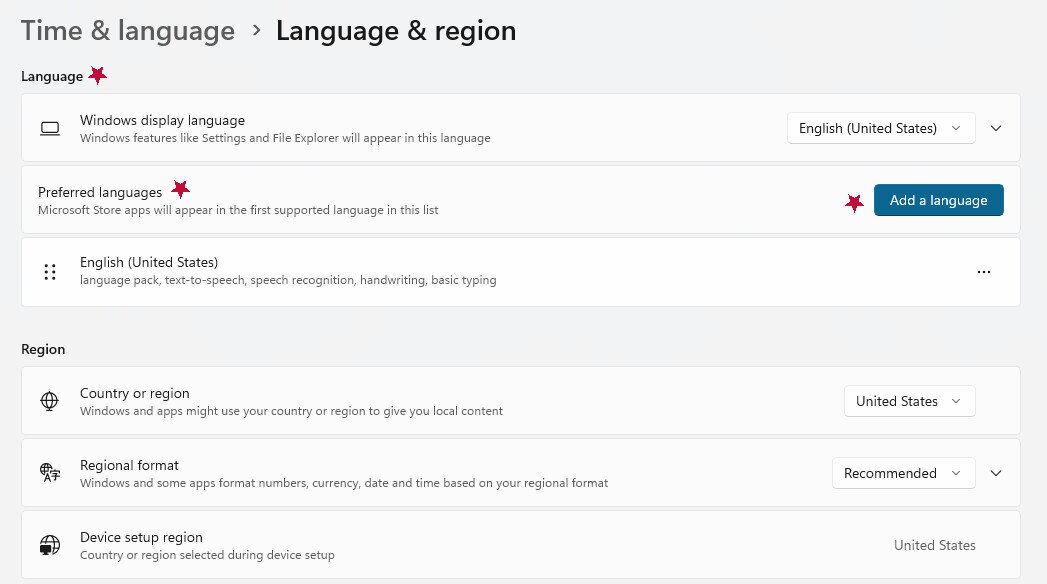
How to Install a Language Pack For Windows 11
The steps are similar for Windows 11. You’ll first check whether your preferred language is already available. Follow these steps:
- Go to Start.
- Go to Settings.
- Go to Time & Language.
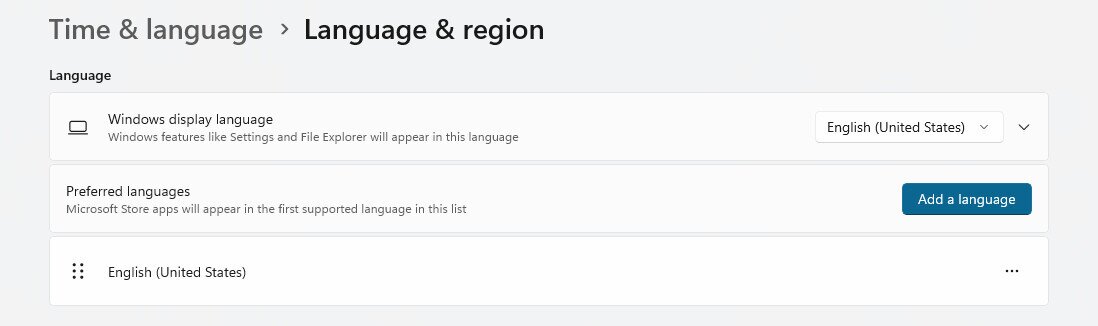
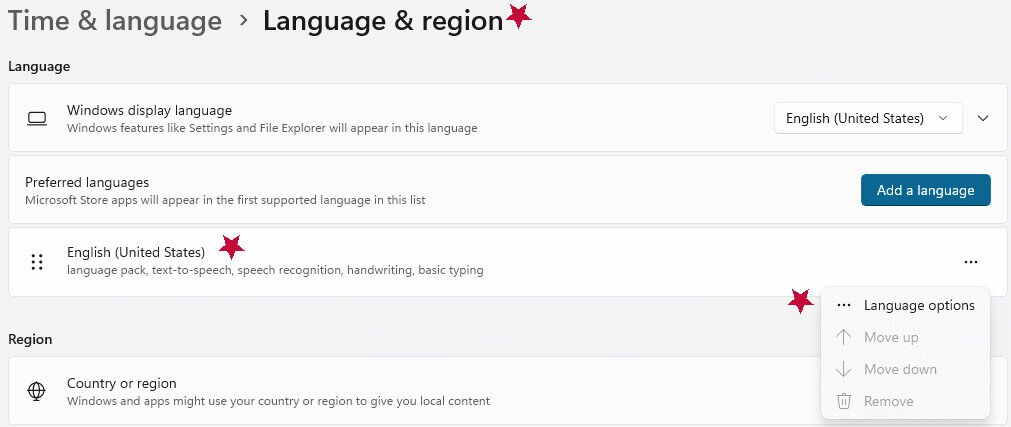
- Go to Language & Region.
- Your Preferred languages are near the top. If you don’t see the one you want, make sure you’re connected to the internet, then click Add a language.
6. A “Choose a language to install“ window will pop up.
7. Input the language you want in the search bar and choose it from the options when it appears. Then click Next.
8. Make sure the Install language pack box is checked. You can also choose “Set as my Windows display language” to activate the new language on your computer. Otherwise, we’ll cover that option in the next section.
9. When you’ve chosen all of your optional language features, such as text-to-speech, click Install.
10. Once it has been installed, the new language will now show up under the Preferred language section. If you previously chose to set it as your display language, you’ll see an alert that says, Windows needs to sign you out in order to apply your new display language.
11. Click the Sign Out button next to the alert or sign out manually.
12. Your language changes should now be applied.
How to Change Language in Windows 10 Display Settings
If you already have the language pack you need installed on your computer, setting the Windows display language is simple:
- Go to Start.
- Go to Settings.
- Go to Time & Language.
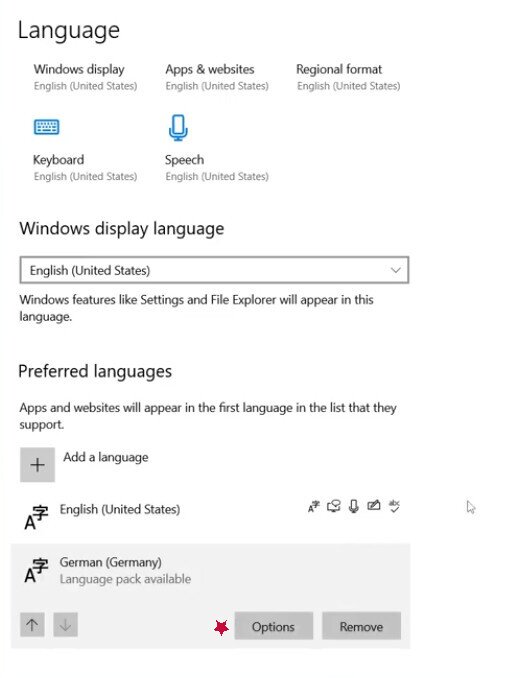
- Go to Language.
- In this window (underneath “Preferred language“), you should see all of the languages that are currently installed on your computer.
- Click the drop-down menu from the Windows display language section, choosing the language you want.
7. You’ll see the alert, “Setting Windows display language. Windows needs to sign you out in order to fully apply the new language. Continue?“.
8. Choose the Yes, sign out now option to apply changes.
How to Change Language in Windows 11 Display Settings
- Go to Start.
- Go to Settings.
- Go to Time & Language.
- Go to Language & region.
- Expand the drop-down menu for Windows display language, selecting the one you want to switch to.
6. From there, you’ll get the alert that Windows needs to sign you out in order to apply your new display language.
7. Click the Sign out button or manually sign out to apply your language changes.
What Changing the Windows Display Language Actually Affects
Changing the Windows display language updates the core Windows interface — this includes Settings, File Explorer, the sign-in screen, and other built-in system areas. It does not automatically update every application on your device.
When you set a new display language, Windows moves that language to the top of your Preferred languages list. This ordering matters beyond just the interface: it can also influence which language Microsoft Store apps display in, and it may affect the language used by websites and services that respect your Windows language preferences.
There are a couple of important caveats to keep in mind. First, many third-party applications maintain their own independent language settings, so they will not automatically switch to match your new Windows display language — you’ll need to change those within each app. Second, not every language available in Windows is fully localized. If you select a partially localized language, some areas of Windows may continue to display text in another fully supported language rather than the one you selected.
Changing Keyboard Layout and Input Method
Sometimes, when you change language in Windows and update your display settings, your keyboard layout can change to match it. This may mean that the letters on your keyboard don’t input the same way they used to, instead matching the typical keyboard layout of the language you selected.
Even if the letters are all still the same, the order they display on the keyboard may be different from the traditional English QWERTY layout. You may press one key and have a different character appear instead. This is particularly important when you need special character input for languages that use accents, tildes, or other diacritical marks.
You may or may not be satisfied if this change occurs. This is especially important to understand at the sign-in screen: after changing your Windows display language, the keyboard layout may also switch before you log back in. If that happens, look for the input language icon in the lower-right corner of the sign-in screen and click it to select the correct keyboard layout before typing your password. If you’re unsure whether the right layout is active, use the password reveal icon (the eye icon) to check that your characters are appearing as expected before submitting. You should be able to make your password characters visible to check whether your keyboard input has changed.
It’s also worth knowing that keyboard layouts are tied to individual language entries in your Preferred languages list and can be added or changed without switching your Windows display language at all. The next sections will cover how to manually change keyboard languages or input methods. If you need quick translation on Windows, there are also tools available that can help you translate foreign language text instantly using hotkeys.
How to Add/Change Keyboard Layouts in Windows 10
- Go to Start.
- Go to Settings.
- Go to Time & Language.
- Go to Language.
- Go to Preferred languages.
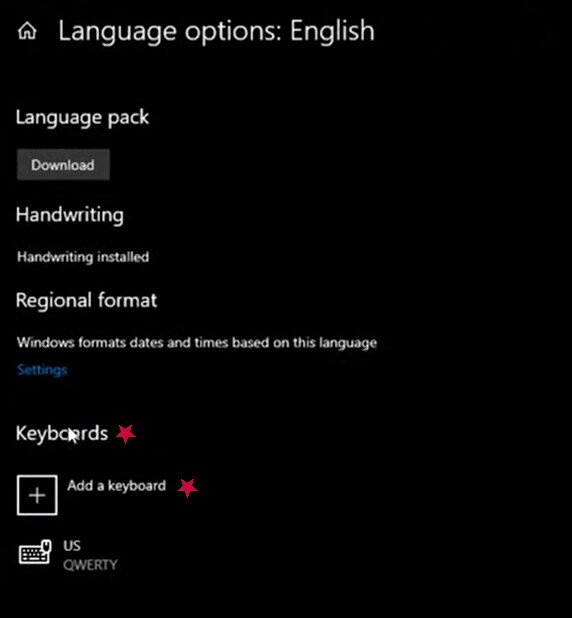
- Select the language you want to add or edit a keyboard for, then click Options.
7. In the Language Options window, go to Keyboards and see if the layout you want is already installed. If it isn’t, click Add a keyboard. This should open up a menu of several layouts to choose from. Select the one you want, and it should appear under the listed keyboards now.
8. Go to the very bottom right of your taskbar. You should see the language icon of your current keyboard layout. Click this icon to expand a menu of other layouts to choose from.
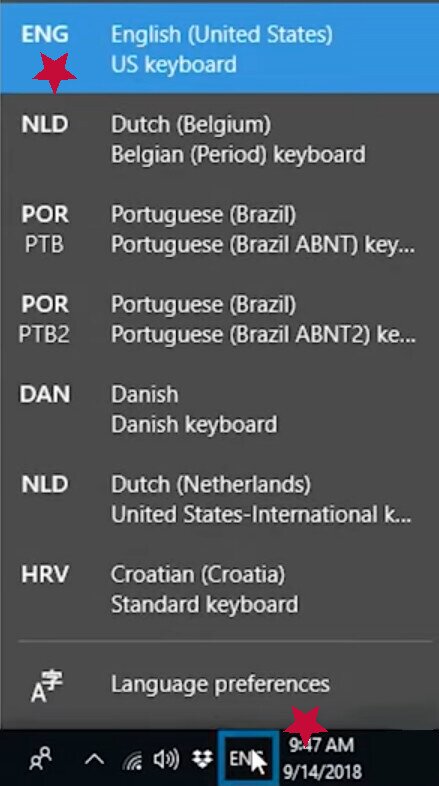
9. You should now see that the language icon has changed to match the new keyboard layout.
How to Add/Change Keyboard Layouts in Windows 11
- Go to Start.
- Go to Settings.
- Go to Time & Language.
- Go to Language & region.
- In the Language section, click the ellipses next to the language you want, then choose Language options.
- Click Language options.
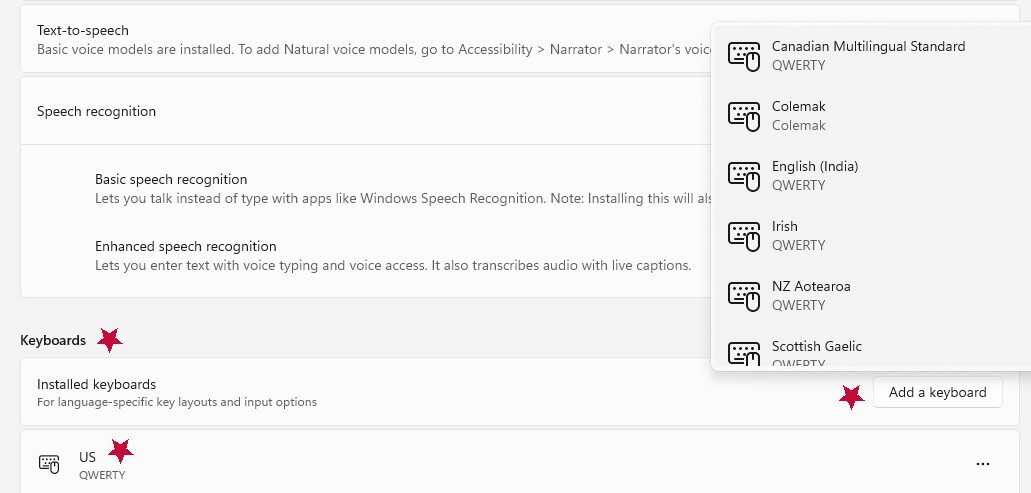
7. Find the Keyboards section and see if your layout is already installed. If it isn’t, click the Add a keyboard button and scroll through the expanded list of layouts. Otherwise, just select the layout that is already installed that you want.
8. Go to the very bottom right of your taskbar. You should see the language icon of your current keyboard layout. Click this icon to expand a menu of other layouts to choose from.
9. You should now see that the language icon has changed to match the new keyboard layout.
How to Use the Language Shortcut Key Commands
If you want to quickly access the keyboard layout via shortcuts, it’s very easy, even if you’re using a laptop keyboard. It also works with both Windows 10 and 11. Here’s how:
- Hold down the Windows logo key at the same time as pressing the Spacebar, which will bring up a small pop-up window with the various keyboard layouts you have installed.
- Pressing the spacebar multiple times while holding the Windows key cycles through all currently installed keyboard layouts. This means you can cycle through them very quickly, and it makes it easy to switch back and forth.
- If you try this shortcut and nothing happens, that usually means you only have a single keyboard layout, and you’ll need to install additional ones, as instructed earlier in this article.
Another shortcut that works very similarly to access your keyboard layout options is:
- Push the Alt key and the Shift key at the same time.
- Each time you use this shortcut, the system cycles to the next installed language on your computer, making it easy to switch keyboard layouts quickly, as it just jumps to the next language instead of having you cycle through the pop-up window. If you only have two languages to juggle, it’s much faster and nearly instantaneous to switch.
Managing Language Packs When You Change Language in Windows
Since you already know how to install language packs and change your keyboard layouts, here are some additional tips on managing preferred languages:
Windows Home Single Language and Single-Language Edition Limitations
If your PC runs Windows Home Single Language (or another single-language edition), you are restricted to one Windows display language — this is a hard limit tied to your Windows license, not a setting you can work around. When you attempt to install a second display language on one of these editions, Windows will show you one of the following error messages: “Only one language pack allowed” or “Your Windows license supports only one display language.”
If you see either of these messages, simply retrying the installation will not work. The only path forward is to use a Windows edition that supports multiple display languages, such as Windows Home (multi-language) or Windows Pro. Upgrading your Windows edition is required before you can add a second display language.
- The installed languages also have additional options such as text-to-speech, handwriting, basic typing, and speech recognition. If you don’t plan on using these, you can remove them to save disk space.
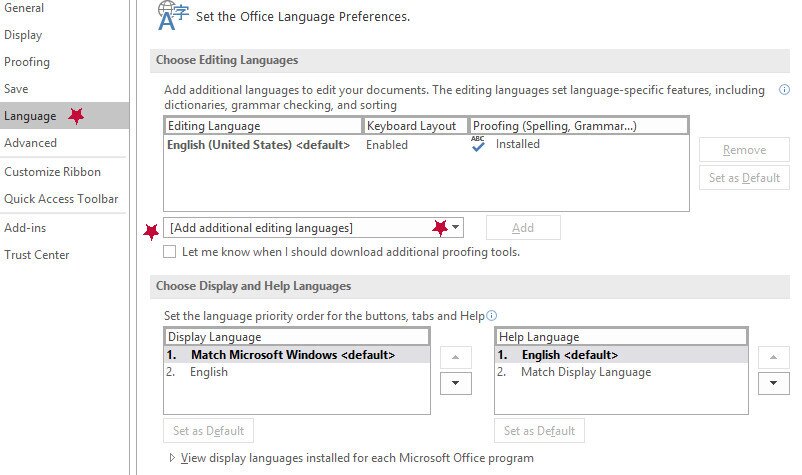
- Changing the system language doesn’t actually change the language in office programs, such as Word. You’ll need to manually do it. Just go to File > Options > Language. Find Office display Language and choose the one you want. You can also choose Match Microsoft Windows Language to make it simpler. There is also a drop-down menu to add additional editing languages.
- To reorder how your installed language packs are listed, just click and drag them in Windows 11 to move them in the order you prefer. If you are using Windows 10, click the language in your preferred languages list, then use the up and down arrows to reorder them.
- Depending on the version of Microsoft you’re using, you may need to download a Language Accessory Pack to access language support features for Office apps and programs. Check out Microsoft’s Language Accessory Pack installation guide to help you get started.
How to Remove a Language Pack
Removing a language pack is very simple. Here are the steps:
For Windows 10:
- Go to Start.
- Go to Settings.
- Go to Time & Language.
- Go to Language.
- Under Preferred Languages, choose the one you would like to remove and press the Remove button.
For Windows 11:
- Go to Start.
- Go to Settings.
- Go to Time & Language.
- Go to Language & Region.
- In the Language section, find the language you want to get rid of and click the ellipses dots next to it. This will give you the option to remove it, at which point you may need to confirm this by selecting Yes.
Troubleshooting & Tips
Here are some common problems you may run across when you change language in Windows or adjust your language settings:
- Your language doesn’t change: Make sure you’ve signed out and signed back in after installing a language pack. Also, make sure it is fully installed, as an incomplete installation can cause this issue. Lastly, some specific apps and programs may not be updated to the new language, so they may be only partially effective in these circumstances.
- You can’t find your language in the language packs: One possibility is that languages not widely spoken may only have partial display language support. There could also be region restrictions or “Single language” editions that could cause issues. Lastly, be sure you’re connected to the internet (as that’s required to install language packs) and that you’re spelling the language the same way Windows does.
- You can’t revert your display back to the default language: To get your Windows device to change to English, just go to Settings, Time & Language, Language & Region, and then choose English from the drop-down for Windows display language. If this doesn’t work, be sure you’re using the right variant (such as United States English) or that you have administrative account permissions to make these changes.
Quick Reference Table: Windows Language Settings by Version
| Windows 10 | Windows 11 |
| Go to Start.Go to Settings.Go to Time & Language.Go to Language.In this window (underneath “Preferred language“), you should see all of the languages that are currently installed on your computer.Click the drop |