How To Change your Drive Icon And Folder Image Easily
How to Change Your Drive Icon
Have you gotten bored of your default drive icons in Windows? If you want to change drive icon settings to something more personal, here’s an easy method to do it in just a few steps. You’ll need a new icon file for your drive for this method to work, so grab an icon before starting this tutorial. This method can still work on many local and removable drives in Windows 10 and Windows 11, but behavior varies by drive type and Windows protections. Keep in mind that autorun.inf does not work for mapped network drives (use the registry method described in the next section instead), BitLocker-protected volumes may continue showing the BitLocker overlay icon regardless of this setting, and administrator rights are typically required when applying this method to the system drive (C:\).
Before you begin: turn on file name extensions. If Windows is hiding file extensions, you might accidentally create a file named autorun.inf.txt instead of autorun.inf, and the method will not work. To show extensions, open File Explorer, click the View tab (Windows 10) or the View menu (Windows 11), and make sure File name extensions is checked.
Go to the root folder of your drive. For example, C:\. This is where you will place the files needed to change drive icon appearance on your system.
Now choose an icon, and rename it to Drive.ico. For the best compatibility across different display sizes and screen resolutions, use an .ico file that contains multiple icon sizes (such as 16×16, 32×32, and 256×256 pixels). Place it in that root folder.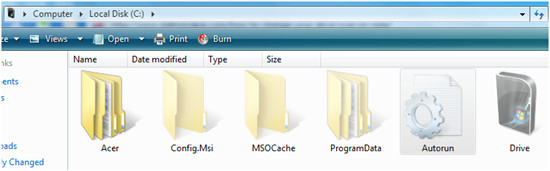
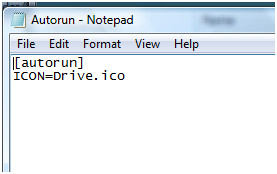
Create a file called Autorun.inf (you can do this by creating a new Notepad file and then renaming it to Autorun.inf). Open it in Notepad and enter the following lines exactly:
[Autorun]
Icon=Drive.ico
If you also want to change the label that appears beneath the drive icon in File Explorer, add a third line:
Label=My Drive
(replacing My Drive with whatever name you prefer).
The Autorun.inf file tells Windows which icon to load for the drive when the system starts up.
Note for the C: drive: Because Windows protects the system root, you may not be able to create or save files directly into C:\ from a standard window. In that case, create both Drive.ico and Autorun.inf on your Desktop first, then open a File Explorer window as an administrator and move both files into C:\.
Now all you have to do is restart your computer, and you’ll notice that your icon has been changed to the one you placed in the drive. This trick can be used to change drive icon settings for all drive partitions that you have in Windows — not just the C: drive.
It’s worth noting that if the icon does not appear immediately after restart, try pressing F5 to refresh the desktop or open File Explorer and navigate away from and back to the drive. Windows sometimes caches the old icon and needs a moment to update the display.
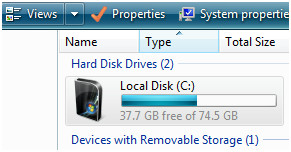
If you ever want to revert back to the default drive icon, simply delete the Autorun.inf file and the Drive.ico file from the root folder, then restart your computer. Windows will automatically restore the default icon for that drive partition.
Change Drive Icon in Windows 10/11 via Registry Editor
The autorun.inf approach works well for physical local drives, but it is not suitable for every scenario. If you need to change a drive icon on a mapped network drive, want the change to apply regardless of whether autorun processing is active, or simply prefer a method that does not rely on files sitting in the drive root, the Registry Editor gives you a clean alternative that works reliably in Windows 10 and Windows 11.
Before you begin: Back up your registry before making any changes. Press Win + R, type regedit, and press Enter. In the Registry Editor, click File > Export and save a backup copy somewhere safe.
To change the drive icon for all users on the PC, navigate to the following key (create any keys that do not already exist):
HKEY_LOCAL_MACHINE\SOFTWARE\Microsoft\Windows\CurrentVersion\Explorer\DriveIcons\<drive-letter>\DefaultIcon
Replace <drive-letter> with the actual drive letter, for example D. Inside the DefaultIcon key, double-click the (Default) string value and set its data to the full path of your .ico file, for example: C:\Icons\MyDrive.ico. Click OK, then close Registry Editor and restart File Explorer (or sign out and back in) to see the change take effect.
To change the drive icon for the current user only, navigate to:
HKEY_CURRENT_USER\Software\Microsoft\Windows\CurrentVersion\Explorer\DriveIcons\<drive-letter>\DefaultIcon
Again, replace <drive-letter> with the actual letter for your drive. Set the (Default) string value to the full path of your .ico file in the same way as described above. This per-user path lets you apply a custom icon for your own account without affecting other users or requiring local machine-level permissions.
For mapped network drives, the registry method is the correct approach since autorun.inf is ignored for network locations. Use the HKEY_CURRENT_USER path above with the drive letter assigned to your mapped drive, point the DefaultIcon value to an .ico file stored on a locally accessible path, and refresh File Explorer.
To revert a registry-based icon change, open Registry Editor, navigate back to the DriveIcons\<drive-letter> key you created, and delete the entire <drive-letter> key (or just the DefaultIcon subkey). Close Registry Editor and restart File Explorer. Windows will restore the default drive icon automatically.
Troubleshooting When the Drive Icon Does Not Change or Will Not Revert
If your new icon is not showing up after following the steps above, or the old icon is sticking around after you have tried to revert, work through these checks in order:
1. Confirm file extensions are visible. Open File Explorer and verify that file name extensions are turned on (see the prerequisite step in the autorun.inf section above). If extensions were hidden when you created the file, your autorun.inf may actually be saved as autorun.inf.txt and Windows will ignore it entirely.
2. Confirm both files are in the drive root. Both autorun.inf and Drive.ico must be located directly in the root of the drive (for example, D:\autorun.inf and D:\Drive.ico), not inside any subfolder.
3. Check for a hidden autorun.inf. A leftover hidden or system-flagged autorun.inf can conflict with a new one or prevent a revert. To reveal it, open Command Prompt and run: dir X:\autorun.inf /a (replace X with your drive letter). If a hidden file appears, you can delete it with: del /a X:\autorun.inf
4. Restart File Explorer or sign out. Right-click the taskbar, select Task Manager, find Windows Explorer in the list, right-click it, and choose Restart. Alternatively, sign out of your Windows account and sign back in to force Explorer to reload its icon cache.
5. Rebuild the icon cache. If the old icon is still displayed after an Explorer restart, Windows may be serving the icon from a stale cache. Open Command Prompt as an administrator and run the following commands one at a time:
taskkill /f /im explorer.exe
del /a /q “%localappdata%\IconCache.db”
start explorer.exe
This forces Windows to rebuild the icon database from scratch, which resolves most stubborn cached-icon problems.
6. Temporarily change the drive letter. In rare cases, Explorer clings to an icon association even after the cache is cleared. Open Disk Management (press Win + R, type diskmgmt.msc), right-click the drive, choose Change Drive Letter and Paths, assign a different letter temporarily, then change it back. This forces Explorer to re-read the drive’s icon configuration from scratch.
7. Revert a registry-based icon. If you used the Registry Editor method and the old icon persists after deleting the DefaultIcon entry, open Registry Editor, confirm that the DriveIcons\<drive-letter> key (and its DefaultIcon subkey) has been fully removed from whichever hive you edited (HKLM or HKCU), then restart File Explorer using the Task Manager method above.
Changing the Folder Image to Change Drive Icon Appearance
In Windows, there is an easy way to change the icon of your folder. You can simply right-click on the folder and navigate to Properties > Customize and change it to whatever you like.
But what if you do not want to change the icon, but the image that is shown in the folder thumbnail? In Windows XP and Vista, a thumbnail image is shown for picture and music folders. Using this trick, you can use album art as folder images for your music albums, or your favorite image can be used for your picture album folder for easy recognition at a glance. This trick can also be used for document or other folders.
First, choose any folder you want to change the image of.
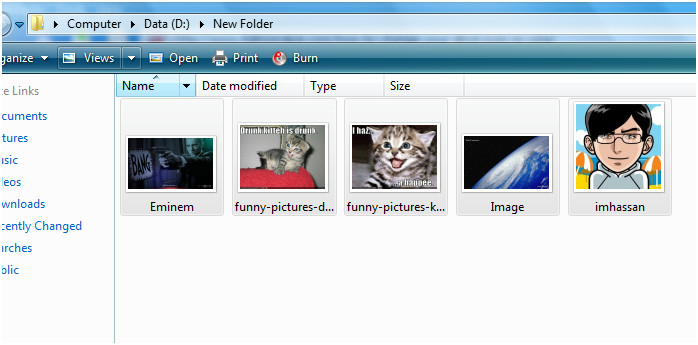
After that, get an image that you want to use as the folder image. Place it in the folder, and rename it to ‘Folder‘, without the quotes. Go back one directory and the folder thumbnail will update automatically — no restart required.
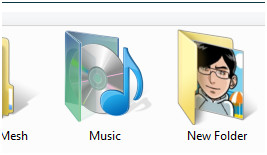
You can change the folder image’s attributes to hidden, so that it doesn’t show up among other files in that folder. To do this, right-click the image file, select Properties, and check the Hidden attribute. This keeps your folder looking clean without the extra file cluttering the view.
Also note that the image can be of any size, and it will show in place of the album art of your music album folder in Vista. If you want to restore the default image or a selection of images, simply delete the ‘Folder’ image file or rename it to something else. Windows will revert to its default folder thumbnail behavior automatically.
This technique is a great complement to the drive icon method described above. Together, these two tricks let you fully customize how both drives and folders appear in Windows Explorer, making it much easier to identify your partitions and directories at a glance. Whether you want to change drive icon settings for a USB drive, an external hard disk, or a standard partition, the Autorun.inf method remains one of the simplest and most reliable approaches available for Windows XP and Vista users.
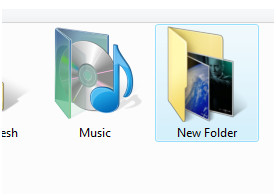
For more information on how Windows handles drive and folder icons, you can refer to the official Microsoft documentation on customizing folders with Desktop.ini, which covers advanced customization options beyond what is described in this guide.

Why don’t you guys just use Folder Marker? As for me it’s the most capable and practice thing I’ve ever met in this sphere.
Yeah. that was helpful. Thanks Jay.
Found its link at http://www.folderchanger.com
This is a helpful. Thanks.
The steps may require sometime to remember though. Another way is to use this “folderchanger”.
It changes folder or drive icon just by dragging which means it only requires one step. Besides, it even allows me to use my photo as the icon looks.
it can be found by googling for “folderchanger”, or the link should be at folderchanger.com
Where do you get that icon shown in the image?
this is very useful site. i am very thankful to you good people