Launchbar: A Powerful Application Launcher With Multi-Monitor Support
Looking for an application launcher with multi-monitor support for launching programs from both primary and secondary display monitors? Launchbar is a freshly-baked open source application launcher that hosts a number of features with an option to specify command arguments to customize the functional behavior of your most frequently used applications. What makes it unique from other application launchers available out there, is that it supports multi-monitor setup; using the Configuration console, you can specify the display monitor from where you want to open the menu for accessing the specified applications. Just like any other app launcher, it allows creating submenus for organizing applications into different groups. Apart from menu-specific customizations, it comes packed with options to set the opacity of the launch bar and set the size of the launch bar as well as the options menu. Sadly, it doesn’t support launching multiple applications at a time, but you can create a batch script file containing the location of your apps, and add it to the menu. It also contains an option to set application’s process priority, which is applied to the application every time you launch it from the launch bar.
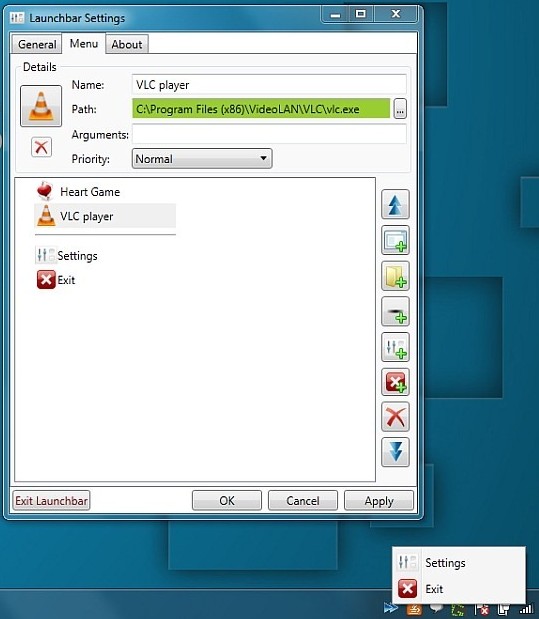
Before you use the launch bar to access the application, open Settings window from its system tray menu. It enables you to configure multi monitor setup options as well as specify applications that you wish to launch from the launch bar. To add applications to Launchbar, select Menu tab and click the add a program icon (second from the top) from the icon panel on the right. Type in the name that you would like to set for the application, add the path of the application by simply clicking the browse button, enter arguments for the application (if required), and then set the process priority of the application. Once everything is in place, click Apply. After you’ve added the application paths, rearrange the app list using the upward and downward buttons. Adding a submenu to launch bar menu is easy. Just hit the folder add icon and enter the name of the menu. Once created, you can add applications and rearrange them in your sub menu.
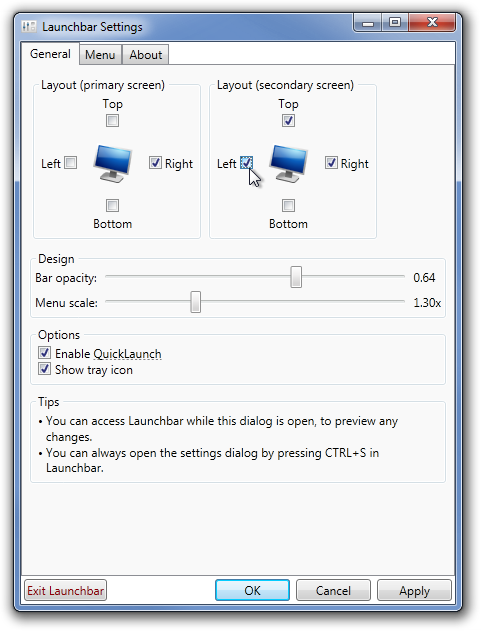
The General tab shows the layout of connected display monitors. Here, you can select the screen edges where the launch bar is to be placed, set bar opacity and set menu scale. Perhaps, the most noteworthy aspect of the application is that it allows you to set multiple screen edges of your display monitors. For example, you can set the right edge of primary monitor and choose Top, Right and Left sides of the other connected display monitor. It will show you a red bar at the specified sides of the screens, allowing you to bring up the launch bar for accessing applications.
Click OK to apply the settings and close the dialog box. Now, move to the specified screen edge and right the red bar to bring up the launch bar.
Launchbar is a portable application that works on Windows XP, Windows Vista and Windows 7, provided you have .Net Framework 4.5 installed.


I want that wallpaper 😀