Organize And Tidy Up Windows 7 Desktop
Less than a week is left before Microsoft rolls out Windows 7 to the public. The first thing users do is try to keep their desktop organized. One thing I like about Windows 7 is that it makes 3rd party application launchers feckless. Windows 7 taskbar now acts more like an application launcher.
This post will showcase how I have organized my Windows 7 Ultimate desktop and how you too can organize it in similar way. Productivity is a big part of my daily life, keeping everything neat is surely going to boost your productivity.
Organizing the taskbar
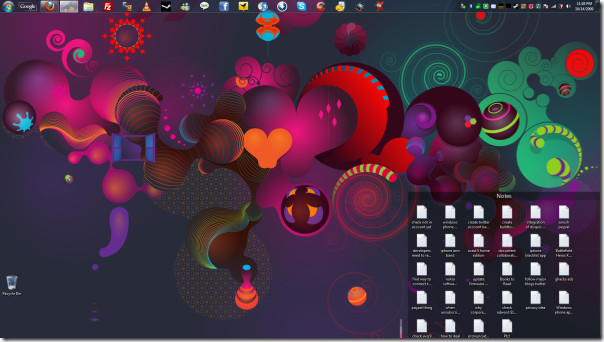
First and foremost make a list of all applications that you use most frequently and pin them to the taskbar from left to right(in order of the application you use most to least). This is exactly what I have done, take a moment to look at my taskbar.

More applications have been added to the taskbar but you can only see a small portion. Taskbar is what Microsoft loves to call it, but personally I call it a “launch bar” since I launch 70-80% of all applications from here.
It doesn’t end here. If you are a geek like me who loves to Google every now and then and also needs to find an application quickly on my local drive, then you need to install the Google quick search box for toolbar. This comes as part of Google Toolbar for Internet Explorer.
Wait a second, did I just say Internet Explorer? Who uses Internet Explorer anymore, right? What I have done is as follows, installed Google toolbar for Internet Explorer, this will automatically add Google Quick Search in the taskbar. Now right-click Quick Search and select View Results In > Mozilla Firefox. If Firefox is your default browser then you don’t need to follow this procedure.
Now simply hit Google Quick Search, type whatever you want, and hit Enter. Alternatively you can also select a hotkey to open Google Quick Search.

This is all that you need to make your taskbar more neat and productive.
Make All System Tray Icons Visible
Right-click the system tray clock and select Customize Notification Icons from the context menu. This will open a new dialog, here check Always show all icons and notifications on the taskbar checkbox.

I love to keep all application icons in front of my eyes, in case I need to access them, a simple click is all that is needed. If the icons are hidden, then it will take two steps to access them, thus reducing your productivity by 2%.

Have a look at the neatly arranged icons, you can also drag and change their positions, same goes for the apps that are pinned.
Use fences to organize files on the desktop
Fences is something so beautiful that I highly recommend it. In Vista I used Fences to organize files and applications, but since Windows 7 taskbar takes care of this part, I now use it just to organize my notes.
Consider me a classic person when it comes to organizing notes. Even though I always use Google Calendar to notify me of an important event, for notes I will use notepads and put them on the desktop for quick reminder. Check the screenshot below to see my complete desktop.

Pick the right wallpaper
Choosing the wallpaper is a tough decision, there are thousands of them on the internet. Don’t pick the one that is shiny and attractive since they can easily distract you from work, go for the one that is soothing to your eyes, for that is more important.
If you sit on the computer for more than 9 hours, I would highly recommend not choosing a wallpaper that is too bright or shiny. For a person like me who sits for more than 14 hours a day, selecting the right wallpaper is very important.
Choosing the Taskbar location
Since I work with both Ubuntu and Windows, choosing the top location for taskbar made sense. You can change the position of taskbar by going to it’s properties. One thing I have noticed is that keeping the taskbar on top can really help the overall productivity since a person’s eye usually scans the desktop from top to bottom. Thus all programs that I need to access are always on sight.
Conclusion
If you follow the steps I have mentioned above, you will have a quick neat looking desktop under 5 minutes without using many 3rd party tools. Let me know how you plan to organize your Windows 7 desktop? Have you made any plans yet? Shoot off in the comments.

Nice post man !!!
I agree for the most of what you says. The problem with fence is that he use .net framework. Do you want to run such a huge layer each time you boot ? even a 5kb app in .net use thousand of megabyte of memory, is slow to run etc etc; Personnally, I avoid EVERY app using .NET
Please tell me more about the horrors of ,NET!
Nice post! I would also recommed using Onenote from MS office, it basically keeps all of your notes in one place
Faaanntastic post ! Didnt know abt fences so +1 rep for showing me that! Love it 😀 And really hels clean the desktop!And i kinda agree… keeping the takbar on top does help somehow..