Wireless Mouse Not Working on my Computer (FIXED)
A mouse is indispensable for desktop computers, and most people use it even on their laptops since the touchpad or pointing stick is quite uncomfortable. Gamers are probably the better example of an audience that truly appreciates the quality of a good mouse with a comfortable feel, plenty of buttons, and excellent response time. If you’re looking to upgrade your setup, check out our guide to the best gaming mice available today
You will rarely find a wireless mouse in a gamer’s equipment stash. Compared to a wired mouse, it has a poorer response time since it connects to your computer through a wireless USB dongle.
Nevertheless, other types of users prefer cordless mice for casual PC activities, Internet browsing, streaming, and working. However, when your wireless mouse is not working, you might be tempted to ditch it in favor of a wired mouse that won’t let you down.

Wireless Mouse Not Working
Before doing so, you should troubleshoot this problem to see if it can be easily fixed. Mouse functionality problems can happen regardless of brand, including Microsoft, Logitech, and HP.
Some unwanted scenarios you might be experiencing:
- Mouse cursor is jumping or not moving properly
- Mouse pointer takes a long time to respond to commands (mouse lagging)
- Your mouse stops working after a while or doesn’t work at all
- USB mouse gets disconnected on Windows 10
- Your Windows PC is not detecting any mouse clicks
How to troubleshoot mouse issues without a mouse
The first issue is delicate: how to fix mouse problems on your computer if you can’t use the mouse to navigate Windows 10. The most obvious solution in this case is to use another pointing device. For example, if you have a laptop, you can switch to the touchpad or pointing stick.
If you don’t have a second mouse on your desktop, try using a different pointing device, like a drawing tablet. Or, you can fully depend on your keyboard for computer navigation, although this takes a bit of practice to learn how to switch tabs and windows as well as how to take action similar to clicking buttons.
You could also try using Cortana or another speech recognition software solution on your Windows 10 PC. However, we believe the best way to troubleshoot mouse problems is by setting up a remote desktop connection from another computer using the built-in Remote Desktop Connection app or a third-party application like TeamViewer.
How to fix a wireless mouse if it’s not working on Windows 10
Follow these solutions one by one to fix functionality issues with your cordless mouse on a Windows 10 computer.
1. Check if your entire system is frozen
Get started by verifying if your entire operating system is frozen since your mouse might be actually working well. If your gaming session was cut short, you can easily tell since the game window and audio freezes.
However, if there was nothing happening on your screen when your wireless mouse stopped working, check if the keyboard is functional. If it has LED lights, press the Num Lock or Caps Lock keys to see if they get turned on. Otherwise, press Ctrl + Alt + Del to see if your screen turns blue and shows the power options and Task Manager.
Once you determine that everything is working perfectly except for your mouse, proceed to the following solutions.
2. Restart your computer
We know it sounds silly, but restarting your computer could be enough to restart your wireless mouse and get it working properly again. It’s possible that its services and drivers were hanging due to other running processes, so rebooting Windows 10 should do the trick.
3. Check mouse compatibility
If you recently purchased a new mouse or received it as a gift, perhaps it doesn’t support your operating system. It’s rare nowadays since most modern mice support Windows 10.
But it could happen nonetheless, especially if the brand is new or relatively unknown. Just visit the website of your mouse’s manufacturer or get in touch with customer support to confirm that your USB mouse is compatible with your system.
4. Check your mouse battery
Flip your mouse over to check if its light is turned on. While doing so, take a closer look to make sure that the light isn’t covered by a thin, transparent film. Perhaps your office colleagues wanted to play a small prank on you.
However, if the light is intermittent or off, it means that your battery is low or dead, so you should replace it. Once doing so, check if your wireless mouse is working now.
5. Move closer to the USB receiver
Some users connect their laptops through their smart TVs through an HDMI cable and try to navigate their computers with a mouse from a great distance. However, cordless mice are not built for long range, so you should move closer to the USB receiver to get a better signal. It’s just like moving with your smartphone closer to the router to get Internet.
Furthermore, you should make sure that the mouse’s USB receiver isn’t obstructed by any objects or close to other devices like a microwave oven or a smartphone since the interference can cause your wireless mouse to stop working on your Windows 10 computer.
6. Use a different USB port
There might be a problem with your USB port, not the mouse. Unplug the USB receiver from your desktop or laptop and try a different, identical port. On desktops, you can also try the front or back of the computer unit.
However, if your notebook doesn’t have too many ports, connect a multi-port USB hub and then attach your USB receiver to the hub to see if your wireless mouse works now.
7. Try using the mouse on another computer
Perhaps your mouse is not malfunctioning but there’s something wrong with your computer settings. The easiest way to prove this is by connecting the mouse’s USB receiver into another computer to see if it works there.
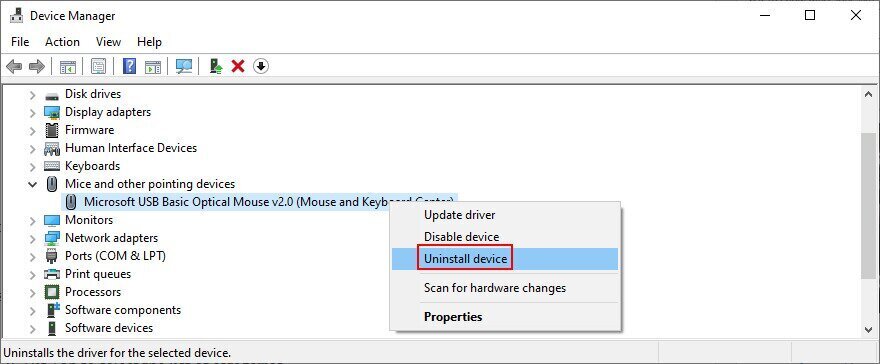
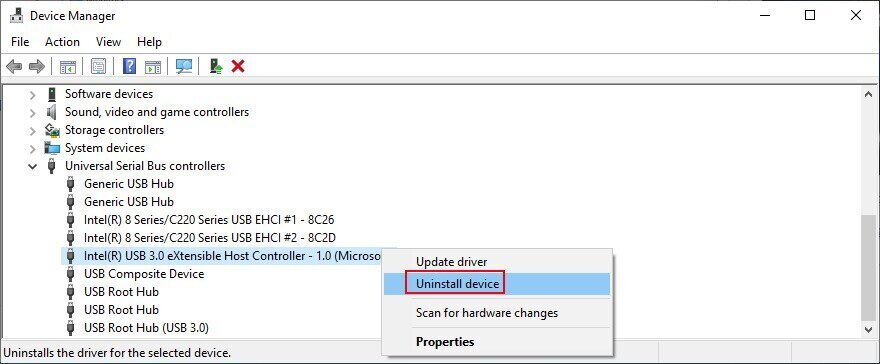
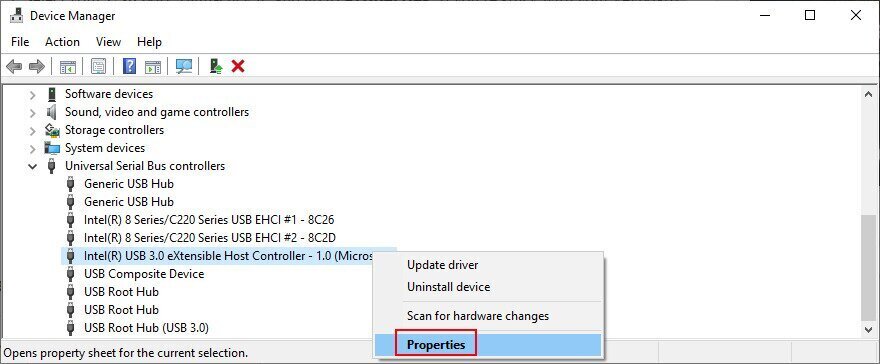
8. Reinstall the mouse and USB devices
It’s possible that your mouse and USB devices were not properly installed on your Windows 10 computer. But you can swiftly fix this from Device Manager.
Using a mouse
- Right-click the Start button and go to Device Manager
- Expand the Mice and other pointing devices menu, right-click your mouse, and select Uninstall device

- Check the Delete the driver software for this device box
- Click Uninstall
- Return to the Device Manager main window
- Open the Universal Serial Bus controllers group
- Take the same steps to uninstall the devices for your USB ports

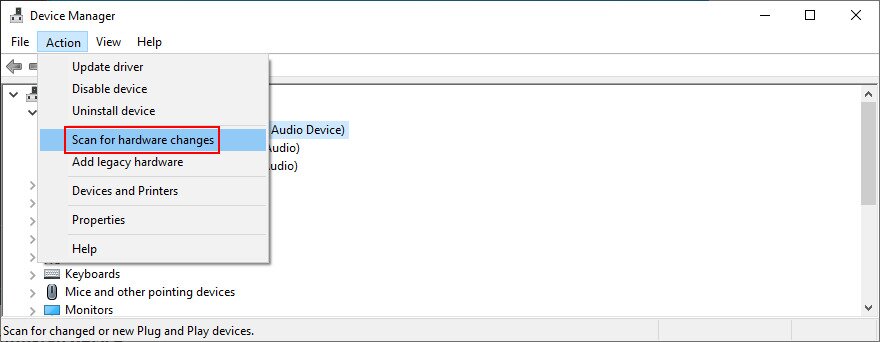
- Open the Action menu
- Select Scan for hardware changes

- Restart your computer. Windows will automatically reinstall the missing devices
- Check your mouse now
Using the keyboard
- Press Win + R, type devmgmt.msc, and press Enter to launch Device Manager
- Hit Tab to select the list of categories
- Use the arrow keys to move down to the Mice and other pointing devices category
- Press Spacebar to expand this group
- Press the menu key (a rectangle with three lines) or use Shift + F10 to open the context menu
- Hit the down arrow key three times to select Uninstall device and hit Enter
- Press Tab until you select Delete the driver software for this device and hit Spacebar to check its box
- Press Tab to select the Uninstall button and hit Enter
- Press Alt + F4 to close all windows until the shutdown dialog pops up
- Use the up or down arrow key to select the Shut down option and press Enter
- After the PC restart, Windows will reinstall the missing devices
- Check if your wireless mouse works now
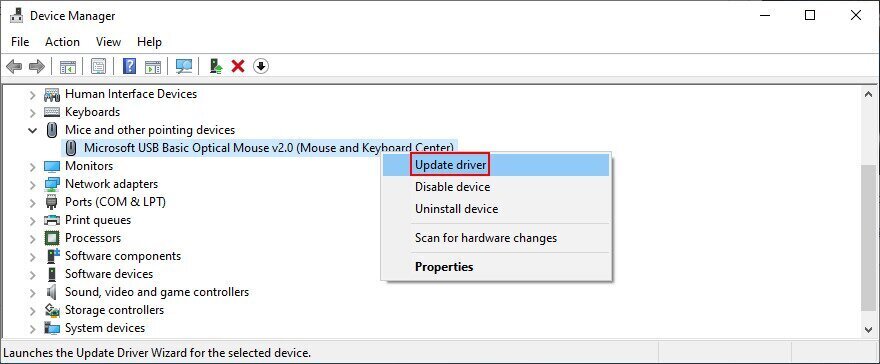
9. Update the mouse and USB drivers
If reinstalling the devices didn’t fix your USB mouse, it’s possible that its drivers are outdated. But you can solve this problem by also using Device Manager.
- Reach Device Manager and navigate it by following the instructions in Solution 8 from this list
- Right-click the mouse adapter (or press the menu key or Shift + F12) and select Update driver (or press the down arrow once and hit Enter)

- Click Search automatically for drivers (or press Tab to select this option, then hit Enter)
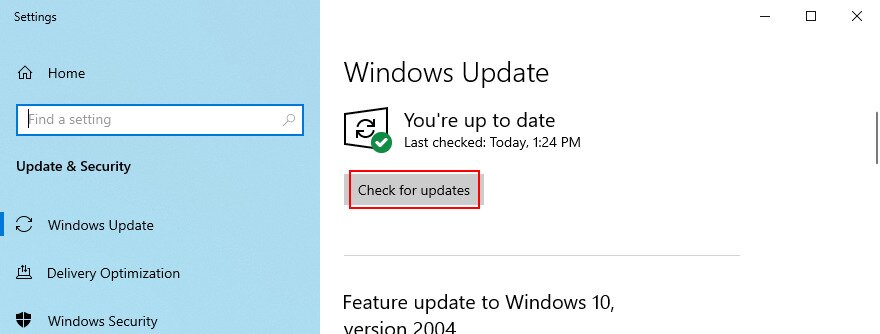
- If you receive the The best drivers for your device are already installed message, click Search for updated drivers on Windows Update (or press Tab to select this option and hit Enter)
- Once the Windows Update settings are opened, your OS should start looking for updates right away. If it doesn’t, click Check for updates (or press Tab until you select this setting and hit Enter)

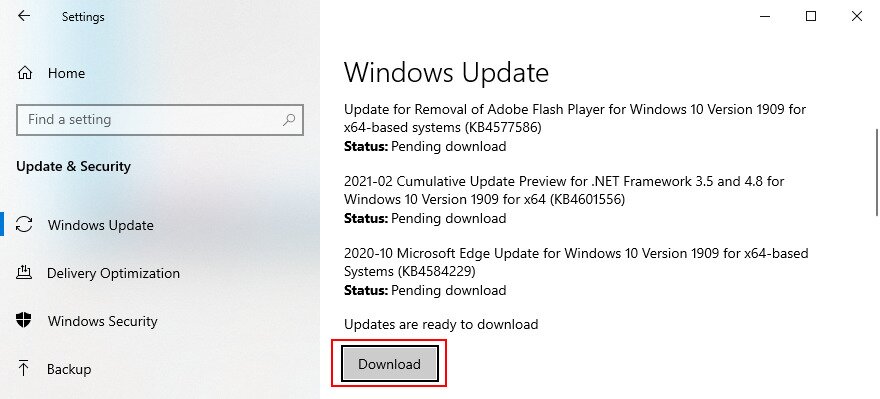
- Patiently wait while Windows looks for updates. If there’s anything pending, click Download or Install now (depending on what your screen shows)

- Restart your computer to finalize the system update
- Return to Device Manager and perform the same steps to update your USB ports from the Universal Serial Bus controllers menu. However, it’s not necessary to check for system updates if you have already done this for your mouse driver
Unfortunately, Windows 10 is not that efficient when it comes to tracking down drivers using Windows Update. There are two workarounds here: you can either download and install the driver on your own, or turn to a driver update application.
For manual updates, you must visit your mouse’s manufacturer website to locate and download a newer driver that’s compatible with your operating system. However, if you don’t want to risk getting an unsupported driver and doing more damage, you can turn to a specialized application that detects and updates all your drivers automatically.
10. Roll back the mouse or USB drivers
If you have already installed an incompatible mouse driver, then you should immediately remove it from your computer and roll back to the previous version. Even if you’re unsure about this, it’s still a good idea to perform the rollback if possible. Here’s what you need to do:
- Access and browse Device Manager by taking the steps detailed in Solution 8 from this list
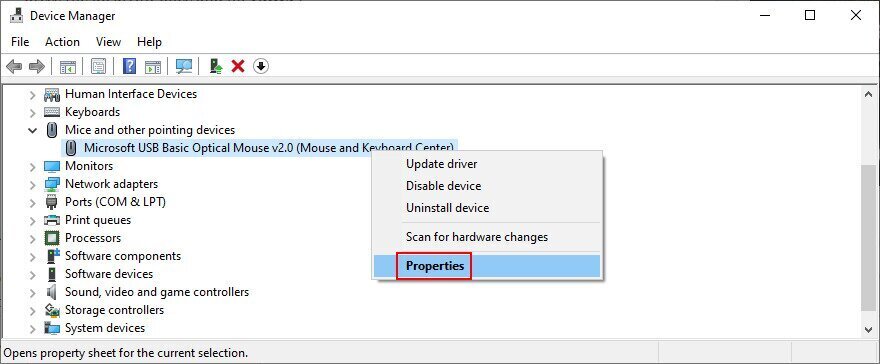
- Right-click your mouse device and select Properties (or press the menu key or Shift + F12, press the up arrow once and hit Enter)

- Click the Driver tab (or press Tab until you select the General tab and hit the right arrow key to go to Driver)
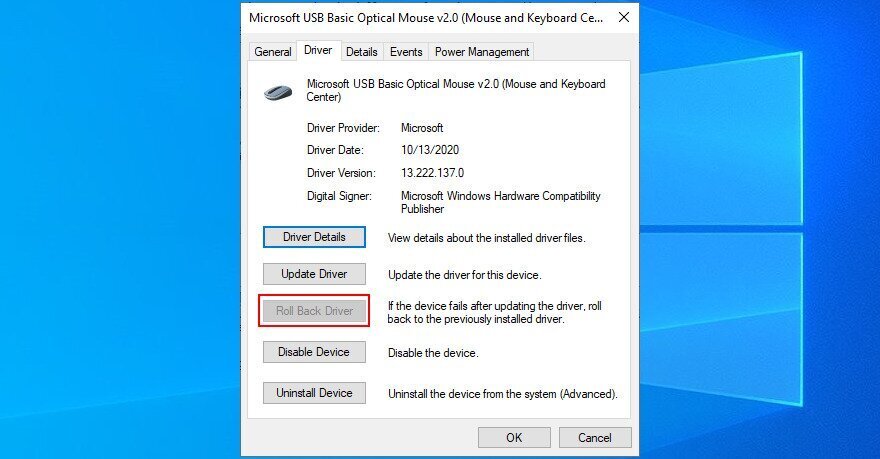
- Click Roll Back Driver and follow the on-screen instructions (or press Tab three times to select Roll Back Driver and hit Enter)
- If the Roll Back Driver button is greyed out, it means that you can’t make the rollback because there’s no previous driver version on your PC

- Do the same for your USB ports in the Universal Serial Bus controllers category to perform the rollback if allowed
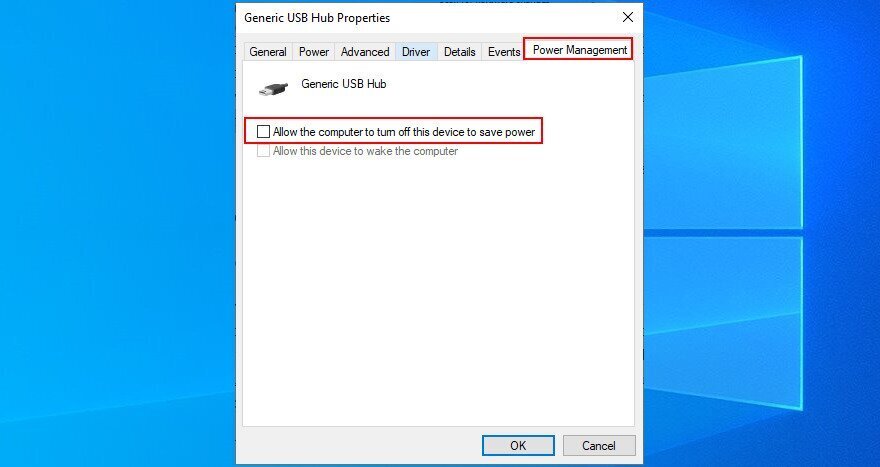
11. Check USB power management settings
Incorrect USB port settings could be another reason why your wireless mouse doesn’t work on your Windows 10 computer. By default, your operating system is allowed to keep USB ports disabled when not in use, in order to save power. But it becomes problematic when the ports don’t get turned on when you plug in your USB receiver. Here’s how to deal with this problem:
- Go to Device Manager and move around using the instructions provided in Solution 8 from this list
- Extend the Universal Serial Bus controllers group
- Select your USB device, right-click it, and go to Properties. If you’re stuck with your keyboard, then press the menu key or Shift + F12, press the up arrow once, and hit Enter to access Properties

- Switch to the Power Management section (press Tab until you select the tabs area and use the arrow keys to go to Power Management)
- Uncheck Allow the computer to turn off this device to save power (press Tab to select this option, then press Spacebar)

- Click OK (press Tab until you select OK, then Enter)
- Reboot your PC (press Alt + F4 until you reach the shutdown menu, then select Restart and press Enter)
- Check if your cordless mouse works now
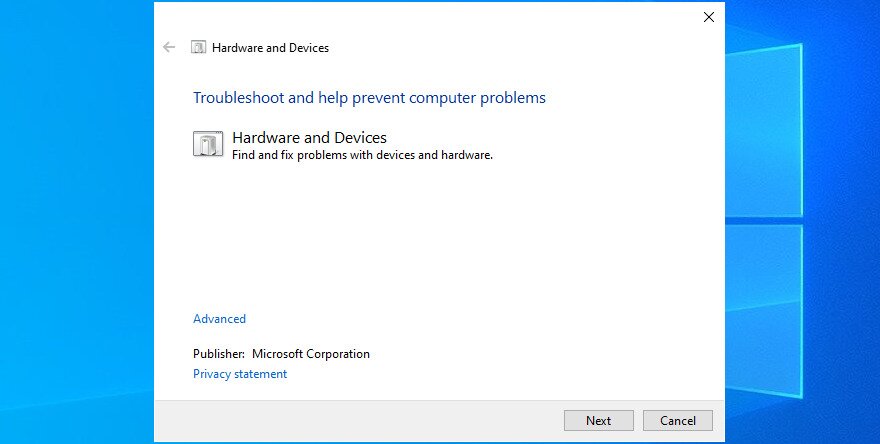
12. Run the Hardware and Devices troubleshooter
Windows 10 has internal troubleshooters for all critical parts of the system, including hardware and devices. It can help you fix common problems that might be preventing your mouse or USB ports from working correctly, so it’s worth a shot. Normally, you can find it in Settings > Troubleshooters. But if the Hardware and Devices troubleshooter is missing from that list, you can launch it using the Run tool. Here’s how:
- Press the Win key + R, type
msdt.exe -id DeviceDiagnostic, and press Enter - Click Next (press Tab until you select Next and hit Enter)

- Follow the wizard steps and apply any available fixes
- Restart your operating system
- Try to use your USB mouse now
13. Disable Fast Startup mode
Fast Startup is a Windows 10 feature that makes sure not all processes and services are shut down, in order to start your operating system faster after a shutdown. However, it’s been known that Fast Startup has caused multiple problems to Windows users, including Blue Screen of Death errors.
In some cases, it can also prevent your wireless mouse from working properly. However, you can easily fix this issue by disabling Fast Startup on Windows 10. Here’s what you need to do:
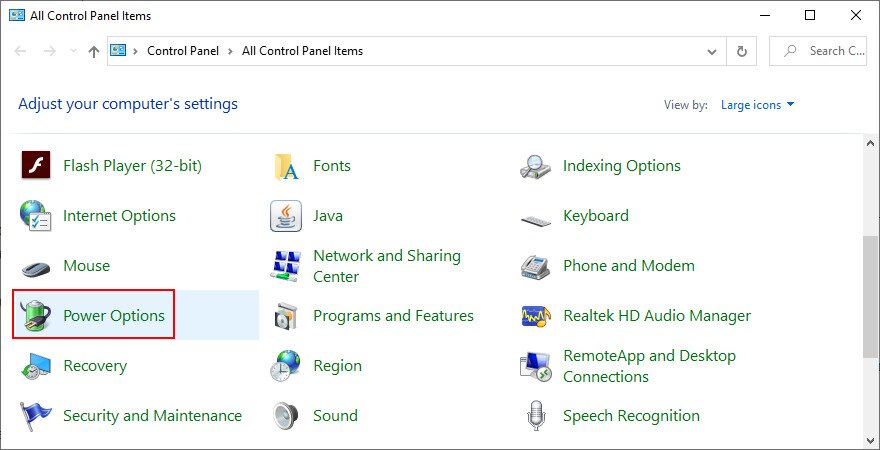
- Make sure to sign in to Windows 10 using an administrator account
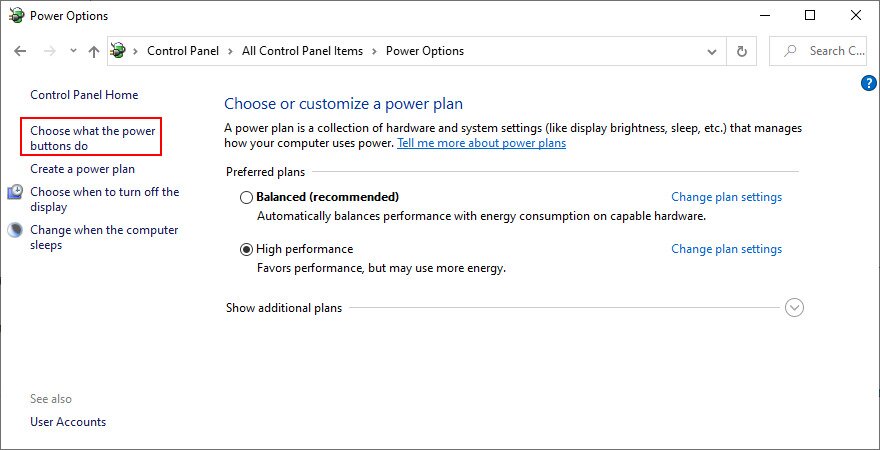
- Press Win key + R, type control panel, and press Enter to open this app
- Click Power Options (or use the arrow keys to move around, select Power Options, and press Enter)

- Select Choose what the power buttons do on the left side (or press Tab to select this option and Enter to click it)

- Click Change settings that are currently unavailable (or press Tab until the option is selected, then hit Enter)
- Disable Turn on fast startup (use Tab or arrow keys to select the option, then press Spacebar to uncheck the box)

- Click Save changes (use Tab or arrow keys to select the button, then hit Enter)
- Restart your computer and try to use your cordless mouse now

14. Close all running applications
If you have resource-demanding applications or games launched, it’s no wonder that your USB mouse freezes every now and then. But you can fix this problem by terminating all programs you’re not currently using. The best way to do this is by ending their task from Task Manager.
How to terminate running processes:
- Click the Start button, search for Task Manager, and press Enter to open this app
- Remain in the Processes tab. If you’re in another area, use Tab to select the tabs and the arrow keys to switch to the Processes section
- Select an unused application and click End task. Or, use the Tab key to select the list of processes and press the arrow keys to navigate. Once you select an app, press Tab until you select the End task button and hit Enter (or press the menu key or Shift + F12 to open the right-click menu, then use the up and down arrows to select End task, and hit Enter)

- Do this for all applications you don’t recognize or use
- Try to use your wireless mouse now

It might be necessary to restart the computer after exiting all applications. However, if all or part of these programs are scheduled to automatically run at Windows boot, then your work will have been in vain. In that case, you should return to Task Manager to disable all startup apps.
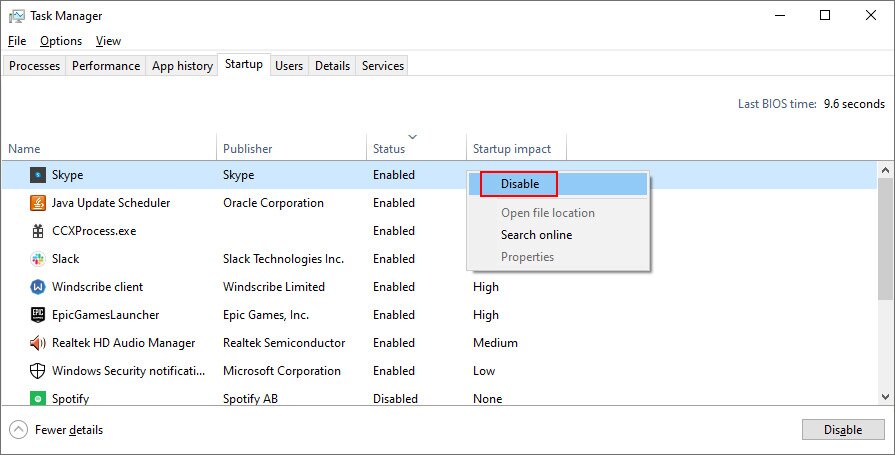
How to disable startup apps:
- Click the Start button, type Task Manager, and press Enter to open this app
- Go to the Startup tab. If you’re using a keyboard, press the Tab key until you select the tabs area, and use the arrow keys to navigate to Startup
- Select an app and click Disable. Or, press Tab until you select the list of apps, use the arrow keys to navigate and select an app. Then press Tab until you select the Disable button and hit Enter (or press the menu button or Shift + F12 to open the context menu, use the arrow keys to select Disable, and press Enter)

- Do this for all startup apps with the Enabled status
- Restart your computer and see if you can use your USB mouse now
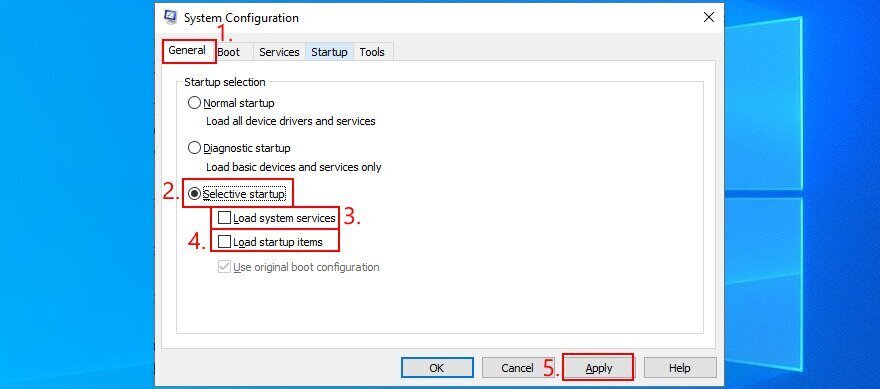
15. Run a clean boot
A better idea than disabling startup apps is running a clean boot on Windows 10. In addition to stopping all programs that automatically run at Windows startup, you will be also disabling scheduled services. It’s a step forward toward fixing your wireless mouse if it’s not working on your Windows 10 PC.
- Press Win key + R, type msconfig, and hit Enter to open the System Configuration app
- Stay in the General tab. If you’re somewhere else, press Tab until you select the tabs area and use the arrow keys to go to General
- At Startup selection, select Selective startup and disable Load system services and Load startup items. Or, press Tab until you reach Selective startup, use the arrow keys to select Load system services and Load startup items, then press Spacebar at each setting to disable it

- Click Apply and exit. Or press Tab until you reach the Apply button, hit Enter, and press Esc
- Follow the instructions at Solution 14 from this list to disable startup apps
- Restart your computer and check your cordless mouse for issues
16. Start Windows 10 in Safe Mode
Running Windows 10 in Safe Mode means starting your operating system in a basic state, with all non-important drivers and files disabled. It’s a bit more strict than clean boot, but it helps you narrow down the root of the problem.
If your wireless mouse works in Safe Mode, it means that there’s no problem with the default Windows settings and standard
