How to Fix “Video Scheduler Internal Error” on Windows 10 & 11
Blue Screen of Death errors are inevitable on Windows computers and can happen due to various problems with your software or hardware. The most important aspect is that BSOD errors can be fixed without having to contact Microsoft tech support.
What is VIDEO SCHEDULER INTERNAL ERROR?
VIDEO_SCHEDULER_INTERNAL_ERROR is a Blue Screen of Death stop code with the value 0x00000119. It means Windows detected a fatal violation in the video scheduler — essentially, the graphics subsystem hit a condition it could not safely recover from, so Windows halted to prevent further damage to your system.
This stop code is not limited to any single GPU brand. It can involve NVIDIA, AMD, or Intel graphics drivers, and is commonly triggered by corrupted or outdated graphics drivers, unstable overclocks, overheating, failing VRAM or RAM, or storage corruption affecting system files. When reviewing crash dump files, you may see associated files such as nvlddmkm.sys (NVIDIA), atidxx64.dll or atikmpag.sys (AMD), or igdkmd64.sys (Intel) — these point directly to the driver component involved in the crash. You can fix this error without turning to a professional for help.
Here are some possible problems:
- Outdated operating system or BIOS
- Malware infections or registry corruption
- Overclocking
- Incompatible security software, system updates, or peripheral devices
- Incorrect firewall settings
- Outdated or incompatible GPU driver
How to fix VIDEO SCHEDULER INTERNAL ERROR on Windows 10
To get rid of stop code VIDEO SCHEDULER INTERNAL ERROR, you have to fix the underlying issue with your display. Before starting the troubleshooting operation, however, it’s a good idea to create a system restore point. You will be able to revert Windows 10 to a previous checkpoint in case you have to start again from scratch. If you’re experiencing other blue screen issues like PFN LIST CORRUPT in Windows 10, the fix often overlaps with the steps outlined here. Many of these thread exception troubleshooting steps can also help resolve similar driver-related BSOD errors.
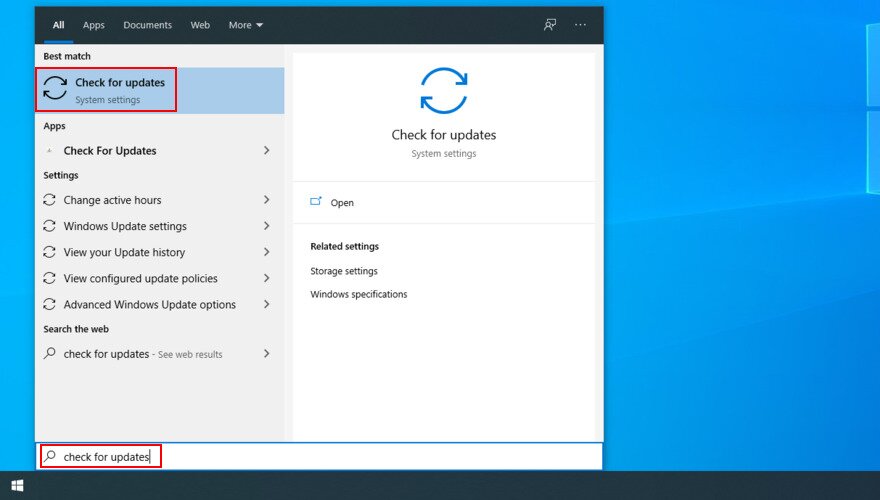
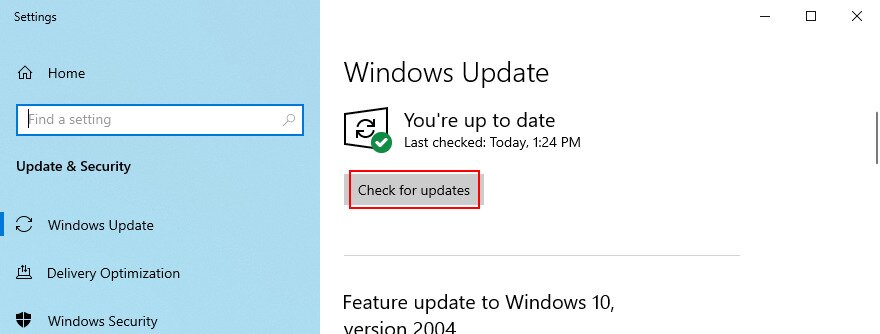
- Click the Start button, type check for updates, and press Enter

- Your OS should start looking for updates immediately. If it doesn’t, click Check for updates

- Click Download to get any pending updates

- Your PC might restart several times. Once it finishes, check for BSOD errors
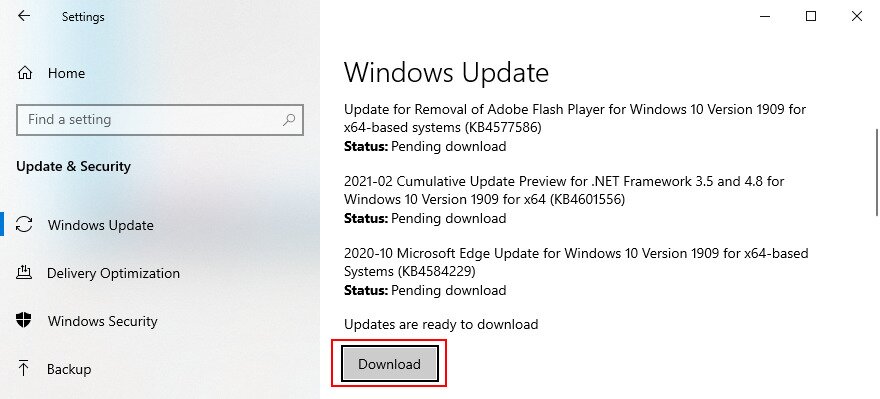
If Windows 10 fails to complete updates, try to restart the Windows Update and dependent services.
2. Run a GPU stress test
The best way to determine the issues of your graphics card is by running a GPU stress test to see what type of Artifacts you receive. Although it takes longer, the test should last at least one hour to be thorough. At the end, it’s a good idea to record the maximum temperatures.
It can be challenging to find the right tool to perform a stress test on your graphics card. If you’re undecided, we suggest opting for FurMark, MSI Afterburner or GPU-Z.
Test RAM and perform basic physical GPU checks
If the VIDEO_SCHEDULER_INTERNAL_ERROR persists after software fixes, faulty RAM or a physically unseated GPU can be the real culprit. Recurring artifacting, black-screen flickers, or hardware errors in Reliability Monitor (search for Reliability Monitor in the Start menu) are strong indicators of hardware instability rather than a software-only problem.
Run Windows Memory Diagnostic:
- Press Win + R, type mdsched.exe, and press Enter
- Choose Restart now and check for problems
- Windows will restart and run a full memory test — this can take 10–20 minutes
- After Windows boots back into the desktop, check the results in Event Viewer under Windows Logs > System and look for entries from MemoryDiagnostics-Results
For a more thorough test, MemTest86 (booted from a USB drive) can run multiple passes overnight and is the gold standard for RAM validation.
For desktop users — basic physical GPU checks:
- Power off your PC completely and unplug it from the wall
- Open the case and firmly reseat the graphics card in its PCIe slot
- Confirm that all PCIe power cables (6-pin or 8-pin connectors) are fully and securely seated into the GPU
- If you have an active GPU overclock or undervolt profile loaded through software such as MSI Afterburner, remove or disable it before testing again
- Restart and monitor for crashes
Reinstall or roll back the graphics driver using DDU
A corrupted graphics driver or a bad driver update is one of the most common causes of the VIDEO_SCHEDULER_INTERNAL_ERROR stop code. Windows’ built-in driver update and uninstall process often leaves behind leftover files that can cause continued instability. Display Driver Uninstaller (DDU) performs a thorough clean removal, giving you a fresh slate before reinstalling.
Option A: Roll back the driver if crashes started after a recent update
- Press Win + X and select Device Manager
- Expand Display adapters and right-click your GPU
- Select Properties, then click the Driver tab
- Click Roll Back Driver if the option is available, then follow the prompts and restart
If the Roll Back Driver button is greyed out, or if rolling back does not resolve the issue, proceed with a clean reinstall using DDU.
Option B: Clean reinstall using Display Driver Uninstaller (DDU)
- Download the latest version of Display Driver Uninstaller (DDU) from Wagnardsoft and save it to your desktop
- Also download the latest stable WHQL-certified driver for your GPU from the official manufacturer site (NVIDIA, AMD, or Intel) — but do not install it yet. If your crashes began after a specific driver update, download the previous known-good version instead
- Disconnect your PC from the internet (unplug Ethernet or turn off Wi-Fi) to prevent Windows from automatically reinstalling drivers during the process
- Boot into Safe Mode: Press Win + R, type msconfig, go to the Boot tab, check Safe boot (Minimal), and click OK, then restart
- Once in Safe Mode, launch DDU
- In the DDU interface, select your GPU type (NVIDIA, AMD, or Intel) from the device type drop-down
- Click Clean and restart
- After the PC restarts (back into normal Windows), reconnect to the internet and install the driver you downloaded in step 2
- Restart again and monitor for VIDEO_SCHEDULER_INTERNAL_ERROR recurrences
Run DISM, SFC, and CHKDSK before deeper repairs
Before attempting more advanced fixes like registry editing, it is worth running Windows’ built-in repair tools. These three commands address the most common underlying causes — a corrupted Windows image, damaged protected system files, and file-system or bad-sector issues on your drive. They are safe, free, and often resolve stop codes without requiring any hardware changes.
- Press Win, search for Command Prompt, right-click it, and select Run as administrator
- Run DISM to repair the Windows component store. Type the following and press Enter:
DISM /Online /Cleanup-Image /RestoreHealth
This contacts Windows Update to download and replace any corrupted Windows image files. It can take 10–20 minutes. - Once DISM completes, run System File Checker to scan and repair protected system files. Type the following and press Enter:
sfc /scannow
SFC will report whether it found and fixed any violations. Do not close the window until it reaches 100%. - Next, run CHKDSK to check for file-system errors on your system drive. Type the following and press Enter:
chkdsk C: /f
If Windows reports the drive is in use and asks to schedule the check on next restart, type Y and press Enter, then restart your PC. - If you suspect physical bad sectors on the drive — especially if you have seen disk-related errors in Event Viewer — run the extended scan instead:
chkdsk C: /r
Note that the/rflag includes everything/fdoes, plus a sector-by-sector scan. This can take significantly longer depending on drive size. - After all scans complete and your PC has restarted as needed, check whether the VIDEO_SCHEDULER_INTERNAL_ERROR stop code returns
3. Run a malware scan
The Windows 10 VIDEO SCHEDULER INTERNAL ERROR can also be caused by a virus infection. So it’s a good idea to run a malware scan on your computer to find and eliminate any threats, whether you’re using Windows Defender or a third-party anti-malware application.
How to use Windows Defender:
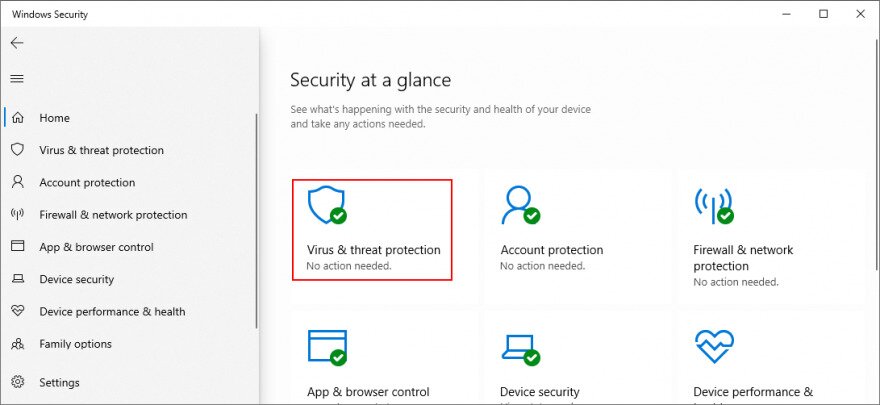
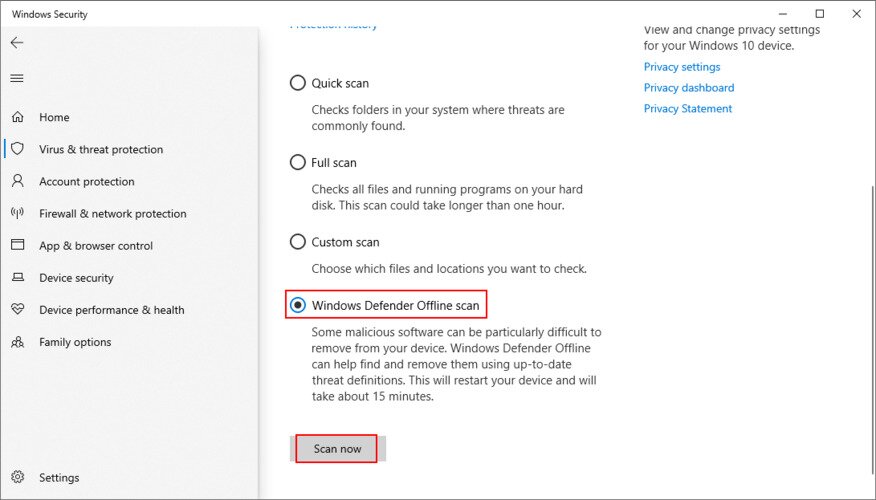
- Press the Win key, type Windows Security, and press Enter to launch this application

- Select Virus & threat protection

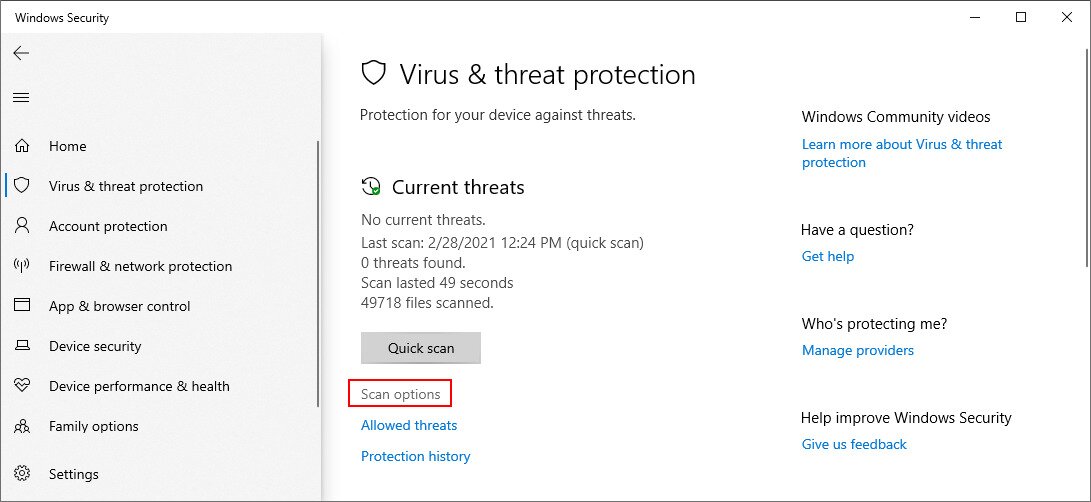
- Click Scan options

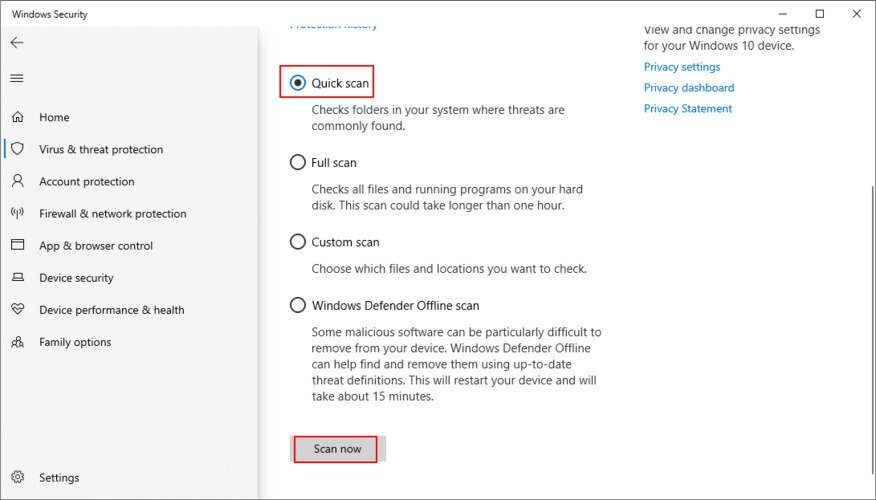
- Choose Quick scan from the list of scan modes

- Click Scan now
- Patiently wait while Defender performs a scan and allow it to remove any infections. If it doesn’t find anything suspicious, run another checkup using Windows Defender Offline scan mode

- Once Defender does its job, restart your PC
- Check for blue screen errors

4. Fix the system registry
If the Windows registry has suffered too many modifications due to too many software installations, it could have become corrupt, triggering BSOD stop codes like VIDEO_SCHEDULER_INTERNAL_ERROR as a result. However, you can fix it by using a registry cleaner, without having to reset the PC or use System Restore. Or, check out the next steps to manually repair the registry.
Important note for Windows 10 and Windows 11 users: Before attempting the manual registry restore steps below, be aware that on modern Windows 10 and Windows 11 systems, the C:\Windows\System32\config\RegBack folder is often empty by default. Microsoft changed this behavior in a Windows 10 update, meaning the copy commands below may fail silently or do nothing useful. Always verify that the RegBack folder actually contains recently dated hive files before proceeding. If it is empty, this method will not help and you should instead use System Restore (search for Create a restore point in the Start menu) or the DISM and SFC commands covered earlier in this guide. Treat the offline registry hive restoration below as a last resort only, and always create a full registry backup first.
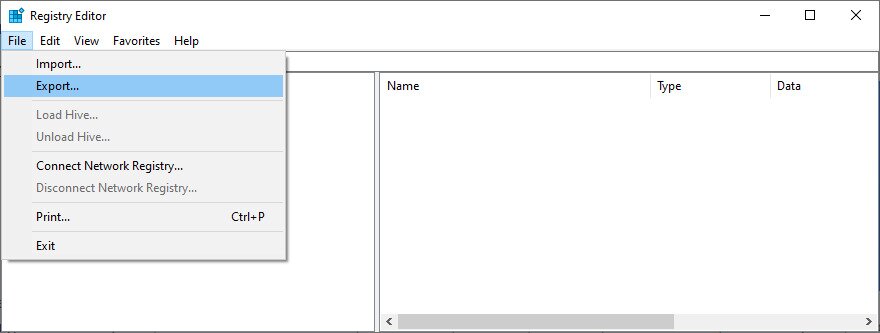
- Create a registry backup:
- Click the Start button, search for Registry Editor, and open this app
- Open the File menu and select Export

- Specify a file name and saving folder for the .reg file
- Click Save
- Exit Registry Editor
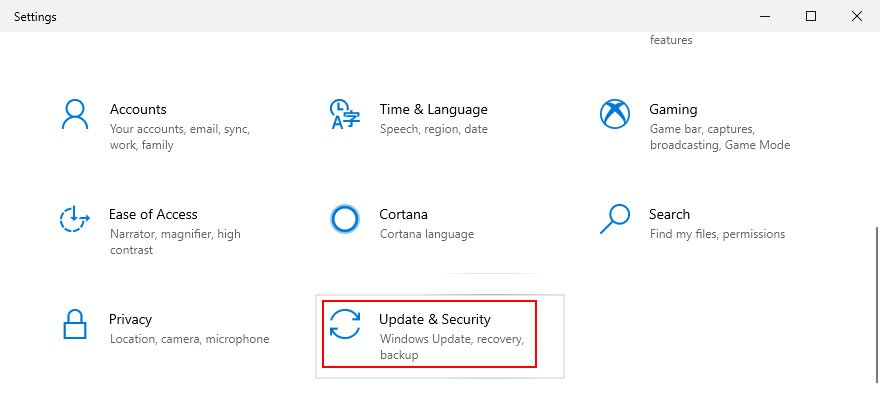
- Right-click the Start button and go to Settings

- Click Update & Security

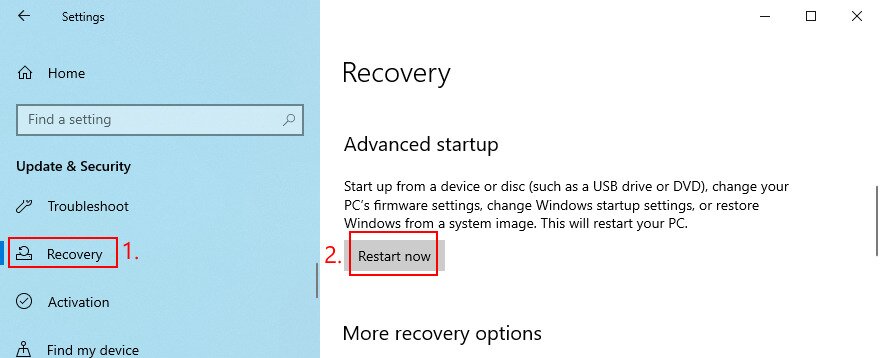
- Jump to Recovery on the left side
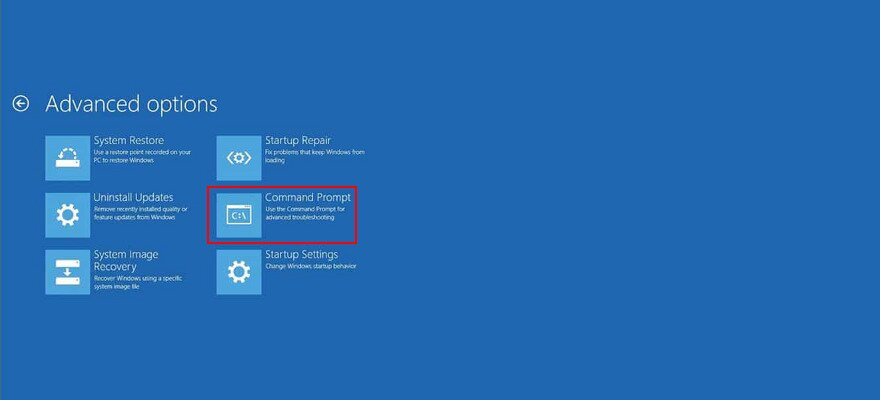
- At Advanced startup, click Restart now

- Windows 10 will reboot in Advanced startup mode. Select Troubleshoot > Advanced options
- Click Command Prompt

- Paste the following commands (press Enter after each command):
cd c:\Windows\System32\config
ren c:\Windows\System32\config\DEFAULT DEFAULT.old
ren c:\Windows\System32\config\SAM SAM.old
ren c:\Windows\System32\config\SECURITY SECURITY.old
ren c:\Windows\System32\config\SOFTWARE SOFTWARE.old
ren c:\Windows\System32\config\SYSTEM SYSTEM.old
copy c:\Windows\System32\config\RegBack\DEFAULT c:\Windows\System32\config\
copy c:\Windows\System32\config\RegBack\DEFAULT c:\Windows\System32\config\
copy c:\Windows\System32\config\RegBack\SAM c:\Windows\System32\config\
copy c:\Windows\System32\config\RegBack\SECURITY c:\Windows\System32\config\
copy c:\Windows\System32\config\RegBack\SYSTEM c:\Windows\System32\config\
copy c:\Windows\System32\config\RegBack\SOFTWARE c:\Windows\System32\config\
- Restart your PC
- Check if you still get the VIDEO SCHEDULER INTERNAL ERROR stop code

5. Disable overclocking
Some gamers overclock their computer to get more juice out of their GPU, CPU or RAM, in an effort to improve the system requirements for high-demanding games. However, if it’s not done properly or if the cooler is not powerful enough to sustain the extra heat, this could make you screen turn blue to protect your hardware from overheating.
A better solution is to turn off your overclocking software. Then, reproduce the situation that led to the VIDEO SCHEDULER INTERNAL ERROR in the first place, like launching a particular game.
6. Reset BIOS
BIOS has a ton of cool options that you can configure, including overclocking, caching, and shading. However, just like in the previous solution, if you don’t what you’re doing, you could end up harming your PC due to incorrect BIOS settings. To fix this issue, you just have to restore BIOS options to their factory values.
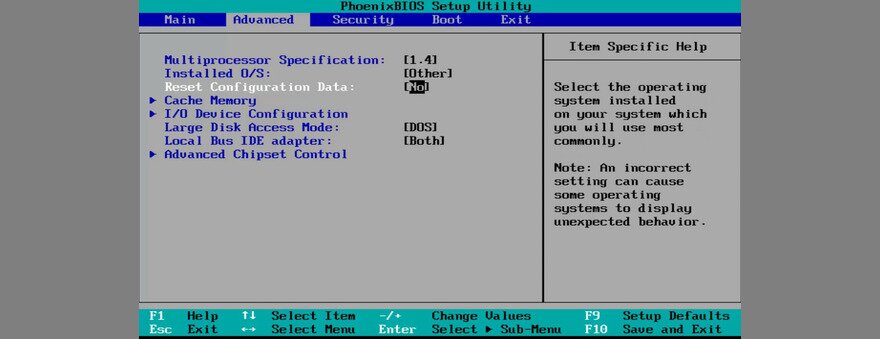
- Restart your computer
- Before Windows boots, press the key displayed on the screen to access BIOS mode
- Access the advanced settings
- Find and enable the option that resets the BIOS configuration to default

- Save the current BIOS settings and exit
- After the OS boot, check for additional BSOD errors
7. Update BIOS
Since we’re discussing BIOS, it’s a good idea to check if it’s obsolete. Just like your operating system, applications and router firmware, the BIOS should also be updated to the latest version in order to take advantage of the newest features.
- Connect an empty USB flash drive to your PC
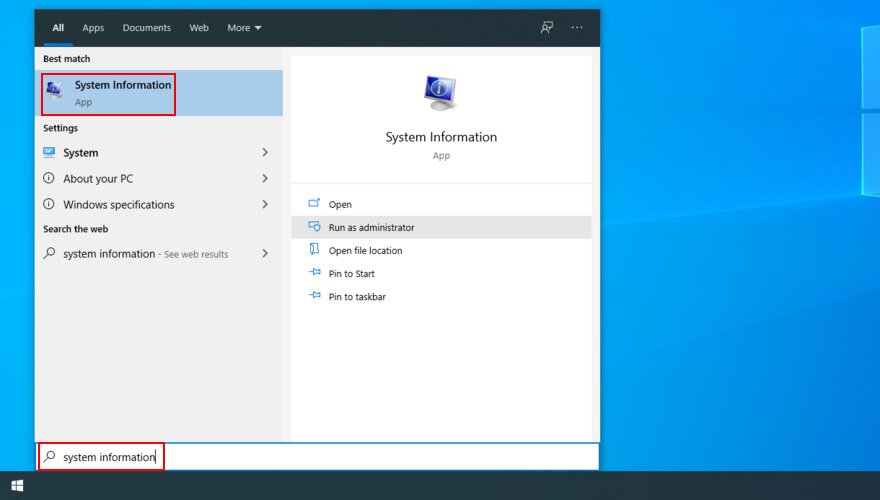
- Press the Windows key, search for System Information, and open this app

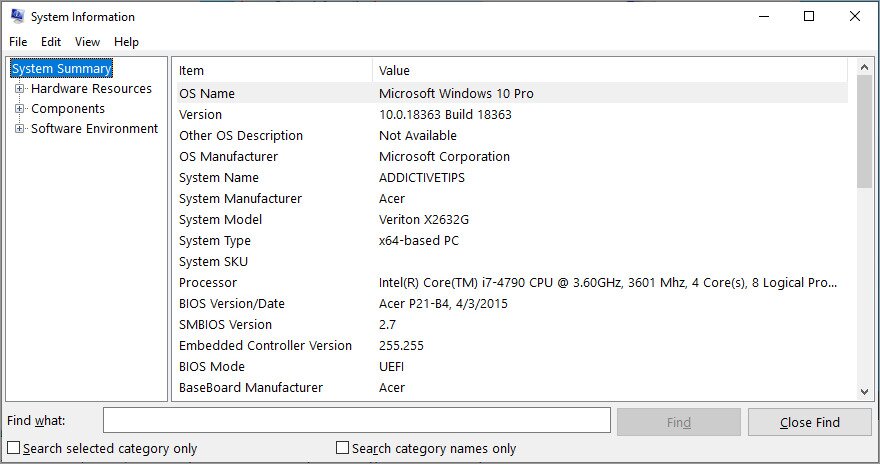
- Go to the System Summary area
- Take note of the information displayed at BIOS Version/Date and BaseBoard Manufacturer

- By taking into account the BaseBoard Manufacturer, visit the official website of your BIOS manufacturer
- Check out the details revealed at BIOS Version/Date and use them to find a newer BIOS version that’s compatible with your operating system
- Download the BIOS archive and unzip it to a pen drive
- Restart your PC and access BIOS mode by quickly pressing the key shown on the screen
- Create a backup of the current BIOS version and save it to the USB flash drive
- Start the BIOS update and follow the on-screen steps

- Patiently wait during the update and make sure to not restart or shut down your PC
- Start Windows 10 as normal
- Check for the VIDEO SCHEDULER INTERNAL ERROR
8. Uninstall third-party security tools
Not all third-party software solutions fully support Windows 10. In fact, some of them can cause display issues and trigger BSOD error messages such as VIDEO SCHEDULER INTERNAL ERROR. To resolve this problem, you should get rid of all third-party security applications installed recently.
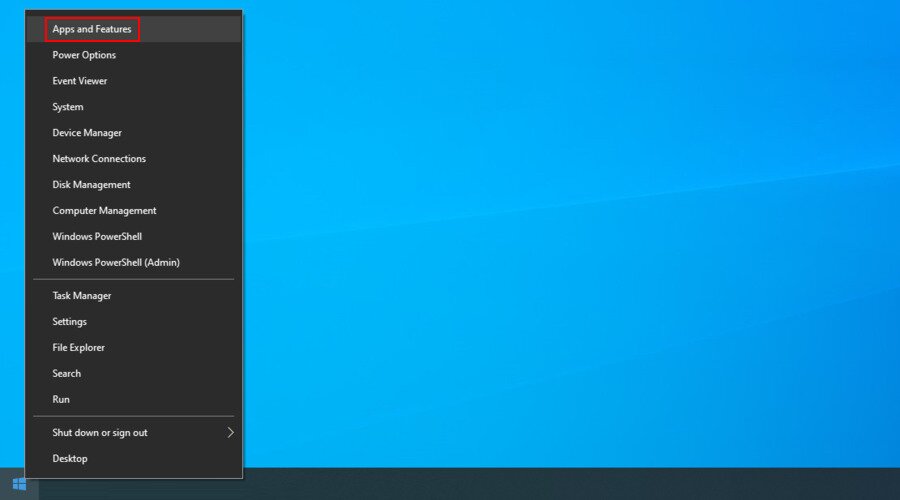
- Right-click the Start button and select Apps and Features

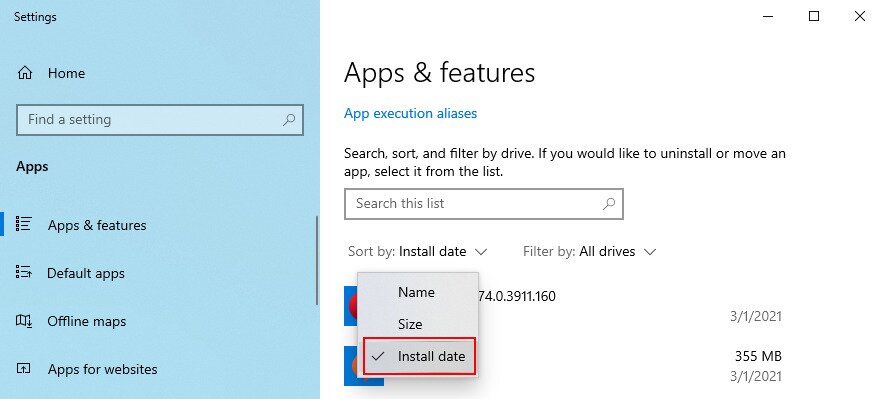
- Set Sort by to Install date (newest first)

- Select a security program and click Uninstall
- Click Uninstall again to confirm
- Proceed with the removal operation
- Reboot your PC and check for BSOD errors
The Windows 10 built-in uninstaller can only remove programs from your computer. If you’re looking for a way to delete leftover files and restore registry settings, we suggest resorting to a specialized application remover that does its job thoroughly.
9. Uninstall system updates
If you started getting the VIDEO_SCHEDULER_INTERNAL_ERROR stop code after a recent system update, perhaps that’s where you should shift your attention. Certain Windows updates can cause stability issues because they do not fully support your system configuration, so it’s better to get rid of them and wait until Microsoft rolls out a reliable update.
How to uninstall recent Windows updates:
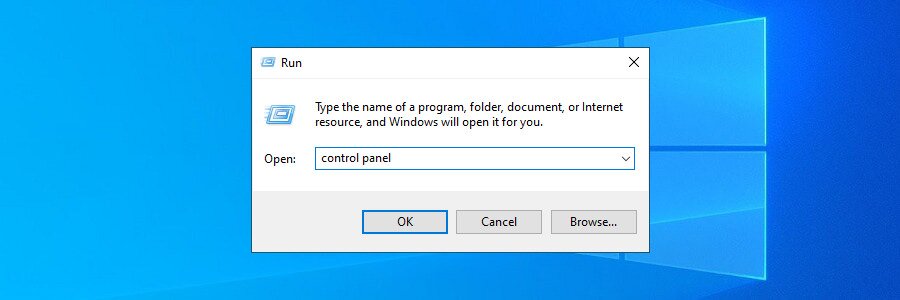
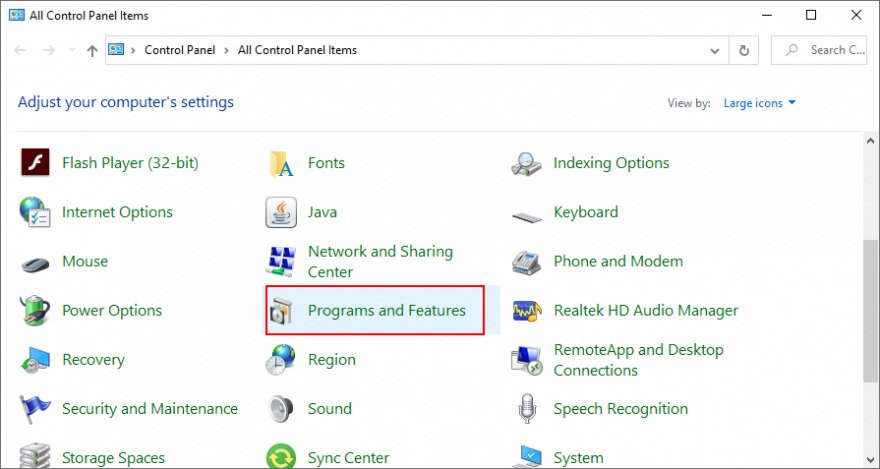
- Press Windows key + R, type control panel, and hit Enter

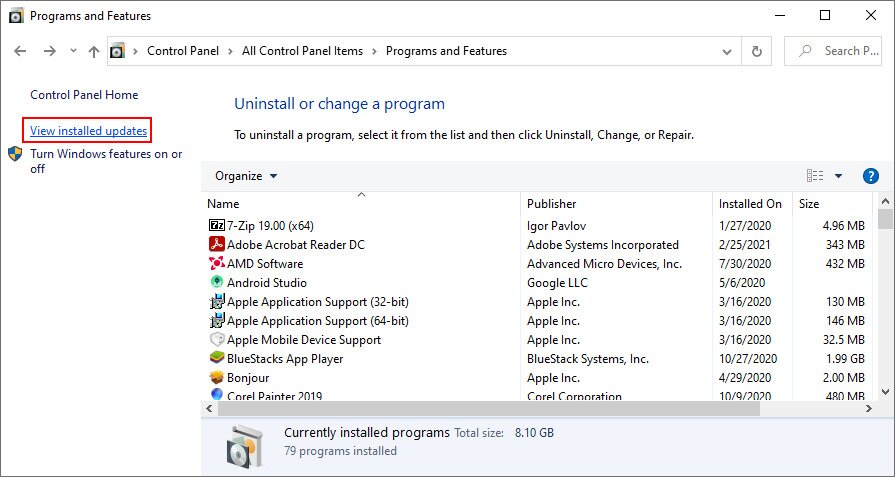
- Go to Programs and Features

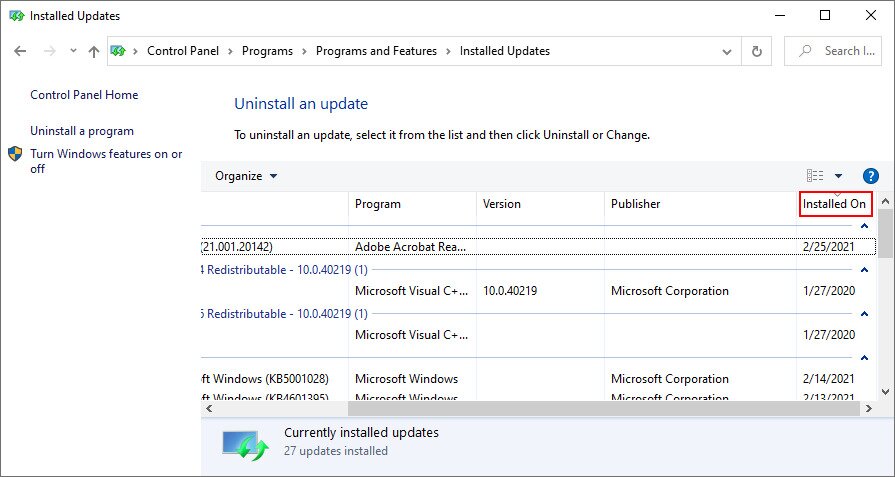
- Click View installed updates

- Click on the Installed On column to sort the updates by date (newest first)

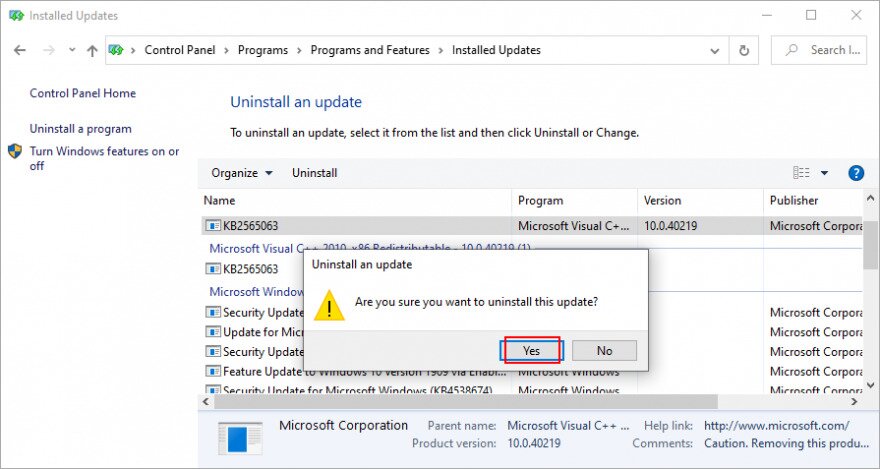
- Right-click the first update in the list and select Uninstall
- When asked if you’re sure, click Yes

- Reboot your PC and check for BSOD errors
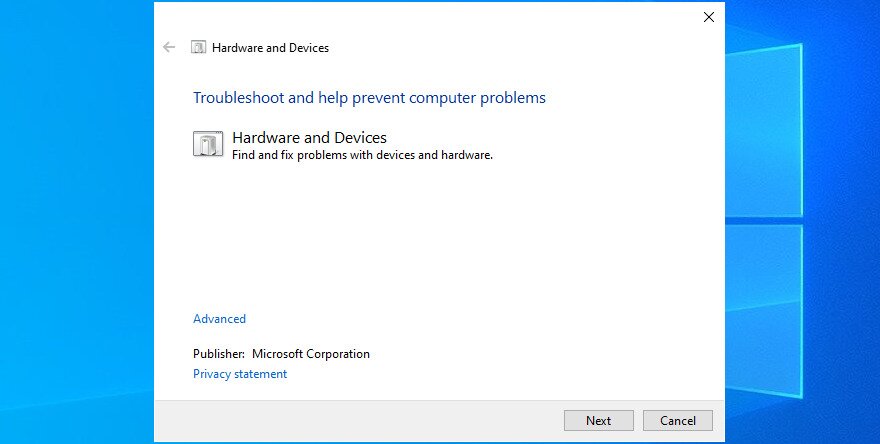
10. Run the Hardware and Devices troubleshooter
Windows has a troubleshooter designed to fix common errors with your hardware and devices. It’s a good idea to use it for getting rid of the the VIDEO SCHEDULER INTERNAL ERROR. You can find it in Settings > Troubleshooters. However, if the Hardware and Devices troubleshooter doesn’t exist on that list, you can use launch it from Run. Here’s how:
- Press the Win key + R, type msdt.exe -id DeviceDiagnostic, and hit the Enter key

- Click Next and follow the given instructions

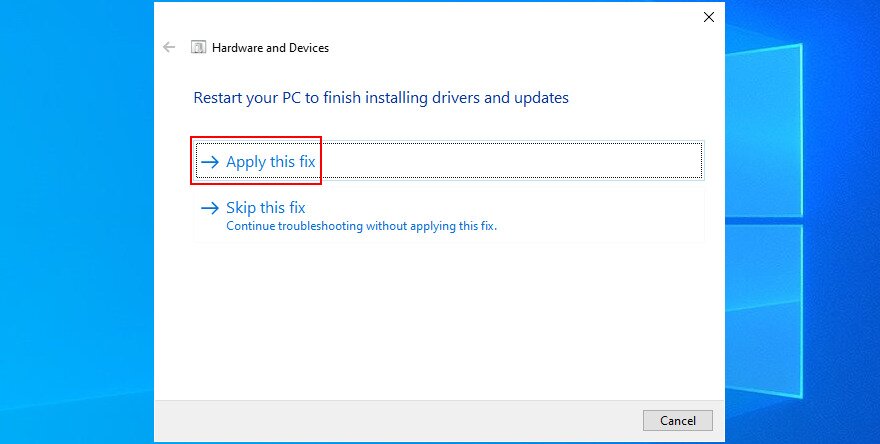
- If it finds a way to repair your hardware and devices, click Apply this fix

- Restart Windows 10
- See if you are still getting blue screen messages

11. Remove recent peripheral devices
The hardware components you recently attached to your desktop or laptop might not be functioning correctly. Or, they could be incompatible with your operating system. So it’s a good idea to detach them, then start your PC and check for blue screen errors.
If you can’t tell which device is at fault, just shut down your computer and unplug everything, except for your mouse and keyboard. Then, boot Windows and confirm that your PC is no longer crashing.
Replug one device at a time and see what happens with your computer. When you get the VIDEO SCHEDULER INTERNAL ERROR again, you will know for sure which component is malfunctioning. In that case, you should send it back to the manufacturer to fix it.
12. Disable your antivirus software
Your antivirus software solution might be blocking critical system processes that your computer needs to function correctly. Otherwise, you could end up with blue screen messages such as VIDEO SCHEDULER INTERNAL ERROR.
It typically happens when you have a third-party anti-malware application installed, which isn’t compatible with your operating system. Or, if you have two or more security tools with real-time protection, those components might clash, leading to PC crashes.
To resolve this problem, make sure to turn off any third-party software solutions. And, if you have multiple such programs installed, remove them to restore the stability of your computer.
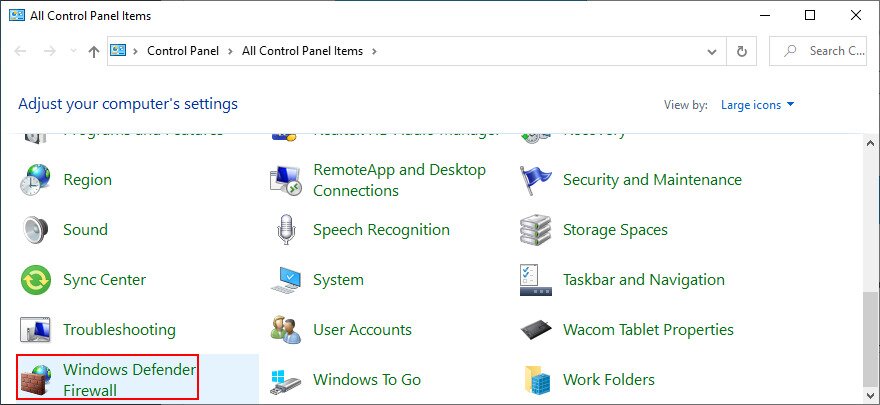
13. Turn off the firewall
Other security issues might be caused by your firewall, which blocks Internet access to critical components that Windows requires, such as Windows Update. If you or someone else with access to your PC has messed up the firewall settings, then you should restore them to default.
Furthermore, some third-party firewall applications might have a default configuration that’s wrong for your PC, so you should remove them. If you’re not in this situation, here’s how to temporarily turn off Windows Firewall:
- Make sure you’re signed in as the PC administrator
- Click the Start button, search for Control Panel, and open this app
- Go to Windows Defender Firewall

- Click Turn Windows