How to Fix Video TDR Failure Error in Windows
“`html
Video TDR failure can ruin your gaming session instantly. There’s nothing worse than getting ready to play a video game with your friends only to get interrupted by a Blue Screen of Death (BSOD) message that takes over your computer, shuts down everything, and prevents you from doing anything except restart. In some cases, this crash is caused by a PFN list corrupt error, which is a serious issue related to memory management.
BSOD errors vary and they indicate the exact issue that’s causing your computer to shut itself off and prevent hardware corruption and major data loss. The problem is that error codes can be difficult to decipher without technical knowledge.
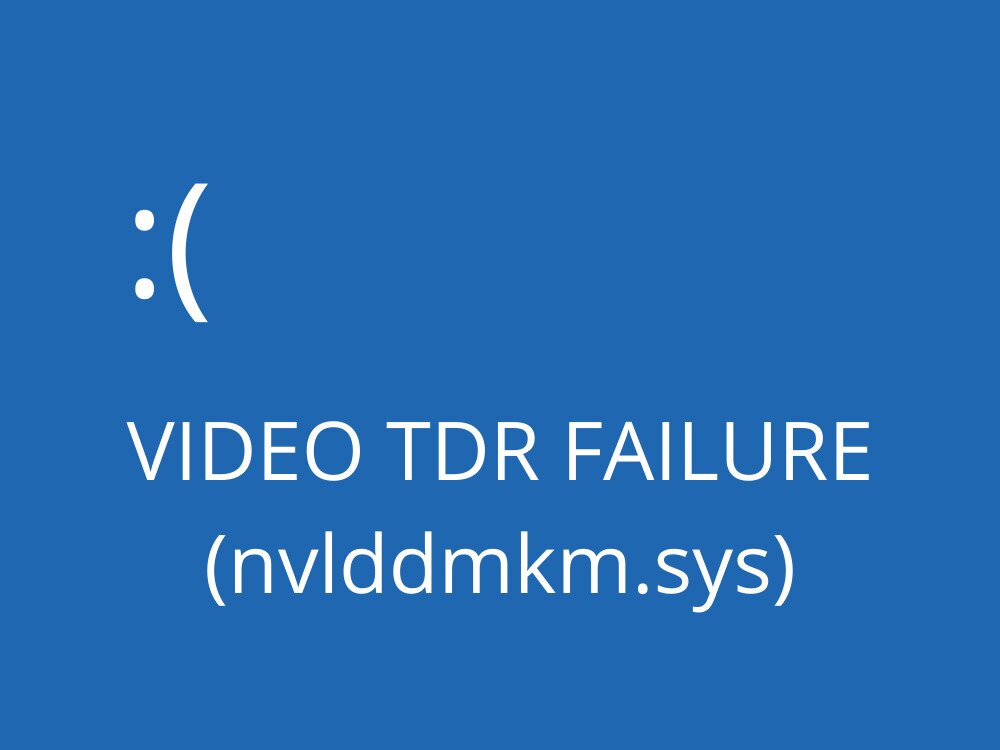
For example, VIDEO TDR FAILURE is a BSOD stop code that can occur on computers with NVIDIA graphics cards. Your entire screen turns blue, shows the Your PC ran into a problem and needs to restart message, and indicates nvlddmkm.sys as the problematic file. nvlddmkm.sys is a driver, and its full name is NVIDIA Windows Kernel Mode Driver. Similar driver-related BSOD errors include video scheduler failure and the driver power crash fix, which also require careful troubleshooting.
VIDEO TDR FAILURE on Windows 10 – FIX
Before finding a workaround for the VIDEO TDR FAILURE error, it’s a good idea to create a system restore point. If anything happens and you need to undo all changes, you can easily roll back Windows 10 to a checkpoint and start troubleshooting from ground up.
1. nvlddmkm.sys failed? Start Windows 10 in Safe Mode
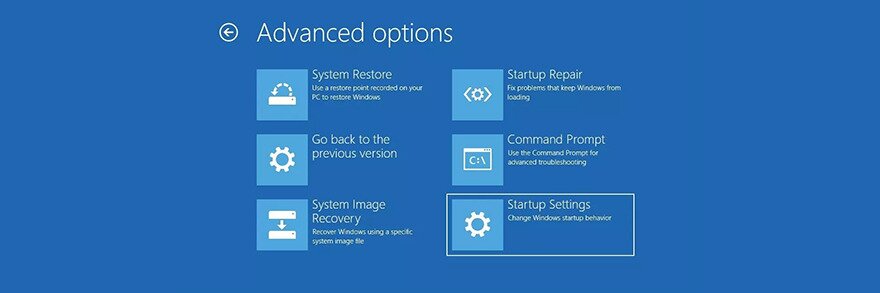
If you’re having a hard time using your computer because the system immediately crashes, shows the blue screen and enters a reboot loop, you can start Windows 10 in Safe Mode:
- Turn your PC on and off three times to trigger the Windows 10 troubleshooting mode
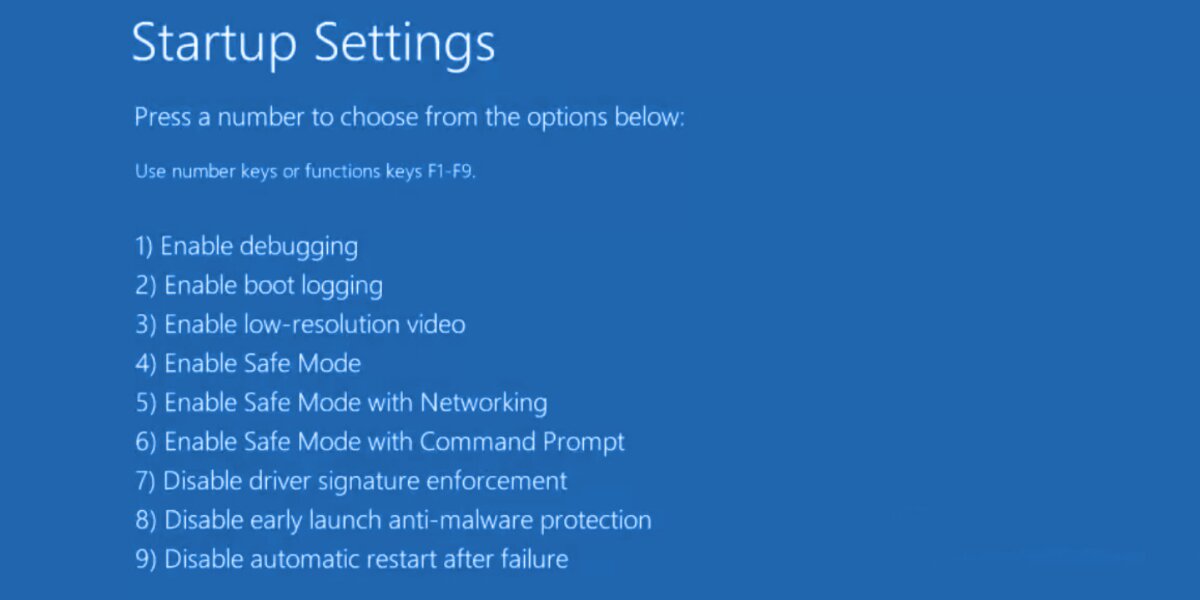
- Go to Troubleshoot > Advanced options > Startup Settings

- Click Restart and wait a bit
- Press F5 to enable Safe Mode with Networking

- After Windows boots, check if you still get the nvlddmkm error. If you still do, follow the steps above to reach the Safe Mode options and opt for F4 to enable Safe Mode without networking features
2. Run a clean boot
If Safe Mode turned out to be the key in stabilizing your operating system and preventing it from showing BSOD errors, you can clean-boot Windows 10 to disable the startup and services which may be malfunctioning and causing the VIDEO TDR FAILURE error.
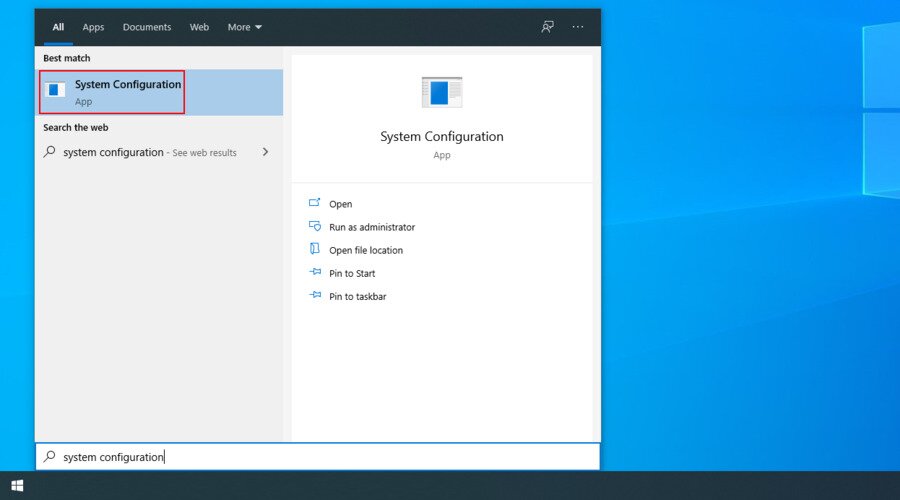
- Follow the steps in Solution 1 to start Windows 10 in Safe Mode
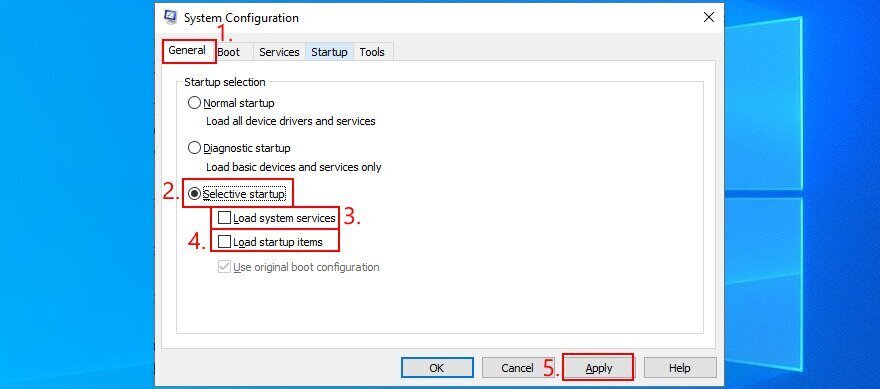
- Click the Start button, search for System Configuration, and launch this app

- In the General tab, choose the Selective startup option
- Disable Load system services and Load startup items

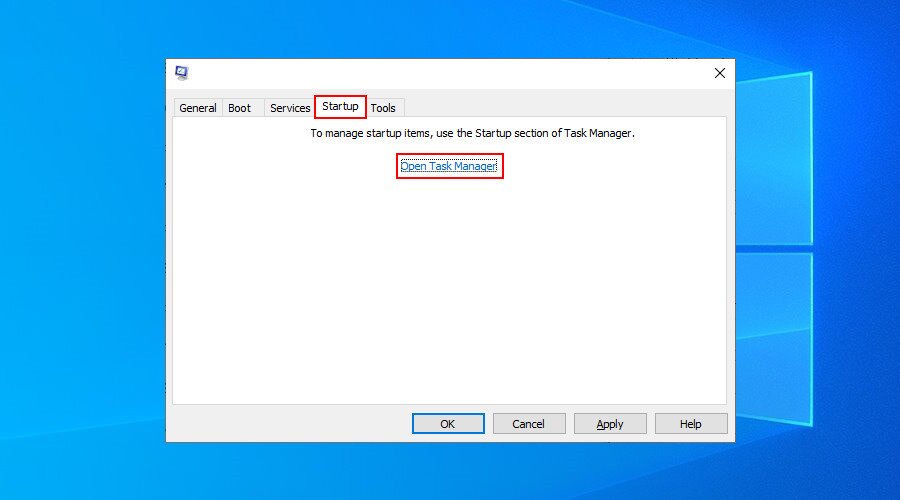
- Click Apply and go to the Startup section
- Click Open Task Manager

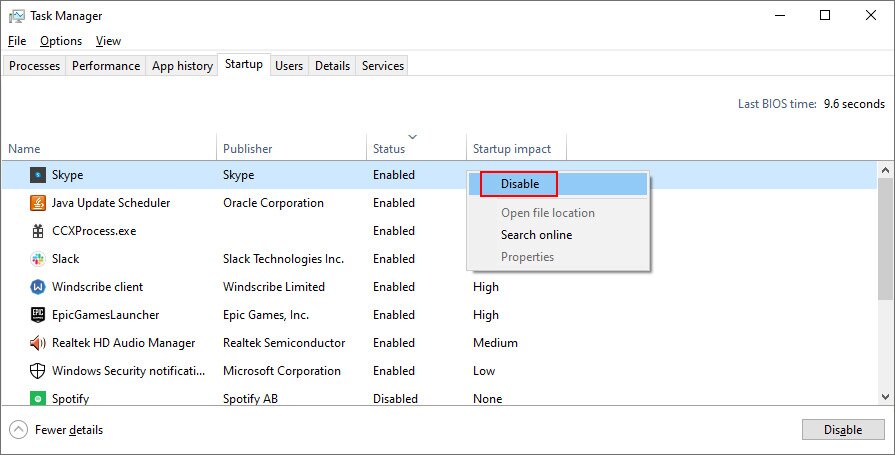
- Choose an application with the Enabled status and click Disable. Make this happen for all apps with the Enabled status

- Reboot your PC and inspect results
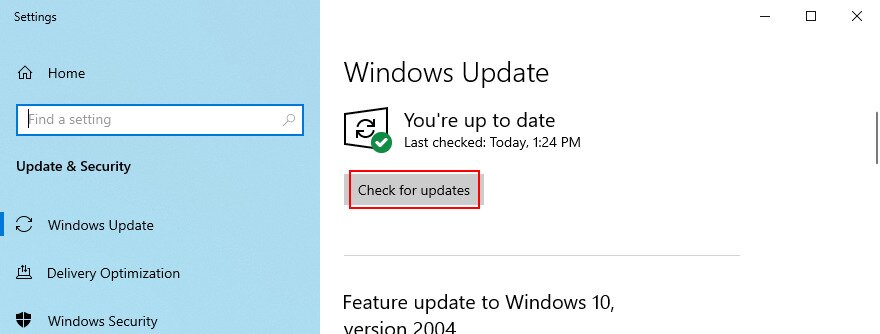
3. Check for system updates
If you haven’t used Windows Update for a long time, you might have missed on critical updates designed to fix system errors. Since it’s such an important OS component, Windows Update should run in the background and prompt you whenever there’s a pending update. But, if automatic system updates were disabled on your device, they should be manually launched.
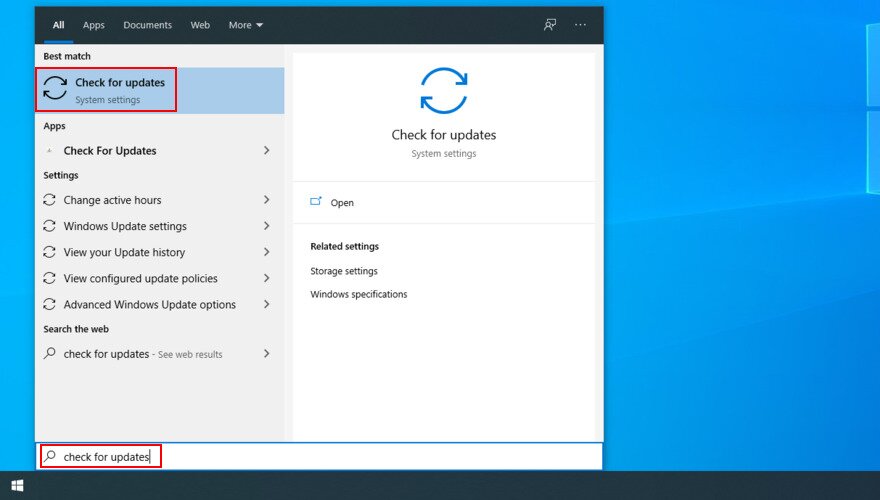
- Press the Win key, type Check for updates, and hit Enter

- Click Check for updates and wait

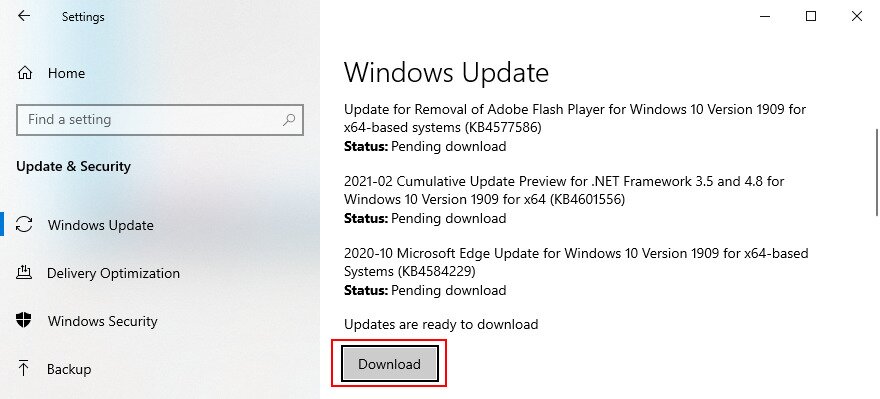
- If Windows finds anything, click Download

- Patiently wait until the new system updates are downloaded and installed
- Restart your computer
4. Disable overclocking software
People use memory overclocking tools to improve their gaming experience. However, if the computer is not accompanied with a cooler that’s powerful enough to sustain the extra heat, Windows will eventually shut itself off and show a blue screen message like VIDEO TDR FAILURE to prevent HDD corruption and data loss.
Unless you know exactly what you’re doing, you should disable any overclocking software tools, such as MSI Afterburner, CPU-Z or GPU-Z, and reset the computer’s clock settings to default. If you configured overclocking in BIOS, check out the next solution on this list.
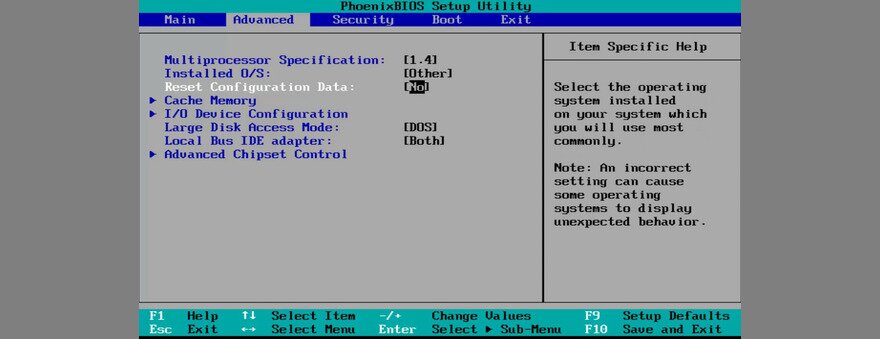
5. Reset BIOS to default
The computer’s BIOS contains a wide range of customization settings designed to improve your system performance. Unfortunately, this plan could easily backfire if you or someone else with access to your computer has aimlessly changed BIOS settings, such as overclocking and caching.
It could even lead to blue screen errors like nvlddmkm.sys. The easiest way to solve this problem is by resetting BIOS to default.
- Turn on your PC
- Before Windows boot, quickly press the key shown on the screen to access BIOS setup
- Access the advanced BIOS section
- Find and enable the option that resets BIOS configuration data to default

- Save the current settings and exit
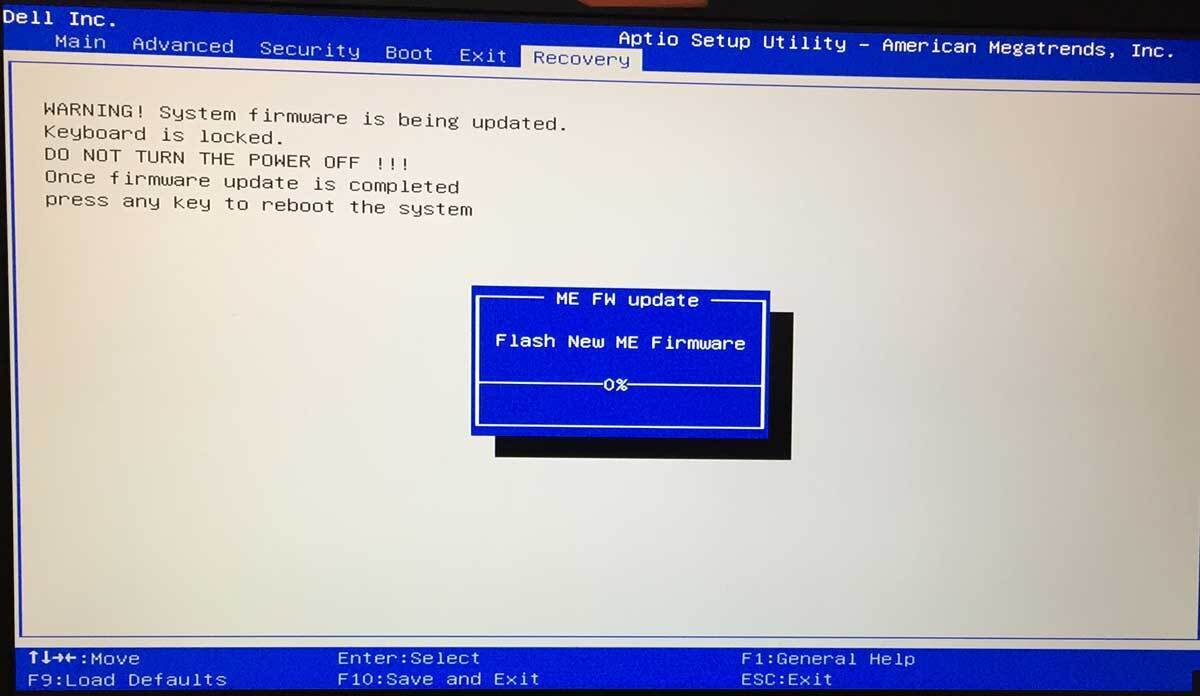
6. Update BIOS
If you haven’t updated BIOS for a long time or have never done this, you should get on it right away. You just need a USB flash drive and an Internet connection.
- Connect a USB flash drive to your PC
- Boot your system and press the key shown on the screen to enter BIOS setup
- In the main BIOS section, you can find out the BIOS manufacturer, version, and date of installation
- Using this information, start Windows on the malfunctioning PC or use another computer with Internet access, open a web browser, and visit the BIOS manufacturer’s website
- Locate and download the latest BIOS version that’s compatible with your operating system
- Unzip the downloaded file to the USB flash drive
- Return to the BIOS menu, create a backup of the current BIOS version for safekeeping, and save the backup to the USB flash drive
- Run the system firmware update and make sure to not shut down or restart the PC during this time

7. Restore the nvlddmkm.sys file
NVIDIA has a backup of the nvlddmkm.sys file somewhere on your computer, so all you have to do is find it, copy it, and overwrite the corrupt nvlddmkm.sys file.
- Open Windows Explorer by pressing Win key + E
- In the address bar, type
%SystemRoot%\System32\Drivers - Locate the nvlddmkm.sys file and rename it to nvlddmkm.sys.old
- In the Windows Explorer navigation pane, click This PC
- Click inside the Search This PC field and search for nvlddmkm.sy_
- Copy the nvlddmkm.sy_ file
- Press Win key + R, type cmd, and press Enter to open Command Prompt
- Run
chdir desktop - Then, run
expand -r nvlddmkm.sy_ nvlddmkm.sys - Exit Command Prompt
- Go to your desktop and copy the nvlddmkm.sys file
- Return to
%SystemRoot%\System32\Driversand paste the file - Restart your computer and check for BSOD errors
8. Clear system cookies and temp files
Windows saves cookies and temporary files, which should get deleted regularly to clear the system cache and make room for new data. If it doesn’t happen, this could lead to system stability issues and Blue Screen of Death errors like VIDEO TDR FAILURE.
To fix this problem, you just have to clear the system cookies and temporary files using specialized tools like CCleaner. Or, if you don’t want to install any third-party applications, you can turn to the built-in Disk Cleanup utility.
How to use Disk Cleanup:
- Click the Start button, search for Disk Cleanup, and open this app
- Pick the drive where Windows is installed (usually C:) and click OK
- Select the following files to delete:
- Downloaded Program Files
- Temporary Internet files
- Temporary files
- Click OK and Delete Files to confirm
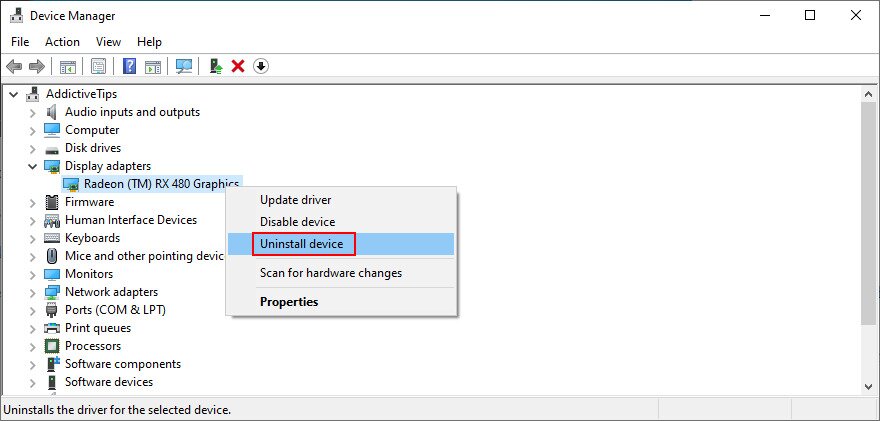
9. Reinstall the graphics adapter
Your graphics display might not have been properly installed on your computer. However, you can easily fix this from Device Manager.
- Right-click the Start button and select Device Manager
- Expand the Display adapters category
- Right-click your display adapter and select Uninstall device

- Restart your PC. Windows will automatically install the missing adapters
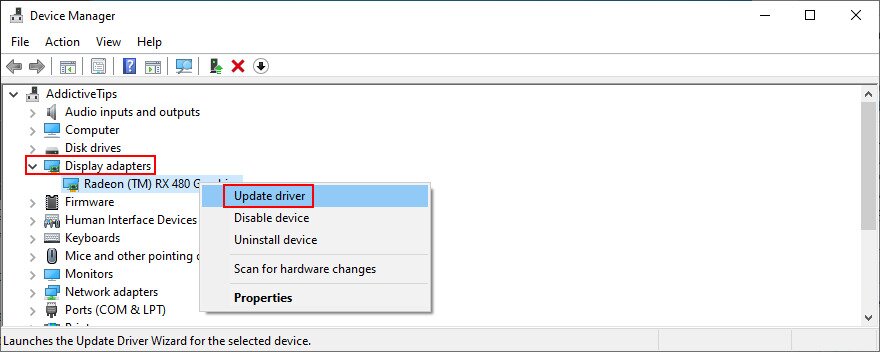
10. Update the GPU drivers
Outdated graphics drivers could cause video card issues, gaming problems, and even blue screen errors like nvlddmkm.sys. But you can update the obsolete GPU driver with minimum effort.
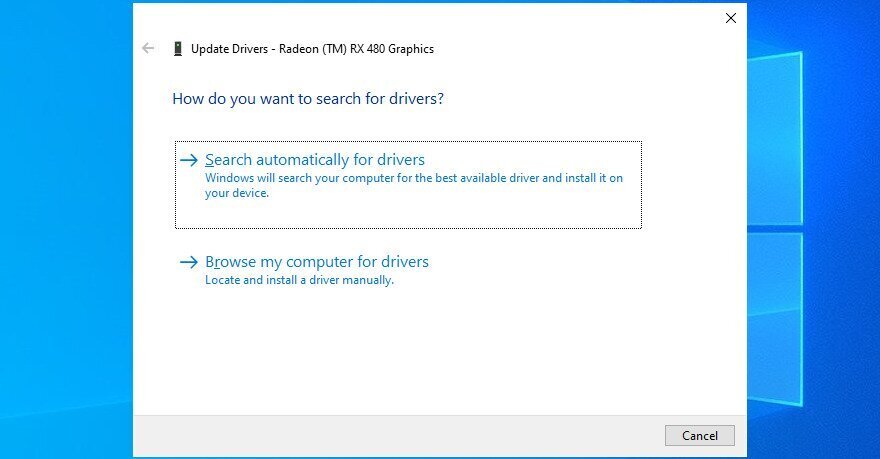
- Open Device Manager, right-click your display adapter, and select Update driver

- Click Search automatically for drivers

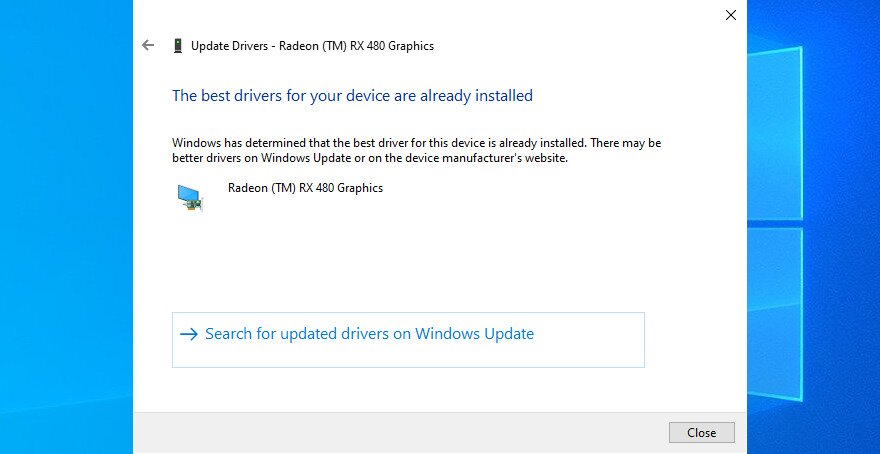
- If you get the The best drivers for your device are already installed message, click Search for updated drivers on Windows Update. However, if you have already checked your system for updates, there’s no need to do it again

- Restart your computer if the driver was successfully updated
Unfortunately, Windows often fails to find newer drivers in its database or by using the Windows Update component. In that case, you can double-click the GPU adapter in Device Manager, switch to the Driver tab, and find out the driver manufacturer, version, and date of installation. Using this information, visit the website’s manufacturer to download and install the latest driver.
However, if you find this process difficult or don’t want to risk downloading an unsupported driver, you can turn to a driver updater that automatically detects all obsolete drivers on your PC and offers to install the latest versions right away. And you won’t risk getting incompatible drivers either.
11. Roll back unsupported GPU drivers
Speaking of incompatible GPU drivers, many PC users download them from unknown sources without actually knowing whether or not they work on their computers.
If you’re one of these users, you should immediately roll back the unsupported display driver to restore the stability of your computer, eliminate recurring system crashes, and proceed with a correct driver update.
- Go to Device Manager and double-click the GPU adapter
- Switch to the Driver section
- Click Roll Back Driver and follow the on-screen instructions. If the button’s greyed out, it means that no previous driver version is saved on your PC, so you can skip this entire solution
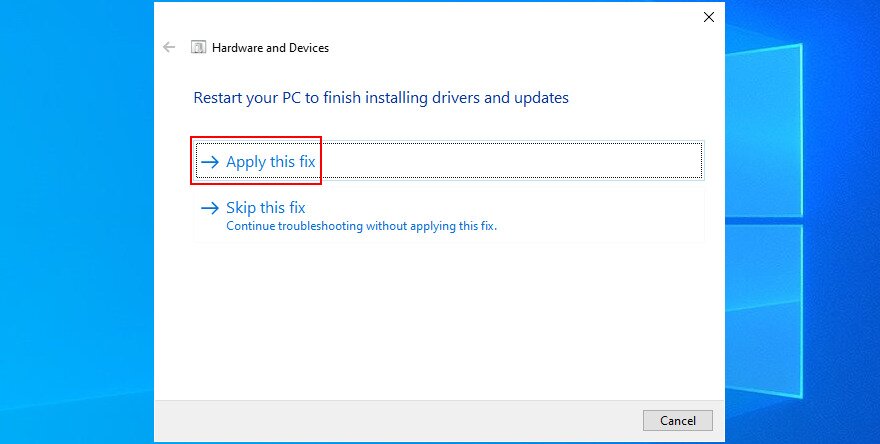
12. Run the Hardware and Devices troubleshooter
Windows 10 has internal troubleshooters for fixing common problems happening to various PC components, including hardware and devices. Normally, you should be able to locate it in Troubleshoot settings. However, if the Hardware and Devices troubleshooter is missing from that section, here’s how you can run it right away:
- Press the Win key + R and run
msdt.exe -id DeviceDiagnostic - Click Next and wait until the troubleshooter scans your PC

- If it finds any workarounds, click Apply this fix
- Reboot your PC when it finishes and check for BSOD errors
13. Disable hardware acceleration
Numerous software applications use hardware acceleration to improve your experience, whether we’re talking about gaming, web browsing, streaming, or something else. If you noticed that your computer shows the BSOD error after launching a particular application, inspect the program’s settings and look for a hardware acceleration option to turn it off. Here are some suggestions.
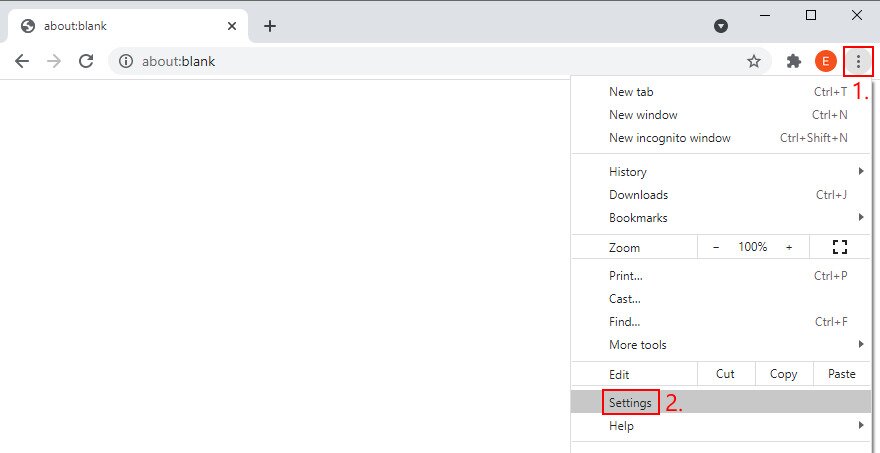
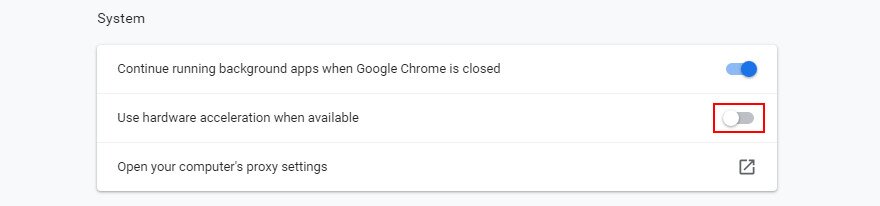
How to disable hardware acceleration in Google Chrome:
- In Chrome, open the More menu and go to Settings

- Select Advanced > System (or go to
chrome://settings/system) - Disable Use hardware acceleration when available

- Restart Chrome
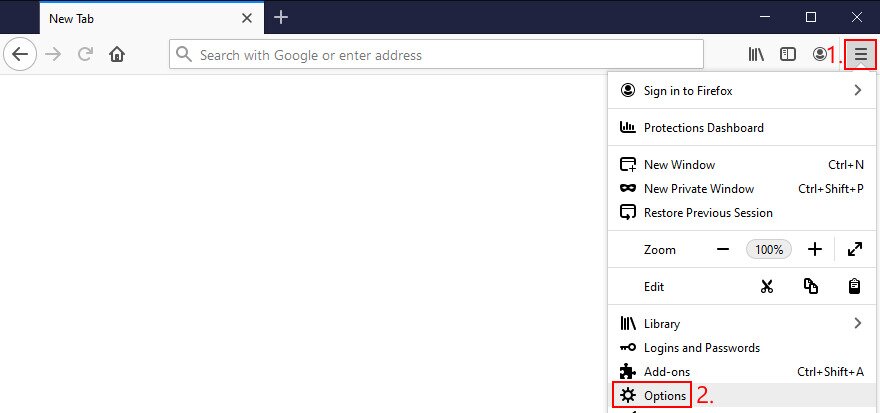
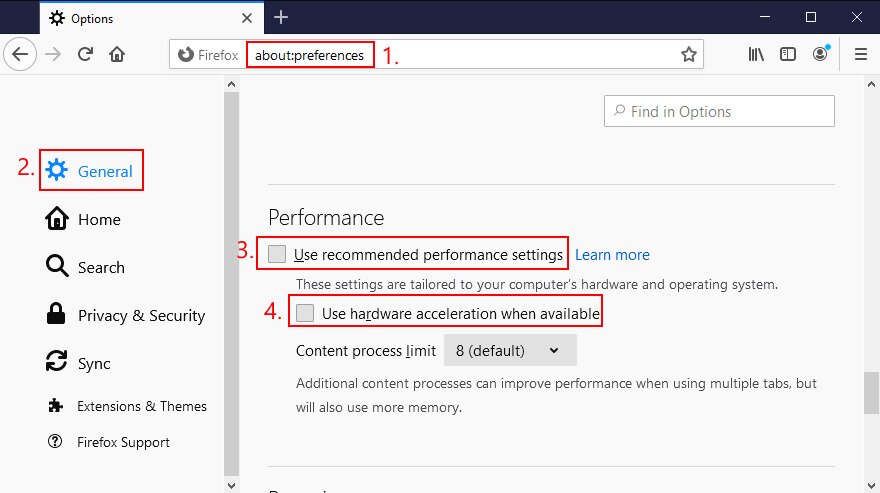
How to disable hardware acceleration in Mozilla Firefox:
- In Firefox, open the ≡ menu and go to Options (or visit
about:preferences)
- In General, locate the Performance section
- Disable Use recommended performance settings
- Also disable Use hardware acceleration when available

- Restart Firefox
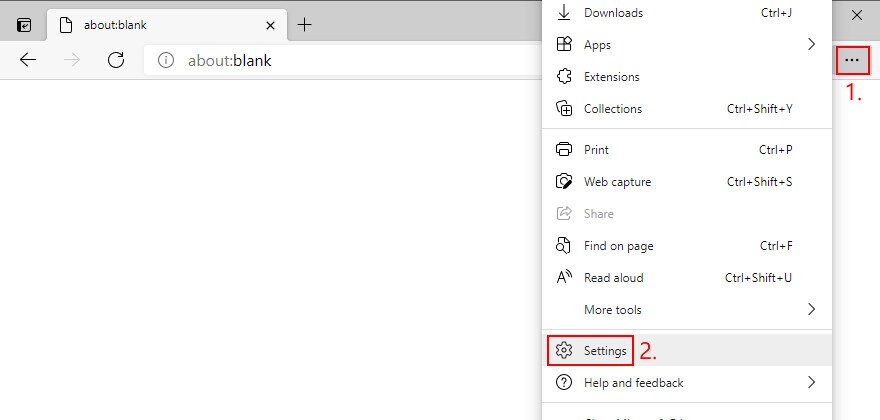
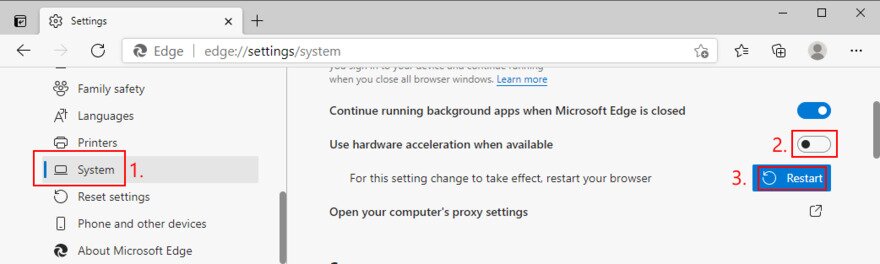
How to disable hardware acceleration in Microsoft Edge:
- In Edge, open the More menu and select Settings

- Go to System (or visit
edge://settings/system) - Disable Use hardware acceleration when available

- Restart Edge
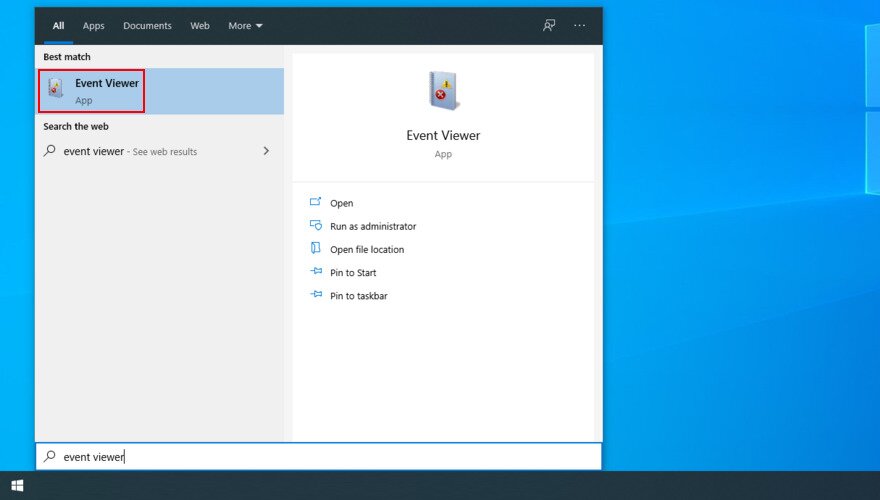
14. Analyze the crash dumps
If you’re the type of user who doesn’t shy away from the computer’s technical aspects, you can analyze the crash dumps left behind by the VIDEO TDR FAILURE error, in order to find out the exact driver that’s giving you trouble. Event Viewer is a great assistant for this role.
How to use Event Viewer:
- Restart your PC after a system crash
- Immediately press the Win key, search for Event Viewer, and open this app

- In the navigation pane on the left side, go to Windows Logs > System
- Select the first entry that says Error
- Inspect the information from the General and Details tab

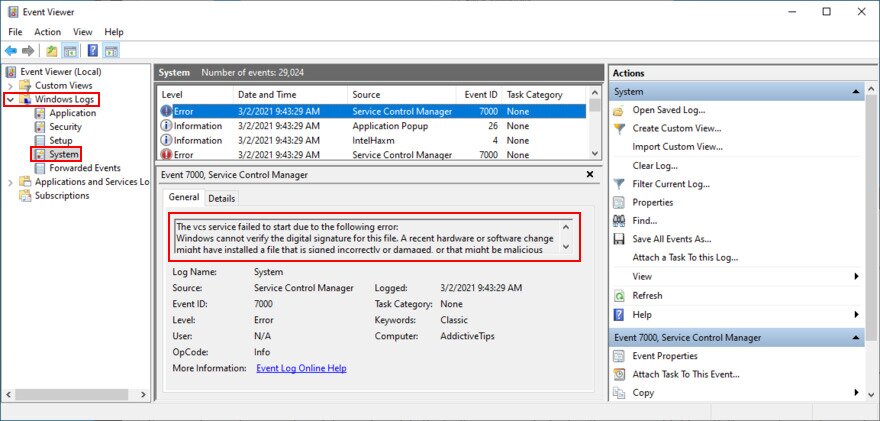
You can use this data to perform a Google search or get in touch with the Microsoft support team. However, if you find Event Viewer to be intimidating, we suggest using BlueScreenView instead. It has the same role but it’s wrapped in a simpler interface and has more intuitive options for analyzing minidump files.
15. Use Display Driver Uninstaller
Display Driver Uninstaller (DDU) is an awesome application that can reset your GPU software and drivers. If display driver nvlddmkm stopped responding on your Windows 10 PC, you can use DDU to safely troubleshoot the BSOD error.
- Make sure to create a system restore point if you haven’t so far
- Download Display Driver Uninstaller from the official website
- Unzip the downloaded archive and open the DDU file
- Start Windows 10 in Safe Mode with Networking
