(FIXED) Your PC Ran Into a Problem and Needs to Restart
Windows 8 has completely redesigned BSOD errors and the way to fix them. Compared to Windows 7 and earlier versions, it opted for a more user-friendly approach so that casual users can look up stop codes on Microsoft’s support page.
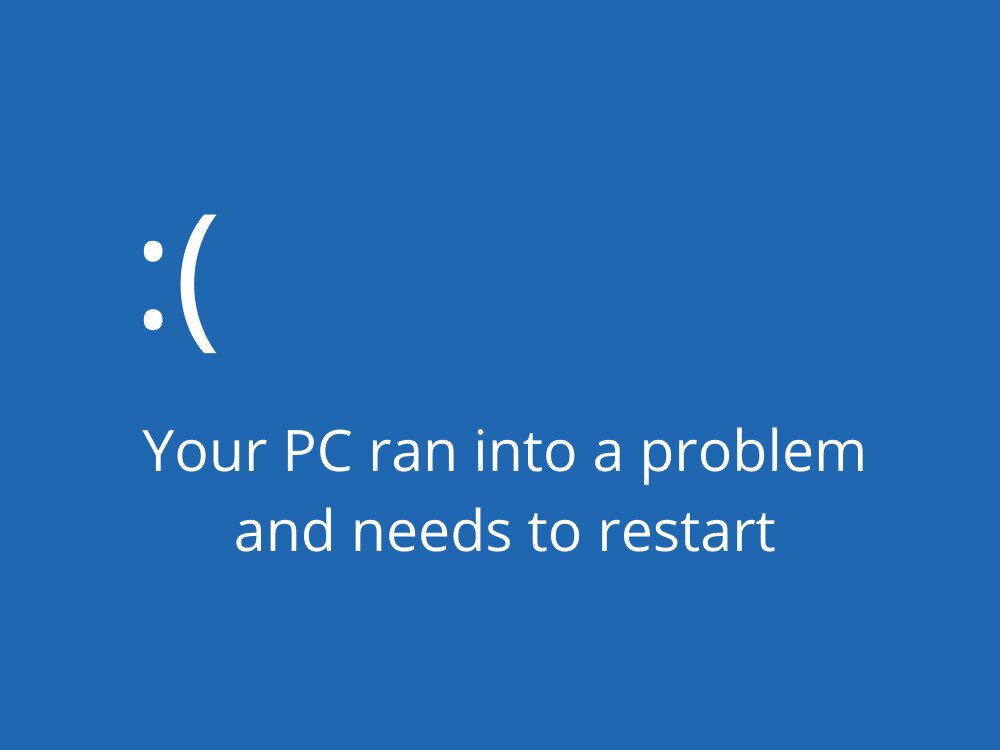
When Windows 10 encounters a fatal error, it does everything it takes to prevent major data loss and corruption, showing a blue screen with a sad smiley face and white text saying Your PC ran into a problem and needs to restart, we’re just collecting some error info.
It’s not an issue when you stumble upon this scenario only once since you can restart your computer and pick up where you left off. But it becomes truly problematic when the Your PC ran into a problem and needs to restart error message enters a loop. Sometimes it gets stuck at 100% and fails to boot Windows, forcing you to restart it.
What causes the Your PC ran into a problem and needs to restart error?
Your PC could be affected by a software event, hardware failure, or both. Here are some possible causes:
- Hardware failure
- Bad sectors in the disk
- Corrupt system files or component store
- Outdated operating system, drivers, or BIOS
- Incorrect BIOS or registry settings
- Insufficient disk space
- Incompatible applications, system updates, or hardware
- Malware infection
- System memory problems
- Overheating resulted from overclocking
How to fix Your PC ran into a problem and needs to restart on Windows 10
There are several ways in which you can approach troubleshooting. But you should set up a system restore point before proceeding with the first solution on this list. This way, you can always revert changes if you make any mistakes.
1. Start Windows in Safe Mode
If you can’t boot your operating system to reach the desktop and perform any actions because you’re immediately sent into a Your PC ran into a problem and needs to restart loop, then you can start Windows in Safe Mode. It’s a precautionary measure that creates a safe environment for diagnosis.
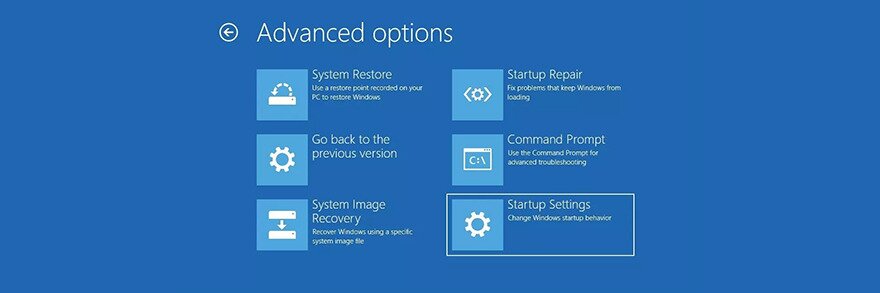
How to start Windows in Safe Mode without boot:
- Launch Windows and interrupt the boot sequence
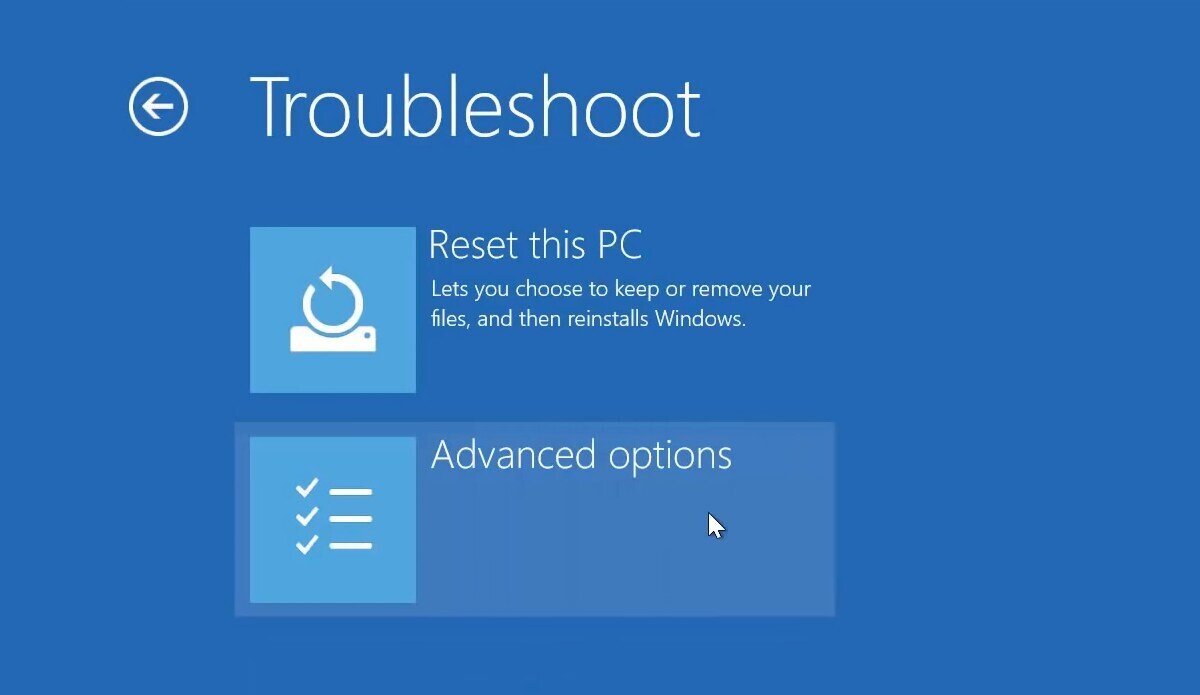
- Do this three times to boot to the Troubleshoot menu
- In the Choose an option screen, select Troubleshoot

- Go to Advanced options
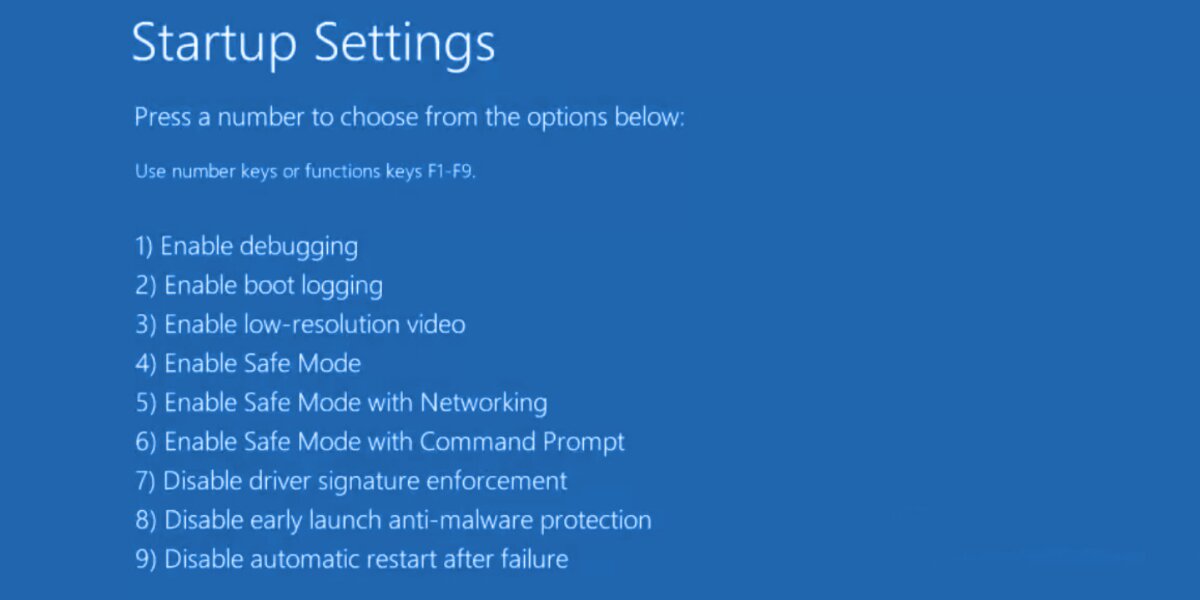
- Select Startup settings

- Click Restart
- Press F4 to enable Safe Mode


2. Run a clean boot
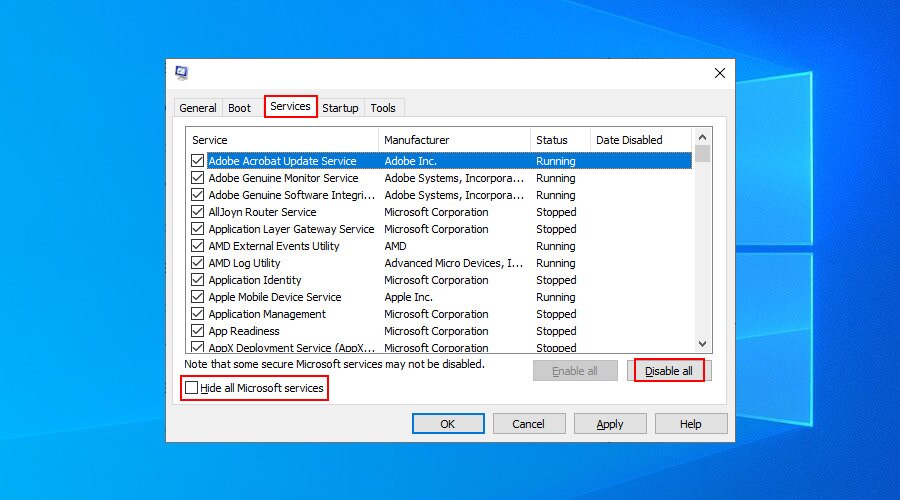
If the Your PC ran into a problem and needs to restart error doesn’t get triggered in Safe Mode, you can clean boot Windows 10 to disable any non-essential process, driver, or service that could cause the problem. Here’s how to make it happen:
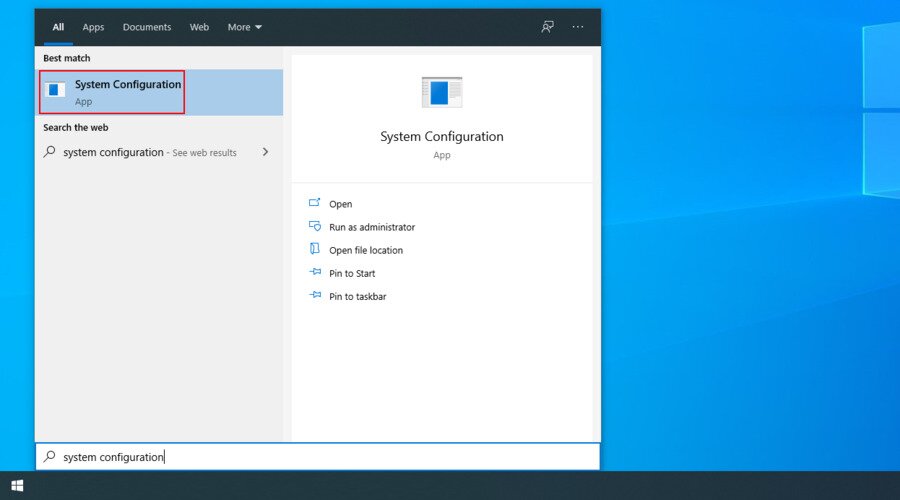
- Click the Start button, type System Configuration, and press Enter

- Go to the Services section
- Uncheck Hide all Microsoft services and click Disable All

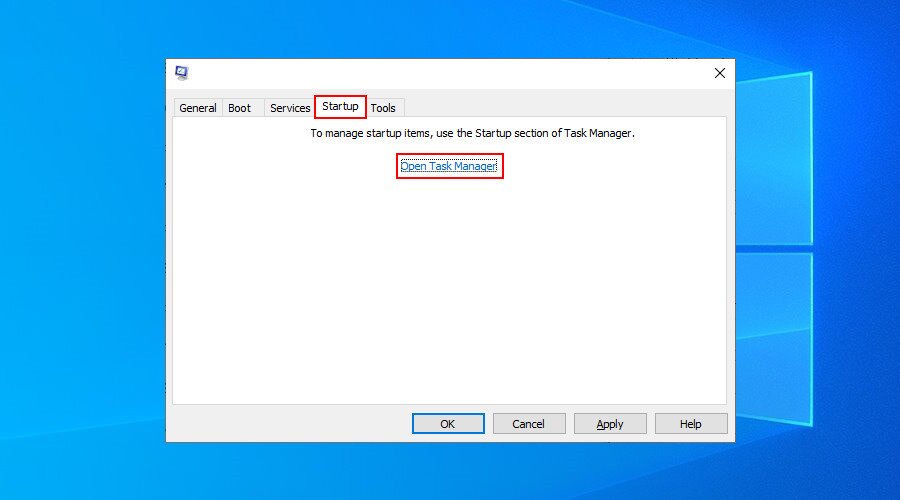
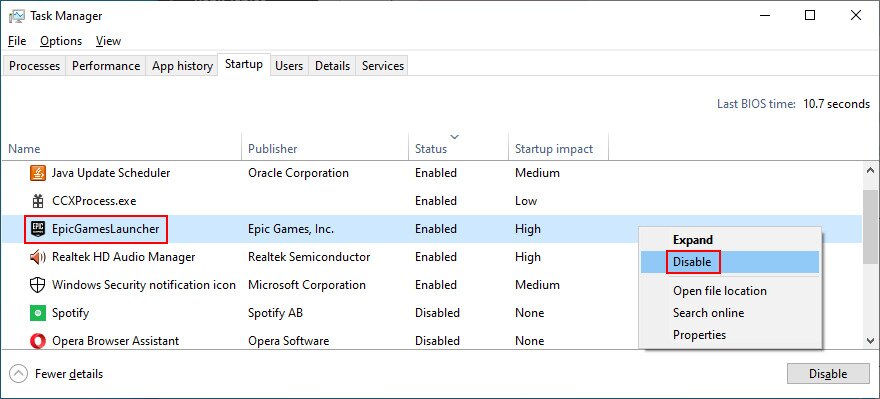
- Switch to the Startup tab and click Open Task Manager

- Select an app with the Enabled status and click Disable

- Do this for all apps with the Enabled status
- Restart your PC and check for issues
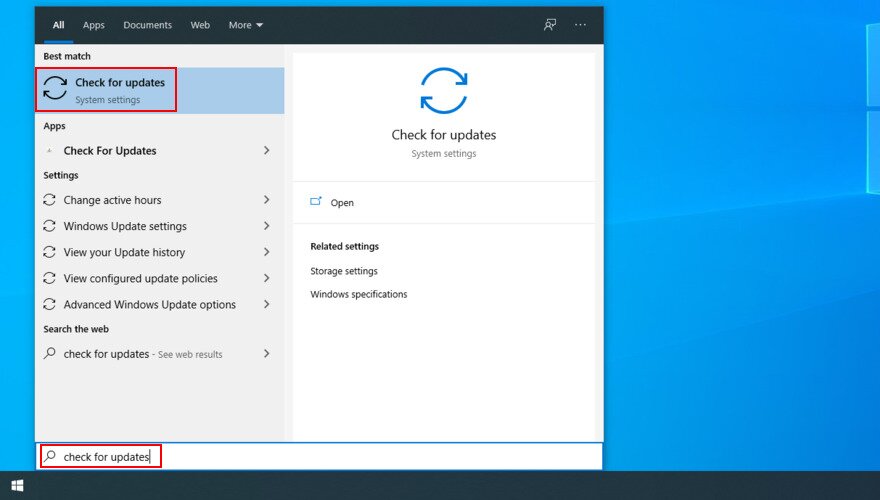
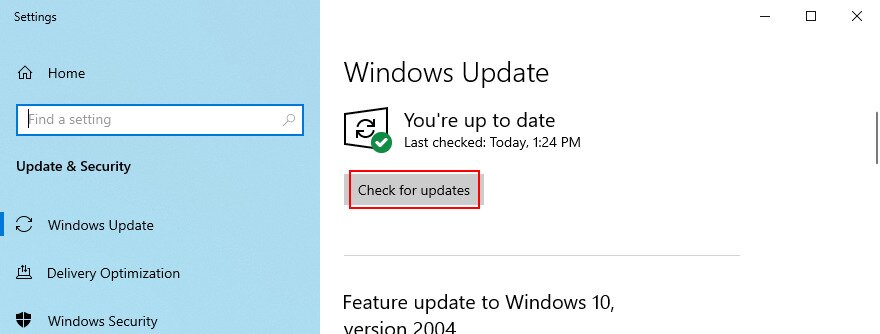
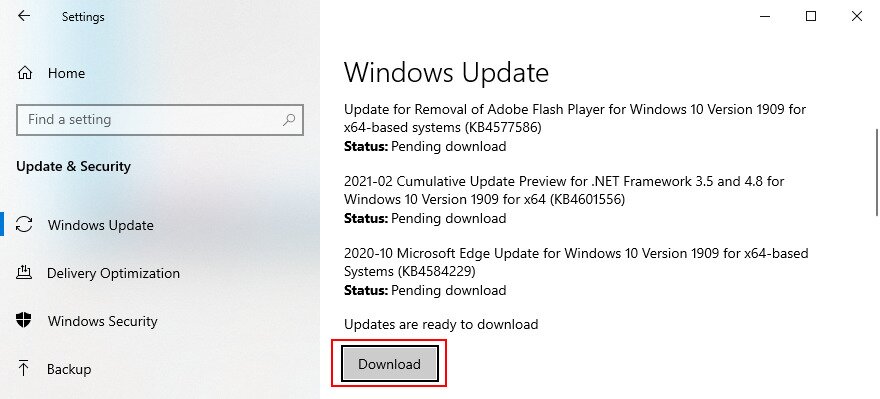
3. Run Windows Update
It’s critical to keep Windows updated with the latest hotfixes and security patches, in order to avoid system stability problems and the Your PC ran into a problem and needs to restart error message.
- Press the Win key, type Check for updates, and press Enter

- Click Check for updates and wait

- If Windows finds anything, click Download

- Reboot your PC after the update is complete and check for errors
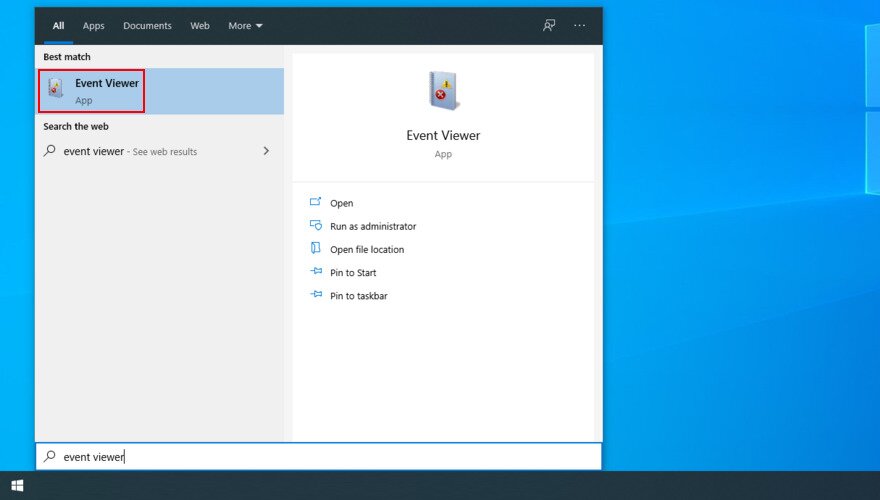
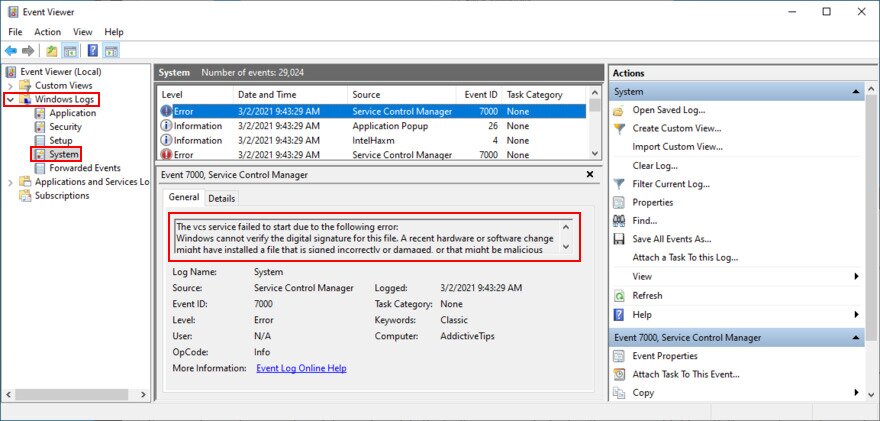
4. Inspect the system log
Windows collects logs about all major events happening on your machine, including crashes. To find out more details about the Your PC ran into a problem and needs to restart error, you can inspect the system log using Event Viewer or BlueScreenView.
Event Viewer is a system information tool built into the operating system. You can use it to analyze the minidumps created by system crashes, in order to find out what drivers caused the Your PC ran into a problem and needs to restart error.
How to use Event Viewer:
- Restart your operating system immediately after the crash
- Click the Start button, type Event Viewer, and open this app

- Access the Windows Logs section on the left side
- Open the System folder
- Select the first error in the list
- Analyze information about the system crash in the General and Details tabs

If you prefer a more user-friendly approach toward investigating minidump files, you can install and use BlueScreenView. It’s a lightweight, portable, and simple-to-use tool.
How to use BlueScreenView:
- Download BlueScreenView from the official website
- Launch the app and open the .dmp file created by the system crash
- Discover the driver files that caused the event
5. Check your device drivers
Once you discover the malfunctioning drivers that triggered the Your PC ran into a problem and needs to restart error message, you can troubleshoot them in three methods: reinstall the adapters, update the drivers, or roll back the drivers to the previous version.
How to reinstall adapters:
- Right-click the Start button and select Device Manager

- Select the faulty device from the list, right-click it, and choose Uninstall device

- Follow the on-screen steps
- Select any device, open the Action menu, and click Scan for hardware changes
- Reboot your PC. The missing adapter will be automatically reinstalled by Windows
- Check for additional system stability problems
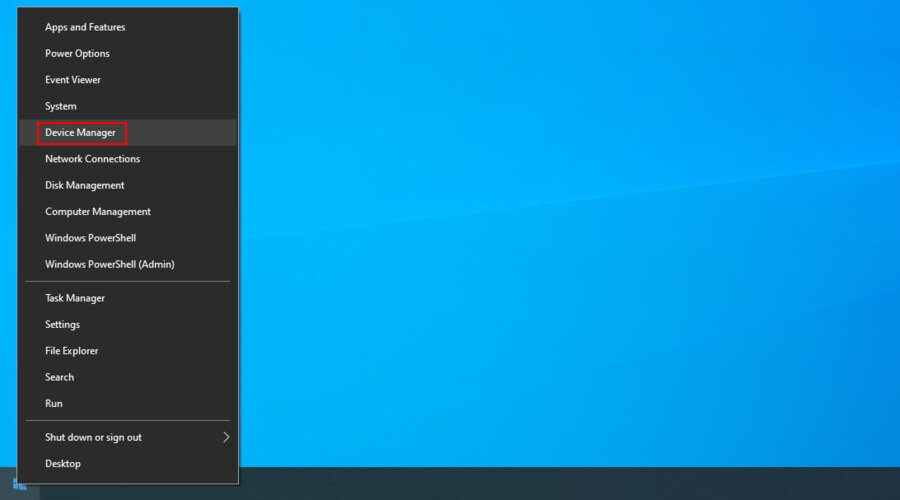
This solution should get rid of the Your PC ran into a problem and needs to restart error message if it was caused by a device not properly connected to the operating system.
How to update drivers:
- Head back to Device Manager
- Right-click the obsolete device and select Update driver

- Click Search automatically for updated driver software

- If it doesn’t find a driver, click Search for updated drivers on Windows Update

- Restart your PC and check for OS errors
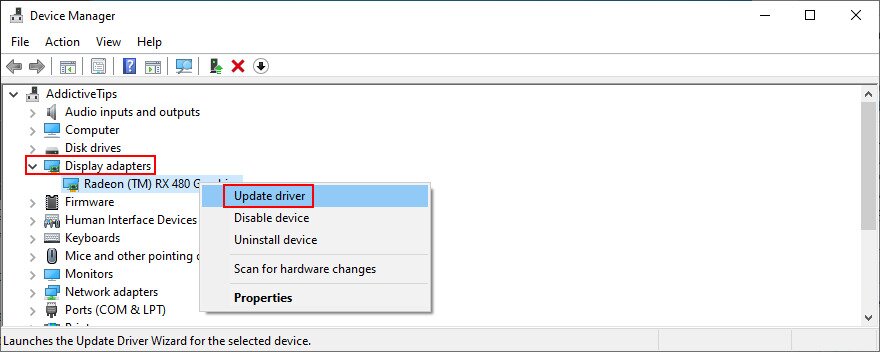
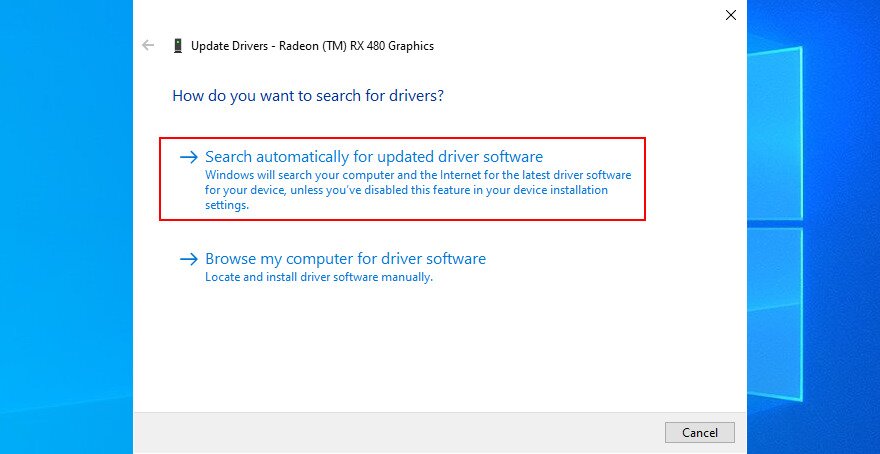
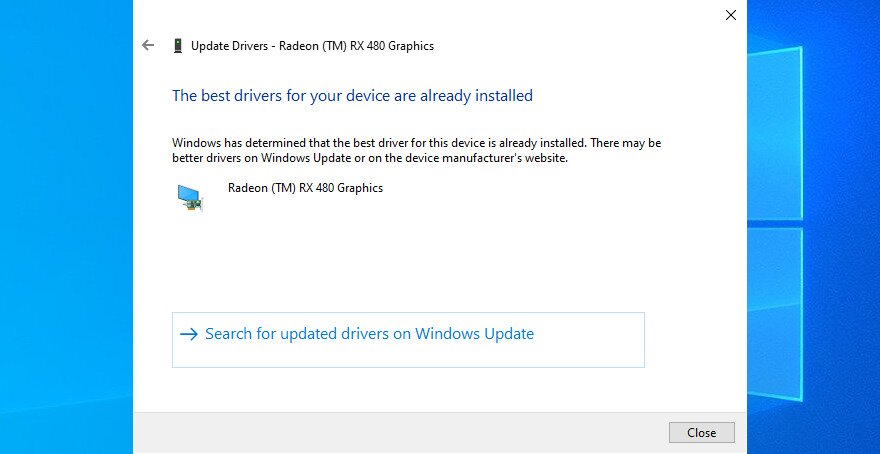
Obsolete drivers can cause computer crashes, so updating them should do the trick. However, if Windows Update fails to find a newer driver, it’s up to you to download and install it from the manufacturer’s website.
It’s risky, however, since you could accidentally install an incompatible driver. To avoid this scenario, it’s better to use a driver update application that downloads and installs newer drivers automatically.
On the other hand, if your operating system started crashing after a driver update, it might be because the latest version doesn’t fully support Windows 10. When this happens, you should roll back the driver to the previous, stable version.
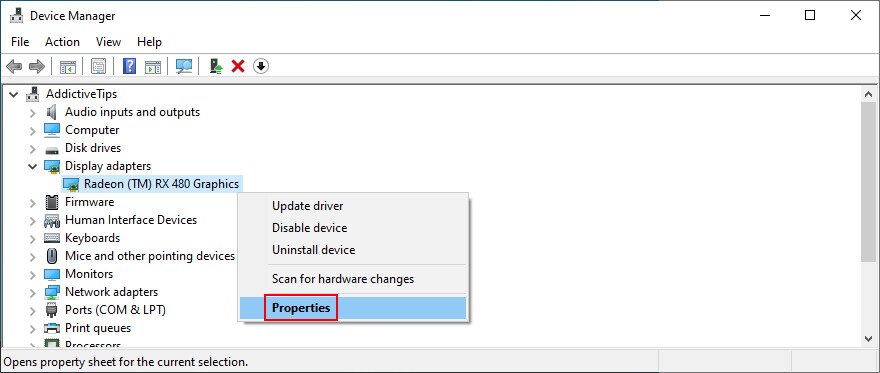
How to roll back drivers:
- Return to Device Manager
- Select the device, right-click it, and go to Properties

- Select the Driver section
- Click Roll Back Driver and follow the steps
- If you can’t click the button because it’s greyed out, it means that there’s no previous driver version available on your PC, so you can’t complete the rollback
- Restart the computer and test it for errors
6. Check your disk space
Your operating system constantly requires free disk space for various operations. Otherwise, it could crash and keep you locked out of your PC until you resolve the matter. It’s possible to allocate more disk space to your OS partition from another drive or to remove existing files to make room.
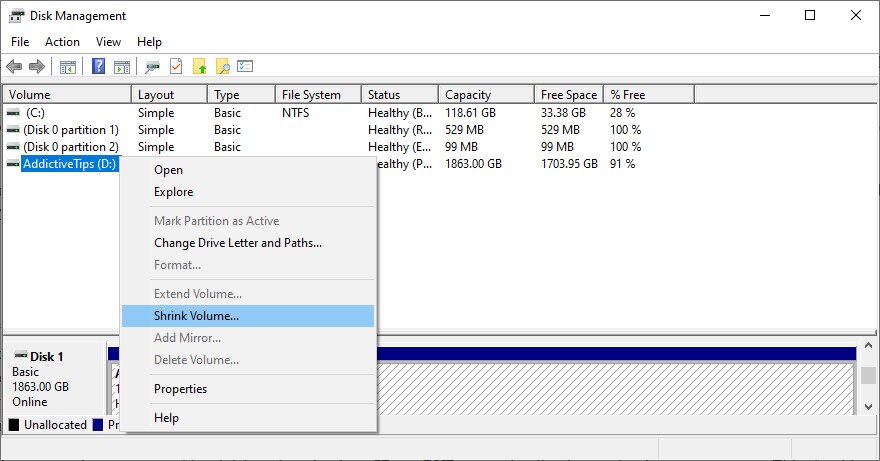
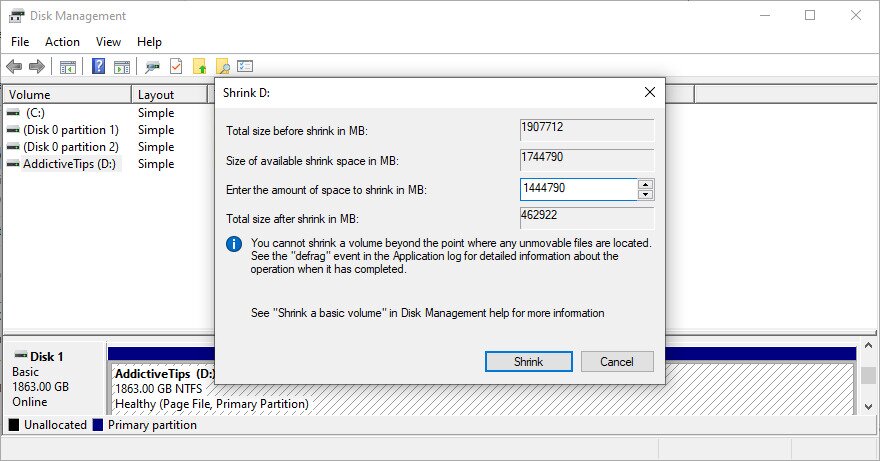
How to increase the OS partition size with Disk Management:
- Press Win key + R, type diskmgmt.msc, and hit Enter
- Pick a big drive beside the one with Windows
- Right-click it and select Shrink Volume

- Set the driver’s new size and click Shrink

- Now, right-click the Windows partition and select Extend Volume
- Specify the new size by adding the free disk space you previously acquired
- Finalize changes, restart your PC, and check for crashes
If it’s not possible to allocate more disk space from another partition, then you can delete existing files. For instance, you can move your collection of photos and movies to an external disk, upload it to a cloud account, or burn it to DVDs. Large games and applications you don’t need anymore should be uninstalled.
And, when it comes to junk data, you can get rid of it by turning to a system cleaner. Or, if you don’t want to install more apps, you can use the Windows Disk Cleanup tool.
How to use Windows Disk Cleanup:
- Make sure to sign in to Windows 10 with an admin account
- Go to Downloads and Recycle Bin to check if there are any files you wish to keep before deletion
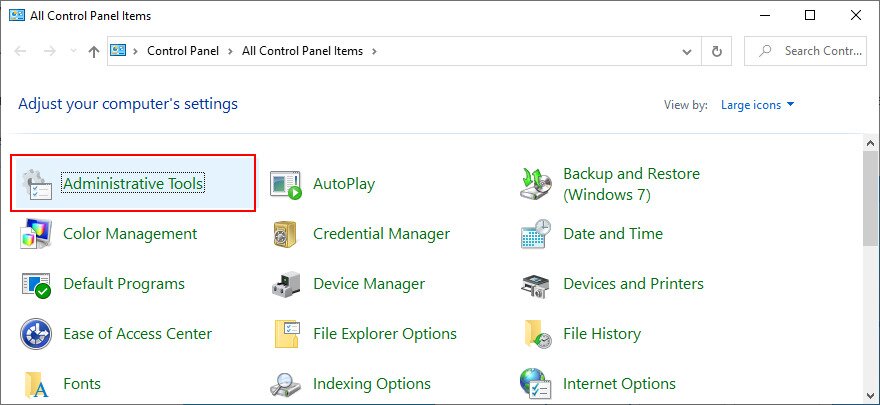
- Click the Start menu, type control panel, and hit Enter
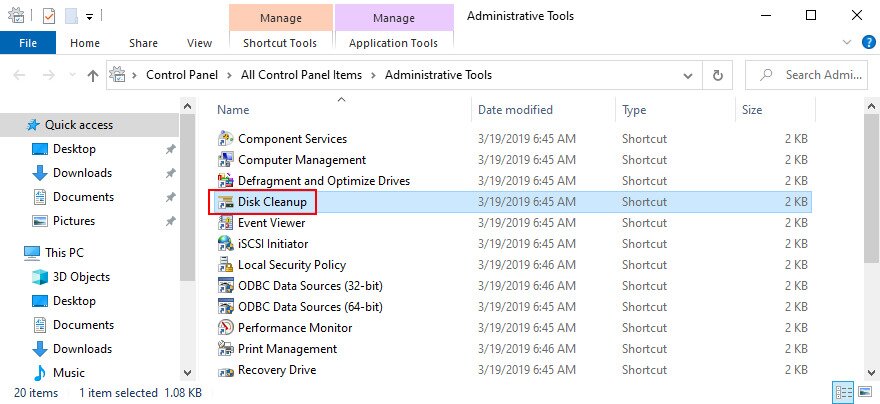
- Select Administrative Tools

- Double-click Disk Cleanup to launch this app

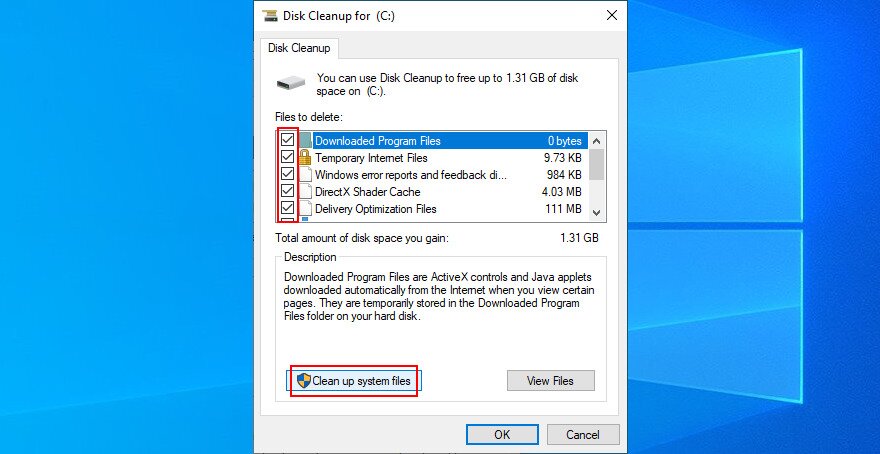
- Pick the Windows partition and click OK
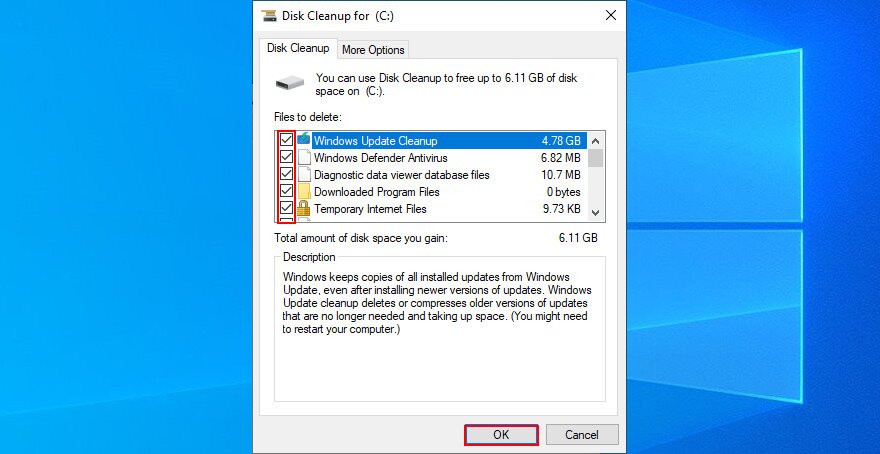
- At Files to delete, select all items, and click Clean up system files

- Once the scan is over, choose all files again
- Click OK and Delete files to confirm deletion

- Don’t shut down or turn off your PC during the cleanup
- Once it’s over, reboot your PC and check for system stability issues
7. Unplug new hardware devices
The Your PC ran into a problem and needs to restart error can be triggered by peripheral devices that have compatibility issues with your computer and operating system. If you notice that you started having problems with your computer after plugging in a new piece of hardware, you should take it out.
It can be anything, from a webcam to a Wi-Fi adapter. Furthermore, if the peripheral device is connected through a USB cable, then you should switch USB ports in case not all of them are functioning correctly.
8. Scan your PC for malware
If your computer was infected with malware, it’s possible that critical processes and services were disabled in an attempt to take down your defenses. It often translates to system crashes, too, represented by a blue screen with an error message and perhaps a stop code.
How to run Windows Defender:
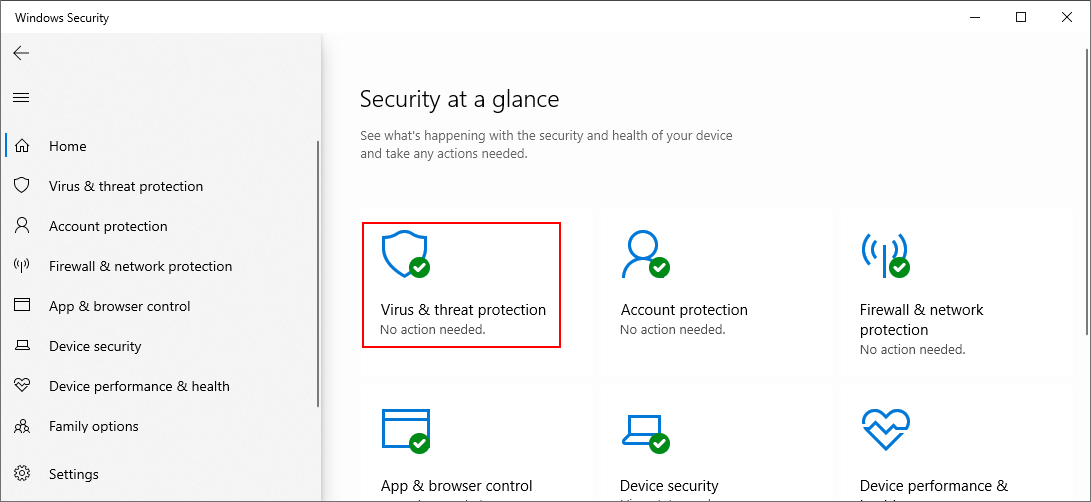
- Press the Windows key, type Windows Security, and open this app

- Select the Virus & threat protection section
![Windows 10 shows how to select Virus and Threat Protection]()
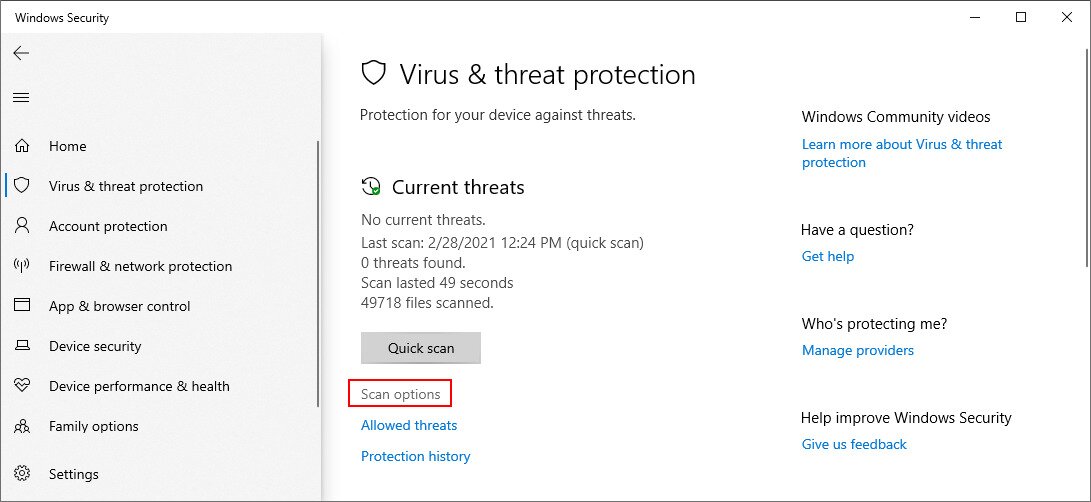
- Click Scan options

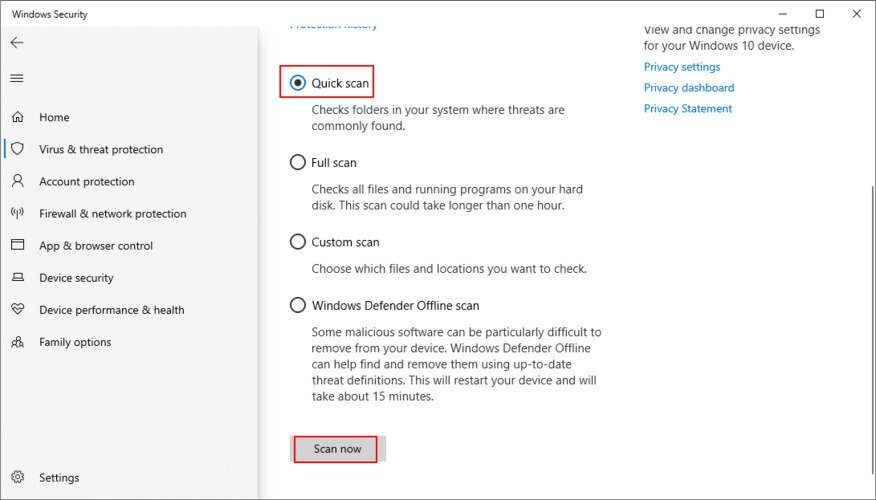
- Pick Quick scan and click Scan now

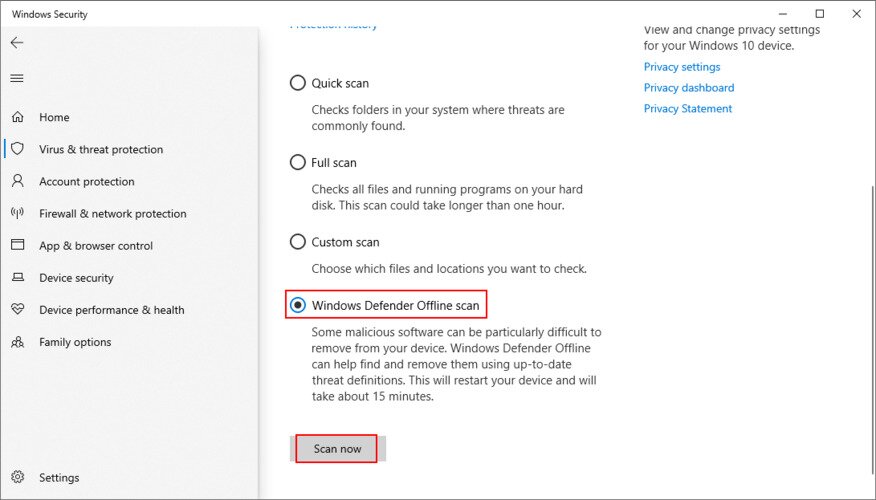
- If the scan doesn’t reveal anything suspicious, select Windows Defender Offline scan and click Scan now

- Once Defender removes the infected files, restart your PC and check for errors

If you have any antivirus solution installed beside Windows Defender, make sure to adapt the steps above.
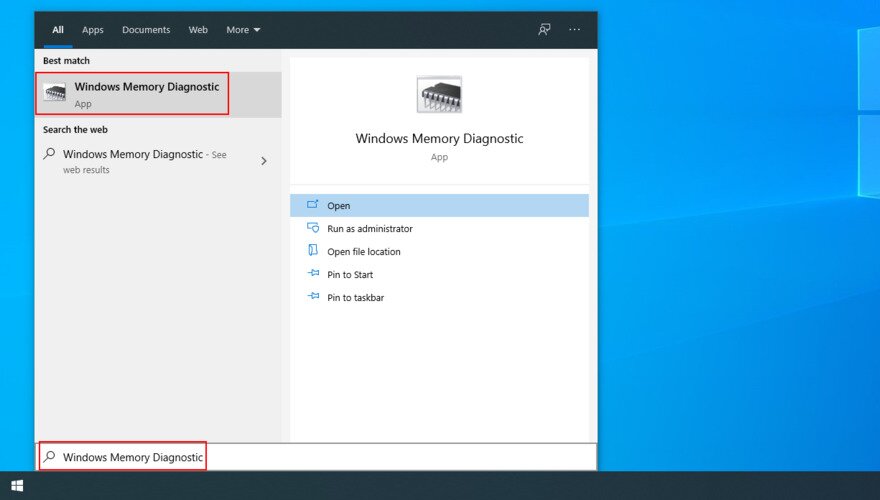
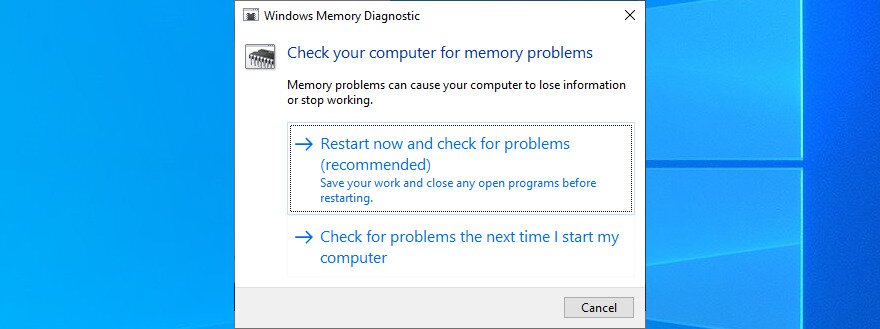
9. Check the system memory
Any issues with your RAM card can affect the entire computer, leading to system crashes and various stop codes. However, you can quickly verify the system memory with the help of Windows Memory Diagnostic, a built-in tool.
How to use Windows Memory Diagnostic:
- Save your work and close all programs
- Click the Start button, type Windows Memory Diagnostic, and open this app

- Click Restart now and check for problems (recommended)

- Your PC will reboot and start checking your RAM
- Once it repairs all memory problems, boot Windows and check for stability issues
Windows Memory Diagnostic is pretty good at what it does. But if you’re looking for something a little more advanced, you should check out MemTest86.
10. Disable overclocking tools
Gamers typically use overclocking tools like MSI Afterburner, AMD Overdrive, CPU-Z or GPU-Z to crank up their systems and enhance their gaming experience. However, it’s not often done properly.
For example, you must have a cooler powerful enough to handle the heat resulted from overclocking. Else, your PC will shut down and show the Your PC ran into a problem and needs to restart error message to prevent overheating and protect itself.
So it’s a good idea to turn off all overclocking software solutions you have on your PC, whether you applied them for your GPU, CPU, or RAM. Then, reset the clock settings to default and check your PC for any additional stability problems.
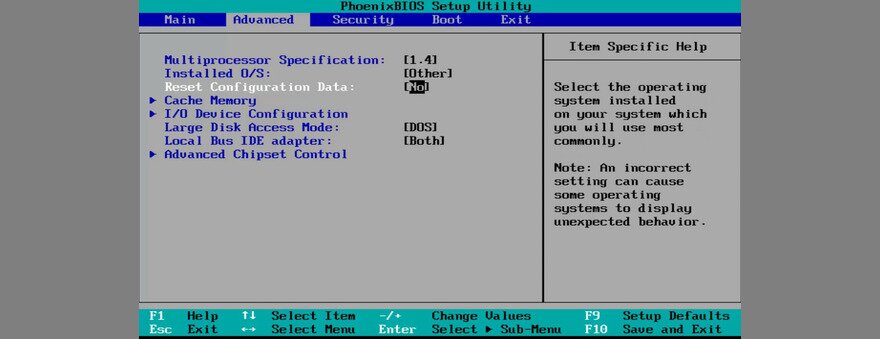
11. Reset BIOS to default
It’s possible to control many computer settings from the BIOS area, including overclocking and caching. However, if you don’t know what you’re doing, you can end up harming your PC and triggering system crashes with can’t carry out its activities properties due to missing or damaged files. However, you can try to fix these problems by resorting to three command-linethe Your PC ran into a problem and needs to restart error message.
But you can fix it by resetting all BIOS settings to their factory values. Here’s how to make it happen:
- Restart your computer
- During reboot, press the key shown on the screen to access BIOS mode on your computer
- Find the advanced options
- Locate the setting that resets configuration data and turn it on

- Save the current BIOS layout and exit
- After Windows starts, check for stability issues
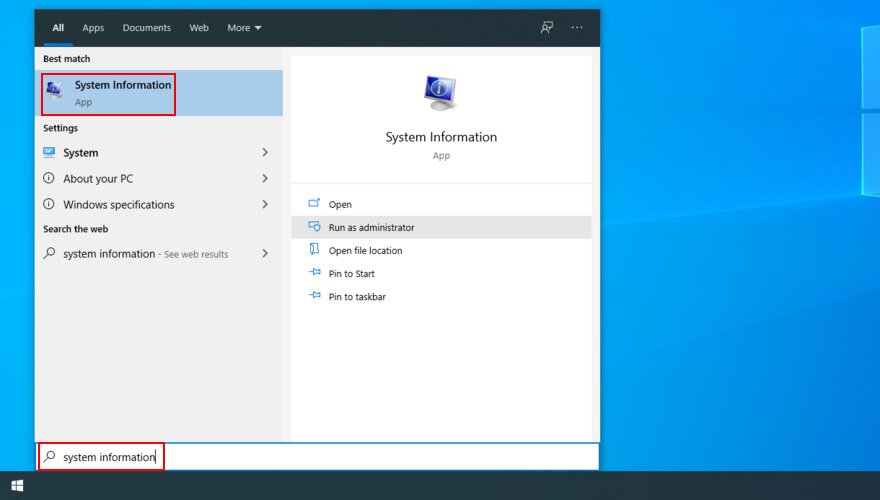
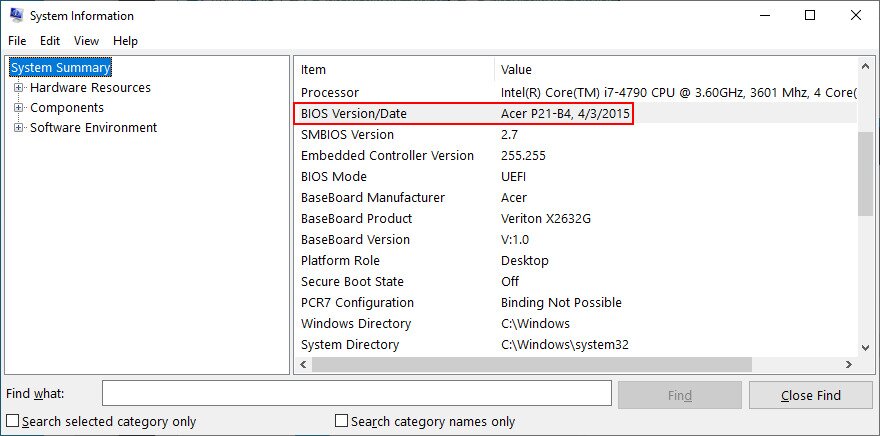
12. Update BIOS
Since you’re already changing BIOS settings, it’s a good idea to update BIOS to the latest version to avoid computer functionality problems and the Your PC ran into a problem and needs to restart loop. Here’s how:
- Click the Start button, type System Information, and open this app

- Select the System Summary area
- Take note of the BIOS Version/Date

- Start a web browsing session and visit the website of your BIOS manufacturer
- Find and download a newer BIOS version that’s compatible with your PC
- Unzip the downloaded archive and copy contents to a USB flash drive
- Restart your PC and press the key that enters BIOS mode
- Back up the current BIOS version and save it to the pen drive
- Begin the BIOS update and proceed with the on-screen instructions

- Don’t shut down or restart your PC during the update
- Start Windows and check for errors
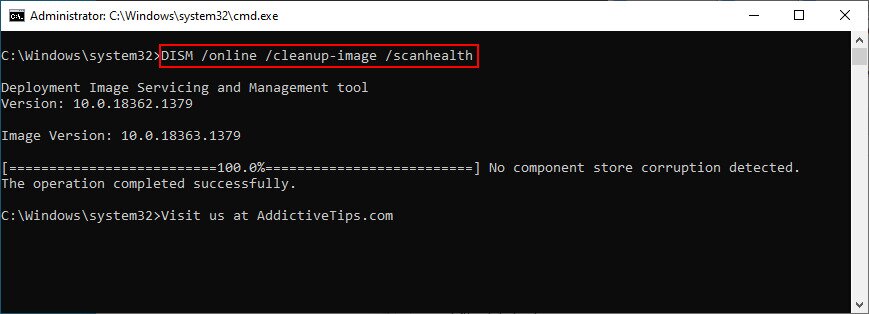
13. Repair disk and system errors
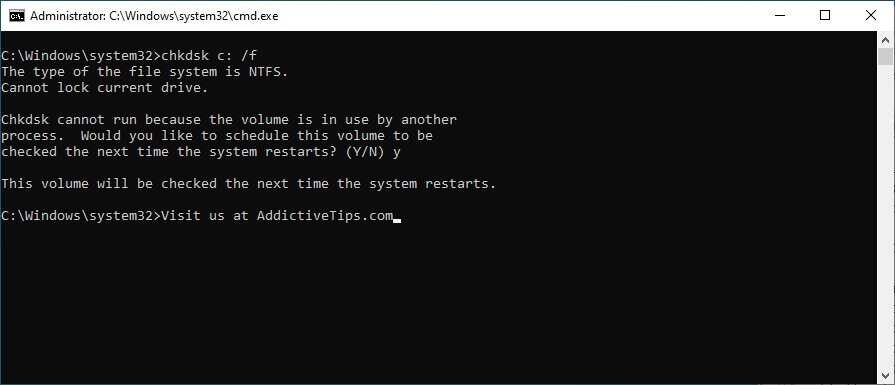
Your hard disk may have bad sectors, or your operating system may have corrupt files. As a result, Windows 10 can’t carry out its activities due to missing or damaged files. However, you can try to fix these problems by resorting to three command-line tools built into the OS: CHKDSK (Check Disk), SFC (System File Checker), and DISM (Deployment Image Servicing and Management).
How to fix bad sectors with CHKDSK:
- Press Win key + R, type cmd, and press Ctrl + Shift + Enter to open Command Prompt with admin rights

- If Windows is installed on the C: drive, run
chkdsk c: /f. Otherwise, replacec:with the right partition letter
- Type y and press Enter when you’re asked to schedule the task at the next system startup
- Restart your PC and wait for CHKDSK to do its job
- Once it finishes, start Windows as normal and check if it still crashes

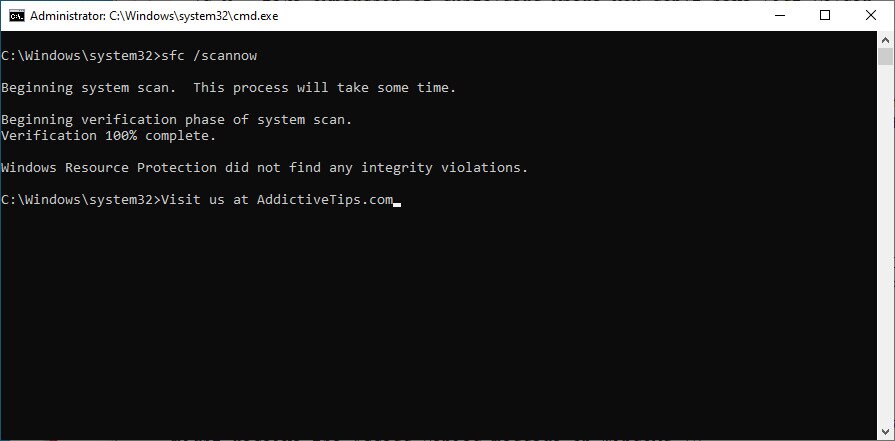
How to fix system errors with SFC:
- Run Command Prompt as administrator
- Type
sfc /scannowand press Enter
- SFC will begin to scan and repair any problems it detects
- Once it finishes, restart your PC and check for issues
How to fix component store issues with DISM:
- Run CMD with elevation rights
- Type
DISM /online /cleanup-image /scanhealthand press Enter
- If it finds any problems, fix them using
DISM /online /cleanup-image /restorehealth - Reboot your PC
- Launch CMD as admin again and run SFC
- Restart your PC one last time to check for stability issues
14. Remove new system updates
Many users report getting the Your PC ran into a problem and needs to restart, we’re just collecting some error info error message right after installing a new Windows update. It’s quite possible that the system update does not fully support Windows 10, resulting in crashes.
To fix this problem, you have to uninstall the most recent system update. Here’s how:
- Press the Windows key + R, type control panel, and press Enter

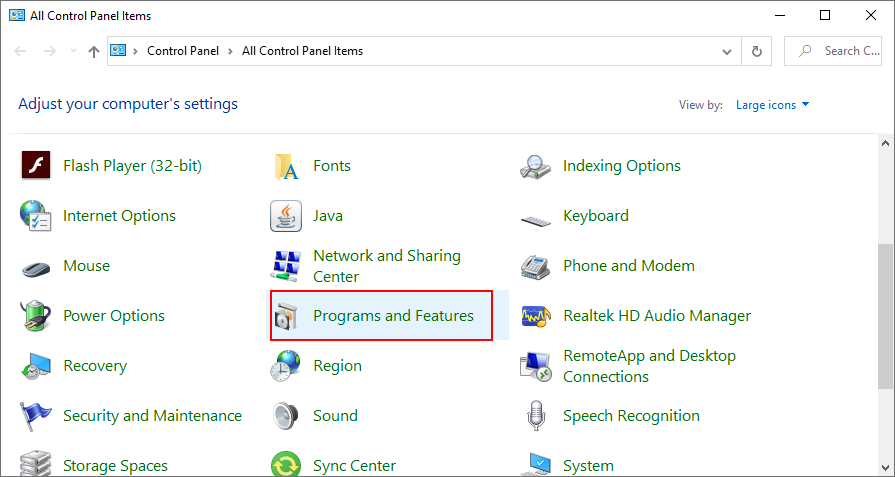
- Go to Programs and Features
![Windows 10 shows how to access Programs and Features from Control Panel]()
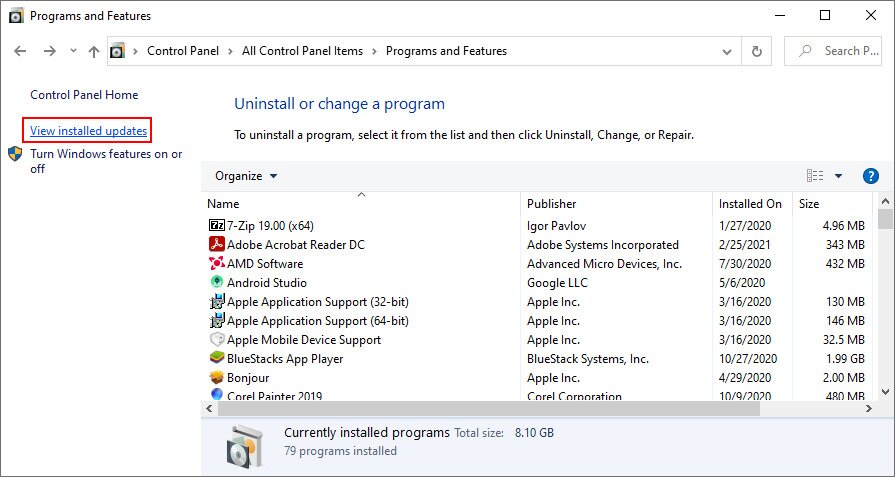
- Click View installed updates on the top-left corner

- Click the Installed On column to sort the update (newest first)
- Right-click the first update in the list and select Uninstall
- Click Yes to confirm
![Windows 10 shows how to confirm Windows updates removal]()
- Restart your PC to inspect results

15. Uninstall third-party applications
Some types of software are known to cause PC functionality problems due to their poor support for Windows 10 as well as the fact that they require access to sensitive parts of the system. It’s the case of several free antivirus and VPN tools for Windows, to name a couple of examples. You just have to get rid of them to restore your computer’s performance.
How to uninstall recent programs:
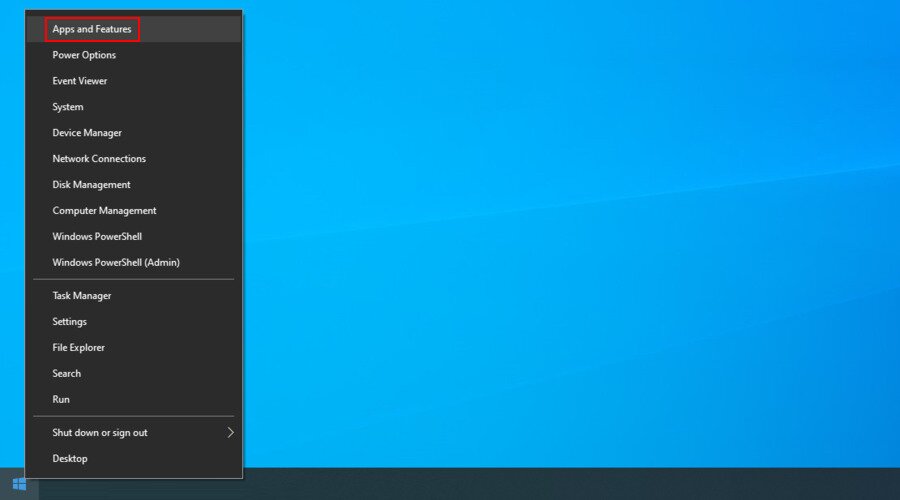
- Right-click the Start button and go to Apps and Features

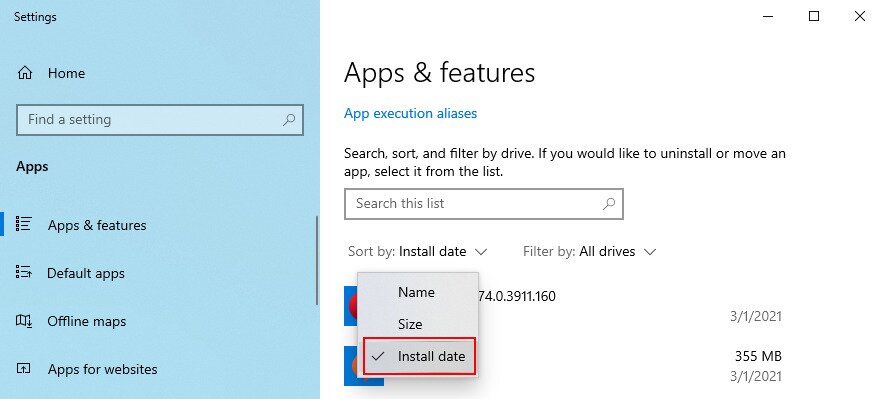
- Click the menu next to Sort by and select Install date (newest first)

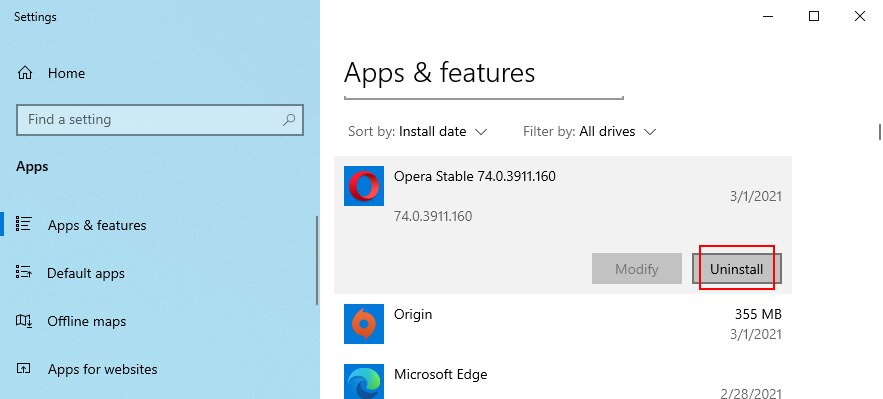
- Choose the first application in the list and click Uninstall

- Click Uninstall again to confirm its removal
- Once the app is removed, restart your PC to check for errors
This method won’t work for applications that have made significant changes to the system registry. However, you can turn to a program uninstaller, which is more thorough than the Windows default uninstaller because it also eliminates leftover files and registry entries.
16. Repair registry settings
If there are incorrect settings in the system registry, like an entry with a wrong value or a missing key, then you should expect system crashes and error messages like Your PC ran into a problem and needs to restart. However, it’s possible to apply some quick fixes using a registry cleaner or the Command Prompt and without having to use an OS emergency disk.
- Press the power button to open a menu
- Hold down Shift and press Restart to trigger Recovery mode
- Or, if you can’t boot Windows at all, interrupt the startup sequence three times to start Recovery mode
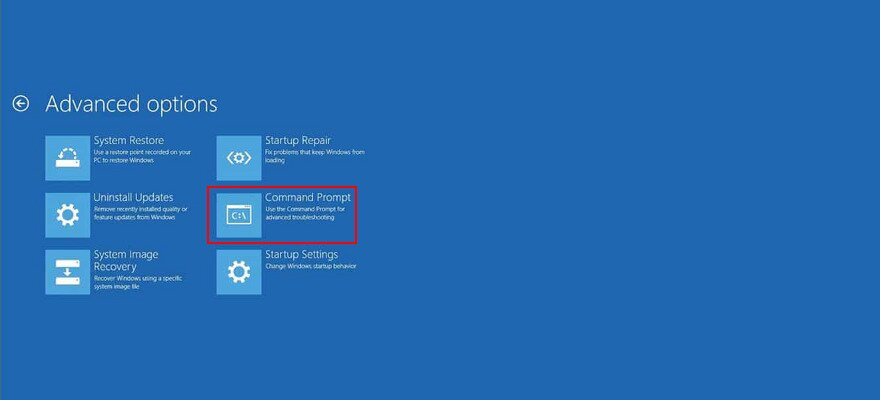
- Select Troubleshoot
- Go to Advanced
- Click Command Prompt

- Copy and paste the following lines (press Enter after each line):
-
cd c:\Windows\System32\config
-
ren c:\Windows\System32\config\DEFAULT DEFAULT.old
-
ren c:\Windows\System32\config\SAM SAM.old
-
ren c:\Windows\System32\config\SECURITY SECURITY.old
-
ren c:\Windows\System32\config\SOFTWARE SOFTWARE.old
-
ren c:\Windows\System32\config\SYSTEM SYSTEM.old
-
copy c:\Windows\System32\config\RegBack\DEFAULT c:\Windows\System32\config\
-
copy c:\Windows\System32\config\RegBack\DEFAULT c:\Windows\System32\config\
-
copy c:\Windows\System32\config\RegBack\SAM c:\Windows\System32\config\
-
copy c:\Windows\System32\config\RegBack\SECURITY c:\Windows\System32\config\
-
copy c:\Windows\System32\config\RegBack\SYSTEM c:\Windows\System32\config\
-
copy c:\Windows\System32\config\RegBack\SOFTWARE c:\Windows\System32\config\
-
- Reboot your PC and inspect results
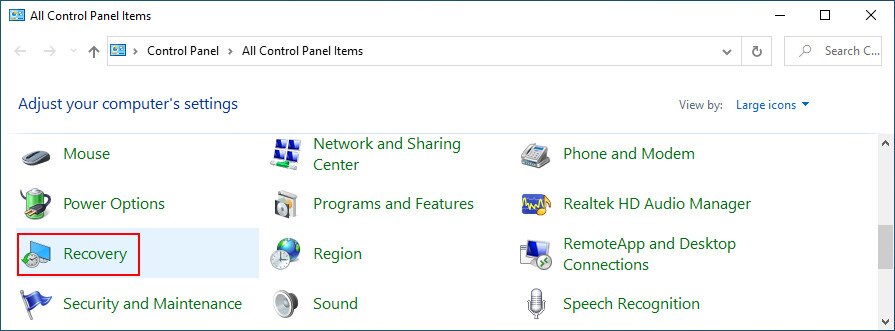
17. Use System Restore
Any software events that you can’t identify can be reversed by rolling back Windows 10 in System Restore more. But that means that you must have created a restore point before you started experiencing system stability problems that led to the Your PC ran into a problem and needs to restart error message.
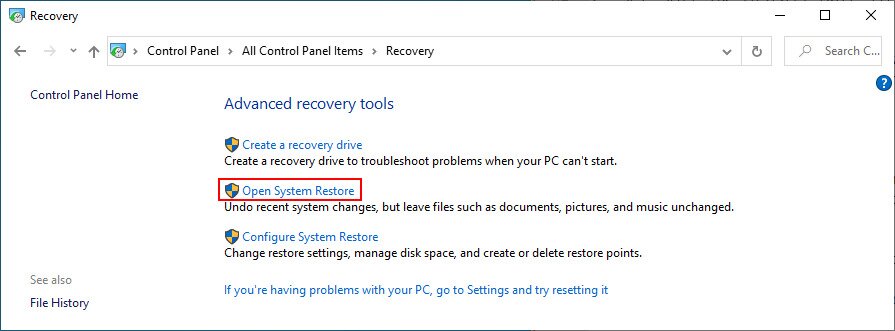
How to use System Restore:
- Press Win key + R, type control panel, and press Enter
- Click Recovery

- Click Open System Restore (you need administrator rights)

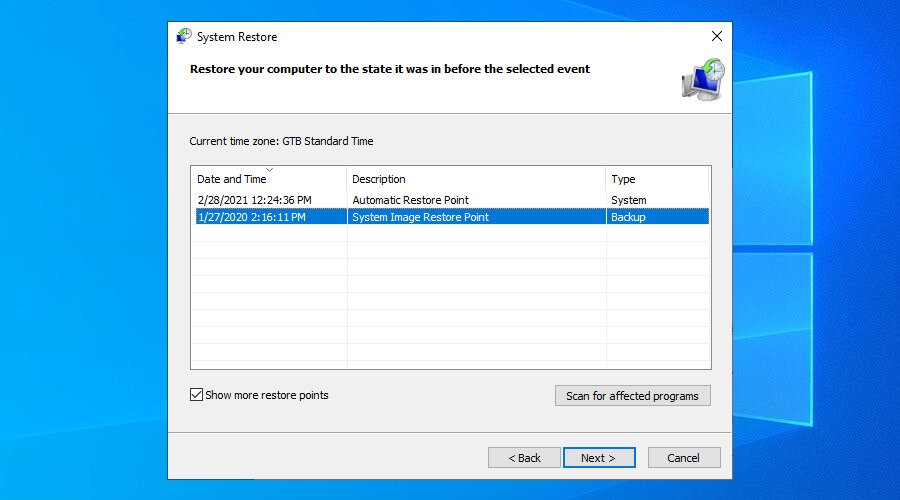
- Choose a restore point. You can click Scan for affected programs to learn more about the changes

- Click Next and follow the steps
- Restart your PC and check for errors
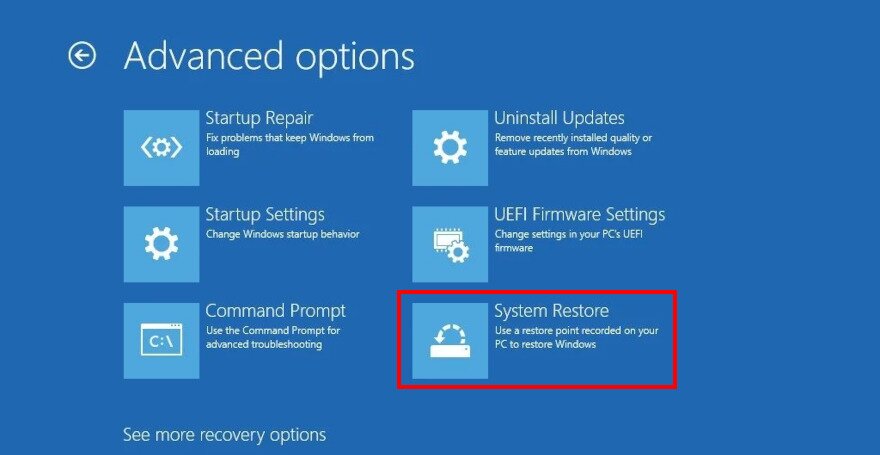
If you can’t boot Windows, interrupt the startup sequence three times to start Recovery mode. Then, go to Troubleshoot > Advanced options to access System Restore.
18. Reset Windows 10
Resetting your OS to factory values is among the last solutions you should try when you can’t get rid of the Your PC ran into a problem and needs to restart error message. You will keep your personal files, but all applications will be removed, so you will have to reinstall everything afterward.
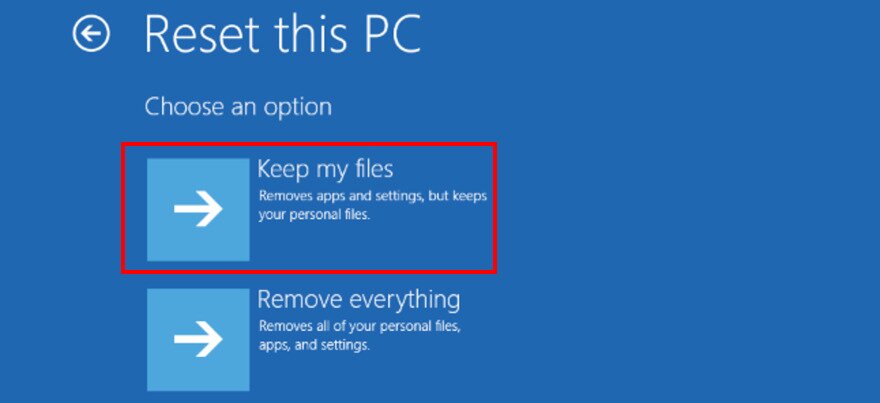
How to reset Windows 10 without boot:
- Interrupt the Windows boot three times to enter Recovery mode
- Click Troubleshoot
- Select Reset this PC

- Click Keep my files

- Follow the on-screen instructions
19. Run System Image Recovery
If Windows Backup is enabled on your PC and if you created a backup before experiencing blue screen issues, then you can restore the backup and regain the functionality of your computer, thanks to System Image Recovery. However, don’t try to restore a system image created on an entirely different computer since it won’t work.
How to use System Image Recovery:
- Restart Windows
- Interrupt the boot sequence three times to trigger Recovery mode
- Go to Troubleshoot and select Advanced Options
- Click System Image Recovery and proceed with the given steps
Conclusion
To review, the Your PC ran into a problem and needs to restart error message is shown on the screen when your display turns blue and your operating system is trying to protect itself from data loss and corruption. It can be caused by various events at the software or hardware level.
However, you can try to repair this error by starting Windows in Safe Mode, running a clean boot, using Windows Update, investigating the system log, checking the device drivers and disk space, or unplugging new gear.
It’s also a good idea to scan your computer for malware infections, check the system memory, disable overclocking tools, reset BIOS to default, update BIOS, repair disk and system errors, and remove new system updates that may not be compatible with your PC.
In addition, you can uninstall third-party applications, repair registry settings, use System Restore, reset Windows 10, and run System Image Recovery.
What solutions did you use to get rid of the Your PC ran into a problem and needs to restart error? Did we miss any important steps? Let us know in the comment area below.
