(FIXED) Audio Renderer Error: Please Restart Your Computer
Computer problems are bound to happen every now and then, so you have to be prepared to take action in any scenario. For instance, if there’s no sound coming from your Windows 10 PC, it could be caused by various issues, such as the audio renderer error. But there’s no need to panic since you can troubleshoot this problem by following the instructions below.
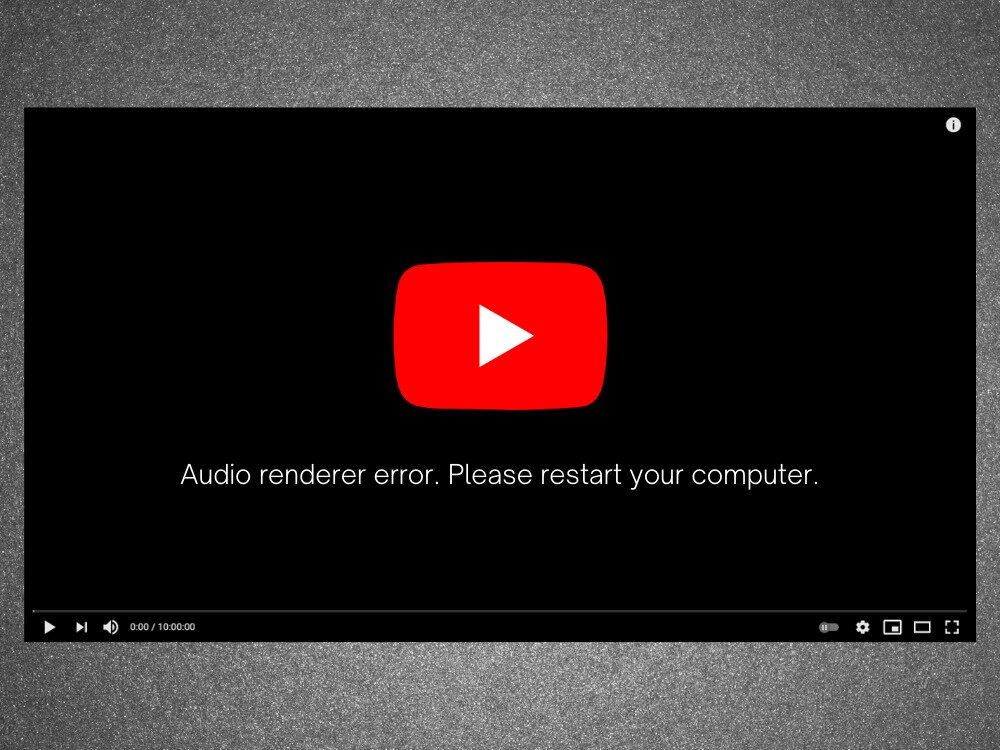
Audio Renderer Error: Please restart your computer!
Audio renderer error, please restart your computer is an error message that appears on the screen when your computer fails to play audio tracks. It can occur anywhere, whether you’re trying to watch a video on YouTube or a movie in your media player.
The behavior is strange. Sometimes, audio gets played without any issues until the error suddenly occurs and disables all sounds coming from your computer. It kindly asks you to restart your computer, which seems to solve the issue.
However, PC reboot is just a temporary workaround since the error pops up again eventually. At that point, you are forced to enter a computer restart loop just to keep the sound going. It’s easy to see why it’s so frustrating to users, especially when the root of the problem isn’t clear.
We have tested this problem, chatted with various users, and gathered a list of possible solutions that solves the audio renderer error on most PCs running Windows 10.
How to fix audio renderer error on Windows 10
The audio rendering error can be caused by a problem with your web browser or computer settings. It’s important to arm yourself with patience because it might take a while until you exhaust all options.
Before starting to troubleshoot this annoying issue, it’s wise to set up a system restore point. It allows you to revert Windows 10 to a stable state in case you encounter more problems along the way.
1. Clear browsing cache
Many users report getting the audio renderer error on YouTube. It could be caused by a browser problem, such as saved cache and cookies. A simple way to fix it is by hard-refreshing your web browser. To make this happen, just select the YouTube tab and press Ctrl + Shift + R. Then, check if you still get the error.
It’s only a temporary fix, though, since you still have to clear browser cache the traditional way.
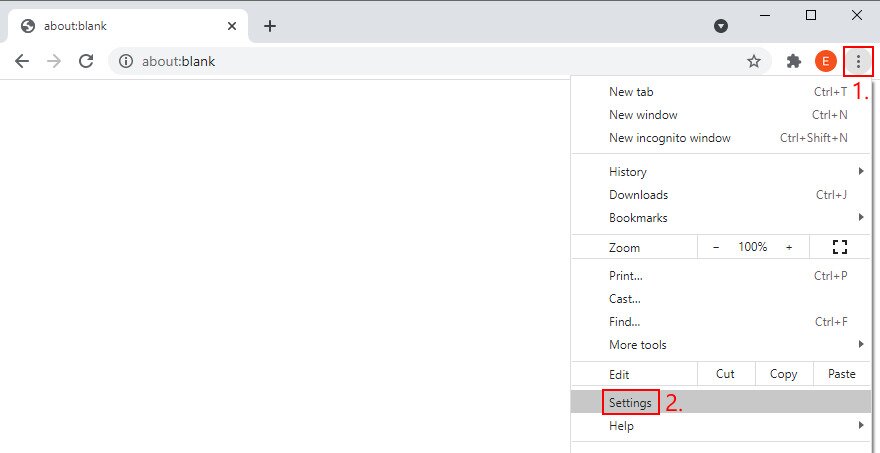
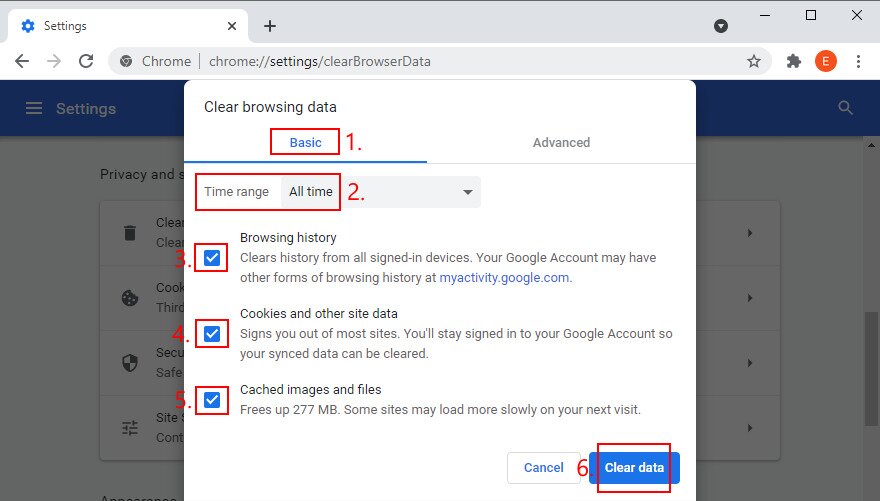
How to clear Chrome cache:
- Launch Chrome and open the More menu on the top-right corner
- Go to Settings

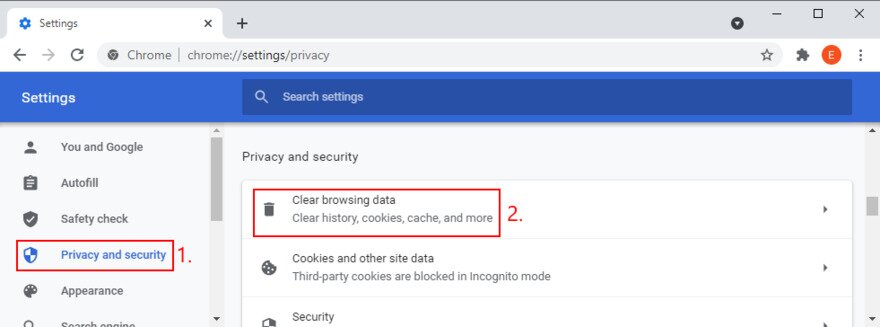
- Jump to Privacy and security on the left side
- Click Clear browsing data. Alternatively, you can enter the
chrome://settings/clearBrowserDataaddress
- Remain in the Basic section
- Set Time range to All time
- Make sure the following options are enabled:
- Browsing history
- Cookies and other site data
- Cached images and files
- Click Clear data

- Restart Chrome and try to watch YouTube now
How to clear Firefox cache:
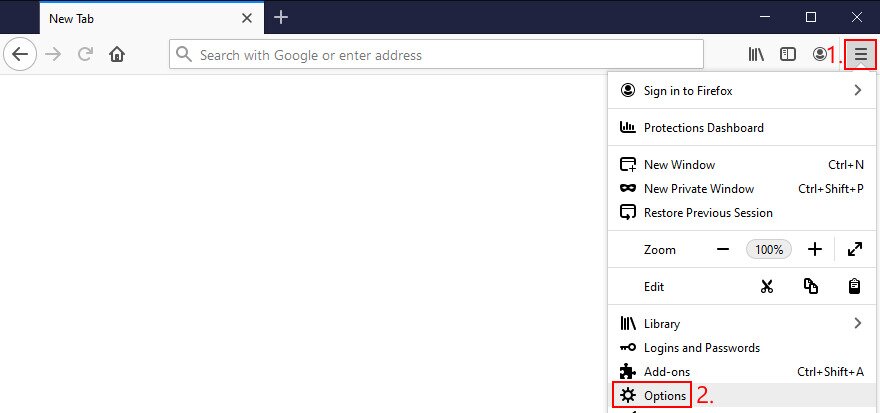
- Open Firefox and click the ≡ hamburger button
- Select Options

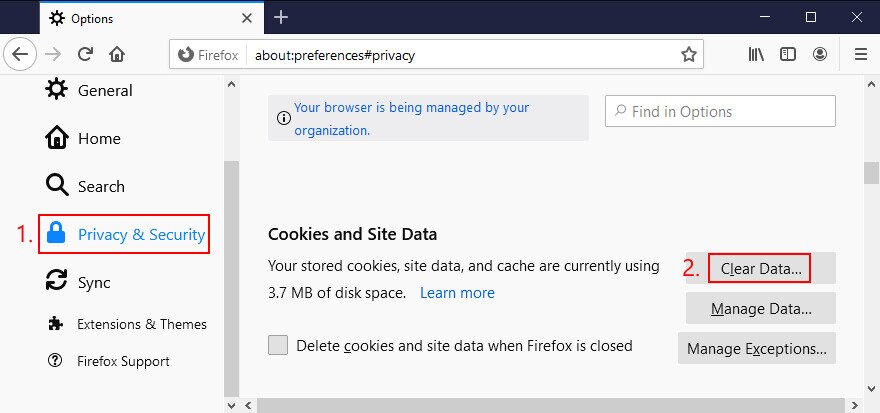
- Jump to Privacy & Security and click Clear Data

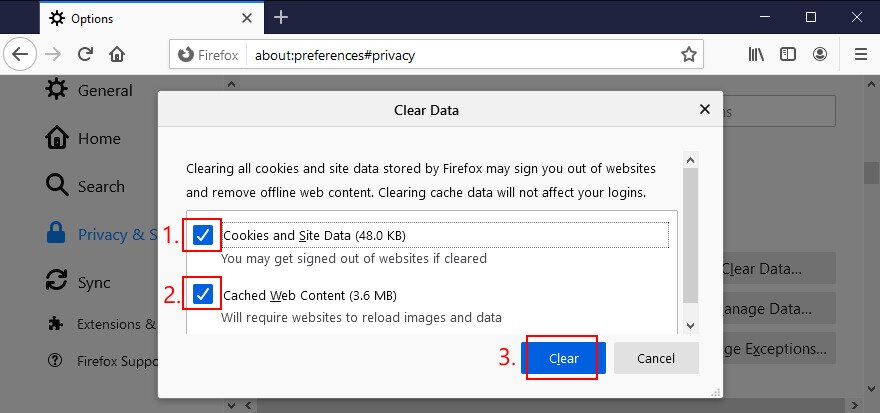
- Check that the next settings are selected:
- Cookies and Site Data
- Cached Web Content
- Click Clear

- Relaunch Firefox and check for audio errors
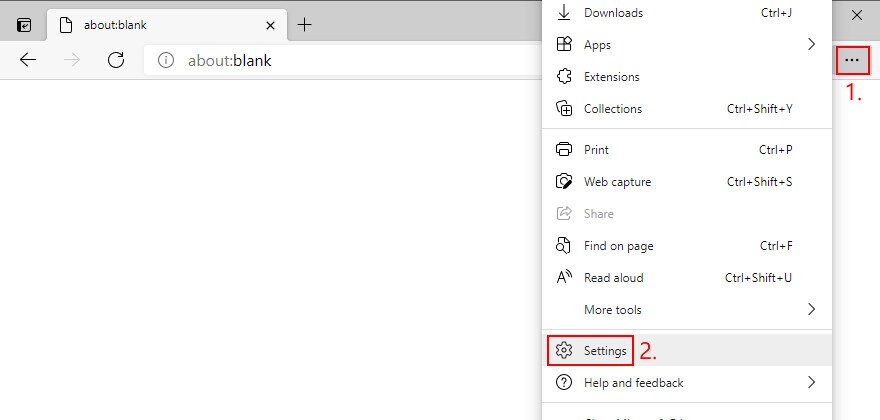
How to clear Microsoft Edge cache:
- Start Microsoft Edge
- Click the More button on the top-right corner

- Select Settings
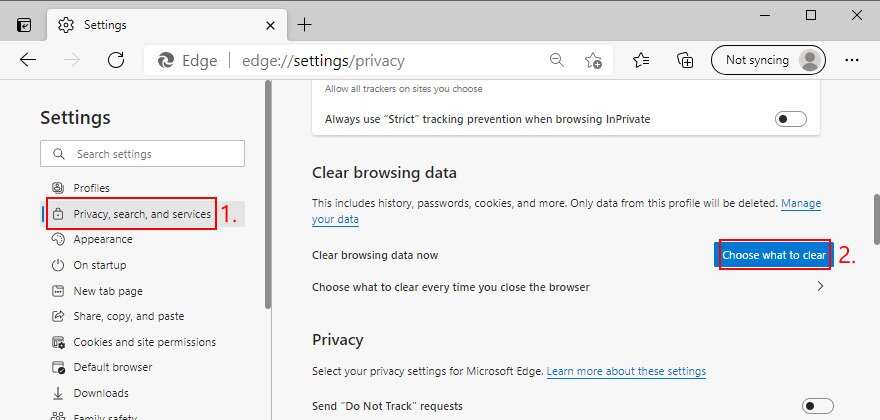
- Jump to Privacy, search, and services. Else, you can use the
edge://settings/privacyaddress - At Clear browsing data now, click Choose what to clear

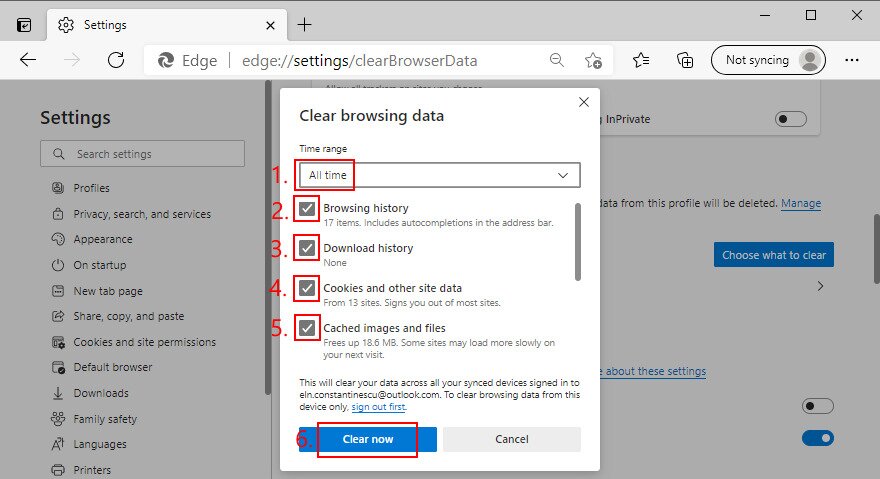
- Set Time range to All time
- Check the boxes of the following options:
- Browsing history
- Download history
- Cookies and other site data
- Cached images and files
- Click Clear now

- Restart Edge and try to enjoy YouTube without audio issues
2. Disable ad blockers and browser extensions on YouTube
If your system sounds and local media files play back fine but the audio renderer error only appears on YouTube or in one specific browser, the culprit is very likely a browser extension rather than a Windows-level problem or a YouTube service error. Ad blockers, volume boosters, audio enhancers, privacy extensions, and even antivirus web shields can all interfere with how YouTube handles audio. Test this path before diving into deeper Windows fixes.
Quick decision point: If local audio works but YouTube fails, start here before trying driver or service fixes.
Here is how to diagnose and isolate the conflict:
- Open YouTube in an Incognito (Chrome/Edge: Ctrl + Shift + N) or Private (Firefox: Ctrl + Shift + P) window. Extensions are disabled by default in these modes. If audio works here, an extension is causing the problem.
- Return to your normal browser window and temporarily disable all extensions — pay particular attention to ad blockers (uBlock Origin, AdBlock Plus, etc.), volume boosters, audio enhancers, privacy tools, and any antivirus browser shield.
- If the error goes away after disabling extensions, whitelist youtube.com in your ad blocker as a permanent fix, or keep specific extensions disabled while using YouTube.
- Restart the browser completely (close all windows, then reopen).
- Re-enable your extensions one by one, reloading YouTube after each one, until the audio renderer error reappears. The last extension you enabled is the conflict.
- Once identified, either remove that extension, whitelist YouTube within it, or look for an updated version that resolves the conflict.
3. Run the audio troubleshooter
Windows 10 comes with an integrated troubleshooter that fixes common audio issues. It’s worth a shot if you got tired of dealing with the audio renderer error. Similar audio problems can also affect other applications, such as when you need a Spotify audio error fix for playback issues.
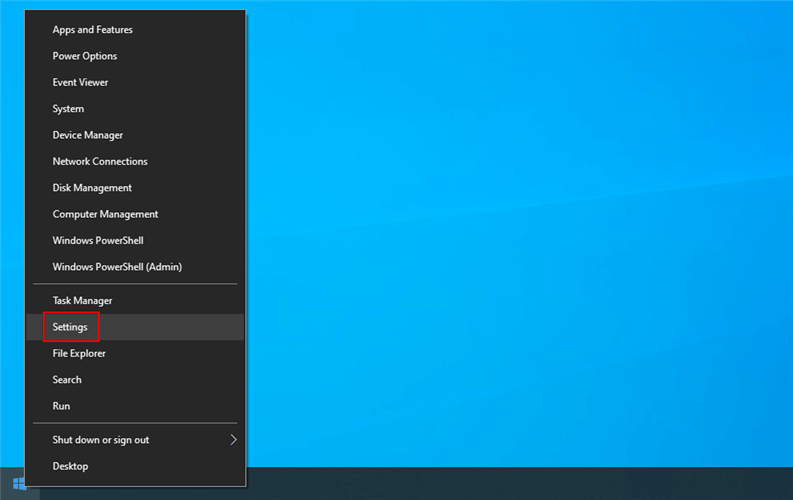
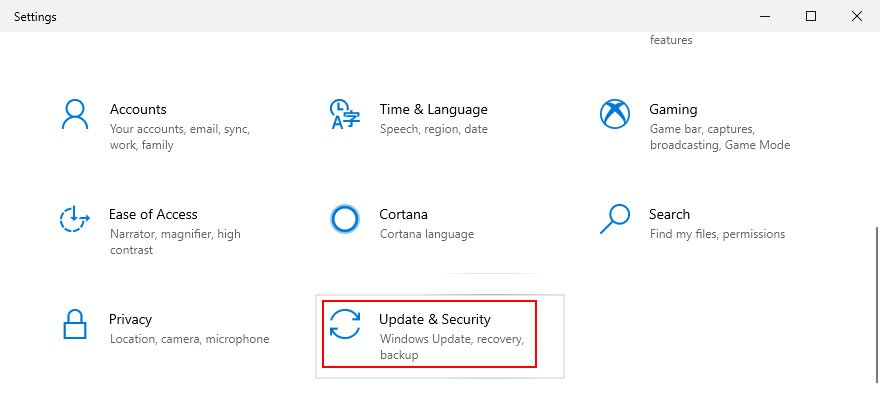
- Right-click the Windows 10 Start button and go to Settings

- Select Update & Security

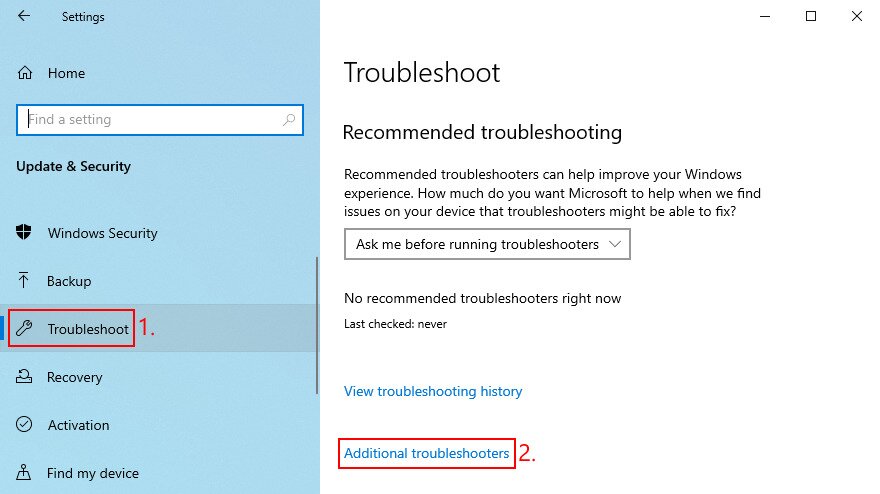
- Go to Troubleshoot on the left side
- Click Additional troubleshooters

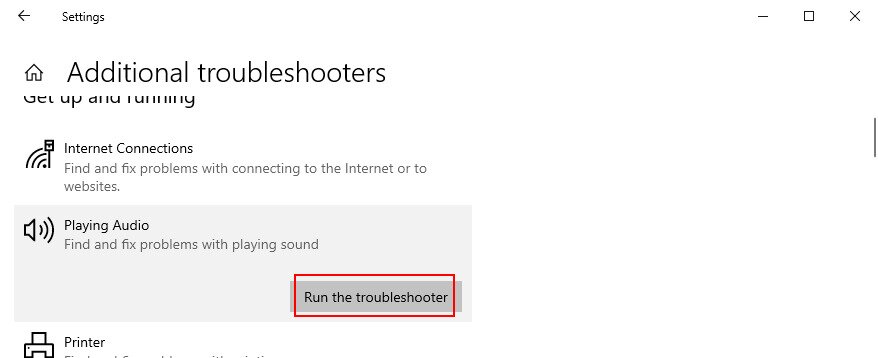
- Select Playing Audio and click Run the troubleshooter

- Follow the on-screen instructions
- Check for audio errors
4. Enable the sound device
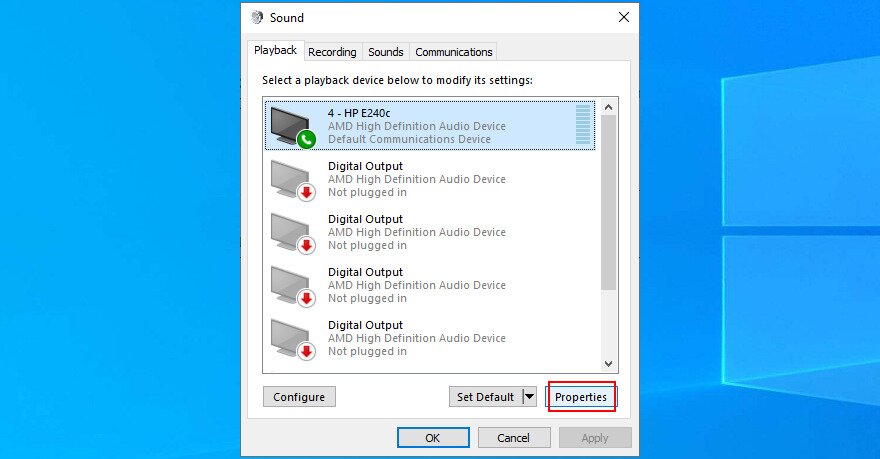
If you have connected multiple audio device into your computer, you might have unknowingly messed up the sound device settings and disabled the primary audio adapter. Here’s how to re-enable it:
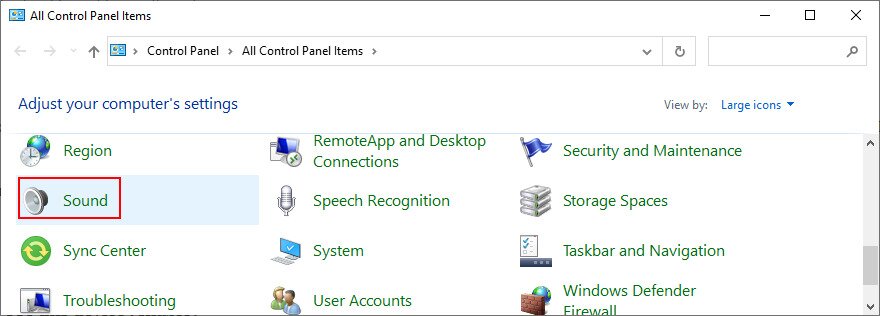
- Click the Start button, type Control Panel, and open this app
- Go to the Sound section

- Switch to the Playback tab
- Select your audio device from the list
- Click Properties

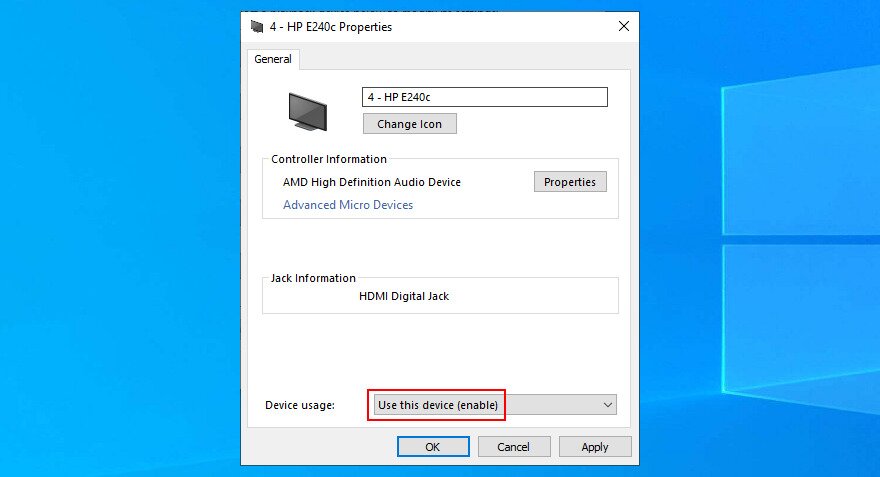
- In the General tab, set Device usage to Use this device (enable)

- Click Apply and exit
- Check for audio issues now
5. Restart the Windows Audio service
All sounds coming out of your computer are operated by a background service. If that service isn’t currently running, gets interrupted often, or doesn’t automatically start when Windows boots, then you should expect issues such as the audio renderer error.
The most effective fix is to perform a true restart of the Windows Audio service — not just start it if stopped. You should also restart the Windows Audio Endpoint Builder service, because failures in audio endpoint handling can trigger the exact same symptom. Here are both methods:
Method 1: Using the Services app
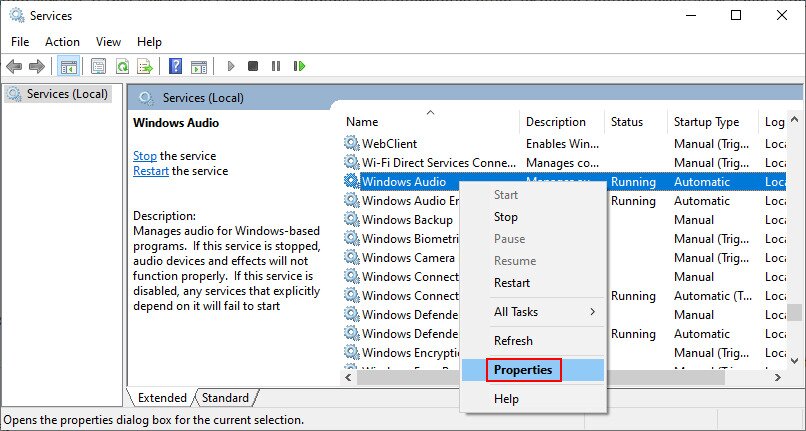
- Press the Windows key, type Services, and open this app
- Find and right-click Windows Audio
- Go to Properties

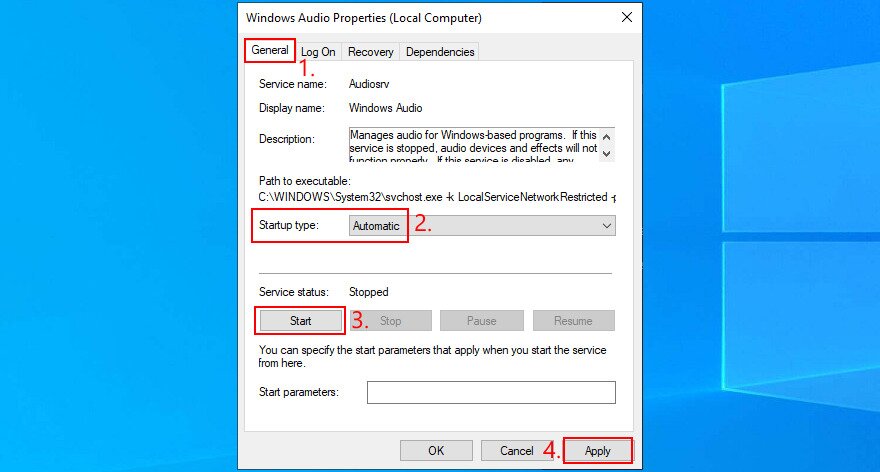
- Remain in the General tab
- Set Startup type to Automatic
- If Service status says Running, click Stop, wait a moment, then click Start to perform a full restart. If it says Stopped, simply click Start.
- Click Apply and exit

- Back in the Services list, find Windows Audio Endpoint Builder, right-click it, and select Restart (or Stop then Start if Restart is greyed out)
- Check for audio issues
Method 2: Using Task Manager
- Press Ctrl + Shift + Esc to open Task Manager
- Click the Services tab
- Find Audiosrv (Windows Audio) in the list, right-click it, and select Restart
- Find AudioEndpointBuilder (Windows Audio Endpoint Builder), right-click it, and select Restart
- Check for audio issues
6. Synchronize the audio frequency (ASIO drivers)
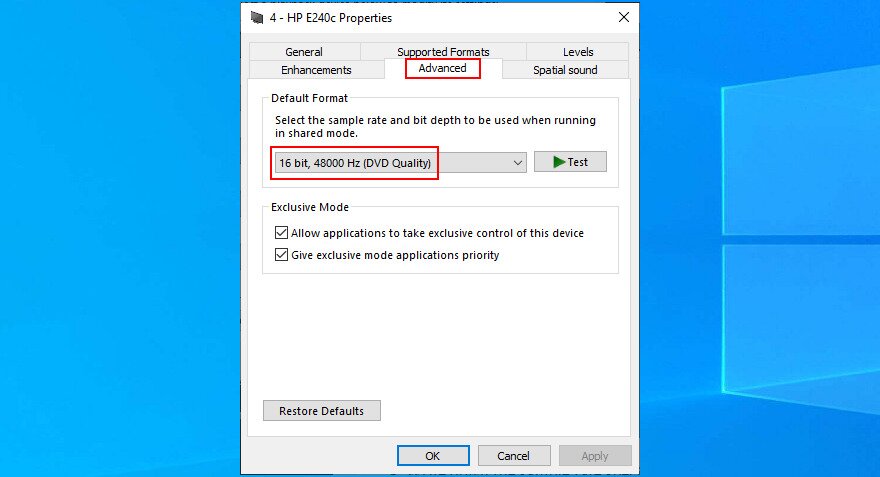
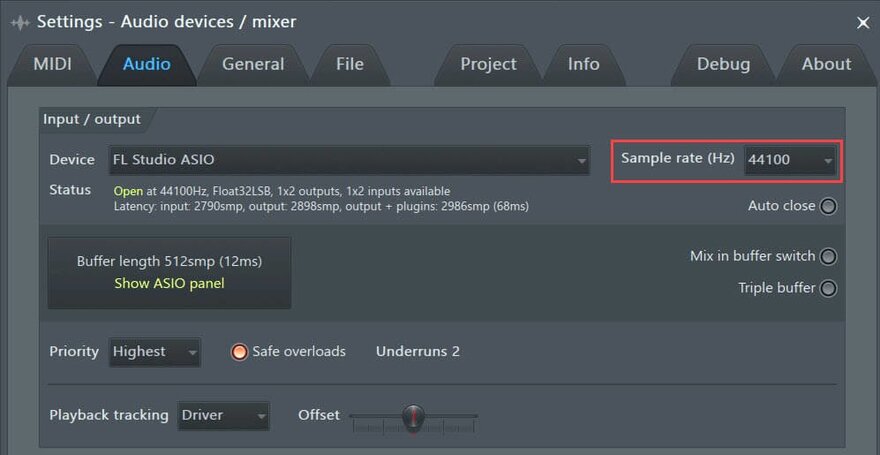
Users with ASIO4ALL drivers have reported conflicts with the system audio settings. More specifically, if the sample rate is not set at the same value in both parts, the computer starts experiencing sound problems. Here’s how to easily solve this issue:
- Click the Start button, type Control Panel, and press Enter
- Select the Sound area
- In the Playback tab, select your audio device and click Properties
- Switch to the Advanced tab
- Write down the sample rate specified at Default Format

- Exit this area
- Open the ASIO utility
- Switch to the Audio tab
- Set Sample rate to the same value as in Windows

- Restart your PC and inspect results
7. Run audio tests (HP laptops)
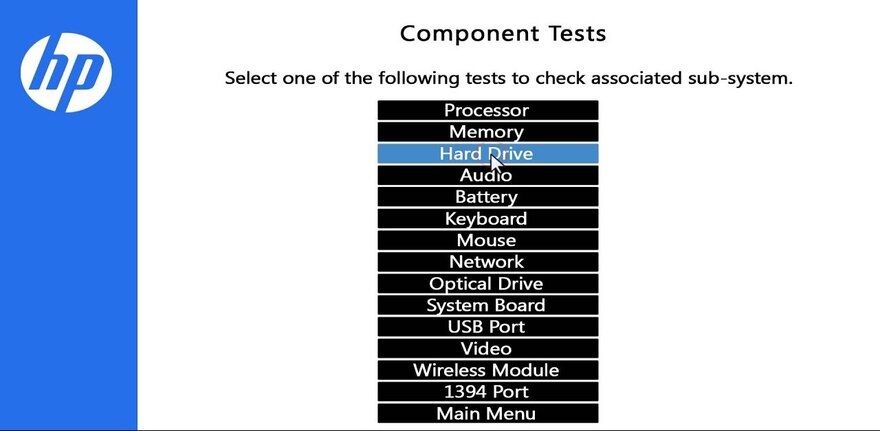
HP users can turn to an audio diagnostics tool called HP PC Hardware Diagnostics (UEFI). Here’s how to use it:
- Restart your HP laptop
- During reboot, quickly press the key that grants you access to HP PC Hardware Diagnostics (UEFI)

- Go to the Audio section
- Click Run once to start evaluating your audio devices
- Select Speaker and follow the on-screen instructions
- Complete the test and boot Windows
- Check for audio issues
You can also download HP Audio Check from the official website and use it to run additional tests.
8. Set the default audio device
Windows sometimes has trouble identifying the default sound device. And this is also why it could show the audio renderer error, whether you get it on YouTube or anywhere else. To fix this annoying problem, you just have to set your favorite audio device as default again. If you would rather assign audio output per app instead of changing it system-wide, Windows 10 can do that too. Here’s how:
- Press the Win key, type Control Panel, and open this app
- Click Sound
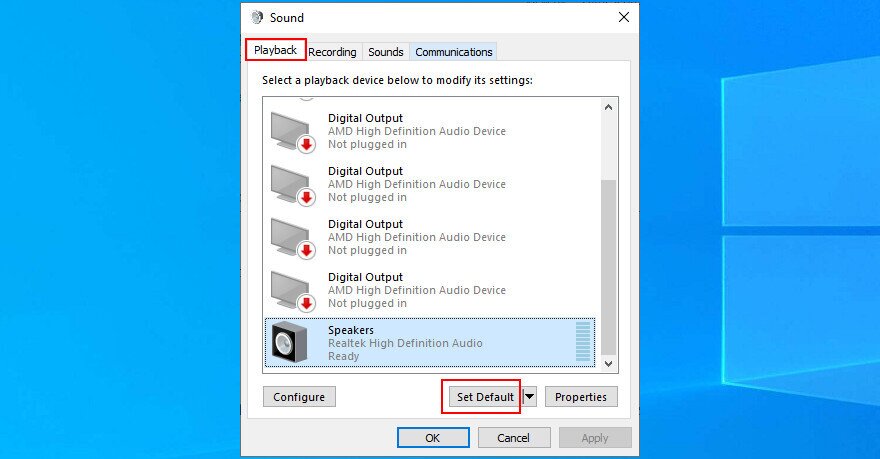
- Choose your audio device from the Playback tab
- Click Set Default

- If the Set Default button is greyed out, select any other device to set it as default, then go back to your first option
- Click Apply and exit this area
- Check for audio issues
9. Reinstall the audio adapter
Your audio adapter might not be properly connected to your computer. However, you can effortlessly reinstall it without harming your PC in the process.
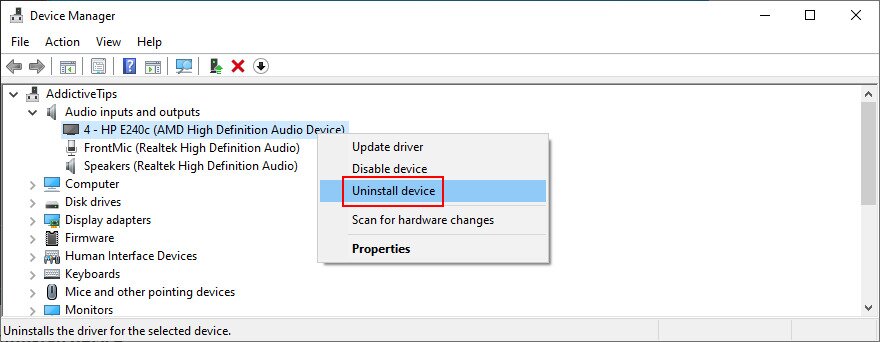
Important note: For driver-level fixes like this one, you need to work under Sound, video and game controllers in Device Manager — not Audio inputs and outputs. The “Audio inputs and outputs” category lists playback endpoints such as Speakers or Headphones, but the actual audio driver/controller (for example, Realtek(R) Audio, Intel Smart Sound Technology, Conexant, AMD High Definition Audio, NVIDIA High Definition Audio, or a USB audio device) lives under “Sound, video and game controllers.” Reinstalling, updating, or rolling back the wrong entry will not fix the problem.
Here’s what you need to do:
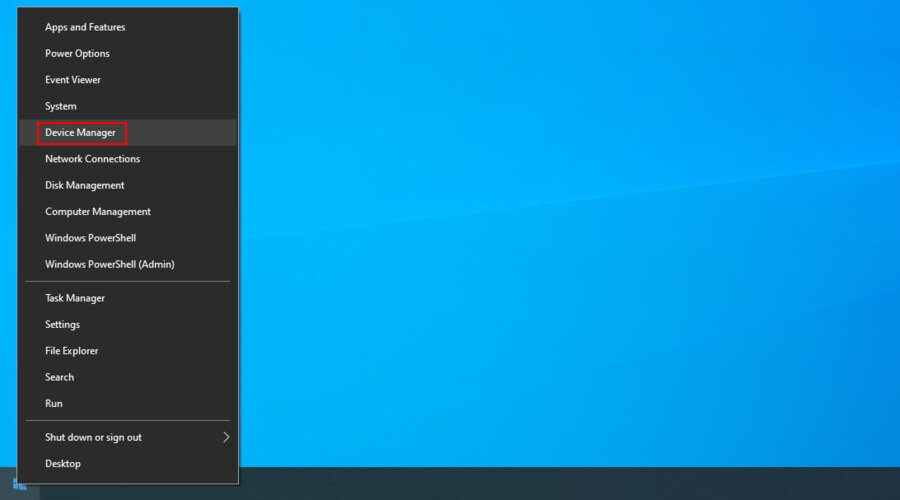
- Right-click the Start button and select Device Manager

- Expand the Sound, video and game controllers group
- Identify your main audio controller (such as Realtek(R) Audio, Intel Smart Sound Technology, Conexant, AMD High Definition Audio, NVIDIA High Definition Audio, or your USB audio device), right-click it, and select Uninstall device

- Select any entry from the list
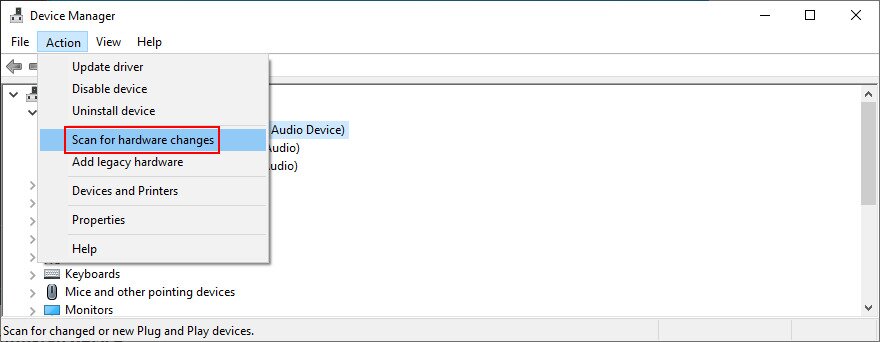
- Open the Action menu and click Scan for hardware changes

- Restart your computer. Windows will auto-reinstall the missing audio driver
- Check for sound problems
10. Update the audio driver
Even if your sound adapter is correctly installed, perhaps it’s equipped with an obsolete driver that’s no longer supported by Windows 10. It would certainly explain the audio renderer error. However, you can easily update the audio driver.
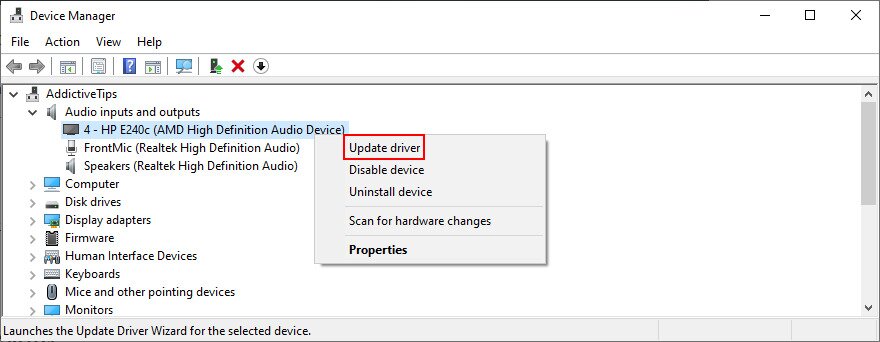
Remember: Use Audio inputs and outputs only to troubleshoot playback endpoints (like Speakers or Headphones). To update the actual audio driver, you must expand Sound, video and game controllers and target your audio controller there — entries such as Realtek(R) Audio, Intel Smart Sound Technology, Conexant, AMD High Definition Audio, NVIDIA High Definition Audio, or a USB audio device.
- Click the Start button, type Device Manager, and press Enter
- Expand the Sound, video and game controllers category
- Right-click your audio controller (e.g., Realtek(R) Audio, Intel Smart Sound Technology, or similar) and select Update driver

- Click Search automatically for updated driver software

- If you see the The best drivers for your device are already installed message, click Search for updated drivers on Windows Update

- Reboot your PC and check for additional audio issues
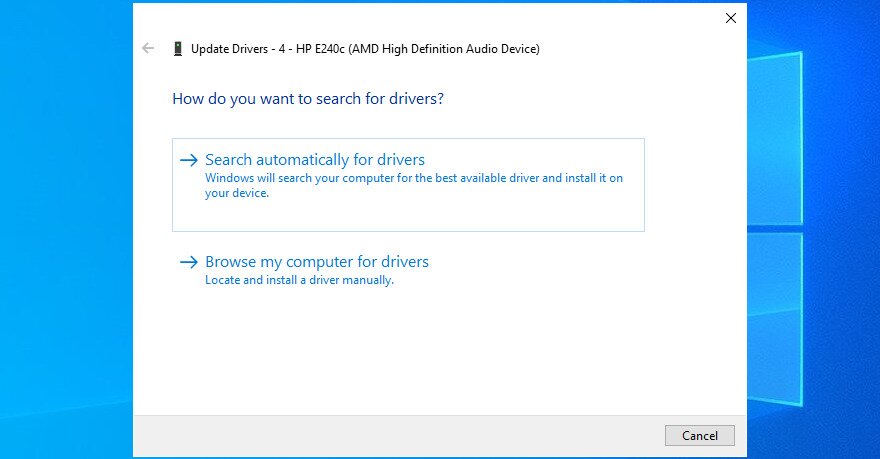
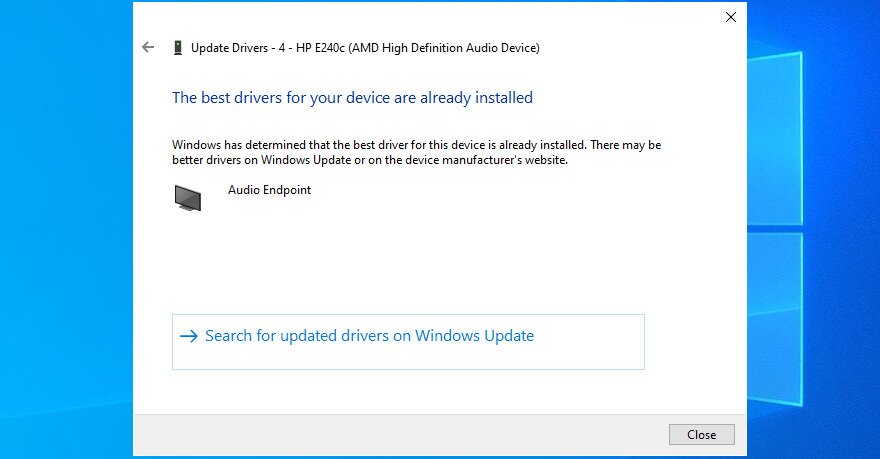
It’s possible that Microsoft fails to find a newer audio driver using Windows Update. In that case, you should head over to the manufacturer website of your sound adapter, then find, download, and install a newer driver that’s compatible with your OS configuration.
However, if you don’t want to go through that trouble as well as risk installing an incompatible driver that could cause more problems, we suggest opting for a driver updating software solution. You can use it to keep all your device drivers in check.
11. Roll back the audio driver
If you have recently updated your sound driver, perhaps you installed an incompatible version that’s throwing you the audio renderer error. To fix it, you should roll back to the previous driver version.
Remember: Perform this rollback under Sound, video and game controllers in Device Manager, targeting your actual audio controller such as Realtek(R) Audio, Intel Smart Sound Technology, or similar — not an entry under “Audio inputs and outputs.” Rolling back the wrong device will have no effect.
Here’s how:
- Head over to Device Manager
- Expand Sound, video and game controllers, right-click your audio controller, and go to Properties

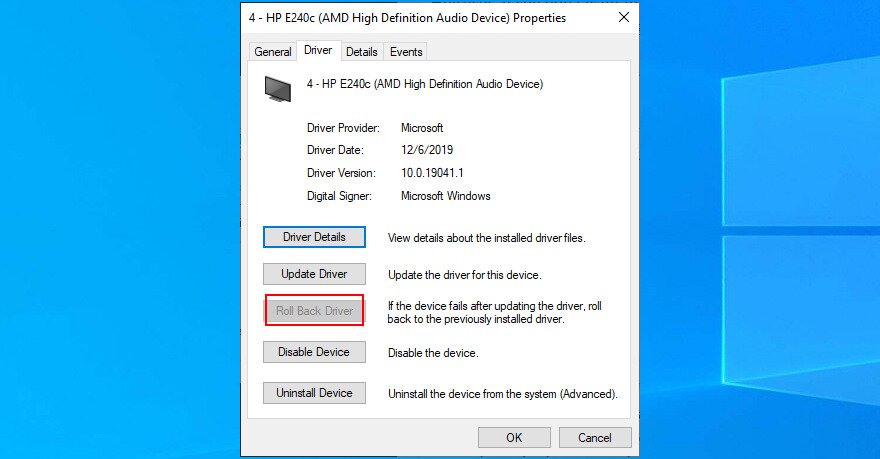
- Select the Driver tab
- Click Roll Back Driver and follow the given instructions
- If the button is greyed out, it means that your operating system doesn’t have the previous driver version, so you can skip this solution

- Restart your computer and inspect results
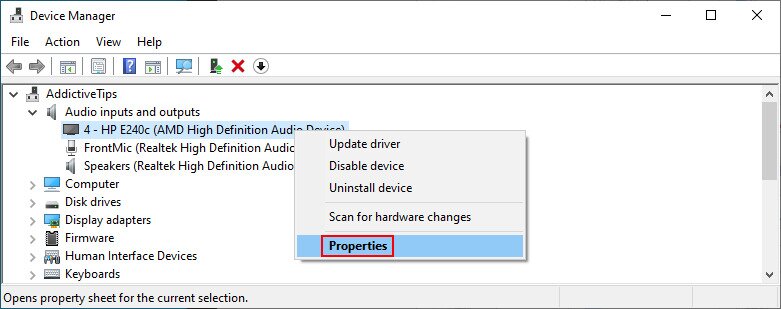
12. Check the audio cable
Hardware connection issues are a surprisingly common and overlooked cause of the audio renderer error — and the fix can be instant. Before reaching for a reboot, try physically reseating your audio devices. Unplugging and reconnecting an audio device can immediately reset a stuck audio endpoint in Windows, clearing the error without any deeper troubleshooting.
Here is what to check and how to do it:
- Headphones or speakers (3.5mm jack): Unplug the audio cable completely from the jack, wait a few seconds, then firmly plug it back in. If your PC has multiple audio jacks, try a different port.
- USB audio devices: Disconnect the USB cable or USB audio adapter, wait a few seconds, then reconnect it. Windows will re-detect the device and reinitialize the audio endpoint.
- HDMI or DisplayPort monitor/TV audio: If you are using a monitor or TV as your audio output, unplug the HDMI or DisplayPort cable from the PC, wait a few seconds, and reconnect it. Alternatively, open Control Panel > Sound and temporarily switch your default playback device to your laptop speakers or another device, then switch back to the monitor — this can jolt the endpoint back to life without unplugging anything.
- Docking stations: If you use a laptop dock, disconnect it from the laptop completely, wait a few seconds, then reconnect it. Audio endpoints associated with dock-connected devices often get stuck when the dock is hot-plugged.
- After reseating any connection, check your Control Panel > Sound > Playback tab to confirm the correct device is set as default, then test audio playback.
Also make sure you haven’t accidentally swapped the audio and microphone jacks, and remove any external playback devices you are not currently using to reduce the chance of endpoint conflicts.
13. Disable audio mixing software
Certain audio mixing tools are not fully compatible with the Windows 10 sound drivers, resulting in conflicts and the audio renderer error message. As soon as you start an audio mixing tool and configure sound drivers, the application overrides the system settings, causing various problems.
To fix this problem, you just need to disable your audio mixing tools when trying to watch a movie offline or a clip on YouTube.
14. Update your web browser
If you’re getting the audio renderer error message on YouTube when trying to enjoy a video, it’s a good idea to update your web browser to the latest version.
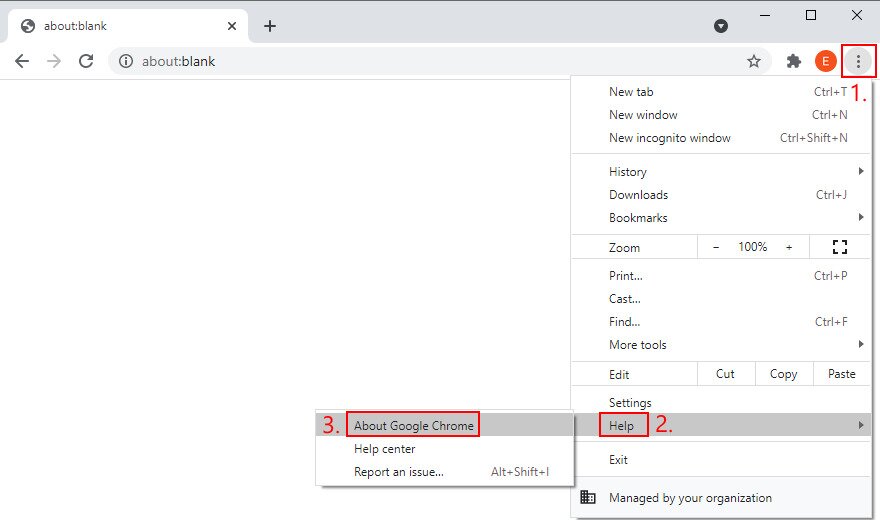
How to update Google Chrome:
- Open the More menu on the top-right corner
- Visit the Help submenu and click About Google Chrome. Alternatively, you can visit the
chrome://settings/helpaddress