Fix “We Couldn’t Complete the Updates” Undoing Changes Error
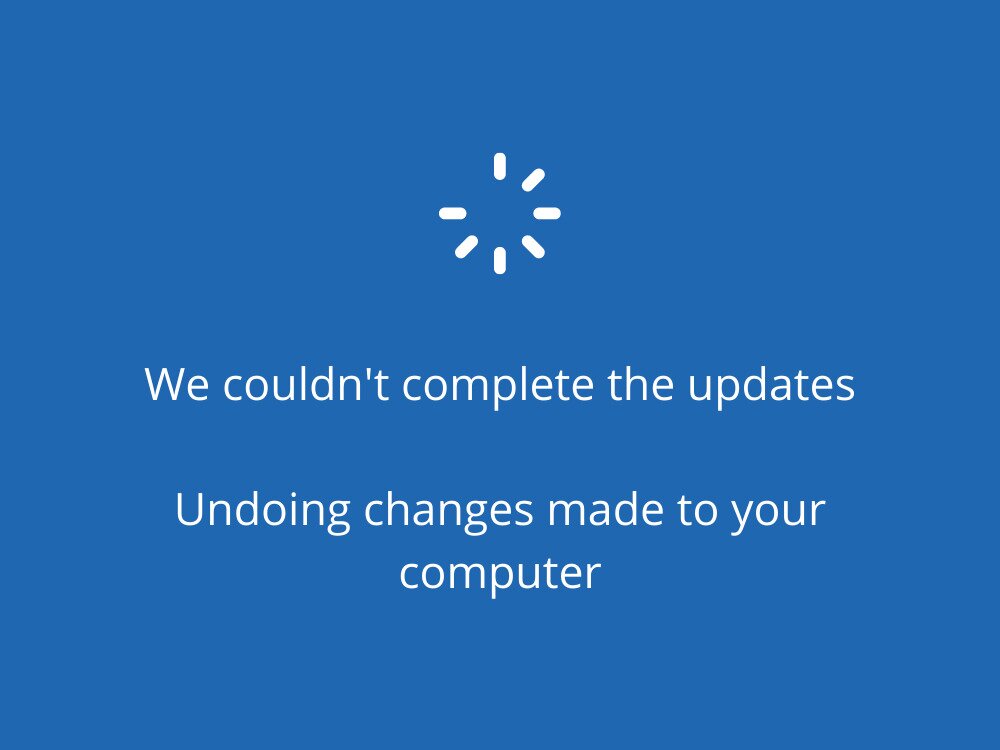
Microsoft regularly pushes Windows updates to deliver new features, improvements, hotfixes, and security patches. Unfortunately, Windows Update doesn’t always work as expected. Instead, it sometimes shows the We couldn’t complete the updates, undoing changes made to your computer error message
It means that Windows 10 isn’t capable of updating itself, rolling back all changes made up until that point. Usually, it’s a one-time issue that gets resolved on its own by simply running Windows Update again.
However, it becomes truly problematic when Windows Update gets stuck at 0%. Other times, it enters a loop and repeatedly rolls back changes made to your computer. This can be especially frustrating if you have pending Windows updates that need to be installed for security or functionality reasons.
What causes the Undoing changes made to your computer error?
Software problems are usually the ones to blame if Windows Update won’t work properly on your PC anymore. There could be something wrong with the Windows Update or other dependent services that send your PC into a spiral.
For instance, you might have recently installed a system update that’s not fully supported by Windows 10. Or perhaps your operating system has corrupt files which must be restored as soon as possible.
How to fix We couldn’t complete the updates, undoing changes on Windows 10
There are several ways in which you can approach Windows Update problems and get rid of the Undoing changes made to your computer message. However, it’s a good idea to create a system restore point before getting started. This way, you can roll back Windows 10 to the starting line in case you make any mistakes.
1. Run the Windows Update troubleshooter
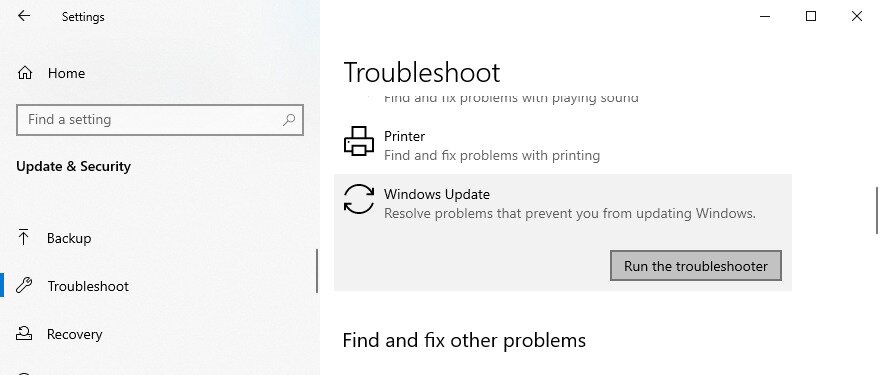
Common problems that prevent you from updating Windows can be fixed with the help of the Windows Update troubleshooter. Here’s how to use it:
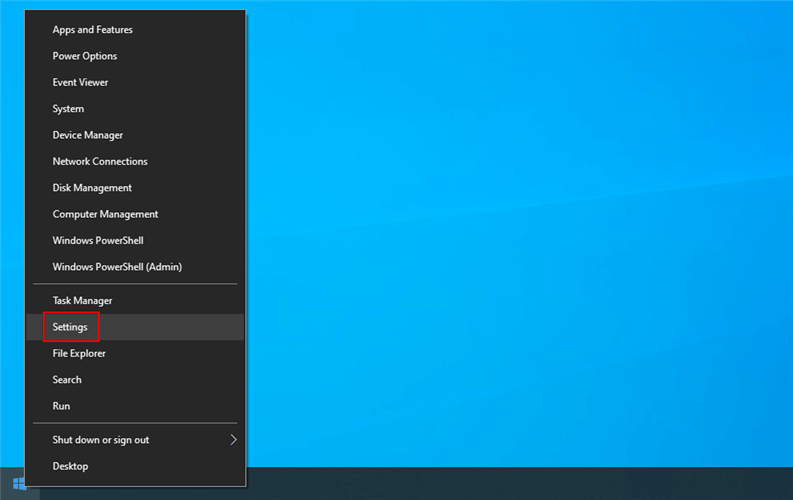
- Right-click the Start button and select Settings

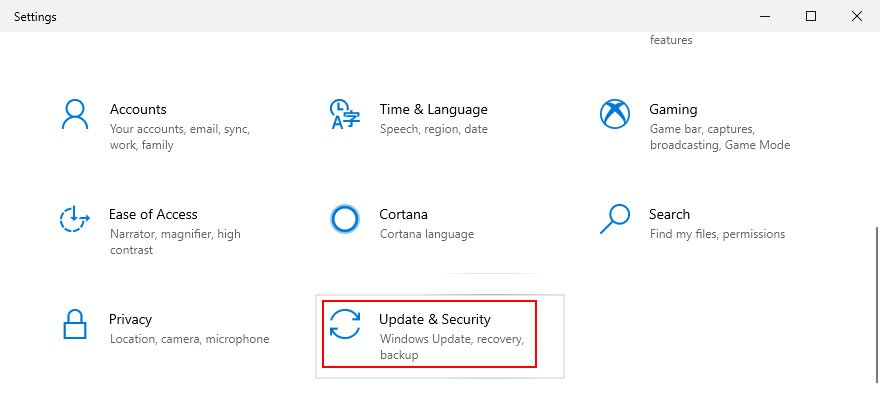
- Go to Update & Security

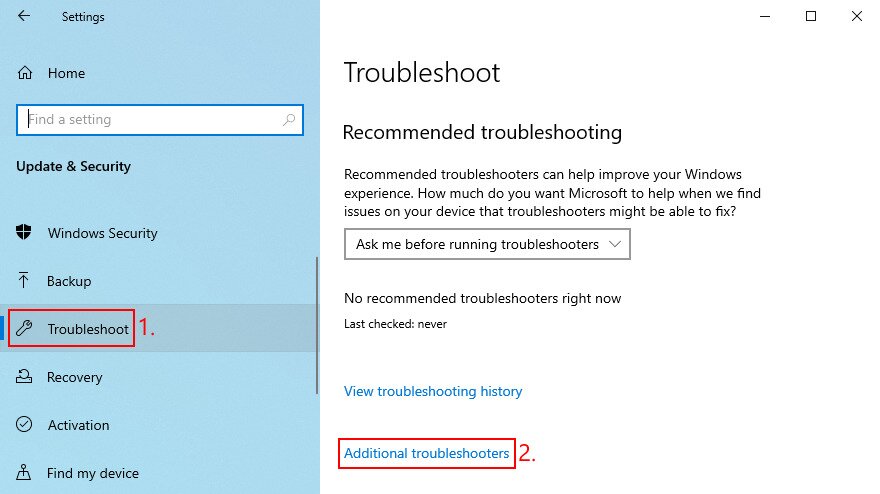
- Select Troubleshoot on the left side
- Click Additional troubleshooters

- Select Windows Update and click Run the troubleshooter

- Follow the on-screen instructions
- Reboot your PC and try to use Windows Update
2. Restart the Windows Update and dependent services
If the Windows Update, Background Intelligent Transfer, and App Readiness services aren’t running properly or aren’t scheduled to start automatically, your operating system will have a hard time trying to complete updates on your PC. But you can fix this by restarting the services and checking the startup status. Here’s what you should do:
- Press Win key + R, type services.msc, and press Enter

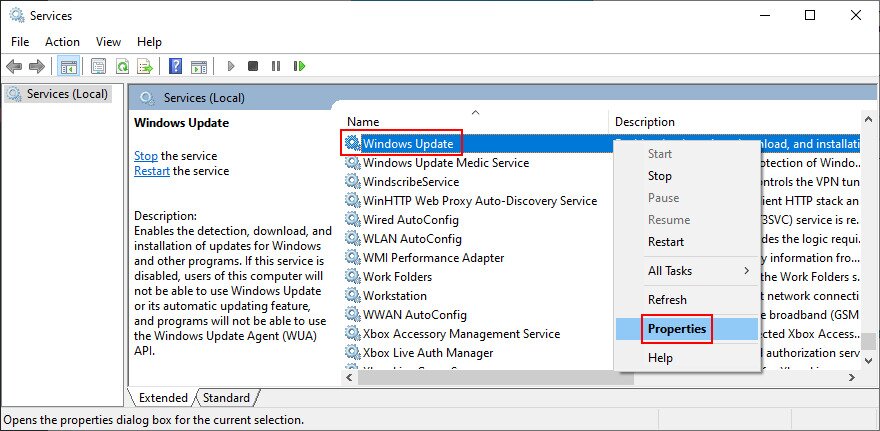
- Find and right-click Windows Update
- Open Properties from the menu

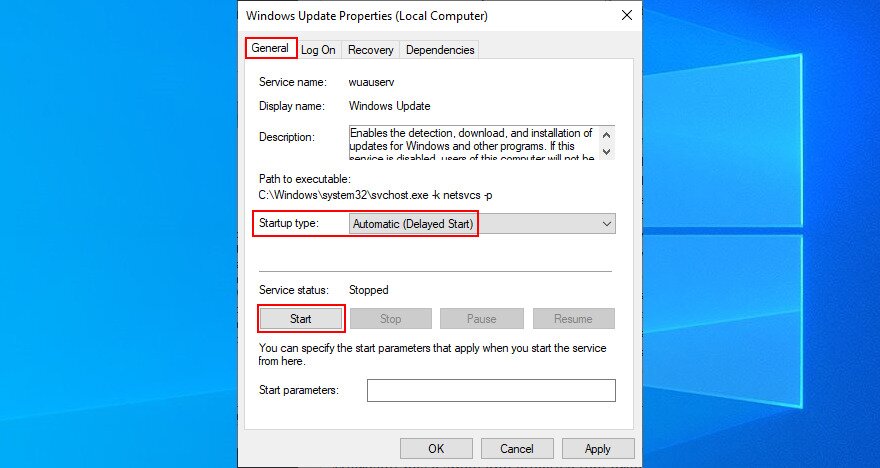
- In the General tab, set Startup type to Automatic (Delayed Start)
- If Service status says Stopped, click the Start button
- Click the Apply button and exit this window

- In the Services list, locate Background Intelligent Transfer Service and App Readiness to perform the same steps
- Reboot your PC and use Windows Update now

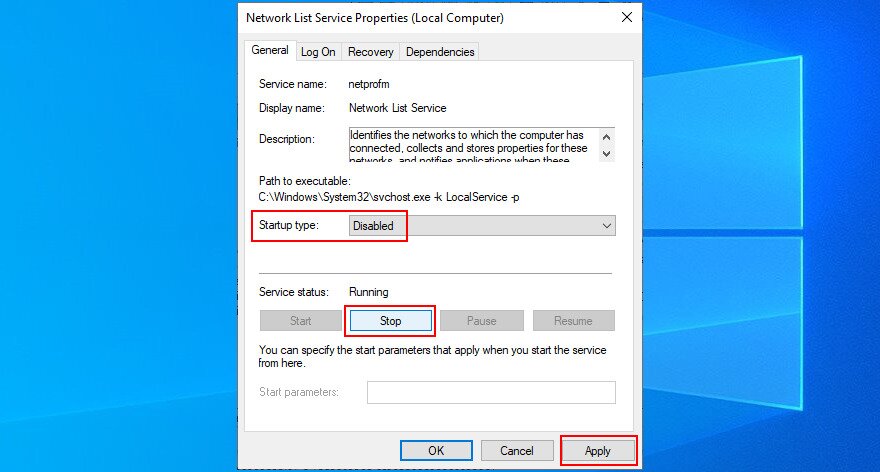
3. Turn off Network List Service
Network List Service is a system service that keeps track of the Wi-Fi networks your device connects to. However, it sometimes clashes with the Windows Update service, leading to the Undoing changes made to your computer error after a failed update. To resolve this problem, you just need to disable the faulty service. Here’s how:
- Press Win key + R, type services.msc, and press Enter
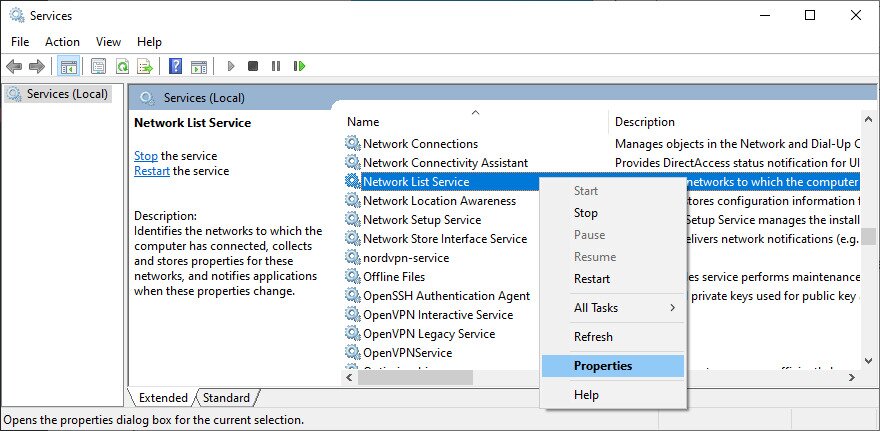
- Locate Network List Service
- Right-click the service and go to Properties

- In the General tab, set Startup type to Disabled
- Click Stop if the service is currently running
- Click Apply to commit changes and exit

- Restart your PC and try using Windows Update now
4. Use Windows Update Diagnostic
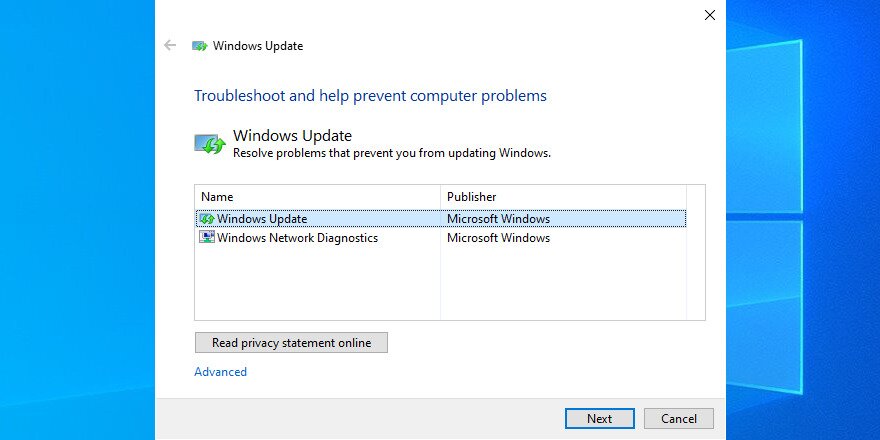
Windows Update Diagnostic is not a tool built into Windows 10 but it’s specially made by Microsoft to troubleshoot Windows Update issues. Here’s how to use it to your advantage:
- Log in to Windows 10 with an admin account
- Download Windows Update Diagnostic from the official website
- Run the tool and select Windows Update
- Click Next and follow the on-screen instructions

- After the fixes are made, open Windows Update Diagnostic again
- Select Windows Network Diagnostics, click Next, and proceed with the given steps
- When it’s done, restart your PC and try to install system updates
5. Rename the SoftwareDistribution folder
Your operating system downloads Windows updates in the SoftwareDistribution directory and temporarily keeps them there until it finishes updating your computer. But there might be a problem with the folder cache.
Normally, deleting the folder should fix this problem. However, since you’re dealing with a critical part of the operating system, it’s wiser to keep the directory and rename it. Here’s how:
- Make sure you’re logged in to Windows 10 with admin rights
- Press Win + E to open File Explorer
- Go to the
C:\Windowslocation - Locate and rename the SoftwareDistribution folder
- Reboot your PC and try to use Windows Update
6. Configure Group Policy settings
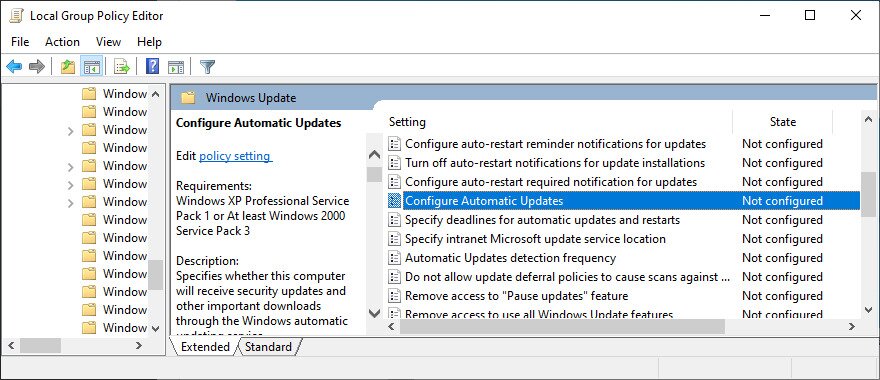
The We couldn’t complete the updates, undoing changes error message could also be caused by an incorrect configuration in Group Policy. Here’s how you can change it:
- Press Win key + R, type gpedit.msc, and press Enter to launch Local Group Policy Editor

- Visit Computer Configuration > Administrative Templates > Windows Components > Windows Update
- Locate and right-click Configure Automatic Updates

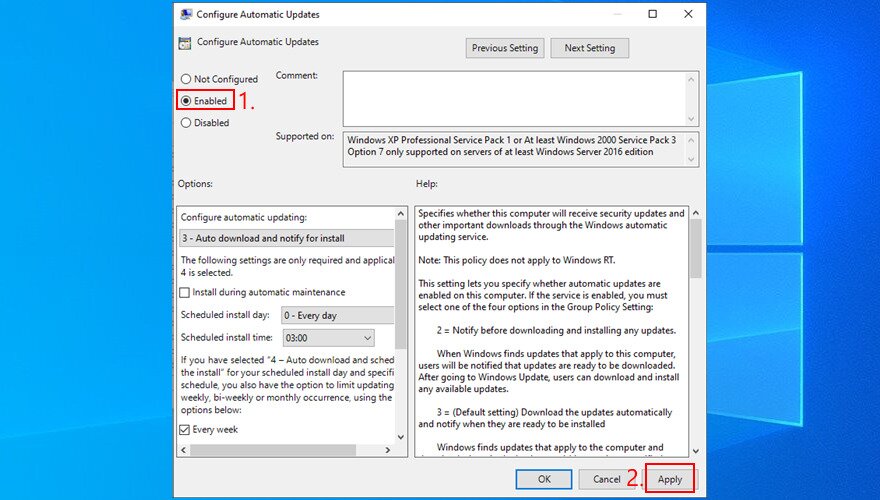
- Go to Properties
- Select Enabled on the top-left side

- Click Apply and exit this window
- Restart your PC and try running Windows Update now

7. Check the free disk space
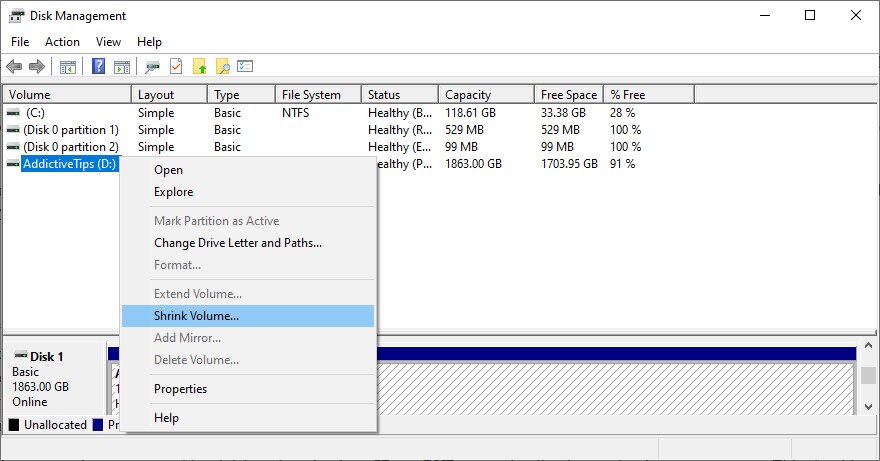
Windows Update needs a certain amount of disk space available on the hard disk. Otherwise, it will not have enough room to download and install new updates. To fix this problem, you can add more disk space to your Windows partition (usually C:) by using a partition manager or Disk Management, a built-in tool.
How to use Disk Management:
- Press Win key + R, type diskmgmt.msc, and hit Enter
- Pick a large drive besides C: (or where you have Windows installed)
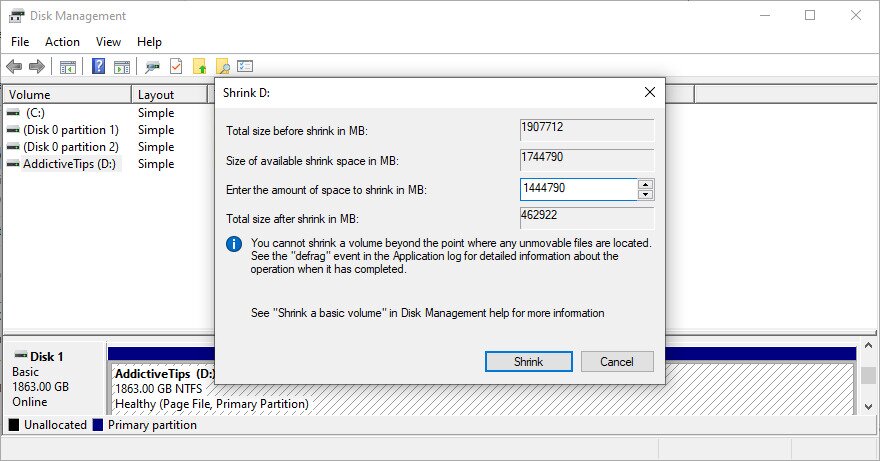
- Right-click the drive and select Shrink Volume

- Set the new volume size and click Shrink

- Select C:, right-click it, and choose Extend Volume
- Specify the new, larger size
- Reboot your PC and try to use Windows Update
Another way to free up your disk space is by removing large files, applications, and games you don’t need anymore. It’s also a good idea to move data to external disks, upload it to cloud accounts, or burn it to DVDs. This includes photos and videos, among others.
When it comes to junk data, you can get rid of it by turning to a third-party system cleaner or by using the Windows Disk Cleanup tool.
How to use Windows Disk Cleanup:
- Sign in to Windows 10 with elevation rights
- Check the Recycle Bin and Downloads locations for any files you wish to keep (these folders will be emptied)
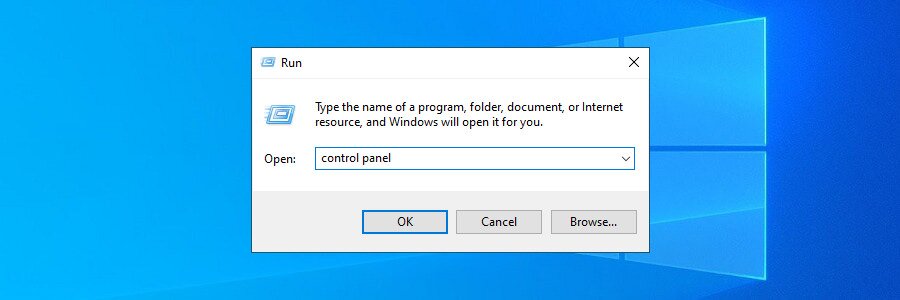
- Press the Win key, type control panel, and press Enter

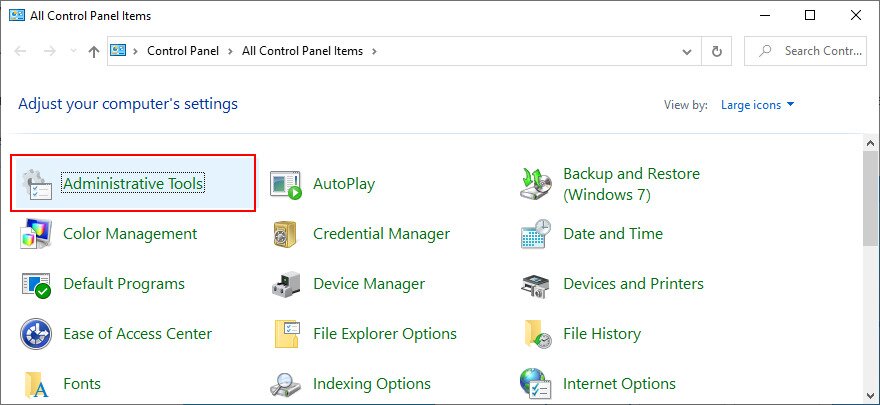
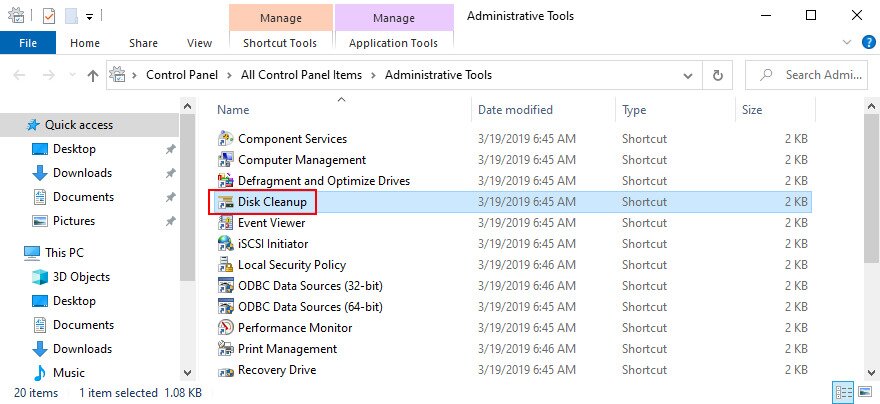
- Select Administrative Tools

- Double-click Disk Cleanup to open this app

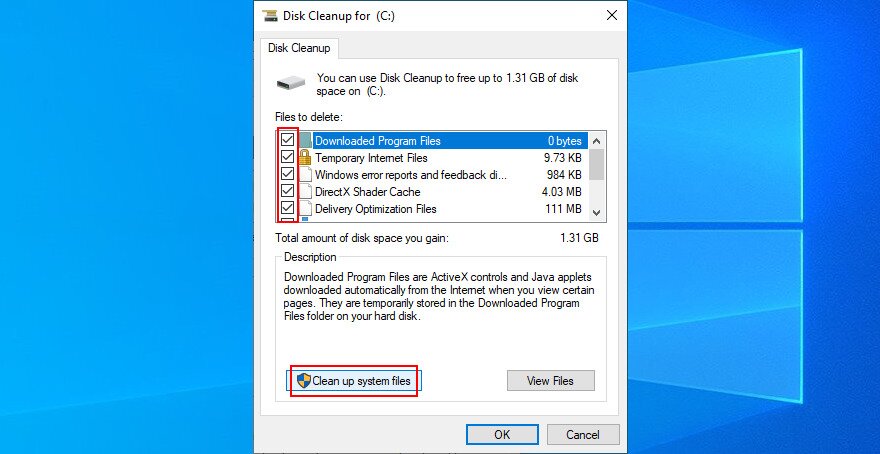
- Select C: and click OK
- At Files to delete, select all items. Then, click Clean up system files

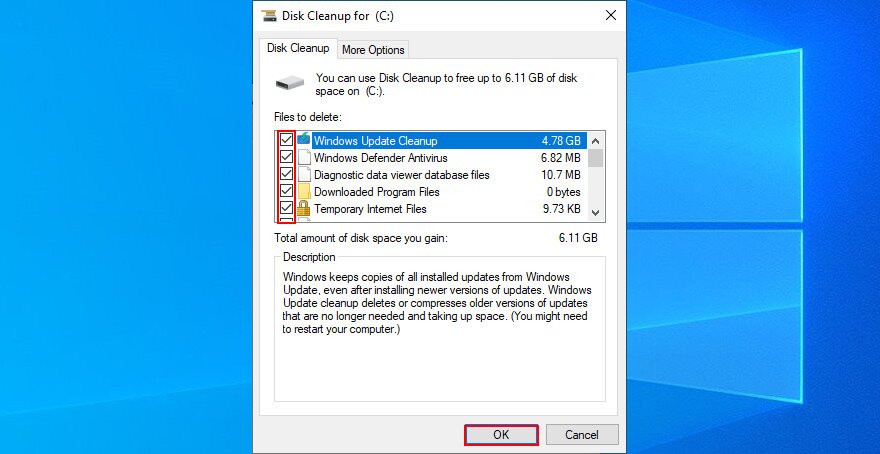
- Once the file search is complete, select all items again and click OK

- After Disk Cleanup finishes its job, restart your PC and try to use Windows Update
8. Start Windows 10 in Safe Mode
It can be tricky to find the malfunctioning driver, service or process that triggers the We couldn’t complete the updates, undoing changes error message on your Windows 10 PC. However, you can turn off all non-essential components by starting Windows 10 in Safe Mode. Here’s how:
- Click the power button to open the menu with the power options
- Hold down the Shift key and click Restart
- Windows 10 will start in Recovery mode. Select Troubleshoot from the blue screen

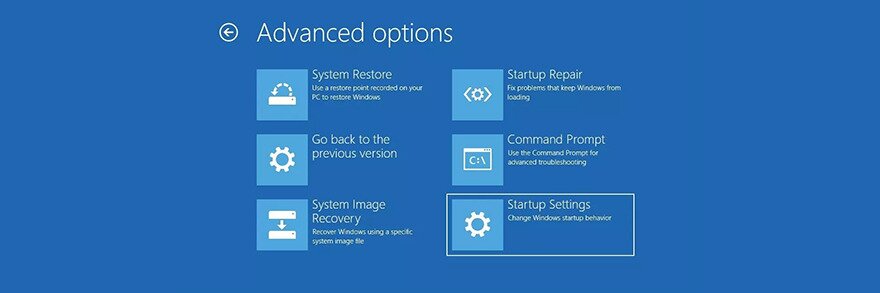
- Choose Advanced options

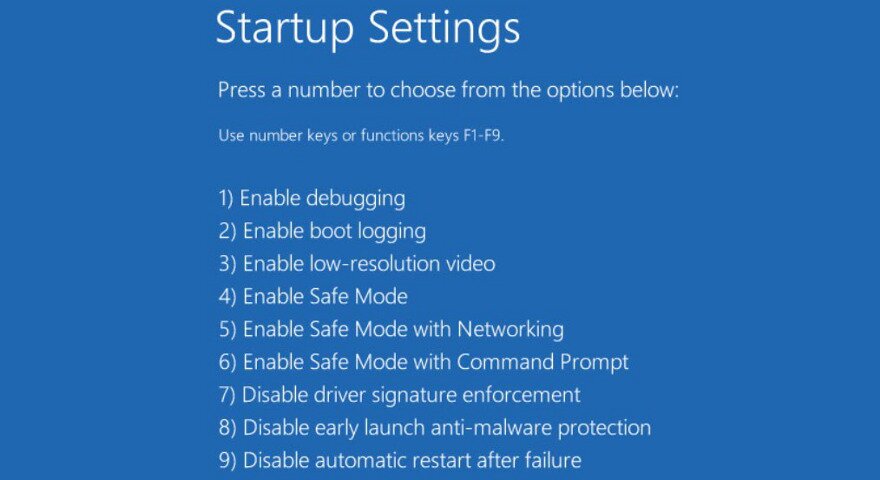
- Go to Startup settings
- Click Restart

- Press F5 to start Windows 10 in Safe Mode with Networking
- Wait until the operating system boots
- Run Windows Update

9. Check your drivers
Your computer might have missing or outdated drivers that prevent Windows 10 from updating itself. To fix this problem, you can try reinstalling the missing adapters, updating the obsolete drivers, and rolling back a malfunctioning driver to a previous, stable version.
How to reinstall missing adapters:
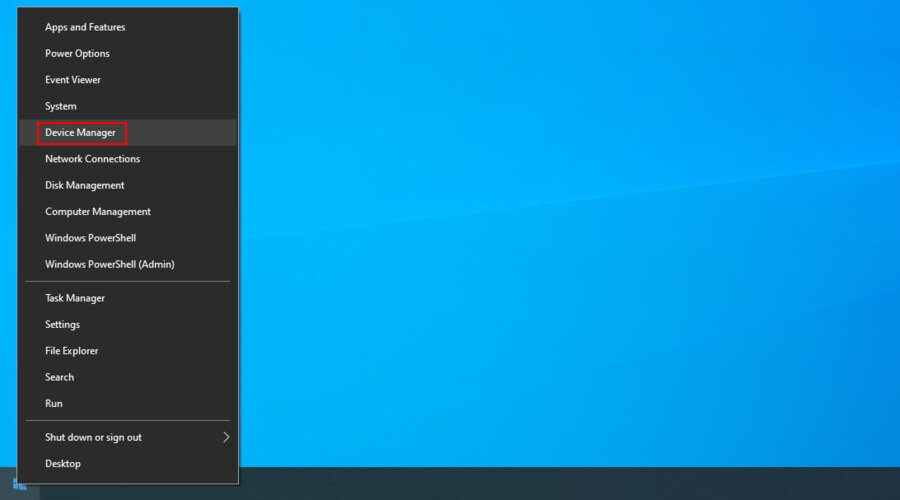
- Right-click the Start button and go to Device Manager

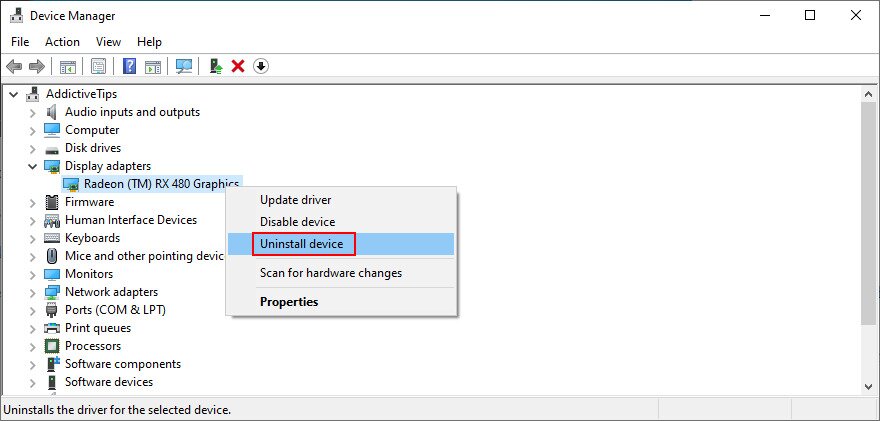
- Look for entries with a yellow exclamation point (it indicates a missing device)
- Right-click such an entry and select Uninstall device

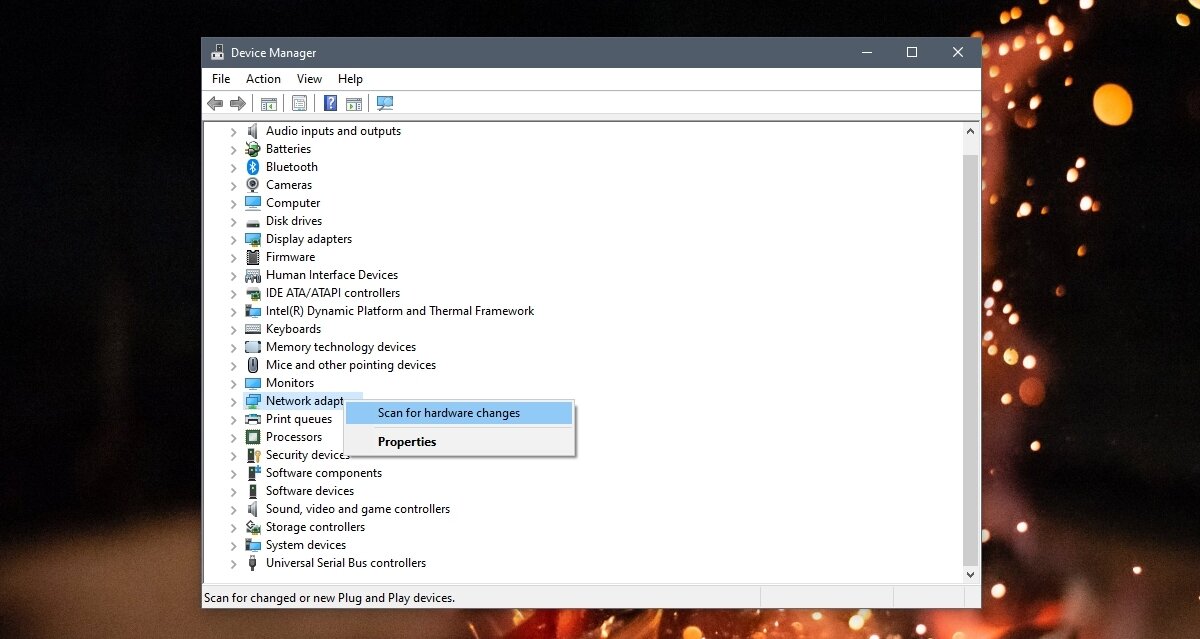
- After the action completes, right-click any device from the list and click Scan for hardware changes

- Restart your computer and allow Windows to automatically install the missing adapter
How to update drivers:
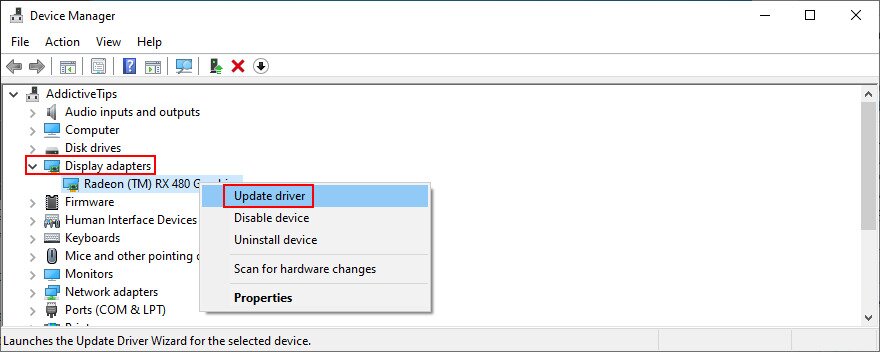
- Go to Device Manager
- Select a device with an outdated driver
- Right-click it and choose Update driver

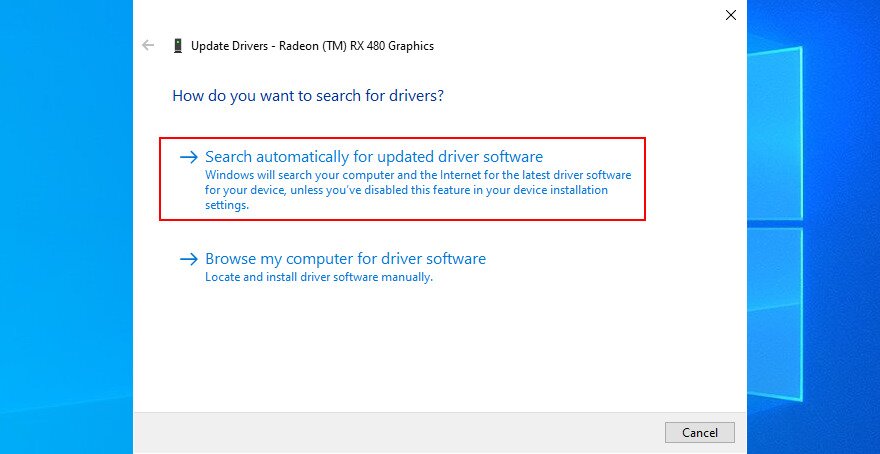
- Click Search automatically for updated driver software

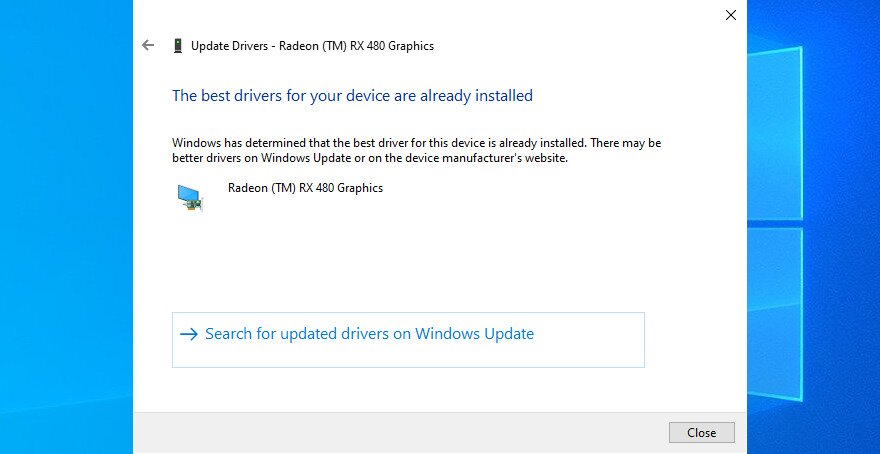
- If it can’t find anything, click Search for updated drivers on Windows Update

- Reboot your PC and try to use Windows Update
If you can’t identify the obsolete drivers or find a newer version on the web, you can turn to a driver updating tool. It automatically detects all outdated drivers on your PC, finds newer versions on the web, then downloads and installs them.
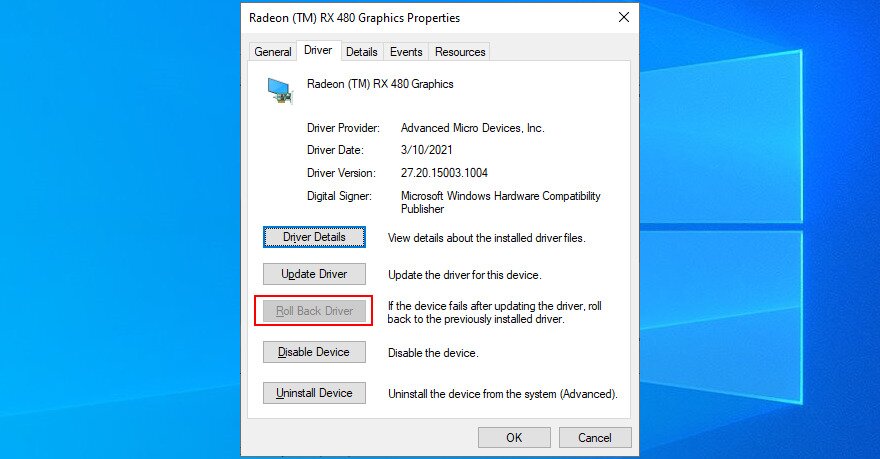
On the other hand, if you have an incompatible driver that’s already installed in Device Manager, you should roll back to the previous version to avoid system stability problems and any errors triggered in Windows Update.
How to roll back drivers:
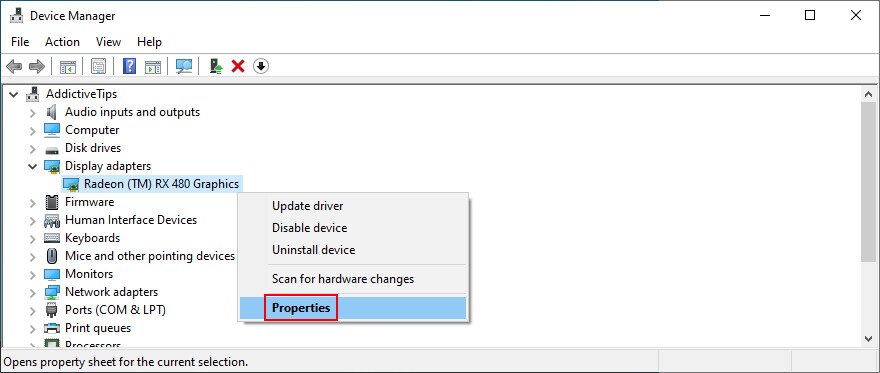
- Access Device Manager
- Right-click the device and go to Properties

- Switch to the Driver tab
- Click Roll Back Driver and follow the on-screen instructions
- If the button is greyed out and you can’t click it, you can’t roll back the driver so it’s safe to skip this step

- Reboot your computer and run Windows Update now
10. Unplug peripheral devices
Driver problems can also be caused by peripheral devices recently connected to your computer. For example, if you purchased or received a new webcam or Wi-Fi adapter as a gift, it’s possible that the device is not fully compatible with your operating system or has damaged drivers.
To handle this matter, shut down your PC and unplug everything, except for your keyboard and mouse. Then, boot your OS and try to run Windows Update. It if works, just replug the devices after the system is updated. But it’s not a long-term solution because you have to detach the hardware components every time you need to update Windows.
11. Fix hard disk and operating system errors
Hard disk and system file corruption can prevent Windows Update from running properly, resulting in a failure to apply system updates that are signaled by the Undoing changes made to your computer error message.
However, you can repair this problem by turning to CHKDSK (Check Disk), SFC (System File Checker), and DISM (Deployment Image Servicing and Management). All three tools can be operated from the console environment on Windows 10, so you don’t need to install anything. Plus, previous experience with Command Prompt is not required, as long as you follow the instructions below.
How to use CHKDSK:
- Press Win key + R, type cmd, and press Ctrl + Shift + Enter to open Command Prompt with elevation rights
