How to Change DNS Settings on Your OS or Router
DNS server settings sounds like something computer science majors and elite hackers talk about at the coffee shop. Despite its foreboding name, however, the technology is one of the common supporting backbones of the internet. If you’ve ever typed a URL into your browser’s address bar and successfully visited a website, you put a DNS server to work.
Changing DNS settings on your home router or computer can alter the way you interact with the web. Not only can a simple tweak make parts of the internet a bit faster, it can also help you circumvent blocked and censored websites, access content restricted in your country, filter malicious websites, and even protect your children online.
What is DNS?
The internet works by sending information back and forth between computers. A device makes a request, a server relays that request to the appropriate destination, those servers pass it back, and a website loads on your screen. All of this happens thanks to internet protocol addresses, or simply IP addresses. Each device connected to the internet is assigned a unique series of numbers used to identify them on the world wide web. Think of it like a mailing address. If you want to send a package to someone, write their address on a box and the postal service will deliver it.
IP addresses aren’t very friendly to human eyes. Looking at something like 123.45.67.89 doesn’t make much sense, and you can forget about memorizing dozens of those to perform your daily internet tasks. That’s where DNS comes into play. DNS stands for Domain Name Service, or sometimes Domain Name Servers, and it works like a human readable label for those seemingly random IP addresses. Instead of typing in all the numbers each time you want to visit a website, you enter Facebook.com, a DNS server looks up the IP address associated with that URL, and you get redirected.
The nature of DNS servers places them between your computer and the rest of the internet. Before you can access a website, a DNS server has to do its job. This gives DNS services a unique opportunity to filter, block, and unblock content before it even reaches your home. If a website is flagged as malicious or inappropriate, the DNS server can deny access without you even knowing it happened.
DNS and Your Home Connection
The entire process of typing in a URL and having a DNS server match it to an IP address takes place in fractions of a second. Most people don’t think about where it takes place, either. When you sign up for internet service with your local ISP, you gain access to their DNS servers. Part of the set-up process when a technician installs a modem or router at your home is to make sure the DNS settings are configured to the local provider’s servers. Without them, you can’t do very much online.
What most people don’t realize is that you’re under no obligation to use your ISP’s DNS servers. In fact, in many cases there’s a great advantage in not doing so. To make the change all you need is access to a third party DNS provider, which in many cases is either free or extremely low cost, and a few minutes of spare time. That’s it. And best of all, it doesn’t take a tech genius to change DNS server settings.
How to Change Your DNS Settings
Switching DNS settings isn’t nearly as complicated as you might think. All you have to do is connect to the internet, find the right settings page, enter your new details, and you’re done. The process can take a bit of time depending on your familiarity with your operating system and internet hardware, however.
There are two main ways you can change DNS settings. The first is through your router, which will affect every device that connects to your network, including Wi-Fi. The second is by changing settings on a particular device. This only affects that computer or smartphone, which is perfect for filtering content on tablets or laptops kids frequently use.
Change DNS Settings on Your Router
Changing DNS settings on your router will affect your entire network, including wireless devices such as cell phones, e-readers, and gaming consoles. It’s a relatively fast method to use a third party DNS server and it doesn’t require a lot of technical knowledge, just a few minutes of your time. The advantage is that every device automatically uses the new DNS information and can benefit from the speed and security boosts without additional configuration.
How to change DNS settings on your router:
- Open your router’s admin page. (See the detailed instructions below if you aren’t sure how to do this.)
- Log in using your username and password.
- Locate the settings tab and find the DNS server entries.
- Enter new info for both primary and secondary DNS server.
- Save your changes.
- You may need to reboot the router for the changes to take effect.
Change DNS Settings on a Windows PC
You don’t have to mess with your router’s config screen to change DNS servers. Windows computers have the ability to switch DNS settings right from the control panel. Simply connect to a network, make the changes, and you’re set. This won’t affect other devices that connect to your home network, but it can be extremely useful on your main desktop or laptop.
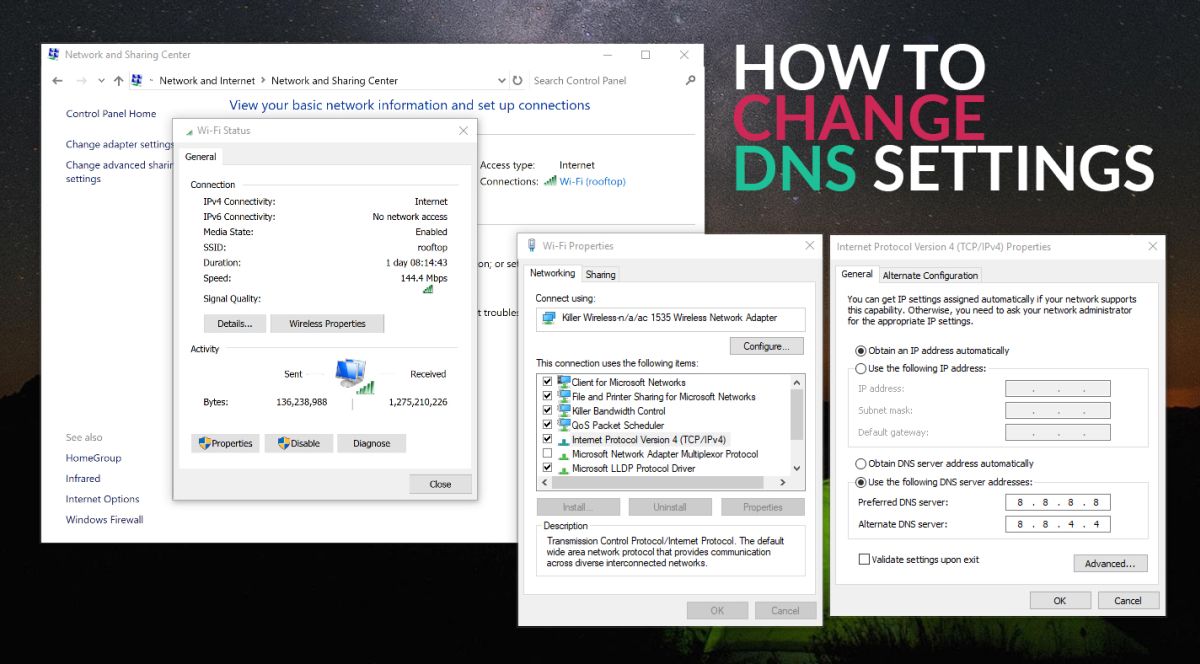
How to change DNS settings on Windows 10:
- Open the Control Panel
- Go to Network and Internet > Network Connections
- Find your ethernet adapter or Wi-Fi in the list, then right click and choose Properties
- Under the Networking tab, scroll to the item that says “Internet Protocol Version 4 (TCP/IPv4)” and click to highlight it.
- Click the Properties button below.
- A new window will open. At the bottom, select “Use the following DNS server addresses:”
- Enter the preferred and alternate DNS server information from your third party provider.
- Save your changes and exit the control panel.
Change DNS Settings on a Mac
Switching DNS servers on a Mac is extremely simple. When you’re connected to a home network, all you have to do is open a settings page and enter the details. This works on all modern MacOS versions, including iMac and MacBook devices.
How to change DNS settings on MacOS:
- Launch System Preferences by clicking the icon in the dock.
- Click the Network Preferences pane.
- Select the currently active internet connection.
- Click the Advanced button.
- Click the DNS tab.
- Click the plus sign in the bottom left corner.
- Enter the new DNS server information.
- Drag the new DNS entries to the top of the list.
- Click “ok” to exit the settings page.
Change DNS Settings on Ubuntu and Linux
Linux devices can switch DNS settings just like Windows and Mac, though the process can be wildly different on certain distributions. The instructions below are for one of the more popular distros, Ubuntu. The process will be roughly the same for most Debian based releases, including Lubuntu, Xubuntu, and Linux Mint.
How to change DNS settings on Ubuntu:
- Connect to the internet.
- Click the internet icon on the taskbar, or open up the Settings page.
- Go to Network Connections and click “Edit Connections”.
- Locate your active connection and select it.
- Click the “Edit” button.
- Choose the IPv4 Settings tab.
- Change the “Automatic (DHCP)” option to “Automatic (DHCP) addresses only”.
- Enter the new DNS information into the DNS servers box. Separate multiple entries with a comma.
- Save your changes.
How to change DNS settings on Linux (command line):
- Edit the resolv.conf file by entering the following into the command line: sudo vi /etc/resolv.conf
- Modify the lines marked nameserver by entering new DNS information.
- Save and close the file.
Change DNS Settings on an Android Phone or Tablet
Android powered devices have a slightly out of the way feature that lets you change DNS settings for any connection. This can be extremely useful for traveling, as you never know how reliable the DNS service will be when you connect to an unknown network.
How to change DNS settings on Android devices:
- Connect to a wireless network on your Android device.
- Go to Settings and scroll to “Wireless & networks”
- Find the network you’re connected to and tap it.
- In the Wi-Fi screen, long press the same network and choose “Modify network”
- Tap “Advanced options”
- Set the IP settings option to “Static”
- Scroll down to the entries that say DNS 1 and DNS 2
- Enter your third party DNS server information into both boxes.
- Save the changes and exit.
Change DNS Settings on iOS Devices
iOS devices have a simple settings page that makes it easy to change DNS information. The process will be the same on newer versions of iOS for both iPhone and iPad devices and will offer a number of speed and safety benefits when you access public Wi-Fi.
How to change DNS settings on iPhone and iPad:
- Connect to a Wi-Fi network.
- Tap the gear icon to open the Settings page.
- Tap the arrow next to the network you’re connected to.
- Tap the DNS field and enter your third party server information.
- Save the changes and exit.
Change DNS Settings on a VPN
When you use a virtual private network you also use their DNS servers. This is done to prevent local DNS leaks that may divulge your real IP address and location. You can still use third party DNS servers if you’re on a VPN, however. Not all providers will allow it, and the process will vary from software to software, so it might take a little experimentation before you can find the correct option.
How to change DNS settings on a VPN:
- Open your VPN software.
- Find the settings page.
- Look for a DNS or nameserver entry.
- Enter the new DNS details.
- Save the changes and resume browsing.
You can also add your VPNs DNS servers to your router settings so every device that connects to your home network will gain the benefits of the new DNS. Simply follow the instructions in the section above for changing the router settings, then enter your VPN’s DNS info. Note that this won’t give devices encryption or IP address masking, just faster access to name look-ups.
Need help choosing a reliable, fast, and affordable VPN? Check out our guides below to add a little extra privacy to your daily web browsing!
How to Open Your Router’s Admin Page
The first stumbling block for many users looking to change DNS settings is figuring out how to access their router’s admin page. After all, it’s not something you need to do that frequently. The method will vary depending on the brand of your router, but the basic idea remains the same. All you need is physical access to the router, a computer that’s plugged into it, and a web browser.
If you aren’t sure what brand your router is, look on the bottom of the device. Most companies place stickers here that display the make and model number along with the default username, password, and access address. If this is the case you have all the information you need to reach the admin page. Simply open up your browser, type in the default IP address, and you’re ready to go.
How to open your router’s admin page:
- Connect your computer to the router (on WiFi or ideally, with a cable.
- Open a browser window.
- In the URL bar type in the router’s IP address*. This will usually be something like 192.168.0.1 or 192.168.1.1
- Log in using your username and password.
* Finding your router’s address is usually easy: Fire up the Properties for the connection (i.e. on WiFi click on the network name and see the Properties button) you’re on and check the DNS server. Unless there are some custom settings on your router, the IP address should look something like the above.
Once you have access to the router’s settings page, look for a settings tab related to internet connections. Some routers hide the DNS server configuration options under an advanced section to make sure no one accidentally changes it. If you can’t locate the tab by trial and error, check the router’s documentation for detailed information.
Advantages of Using a Third Party DNS Service
Just about everyone on the internet uses their local ISPs DNS service without even thinking about it. You can connect to the internet just fine, so why bother messing with it? There are a number of advantages using a third party DNS service can bring, however, including speed, security, and access to brand new content.
Some of the immediate advantages of using a third party DNS service include:
Bypass censored and blocked websites – Blocking content at the DNS level is a common tactic used by corporations and governments to prevent people from viewing certain content. If you live in a country that doesn’t allow Facebook, for example, your ISP may simply filter it from their DNS servers to prevent access. If you use a third party DNS service, however, you can bypass these blocks with almost no effort. For those looking to unblock sites without proxy, changing DNS settings offers a simple and effective solution.
Stop phishing attempts – Phishing scams are attempts at getting sensitive user information such as e-mail addresses or passwords by disguising a link with a more trustworthy URL. It may look and act like your bank’s website, but in reality it’s harvesting your information to use for nefarious purposes. If you’re not paying close attention, it can be easy to fall victim to this kind of traps. Several third party DNS services offer built-in protection that block most phishing websites by default.
Improved speed – ISPs aren’t under any pressure to provide faster name look-ups. Depending on your location and the location of the DNS service you want to use, you might see a noticeable increase in speed when you change servers. Seeing a 50-60% increase in URL resolution isn’t all that uncommon.
Filter the web – An extremely convenient way to block websites from your entire home connection is to add filters to your DNS server. It’s perfect for increasing productivity by blocking distracting social media websites or for keeping kids safe from harmful online content. ISP operated DNS servers usually don’t allow filtering, but third party services such as OpenDNS do.
Which DNS Services to Use
DNS services come in two basic varieties: free and paid. Free DNS services offer basic servers with a variety of no-cost features, including phishing protection and faster look-ups. Paid services add extra features such as configurable web filters to help make your surfing safer. Which option you choose is up to you and your needs, but both can deliver faster speeds depending on location.
Just like free proxies and free VPNs, there can be some risk associated with using lesser-known no-cost providers, including privacy violations, activity logging, and censored websites. For this reason, it’s best to do a little research on your DNS provider before changing settings. There are a few free and low-cost DNS services that focus on open availability and ease of use, however, some of which are provided by big name companies.
Some of our favorite, reliable services that offer free or paid DNS servers:
OpenNIC Project – An alternative DNS provider that prides itself on being open and democratic. Delivers DNS servers that are completely free, promote neutrality, and stop DNS hijacking. Privacy advocates consistently list OpenNIC as their favorite DNS service.
OpenDNS – One of the more popular alternative DNS providers, and for good reason. The OpenDNS mission statement is to provide safety, reliability, and efficiency for the entire internet. It does this by filtering dangerous websites and building its entire network around speed. It even features both free and paid VIP services for homes, families, and businesses, all of which are surprisingly cost effective.
Google Public DNS – Another extremely popular alternative DNS service, Google delivers better security, better speeds, and more accurate DNS look-ups than many local service providers. It’s also completely free.
Norton ConnectSafe – A paid DNS service operated by the anti-virus and digital security giant Norton. Offers several different plans geared towards safety and security, with several options for web filtering that may be useful to parents.
Can Changing DNS Servers Replace a VPN?
While DNS servers can bypass blocked websites, allow access to foreign video streaming services, and even protect your privacy, they’re not a true substitute for a good virtual private network.
VPNs encrypt the data you send through the web, which is a fundamental requirement for online privacy. This helps mask the information you send across the internet to prevent digital surveillance attempts, ISP tracking efforts, and data snoopers. Encryption makes it safer to do your usual online tasks, whereas DNS servers simply fetch websites. A VPN will also let you change virtual locations for better access to Netflix, Hulu, YouTube, and BBC iPlayer videos from other countries.
It’s possible to use a third party DNS service along with your VPN, however, which delivers the benefits of speed, security, location variability, and privacy offered by both. All you need to do is change the DNS options in your VPN software. See the instructions above for a more detailed guide.
