How to Change the Apple ID Country on iPhone, Mac, or Web
If you want to know how to change Apple ID country settings for your account, the process is straightforward but requires a few preparations. An Apple ID is region specific — it works only for the country store it was created for. The App Store on both iOS devices and Macs detects which store an Apple ID was created for and switches you to it automatically.
The point is to control the geographical distribution of apps. For example, Pokèmon Go was initially only available in the US App Store. Users residing outside the US had to create a new Apple ID for the US store to download it.
This works fine if you don’t mind having multiple Apple IDs and if you don’t intend to make any purchases in the App Store. If instead you’d like to change the country or region for your existing Apple ID rather than creating a new one, there’s a simple way to do just that. You may be required to enter a valid payment method accepted in the new country or region, along with a billing address there — though some users see a None payment option depending on their account and country setup. If Apple does not give you the option to skip payment and you do not have an accepted payment method for the new region, the official fallback is to create a new Apple Account when you are physically in the new country or region.
How to change Apple ID country: what to do before you switch
Before you start, Apple requires that a few conditions are met. If any of these are still pending, the option to change your country or region may be unavailable or the process may fail:
- Spend your remaining Apple Account balance. Your App Store balance must be zero before you can switch regions.
- Cancel active subscriptions and wait until the current subscription period ends before proceeding.
- Wait for any memberships, pre-orders, movie rentals, Season Passes, or pending refunds to finish processing.
- Check Family Sharing. If you are the Family Sharing organizer, the change may be blocked until your family group requirements are resolved.
It is also worth noting that some apps, music, movies, TV shows, and books are not available in every region. Before switching, redownload any content you may need, as it might not be accessible from the new regional store.
On iPhone or iPad, open the Settings app and tap your name at the top. Go to Media & Purchases, then tap View Account and sign in if prompted. Tap Country/Region, then tap Change Country or Region. Select the country or region you want to switch to, then review and agree to the Terms & Conditions. Finally, enter your new billing information and billing address, then tap Next.
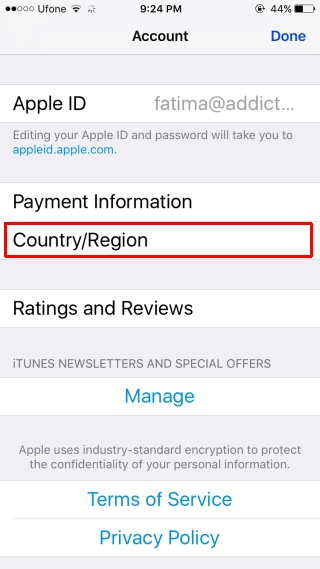
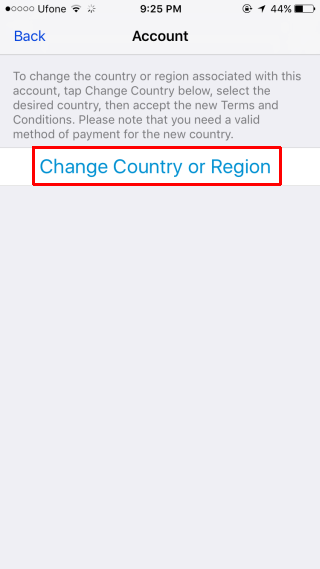
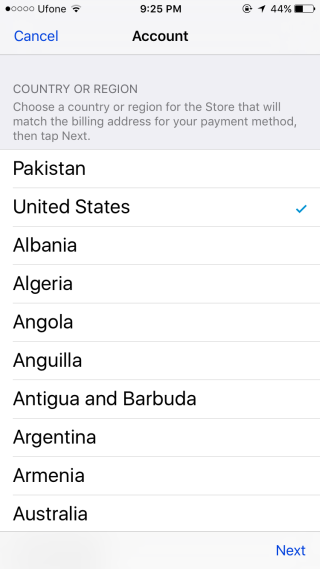
A list of all available regions will load. Select the country or region you want to switch to and tap next at the bottom. Next, you will be asked to accept the terms and conditions of the App Store for the region you’re switching to. This is going to take a few taps. The last screen will ask you to update your billing information.
At this step, you may be asked to enter a valid payment method accepted in the new country or region, along with the correct billing address. Depending on your account and the countries involved, Apple may offer a None option if a payment method is not required for your setup. Tap Next at the bottom to complete the change.
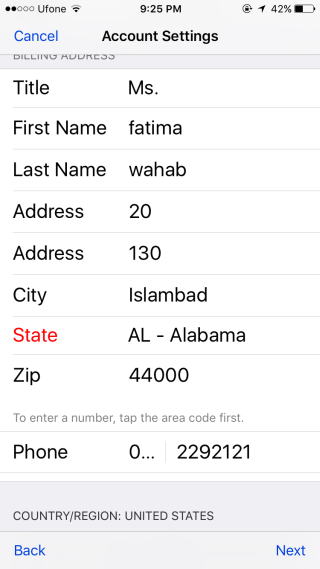
That’s all it takes to change Apple ID country settings on an iPhone or iPad. Apple may require a valid payment method accepted in the new country or region, along with a billing address there. According to Apple’s official support documentation, if you would prefer not to add a payment method at all, the recommended alternative is to create a new Apple Account when you are physically in the new country or region, rather than changing your existing one.
Of course if you don’t have a credit card that works in that particular region, you’re not going to be buying apps or making in-app purchases in said store. If all you want is to download free apps, it’s best to create a new Apple ID for the country store you want to use.
How to change Apple ID country on Mac, Windows, or the web
If you are not on an iPhone or iPad, you can still change Apple ID country or region settings from a computer or browser. The steps vary slightly depending on your platform, but the overall process is the same — sign in, locate the Country/Region setting, and follow the prompts to complete the switch.
Mac
You can change your Apple ID country on a Mac using the Apple Music app, the Apple TV app, or the App Store. Here is the full click path:
- Open the Apple Music or Apple TV app. Alternatively, open the App Store, click your name or avatar at the bottom of the sidebar, then click View My Account and skip to step 4.
- In the menu bar, click Account, then select Account Settings.
- Sign in with your Apple ID if prompted.
- Scroll to the Country/Region section and click Change Country or Region.
- Select your new country or region from the list.
- Review and agree to the Terms & Conditions.
- Enter a valid payment method accepted in the new country or region, along with your new billing address, then click Next.
Knowing how to change Apple ID country from a Mac is especially useful if you prefer managing your account settings from a desktop environment.
Windows
Open the Apple Music or Apple TV app on your Windows PC and follow these steps:
- Click your account name at the bottom of the sidebar.
- Select View My Account.
- Sign in with your Apple ID if prompted.
- Click Change Country or Region.
- Select your new country or region from the list.
- Review and agree to the Terms & Conditions.
- Enter your new billing information and billing address, then click Next.
Web
Sign in to account.apple.com in any browser and follow these steps:
- Click Personal Information.
- Under the Country/Region section, click Country/Region to edit it.
- Select your new country or region from the list.
- Review and agree to the Terms & Conditions.
- Enter a valid payment method and billing address for the new region, then click Continue.
This web-based method is a convenient way to change Apple ID country settings without needing any dedicated app installed.
Regardless of which platform you use to change Apple ID country settings, the end result is the same — your account will be associated with the new regional store and you will have access to its full catalog of apps, media, and services.
Before you attempt the switch, make sure you have cleared any blockers — such as a remaining store balance, active subscriptions, pending rentals or pre-orders, and any Family Sharing issues — since these will prevent the change from going through.
If you can’t change your Apple ID country or region
If the option to change your country or region is missing, grayed out, or the process fails partway through, one or more of the following blockers is likely the cause. Here is what each one means and how to fix it.
You have a remaining Apple Account balance
Apple requires your store credit balance to be exactly zero before you can switch regions. Open the App Store, tap or click your account, and check your current balance. Spend it down on apps, in-app purchases, or media before attempting the region change again.
If your remaining balance is too small to spend — for example, it is less than the lowest-priced item in the store — you will not be able to zero it out on your own. In that case, contact Apple Support directly and ask them to clear the residual balance for you before you proceed.
You have active subscriptions
Any active subscription tied to your Apple ID must be cancelled before you can switch regions. Go to Settings > [your name] > Subscriptions on iPhone or iPad (or the equivalent in your Apple account settings on other platforms), cancel each active subscription, and then wait for the current billing period to expire. Once all subscriptions have lapsed, try the region change again.
You have memberships, pre-orders, movie rentals, Season Passes, or pending refunds
Apple blocks region changes when any of the following are still active or in progress: channel memberships, app pre-orders, movie rentals currently in the rental window, Season Passes with unreleased episodes, or store-credit refunds that have not yet been issued. You need to wait for each of these to fully complete or expire before the region change option becomes available.
For pre-orders, you can cancel them directly in the App Store or iTunes Store before they charge. For rentals, you will need to wait out the rental period. For pending refunds, allow Apple time to process the credit before attempting to switch.
You are a Family Sharing organizer or member
If you are the organizer of a Family Sharing group, Apple may block the region change until your family group situation is resolved. You will need to either stop Family Sharing entirely — which removes all members from the group — or transfer the organizer role if that option is available for your setup.
If you are a member of someone else’s family group rather than the organizer, you may need to leave that group first. After resolving the Family Sharing status, try the region change again.
If you have worked through all of the above blockers and the option still does not appear or the process continues to fail, contact Apple Support. They can review your account for any additional holds and assist you in completing the switch. Understanding how to change Apple ID country settings and what can block the process will help you resolve issues quickly and get your account moved to the new region without unnecessary delays.

awesome