GeekTool Is A Great Rainmeter Alternative To Customize Your Mac Desktop [Guide]
If you have been into desktop customization, chances are you’re familiar with Rainmeter – the robust Windows tool that lets you customize your desktop beyond recognition. For those looking for something similar for Mac, GeekTool is quite an astounding option that allows for adding easily configurable widgets to your Mac desktop. It really brings you close to the true power of the underlying UNIX architecture of the OS X. In what follows, we’ll show you how you can use the tool to add a lot of useful information to your Mac’s desktop.
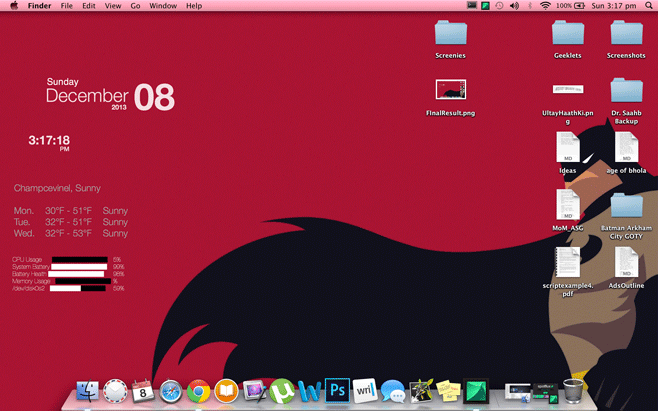
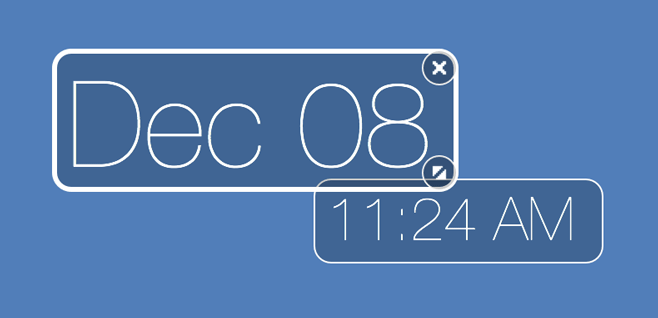
We could talk for days about the prowess and customization capabilities of GeekTool, but we’d rather first show what sorts of results you’ll be looking at:
The biggest advantage GeekTool offers over other similar tools is its passive nature; the desktop will still be usable real estate, in that you can place icons over any active scripts or Geeklets (like widgets), and interact with the desktop as you normally would.
Configuring GeekTool might seem like a difficult undertaking, since it requires a little scripting, but novices needn’t be afraid; GeekTool looks more complicated than it really is, and bridging the gap between Novice and Geek is exactly why we’re here. The only skill you’ll need is the ability to copy & paste scripts, as we’ll guide you step-by-step on how to turn that empty screen real-estate into a beautifully functional stats dashboard. For those who have used Android, it functions like having a live wallpaper.
The setup you see in the screenshots above utilizes only two scripts: date and time. In addition, you can also download Geeklets for weather forecasts, stocks, Social streaming and more.
Getting Started
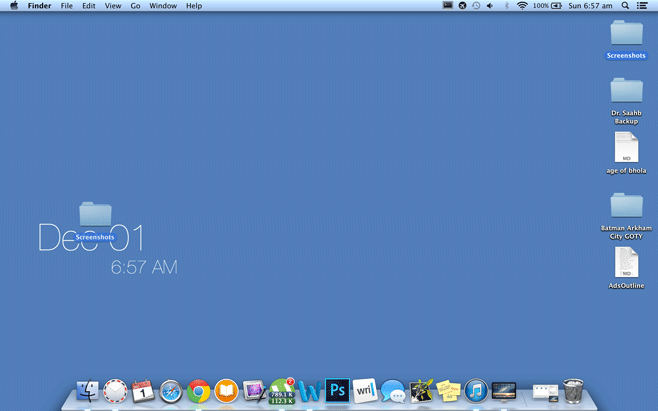
Before we get started, you might want to select a wallpaper with a solid color so you can get a better look at what is going on.
The first thing you’ll want to do is grab GeekTool from the link provided at the end of this post. It used to be available at the Mac App store, but seems to have been taken down from there. That does not matter, though; it is a free download and only takes a minute to install.
If you are using Snow Leopard or an earlier version of Mac, the tool will show up in the System Preferences. If you are using Mavericks, it will function as any other standalone app. After you have downloaded it, launch GeekTool.
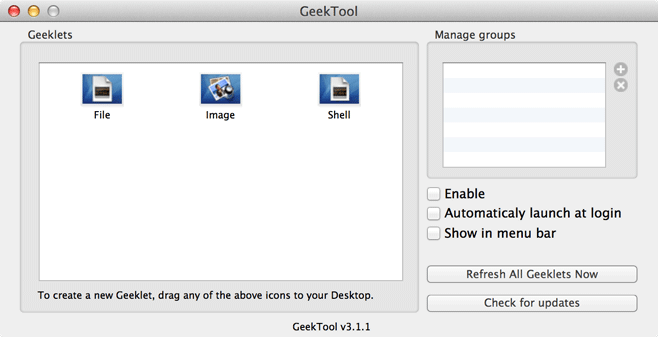
On the left side of the main window, you will see three icons or Geeklets that can be installed: File, Image and Shell. You can also get more Geeklets, but we’ll get to that later. For now, we will be focusing on the Shell option, given that it is simultaneously the most powerful as well as the most complicated of the lot.
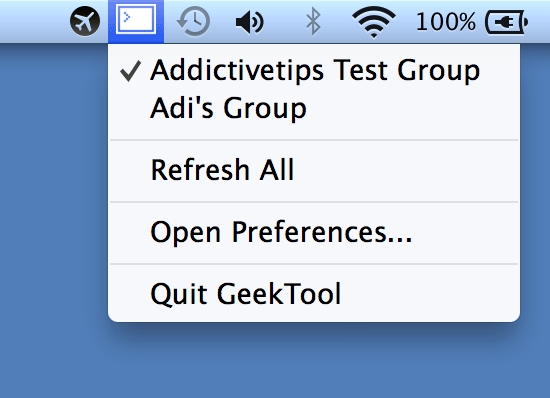
On the right side of the main window, you have Groups. Whenever you have a setup that best suits your preferences, be it a single customized Geeklet or a collection, you can save it all as a group. This way, you can have multiple options to select from. You can have different group for home, work, social media, weather, or any other use case based on your requirements. After the initial configuration, activating a group will be as simple as checking the option from the Groups under the Menu.
How To Set Up GeekTool
To create a new Geeklet, click and drag an icon out onto the desktop. As mentioned earlier, we will opt for a Shell Geeklet. As soon as you drop the icon, you will be shown a transparent empty box and a Geeklet properties window. After you release the icon on your desktop, an empty box should appear, and the Geeklet properties window should come alive with various options for customizing the Geeklet to your heart’s content. This transparent window is where the Geeklet will appear on your desktop. Once you’ve configured it, you can move it around to suit your needs.
The properties window is categorized in 5 sections under Properties (name, size, position), Groups, Command, Status Feedback, and Style.
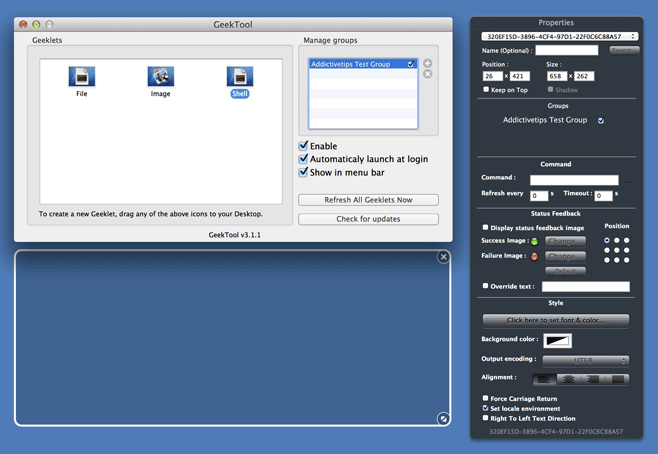
Properties and Group sections are very straightforward; you can give your Geeklet a title, set its size and position, and assign it to one or more groups. Our main focus, however, will be the Command section, where we will input codes for Geeklets. If you hover your mouse in the empty space towards the right of the Command input textbox, you will see three dots. Clicking them will launch a Script Editor for the Geeklet. Here, you can also include the refresh rate (how frequently it updates) and timeout interval for the Geeklet.
The Status Feedback section lets you put an image on your Geeklet to indicate if it is properly working or not. By default, it will show a green icon for successful execution and a red for failure, indicating something wrong with the Geeklet’s settings or the script you’ve used. You can also use indicator images of your choice, and use the grid next to these options to choose where the indicator appears.
Example: Creating Date & Time Geeklets
All of the above will fall into place and immediately start making sense just as soon as you run through an example. Let us go through a list of fairly basic commands that will allow you to create a simple time and date setup. All these have to be entered in the Command field.
date +%A
Result: Long Day of the week (Friday)
date +%a
Result: Short Day of the week (Fri)
date +%B
Result: Long Month (August)
date +%b
Result: Short Month (Aug)
date +%D
Result: Full Date (10/23/13)
date +%d
Result: Short date (23)
cal
Result: Basic Calendar
Often, you don’t need a separate Geeklet for each of these, and in such cases, you can simple combine the above codes to get a much wider range of options. For example:
date +"%b %d"
Result: Short month and date

date +"%l:%M %p"
Result: Current time

So, by combining multiple parameters, you can create the exact string of your choice. You can also move the boxes around for your aesthetic pleasure.
Summary
To sum up the seemingly convoluted process:
- Just drag out a Geeklet
- Paste the desired code in the command section
- Adjust its location according to your choice, and enjoy.
Needless to say, a Geeklet’s text should be visible on your background. The text’s color, font and size can all be adjusted under the Style section.
What Else Can You Do With GeekTool?
The aforementioned commands were just a few simple examples of starting off with GeekTool; there’s a lot more you can do with it, using other available commands. For those of us unfamiliar with or intimidated by the idea of writing their own scripts, there is a plethora of GeekTool scripts available online. For most of them, you just need to copy and paste their code into the aforementioned Command section of a Geeklet enjoy. A majority of these scripts are fairly simple to use and once you get the hang of those, you can eventually get used to the difficult ones as well.
In addition to scripts, you can also find more Geeklets online as well. Most of these are self-configuring; you just have to decide where you want to place them on your desktop. Some are more complex but almost every Geeklet comes with a configuration guide to help you with setting it up.
Be sure to share screenshots of your customization experience with us in the comments below.

Awkward, Why would you reply the answer to your own comment
What’s the font, i can’t find it?
Helvetica Neue Ultra Light
heii
Whats that font?
Looks like Helvetica Neue Ultra Light to me.
did u just commented to yourself
oh he sure did.
capitals