How To Customise the Arctic Zephyr Skin For Kodi
The default look on version 17, aka Krypton, is a simple black and blue theme which is clear and easy to navigate. And some people still use the older version of the software, version 16 aka Jarvis, which has a different theme with a large menu bar at the bottom and black and grey colours. But did you know that it’s possible to change the look of Kodi?
If you fancy a new look for your Kodi system, it’s very easy to achieve this by installing and using a new skin. A skin is just a package of colours, fonts, and images which dictate how Kodi should appear, but it can radically change the experience of using the software.
One of our favourite skins for Kodi is called Arctic Zephyr. It has a very clean, elegant look and it uses a lot of white and grey shades. It’s great if you want a more modern look for your Kodi system. There are also a ton of customisation options available so that you can tweak the skin to your liking. In this post we’ll show you how to install and customise the Arctic Zephyr skin for Kodi so you can enjoy a new look for your software.
Before we proceed
We’ll get into the details of installing and using the Arctic Zephyr skin in a second, but before that it’s useful to reiterate some security issues around Kodi. While the Kodi software itself is fully legal, as are skins like Arctic Zephyr, many of the add-ons which are available for Kodi are created by third party developers and some exist in a legal grey area. If you’re going to use add-ons for Kodi, especially those which allow you to stream copyrighted content, then you need to protect yourself from legal problems.
We recommend using a VPN for Kodi if you’re streaming content, as a VPN will encrypt your data before sending it over the internet. This means that no one can see what sites you are visiting or whether you have been streaming. It’s good practice to use a VPN to keep yourself secure when you’re streaming.
IPVanish – best VPN for Kodi

The VPN provider than we recommend for Kodi users is IPVanish. They have blazing fast connections which are perfect for media centres, and a large network of 850 servers in 60 different countries. The security is excellent, with strong 256-bit encryption and a no logging policy. The software is available for Windows, Mac, iOS, and Android.
IPVanish offers a 7-day money back guarantee which means you have a week to test it risk-free. Please note that Addictive Tips readers can save a massive 60% here on the IPVanish annual plan, taking the monthly price down to only $4.87/mo.
Once you have a VPN sorted and protecting you, you can move on to installing and tweaking a new skin for your Kodi system.
How To Install The Arctic Zephyr Skin
Installing new skins is actually very easy as it can be done within Kodi settings. You just need to navigate through the menus to the skin section and you can install new skins from there. Here are step by step instructions:
- Start on your Kodi home page
- Go to Settings (it’s the icon that looks like a gear)
- Go to Interface settings
- Select Skin from the menu on the left
- Find the entry for Skin in the box on the right
- Click on Skin and a popup will appear showing all of your currently installed skins
- Now click on the Get more… button on the right
- You’ll see a list of skins. Select Arctic Zephyr and it will start to install
- Wait a minute until the installation is complete
- Confirm that you want to keep the change

- Now your Kodi will have the Arctic Zephyr skin and you can enjoy your new look

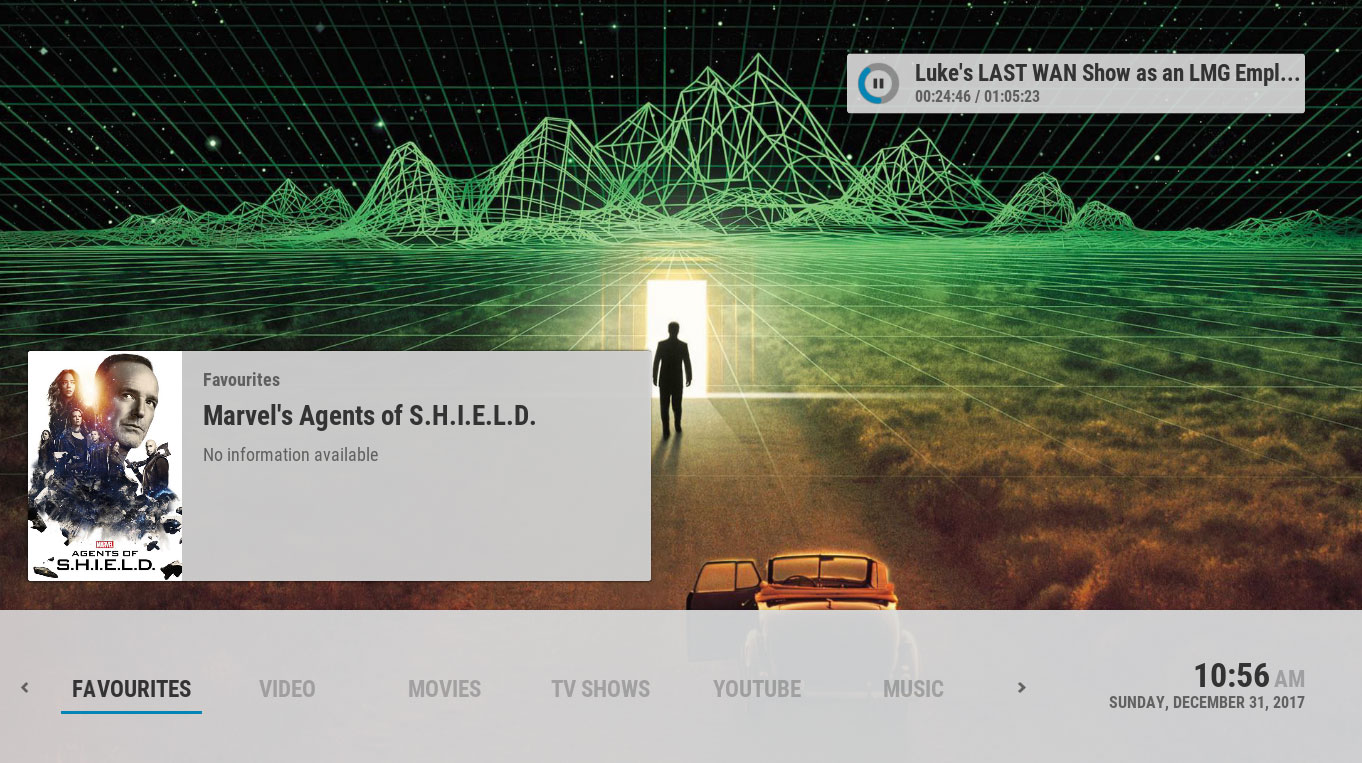
When you go back to your Kodi home screen, you’ll see that you now have a white theme with a slim menu bar at the bottom and rotating images in the background. You can navigate through the menu at the bottom with the left and right keys, and the time and date are shown in the bottom right. The information about the currently playing media is shown in the top right of the screen, along with a small round icon to show how far you are through the current item.
One thing to note about using the Arctic Zephyr skin is that it is not designed to be used with a mouse. If you try to control Kodi using a mouse in this skin it will sometimes work, but some menus will not function correctly. Because of this, the cursor appears as a large and ugly red warning box when you try to use the mouse on this skin. Though it’s understandable that the skin doesn’t support mouse use, it would be preferable if the warning box were removable. However, this shouldn’t be a problem as it’s rare to use a mouse for Kodi anyway. It’s much easier to use a keyboard or remote control program to control Kodi, as this is what it was designed for.
How To Customise The Arctic Zephyr Skin
Once you have the skin installed, you can start to customise it to get the look and functions that you want.
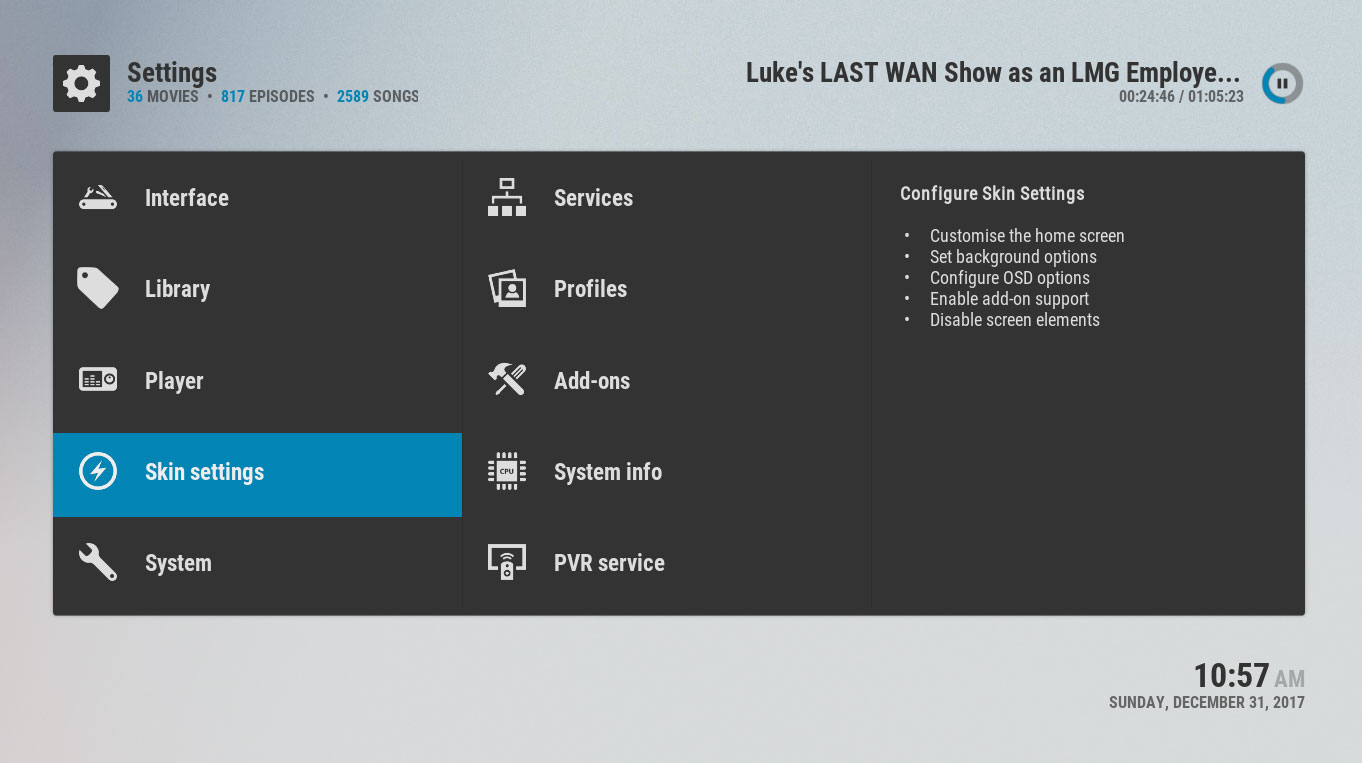
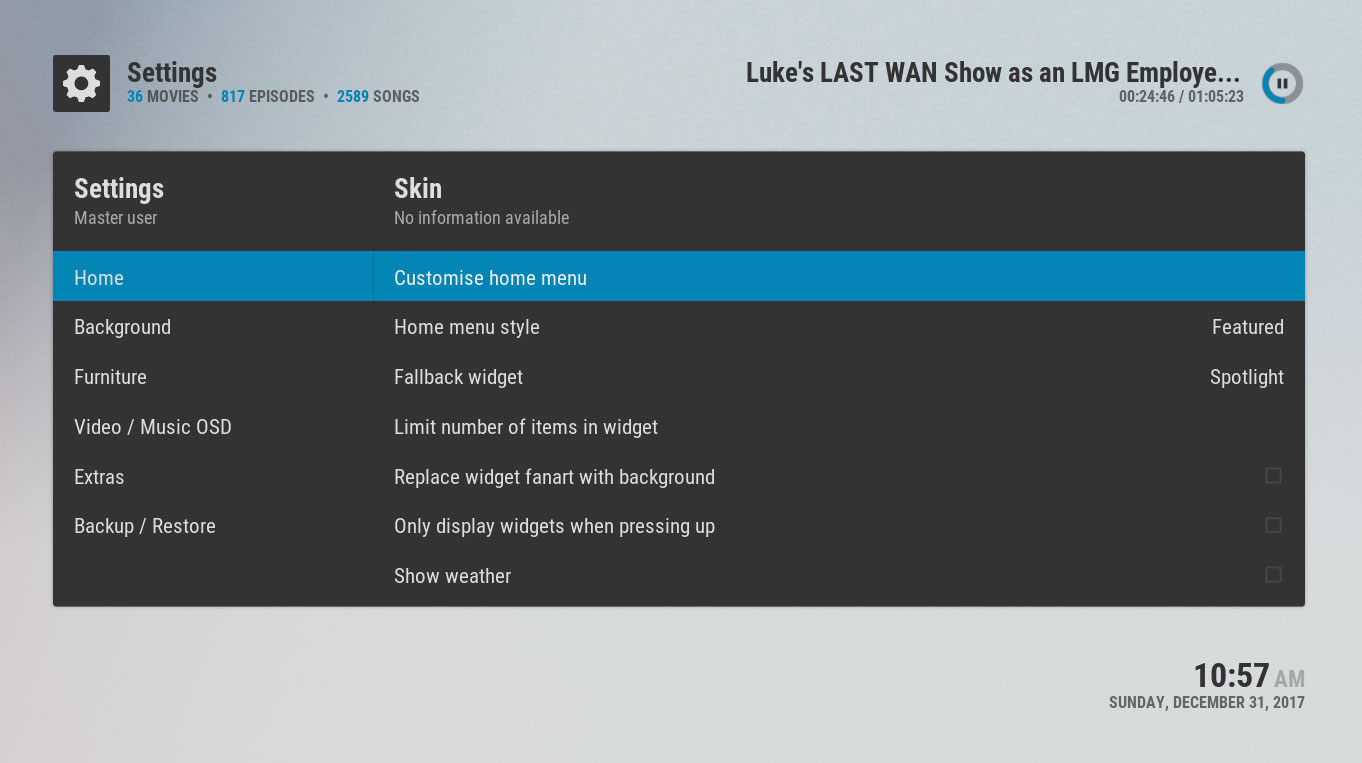
To begin customising, go to Settings and then to Skin settings. This will open up the settings panel for the skin, which is the main place you will use to make changes to the skin. Select Home from the menu on the left and then click on Customise home menu.
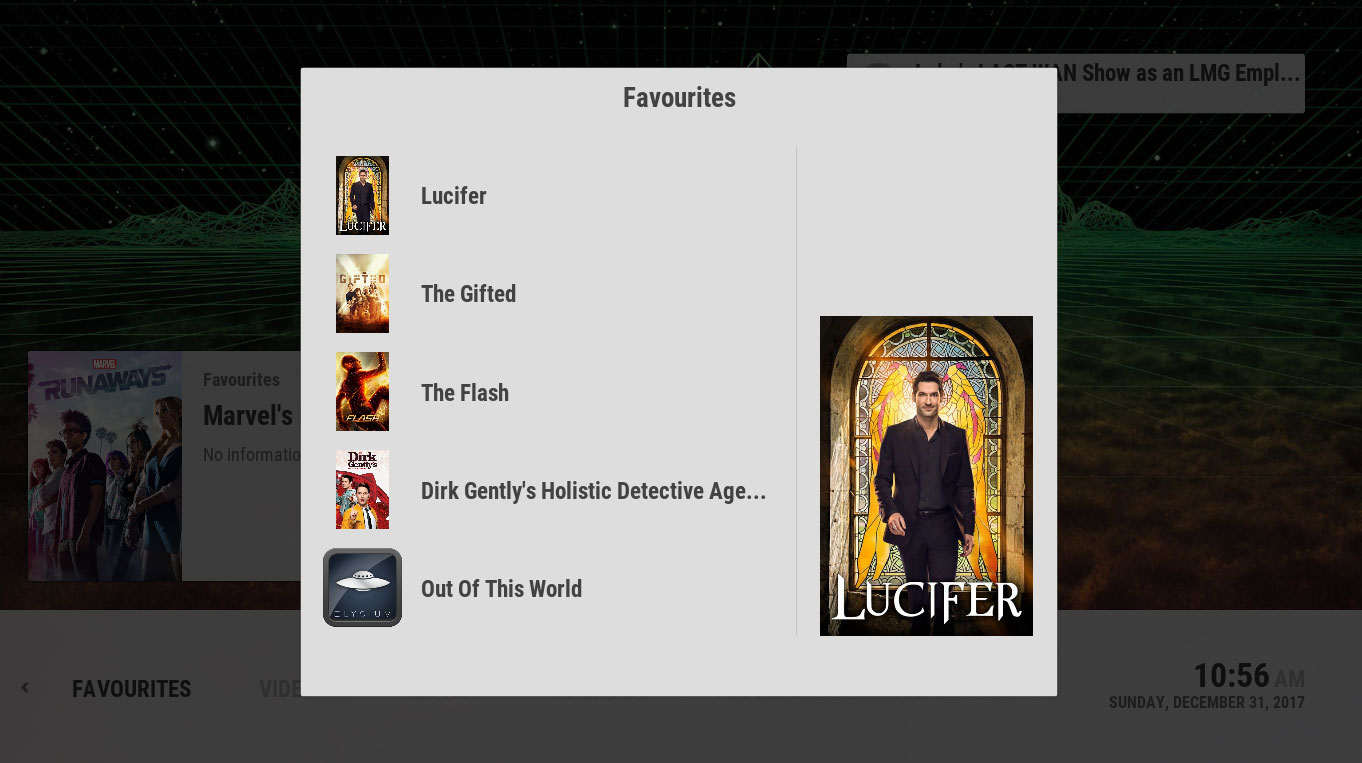
The Customize Main Menu window is where you can change what appears on the main menu at the bottom of your home screen. For example, you might want to add a menu item for Favourites, so that you can quickly access your favourite items.
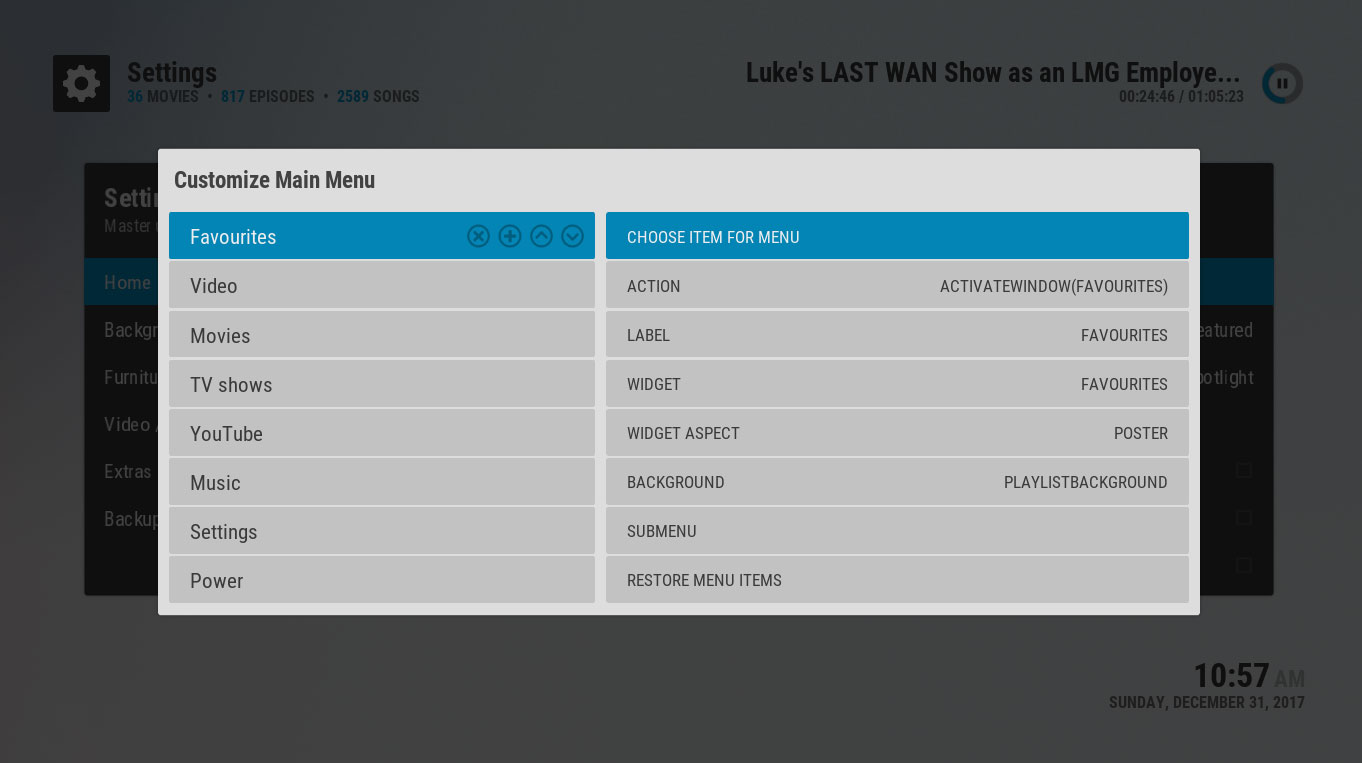
To add an item, move the highlight until the icon of a cross in a circle goes white. Click this to add a new menu item. Now move to the right to choose the options for this new item you just created. The easiest way to change this is to go down to the ACTION setting. Click this and select what you want to happen when you click on this item. In this case, we’ll go to Common, then to Favourites at the bottom of the menu and select it. We’ll also change the name of the item by changing the text in the LABEL section. Once this is done, use the back key to go home.
Now when you look at the menu on your home page, you’ll see an item for Favourites and if you click it it will bring up a popup of your favourites.
You can change other things in the Customize Main Menu window too. If you choose the SUBMENU option, then you can add items which scroll out of the bottom of your main menu items when you press the down key. Another very neat thing to change is the WIDGET option. This affects what you see in the background of the screen when you hover over a menu item.
You can also choose a widget option, for example by going to Video Library and then to Movies, then select Use a widget. Once you have done this, in the background of the item you’ve chosen you’ll see a slideshow of items from your movie collection. If there’s a movie which catches your eye while you’re on the home screen, you can press the up key to select the movie, and then the enter button to play the movie straight away.
Using this Customize Main Menu window to change all of your home screen options. Another thing you can change in the previous menu is the Furniture options. Here you can turn on and off items like the clock, weather, header, and media flags. Finally, one option lets you change the colour of the highlights, which are blue by default in the skin. To do this, select the Extras option and then go to Select highlight color. Click on this and you’ll see a window full of colour options that you can choose from to style the skin in whatever colour you like.
Conclusion
It’s easy to change the look and feel of your Kodi system using skins. While you’ll find some skins already available in Kodi by default, you can find even more variety by using the Get More button in the skin section to download new skins.
The Arctic Zephyr skin is one of our favourites thanks to its clean look and endless customisation options. We’ve shown you how to install the skin and how to customise it so that you can make your Kodi system look exactly the way that you want it.
What’s your favourite skin for Kodi? Do you like the Arctic Zephyr look, or is there another skin which you prefer? Let us know what you think in the comments below!
Don't miss this great deal
