The Durex Build For Kodi – Installation And Guided Tour
Kodi builds are a great way of loading your Kodi installation will tons of excellent add-ons in one single installation. Most builds also feature an improved user interface that makes accessing various content easier. The Durex build has all that and more. It also lets you easily access the Durex TV service. More about this later.
In this article, we’ll give you detailed step-by-step instructions on how to install the Durex build on Kodi. All the required steps will be thoroughly covered. Then, once we have the build installed, we’ll proceed to give you sort of a guided tour of the build’s best features. The build has a lot of content, we might not have the chance to go over every single feature but we’ll make sure we cover the essential and give you enough information to find your way around the build’s user interface.
For Better Privacy While Using Kodi, Use A VPN
You probably want to keep what you’re doing to yourself, avoid the scrutiny of an overzealous Internet Service Provider, or improve your level of online privacy and security. Then, you need to use a VPN. When an ISP suspects someone might be violating their terms and conditions, they often react by sending them infringement notices, throttling down their speed, or even interrupting their service. Don’t we all want to avoid that?
Virtual Private Networks protect your privacy by encrypting all data in and out of your computer using strong algorithms that make it virtually–no pun intended–impossible to crack. No one, not even your ISP or the best of hackers, will be able to know where you’re going or what you’re doing online. If they were to intercept your data all they would see would be meaningless gibberish with no way of knowing what you’re doing or where you’re going online. As a bonus, using appropriately located servers lets you use a VPN to bypass most–if not all–geographic restrictions.
Considering the vast number of VPN providers to choose from, picking the right one can turn out to be a daunting task. There are several factors one should consider. Among the most important, a fast connection speed will reduce buffering, a no-logging policy will further protect your privacy, no usage restrictions will let you access any content at full speed and software for multiple platforms will ensure the VPN works on any of your devices.
The Best VPN For Kodi: IPVanish

At addictivetips.com, we’ve tested many popular VPN providers–perhaps all of them–and our top pick for Kodi users, the one we’d recommend with no hesitation is called IPVanish. With hundreds of servers worldwide, no speed cap or throttling, unlimited bandwidth, unrestricted traffic, a strict no-logging policy and client software available for many platforms, IPVanish truly delivers the best in performance and value.
IPVanish offers a 7-day money back guarantee which means you have a week to test it risk-free. Please note that Addictive Tips readers can save a massive 60% here on the IPVanish annual plan, taking the monthly price down to only $4.87/mo.
Durex Build Installation
Installing a build on Kodi is not much different from installing an add-on. It usually takes a tad longer as the build will normally include dozens of add-ons but the steps are similar. After enabling unknown sources, we will add the installation source to the Kodi File manager. We will then proceed to install the Durex Wizard. This is a necessary step as the Durex build installs from the Wizard. Once the Wizard is installed, we’ll go on with the actual build installation.
Whether you’re a seasoned Kodi user or a complete newcomer, our detailed step-by-step instructions will ensure the process is smooth and easy. You’ll be up-and-running with the Durex build in just a few minutes and with little effort.
Enabling Unknown Sources
Before we can install any third-party add-on, repository, build, or pretty much anything on Kodi, we first need to enable Unknown sources. Here’s how it’s done.
From the Kodi home screen, click the Settings icon (It’s the little gear icon at the top left), Then, from the Settings screen, click System settings. Click Add-ons in the left pane and make sure that the switch next to Unknown Sources is on. It should be white instead of gray.
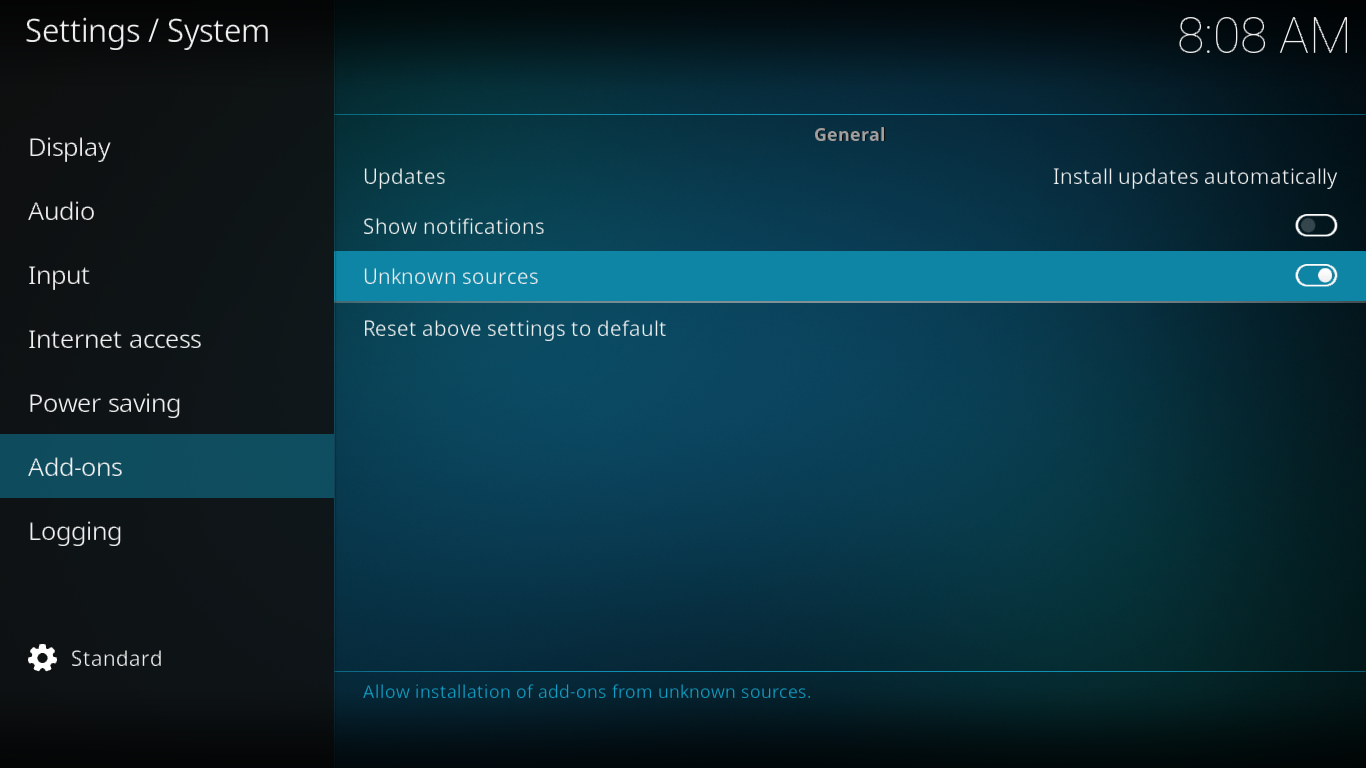
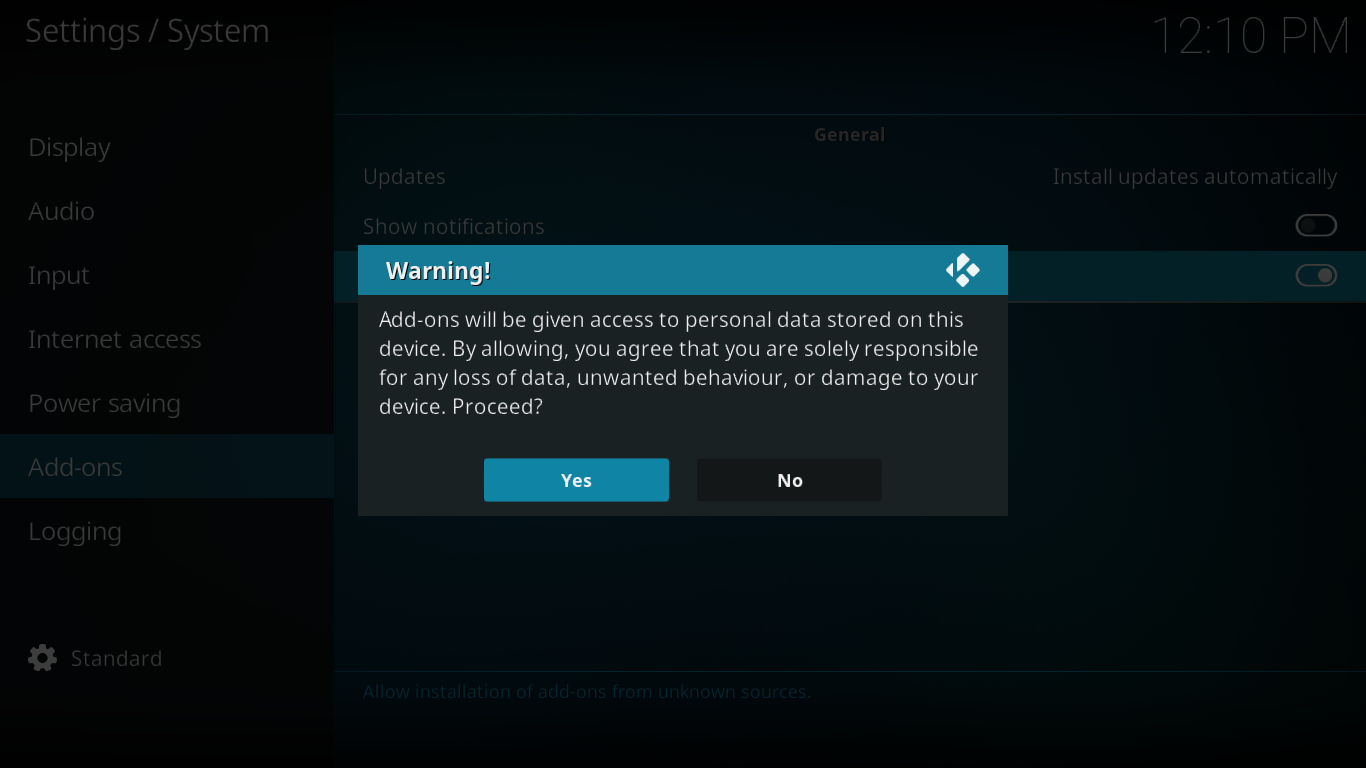
In the switch is off, click it to enable Unknown sources. When you click it, a warning message will pop up. Read it and click Yes to close the message box.
Adding The Installation Source
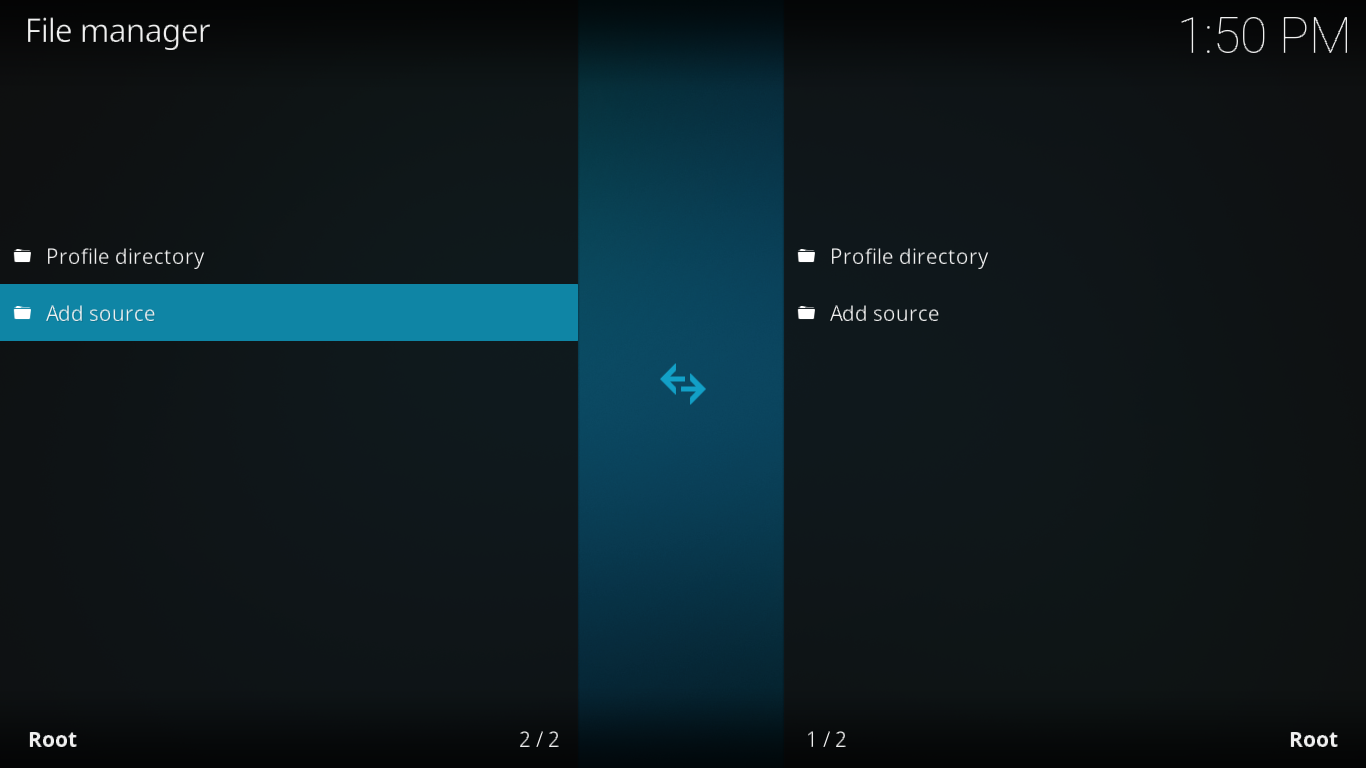
The first real step is to add the installation source path to the Kodi file manager.
From to the Kodi home screen, click the Settings Icon once more. This time, from the Settings screen, click File manager.
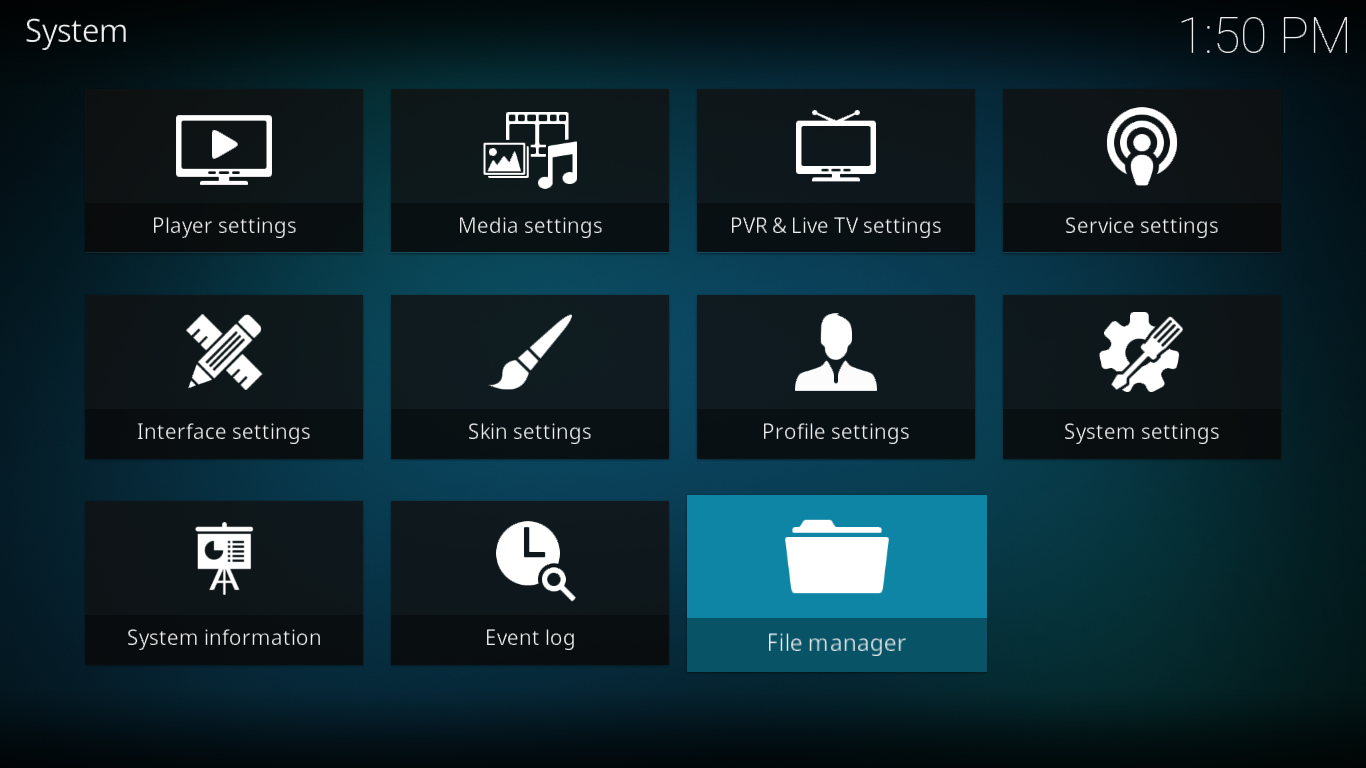
Now, from the File manager screen, double-click Add source on the left side.
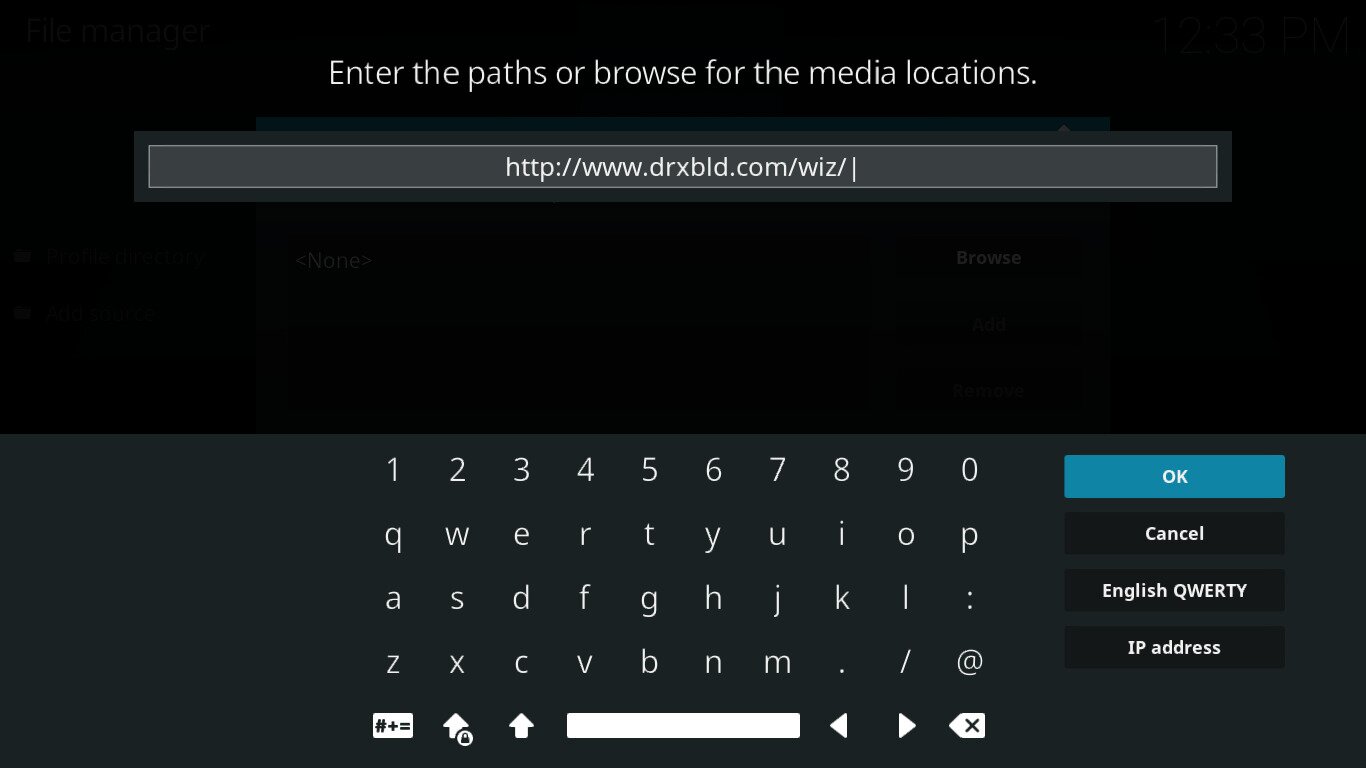
On the next screen, click <None> and enter the installation path exactly as shown: https://www.drxbld.com/wiz/ and then click OK.
Back to the Add file source screen, click the box below “Enter a name for this media source” and replace the current text, wiz, with a more meaningful name. We’ll call it Durex but feel free to call it whatever you want. Just make sure you remember the name as you’ll need it for the next step.
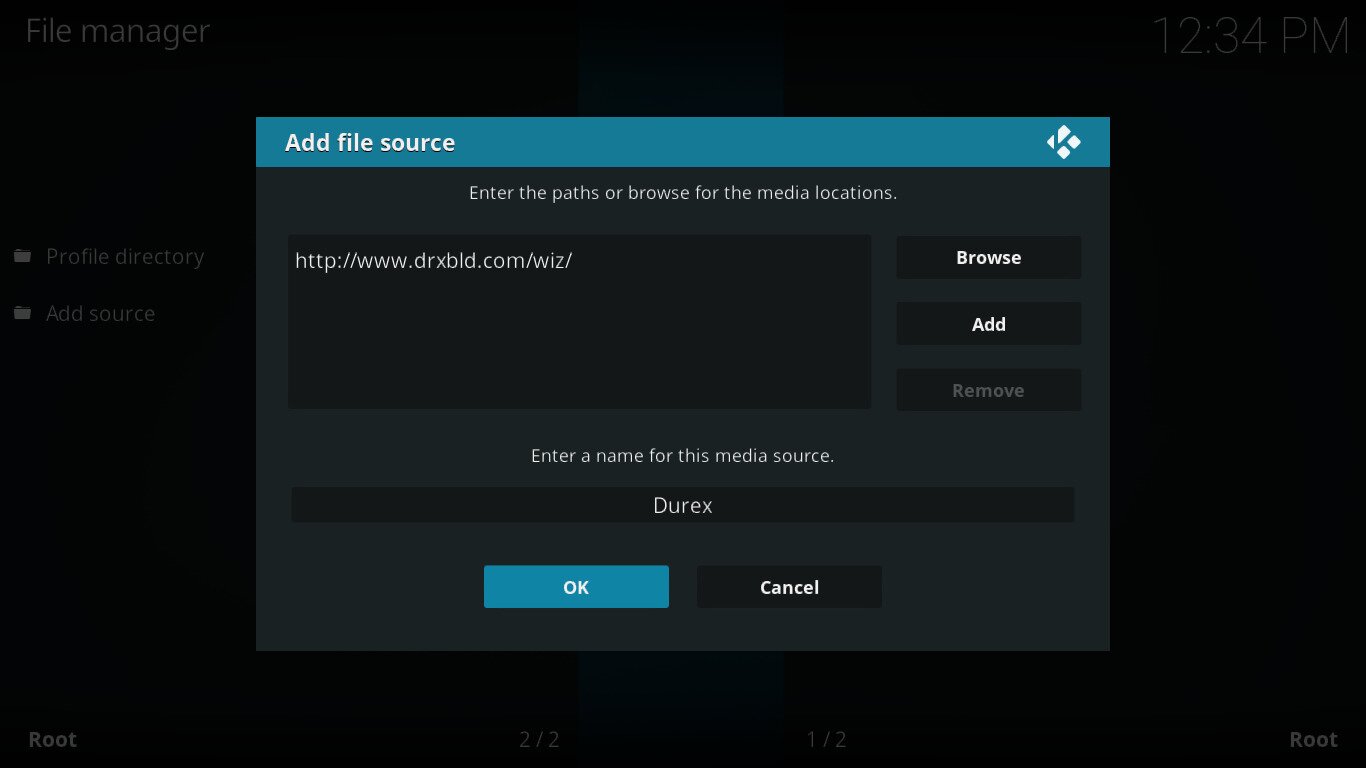
Make sure everything is correct and click OK to save the new media source.
Installing The Durex Wizard
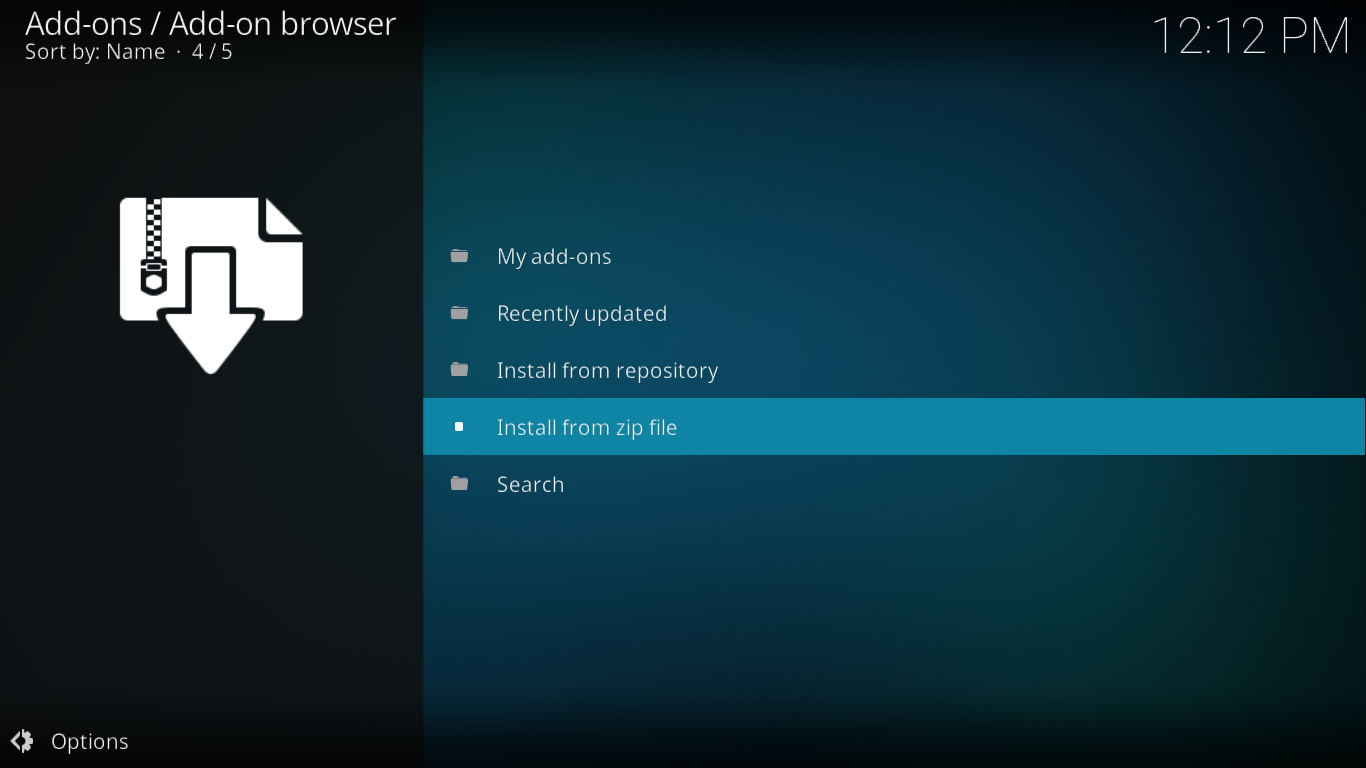
From the Kodi home screen, click Add-ons on the left side menu and then click the add-ons browser icon at the top left of the screen. This is the icon that resembles an open box.
![]()
From the Add-ons browser screen, click install from zip file.
Next, click the Durex source that we just added in the previous step and then, click plugin.program.drxwizard-5.1.zip to launch the installation of the Durex Wizard.

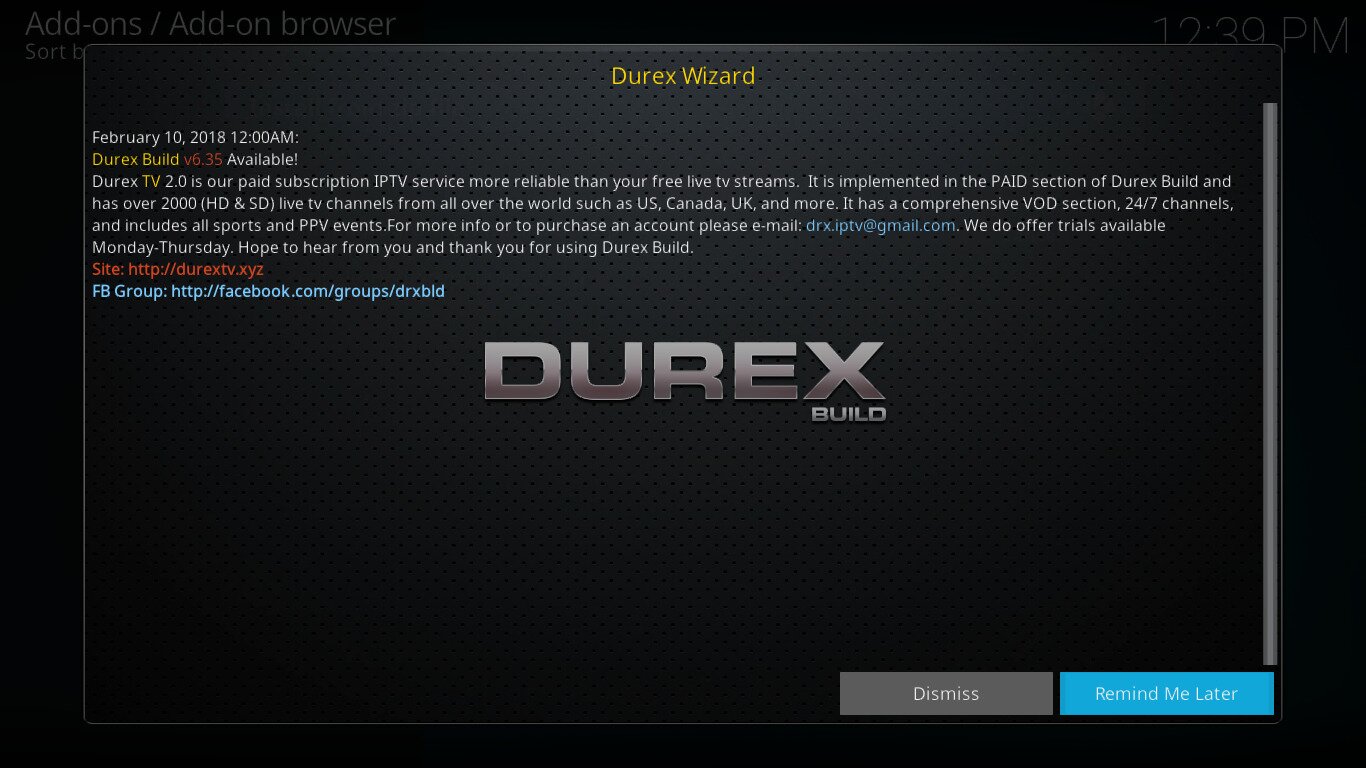
Once the Wizard installation completes, a message will flash briefly at the top right of your screen and some wizard updates will be automatically installed. Once the process completes, the Durex Wizard will start automatically and this screen will be displayed.
Click either button at the bottom right to close that screen. This will bring up the first configuration screen.
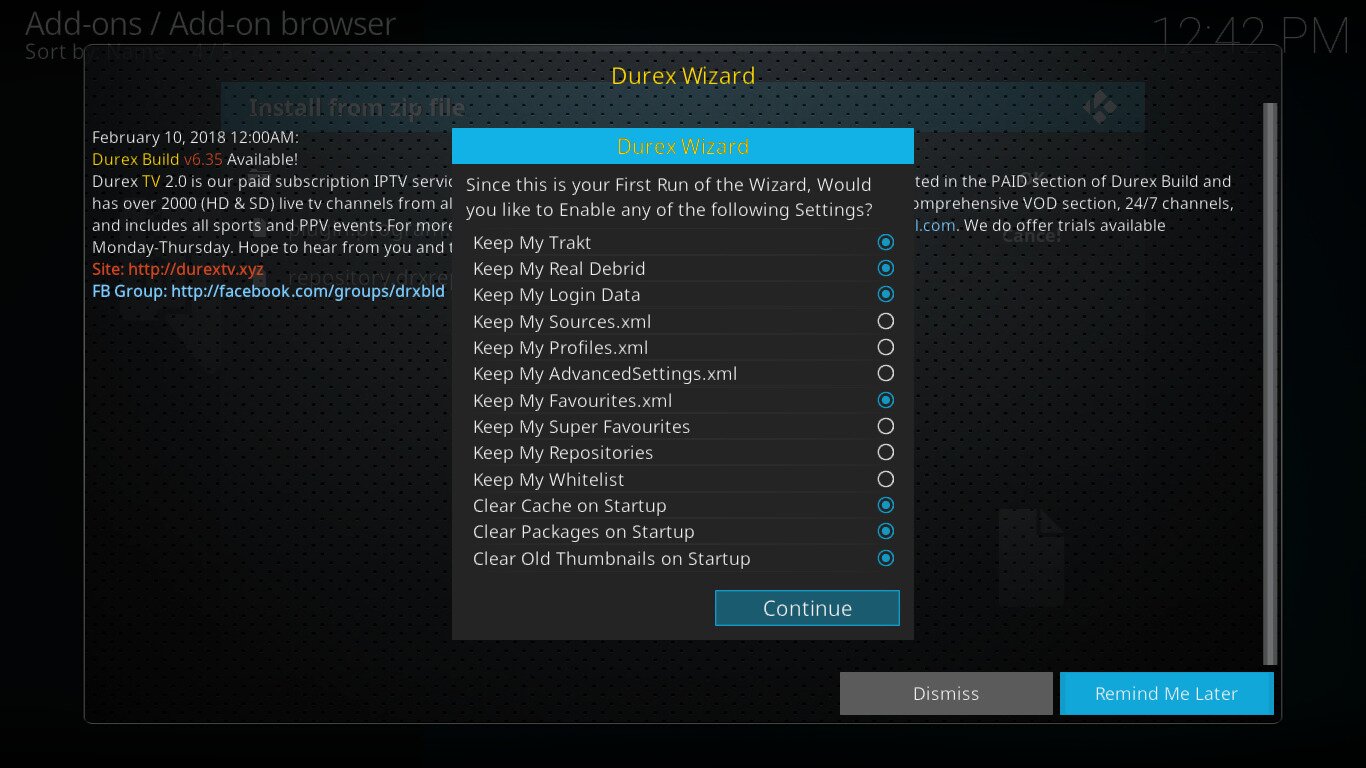
For now, we suggest you leave the settings as is. You can always modify that later if you ever need to. For now, simply click Continue.
Next, you’ll be prompted to go directly to the build menu to install a new build.
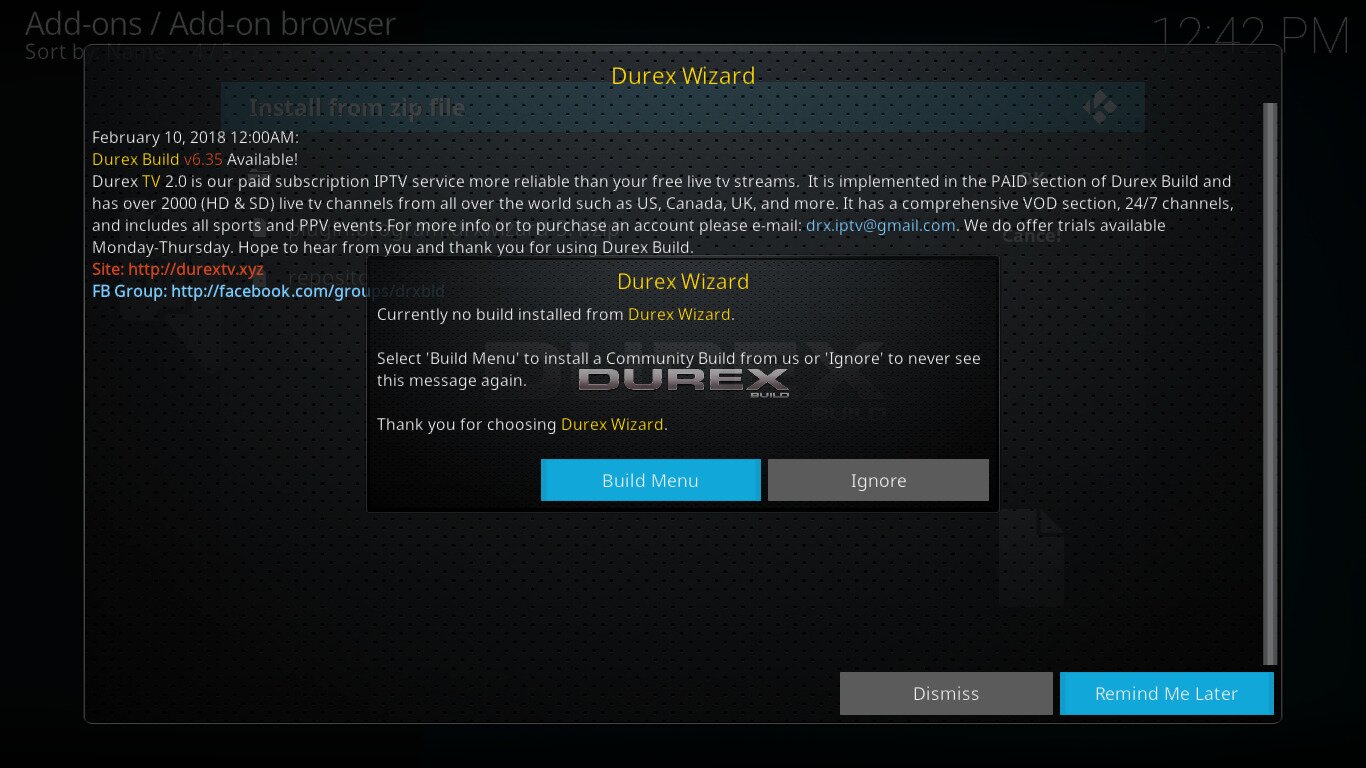
We’ve had some issues with this so, for now, we suggest you simply click Ignore and manually start the Durex Wizard when you get to installing the Durez build.
Installing the Durex Build
With all the preliminary steps behind us, we’re ready to proceed with the actual build installation.
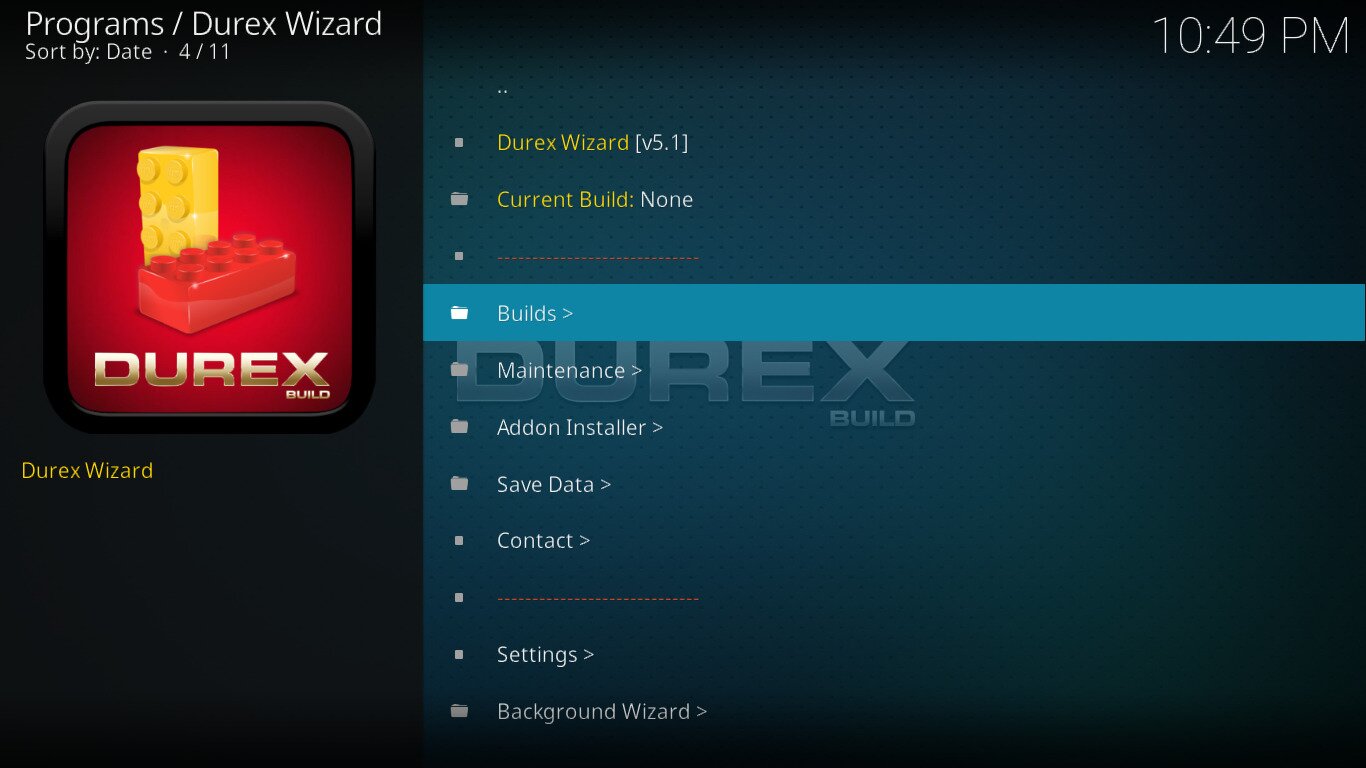
First, start the Durex Wizard. You’ll find it by clicking Add-ons and then Program add-ons from the left-side menu.
Once the wizard starts, click Builds >.
Then, select the proper build for your version of Kodi–Jarvis or Krypton–and click one of the available selections. Each one will install from a different server. If one doesn’t work or seems to slow, try the next one.
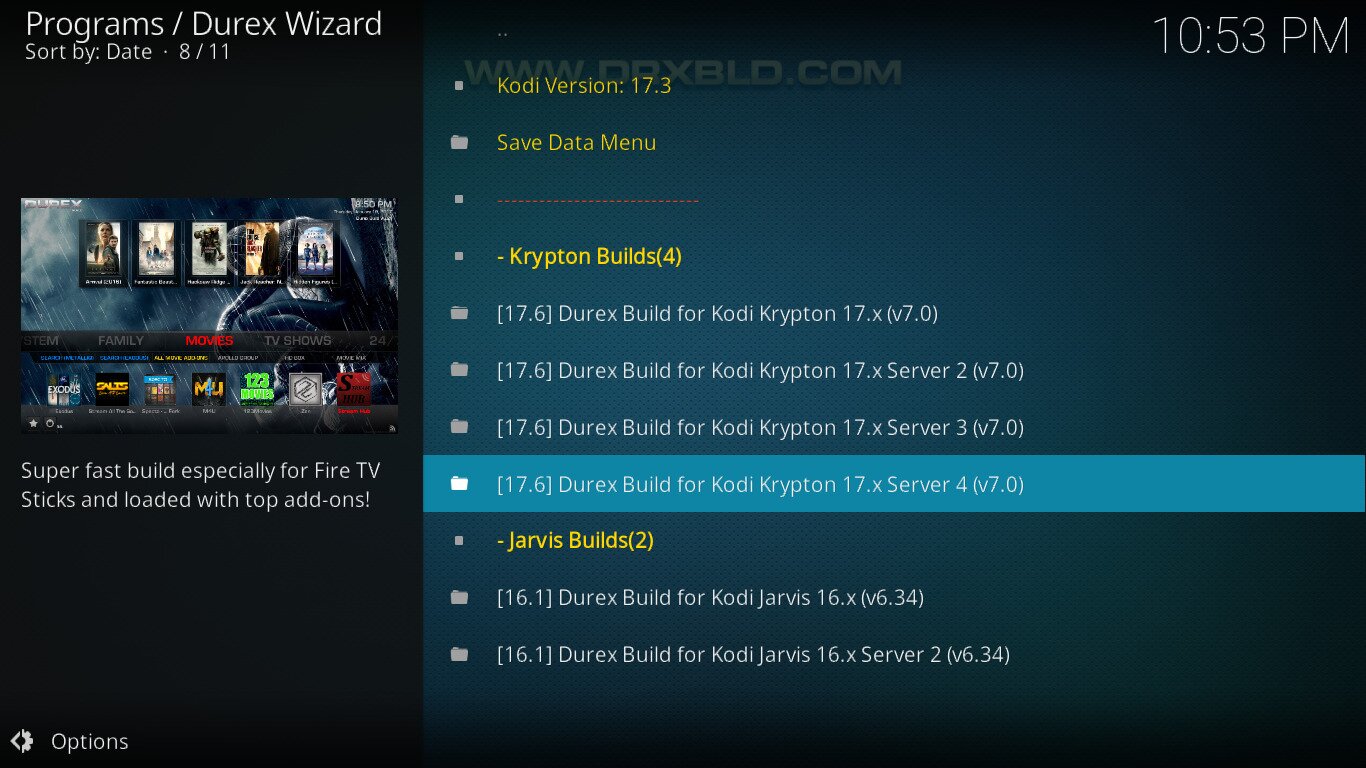
In the image above, we’ve chosen to install the Durex Build for Kodi 17.x from server 4. Click your selection to go to the installation menu.
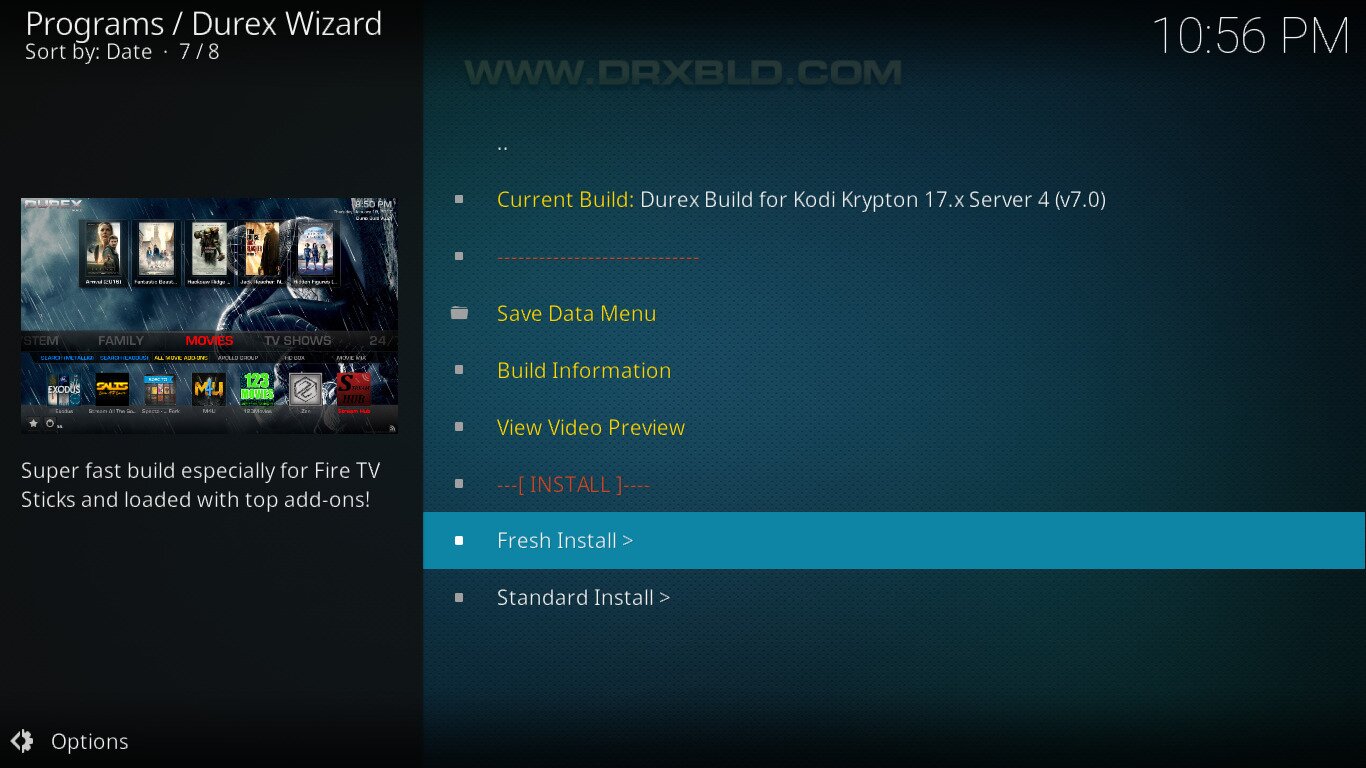
Click either Fresh Install > to wipe your current configuration before installing the Durex build or Standard Install > to keep what you currently have in Kodi.
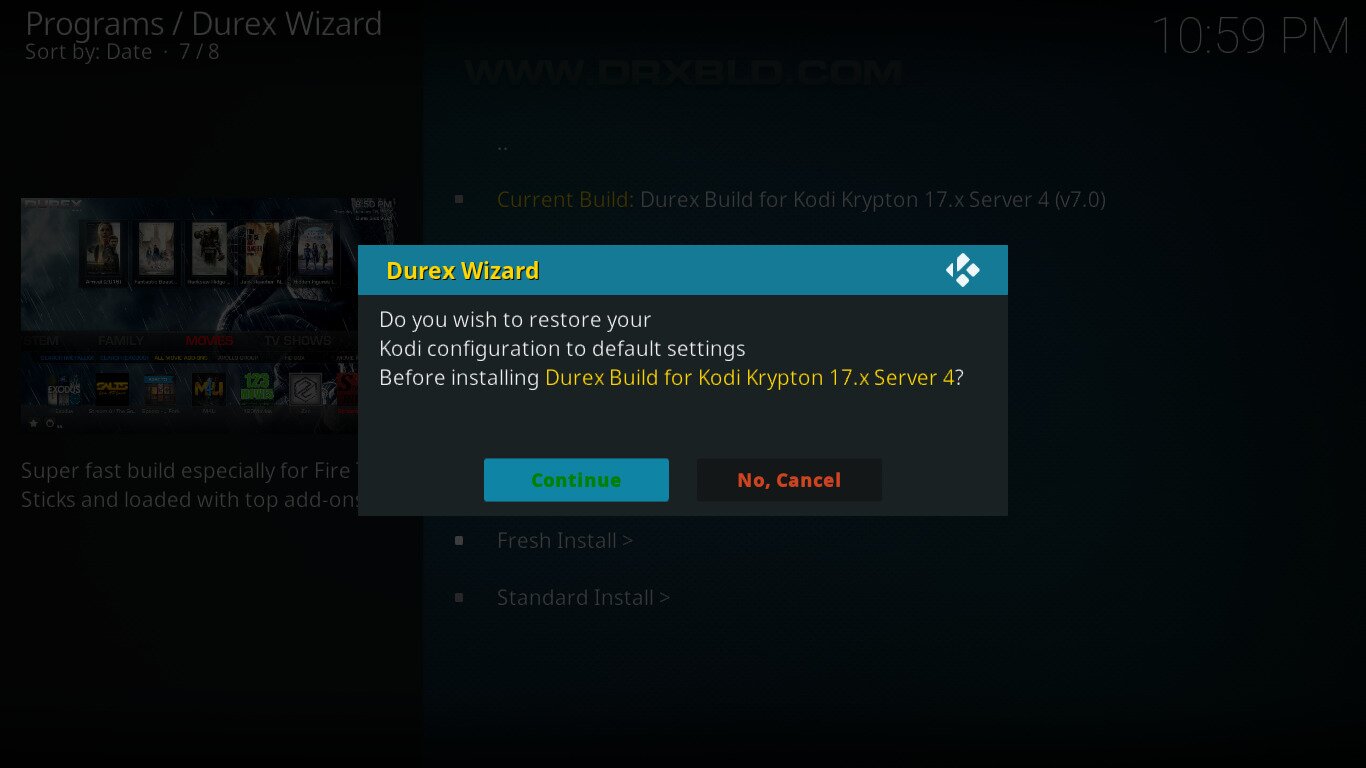
If you’ve clicked Fresh Install > you’ll be prompted to confirm the restoration of Kodi to its default configuration. Just click Continue.
The installation process will quickly be launched and a progress box will be displayed. Let the installation finish. it could take several minutes, depending on the speed of your Internet connection.
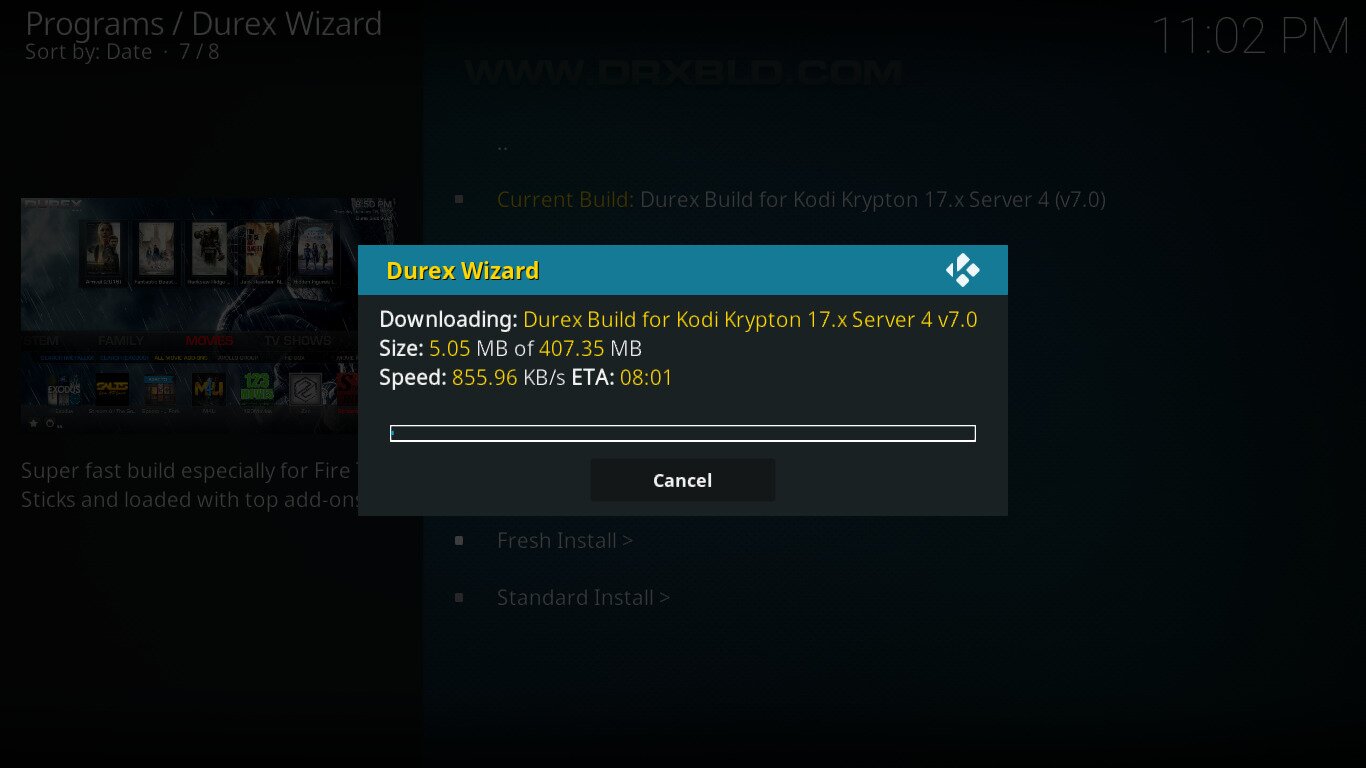
The installation is a two-part process. First, the build will be downloaded and then, it will be installed. When the installation is completed, you’ll be prompted to reload your profile or to force close Kodi.
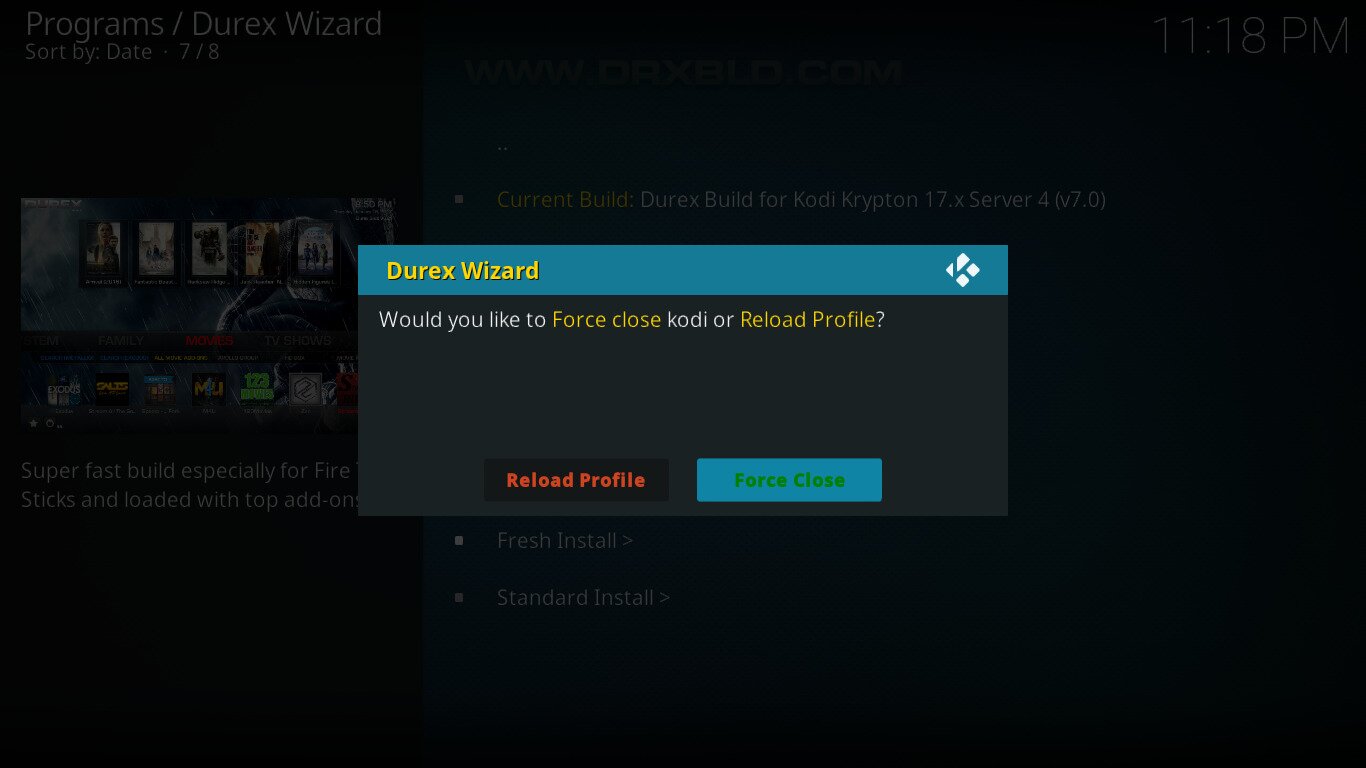
Click Force Close and then manually restart Kodi. After Kodi is restarted, you’ll be in the Durex build.
A Quick Tour Of the Durex Build
If you’re familiar with the Confluence skin that was the default in Kodi 16 Jarvis, you’ll feel right at home in the Durex Build. Its user interface is most likely based on it.
The screen has five parts. At the top are icons for selected content from the current category. Below the icons is the menu ribbon. This is where you select the current category. Just below it, you’ll find a sub-ribbon–I couldn’t think of a better name–where you have sub-options of the current category. Below that, you have icons to quickly access add-ons pertaining to the current category. And finally, the very bottom of the screen displays a ticker of useful information and news about the build.
Durex Build Included Add-ons
There are way too many add-ons included in the Durex build to list them all here. There are 87 video add-ons 18 program add-ons and 17 music add-ons.
Most of the major add-ons are there. We can think of add-ons such as Placenta, Neptune Rising, Elysium, The Pyramid, Death Streams, Deliverance, Sky Net, UK Turk Playlists, Nemesis, Maverick TV, Not Sure, Project M, and Bob Unleashed.
All these included add-ons combine to give you an amazing quantity of quality content. Whether you’re into movies, TV shows, sports, kid stuff, music, or live TV, this build is certain to have something for you.
Navigating The Durex Build
While it would be long, tedious and boring to go through each and every menu option of the Durex build, we’ll try to give you an overview of the best and/or most important that each section has to offer, starting with the Movies section.
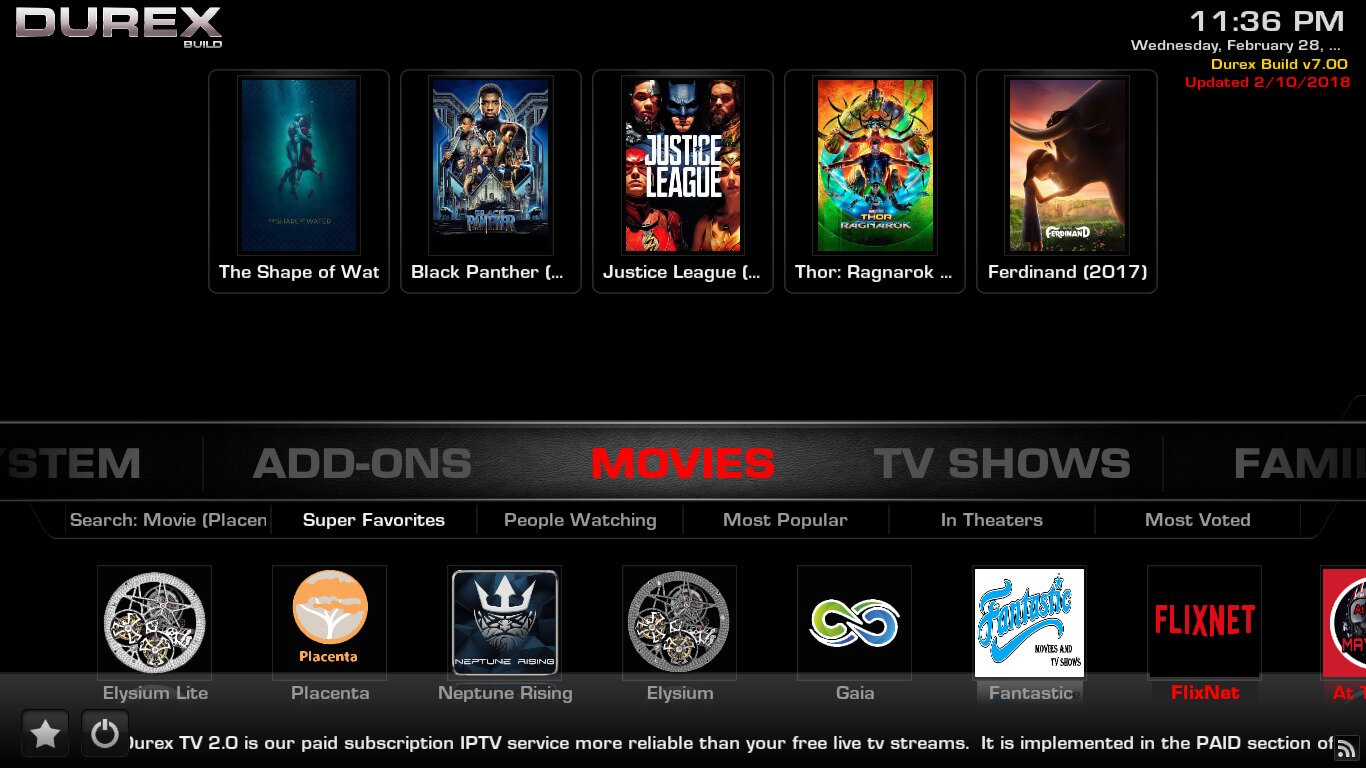
Movies
For many users, this will be the add-on’s most important section. The top icons show you a selection of trending movies from the Placenta add-on. Under the ribbon, you’ll find several interesting options, the far left and far right selections let you access the Placenta add-on and the MetalliQ add-on search functions, respectively.
Year, people, languages, and certificates will let you browse movies based on different selection criteria. People watching, most popular, most voted and Oscar winners are other ways you can browse the huge movie selection.
As for the Super Favorites selection, we weren’t able to fully understand what it is used for. It appears to be a way to access several movie add-ons that are part of the Durex Build.
Finally, there’s a my movies section that can be linked to your Trakt of IMDb accounts.
TV Shows
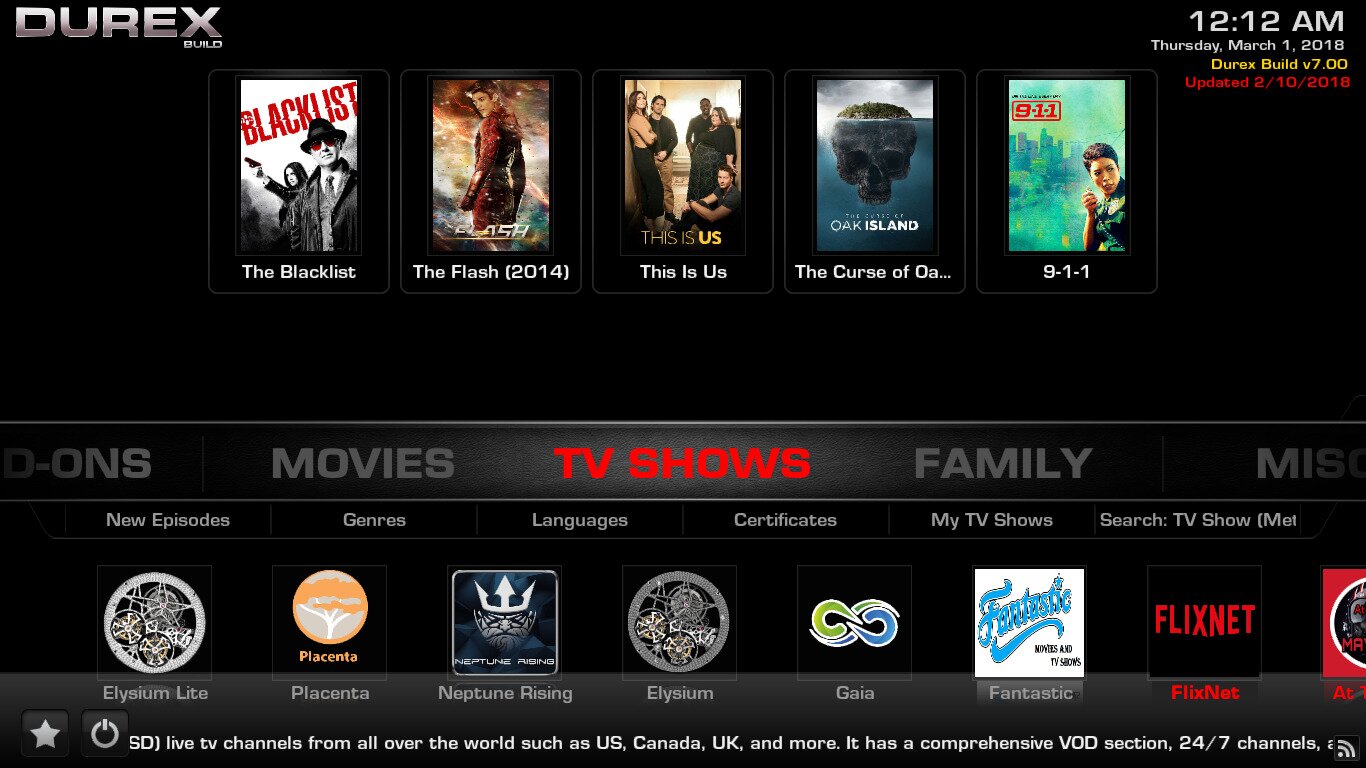
TV Shows is another very important section of the Durex build. And content-wise, it is as full as the movies section. And its look and feel are very similar, down to the almost identical selections.
The top of the screen lets you quickly access some of the most recent TV show episodes, somewhat like the new episodes section will let you quickly access all TV shows most recent episodes. Likewise, New TV shows will let you browse the list of TV shows that are in their first season. It’s a great way to quickly find what’s new.
Airing today is another section we loved. As the name implies, it will list all TV shows airing on that day. A great tool to quickly watch something that just aired. And if you know on what network a show you want to watch is airing, the Networks section will let you browse shows by network.
Family
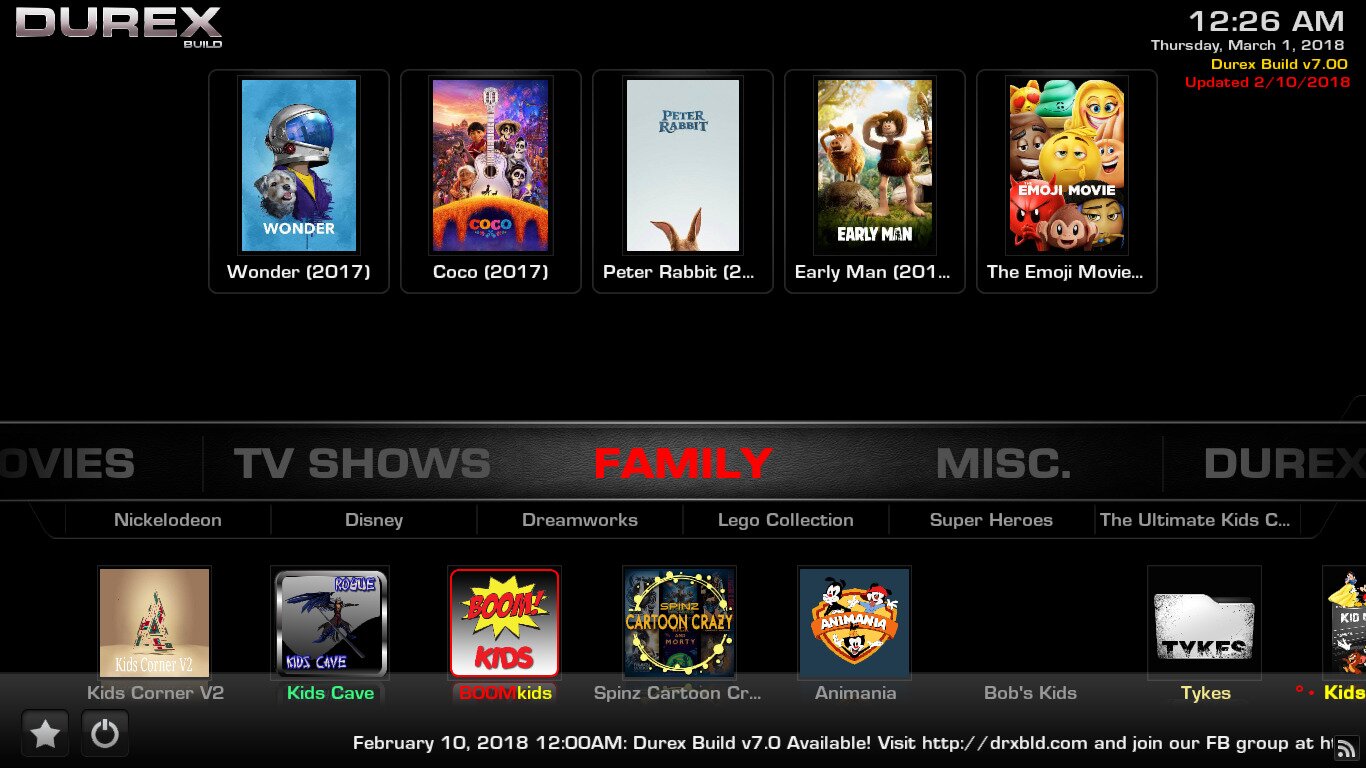
The family section is where you’ll find content for kids and the whole family. The different selections let you access all sorts of content by category or by network. It has, for instance, sections for Disney, Nickelodeon and the Cartoon Network, Dreamworks. But you also have selections for family TV shows, G movies and PG movies.
Overall, there’s a lot of family-oriented content available and accessing it is easy, thanks to a very well-built interface.
Free TV
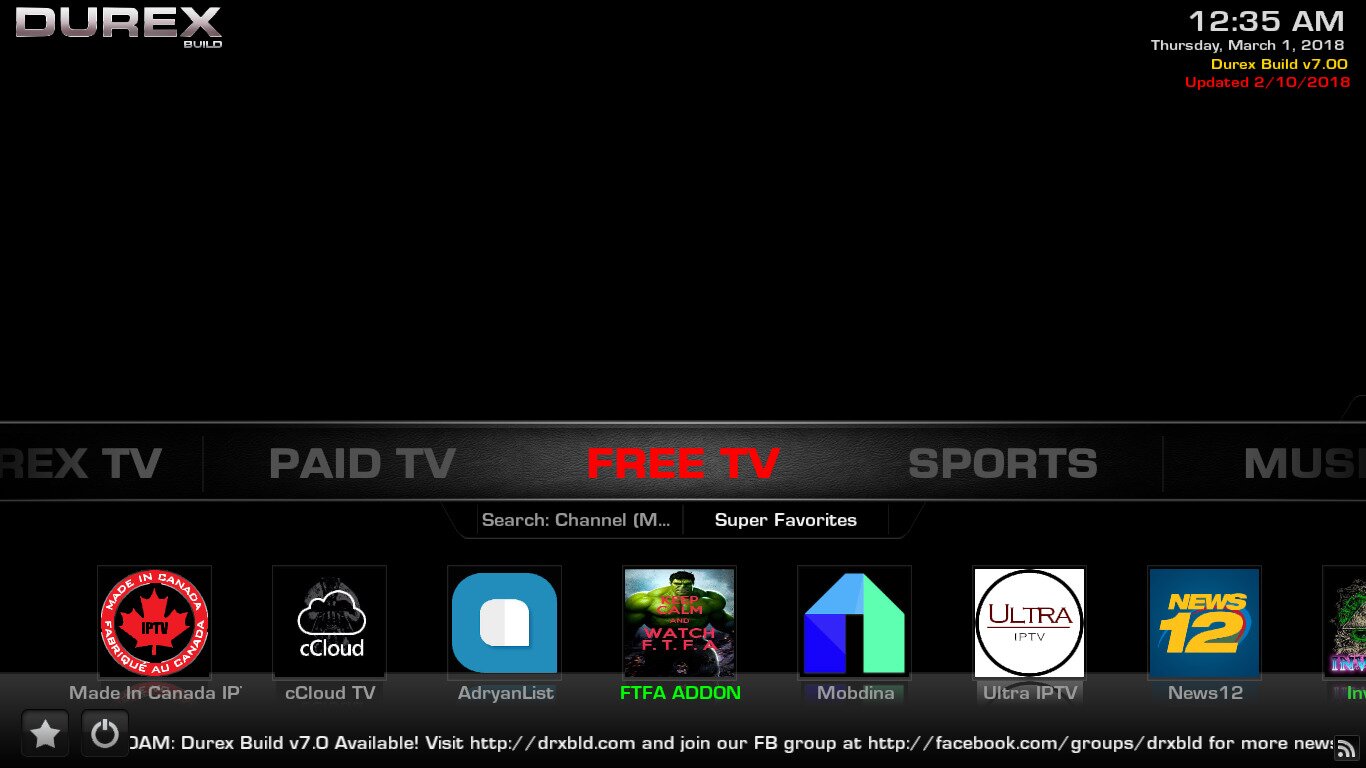
As you would have guessed, this section is all about live IPTV that you can watch for free. It is not as organized as the previous sections but it has a great selection of live IPTV channels spread out over a handful of the best IPTV add-ons.
There’s not a lot of subsections under the ribbon in the section. You may search the MetalliQ add-on for a specific channel or enter the Super Favorites, a list of add-ons with live IPTV content. However, you’ll find icons for much the same add-ons in the bottom section, under the ribbon.
And some of the best Live IPTV add-ons are included. You have Made In Canada IPTV, cCloud TV, or Ultra IPTV, to name a few of the 22 different add-ons that are featured.
Pretty much every decent live IPTV add-on is included in the Durex build and while we would have preferred an easier navigation, we can’t deny that the available content is impressive.
Sports
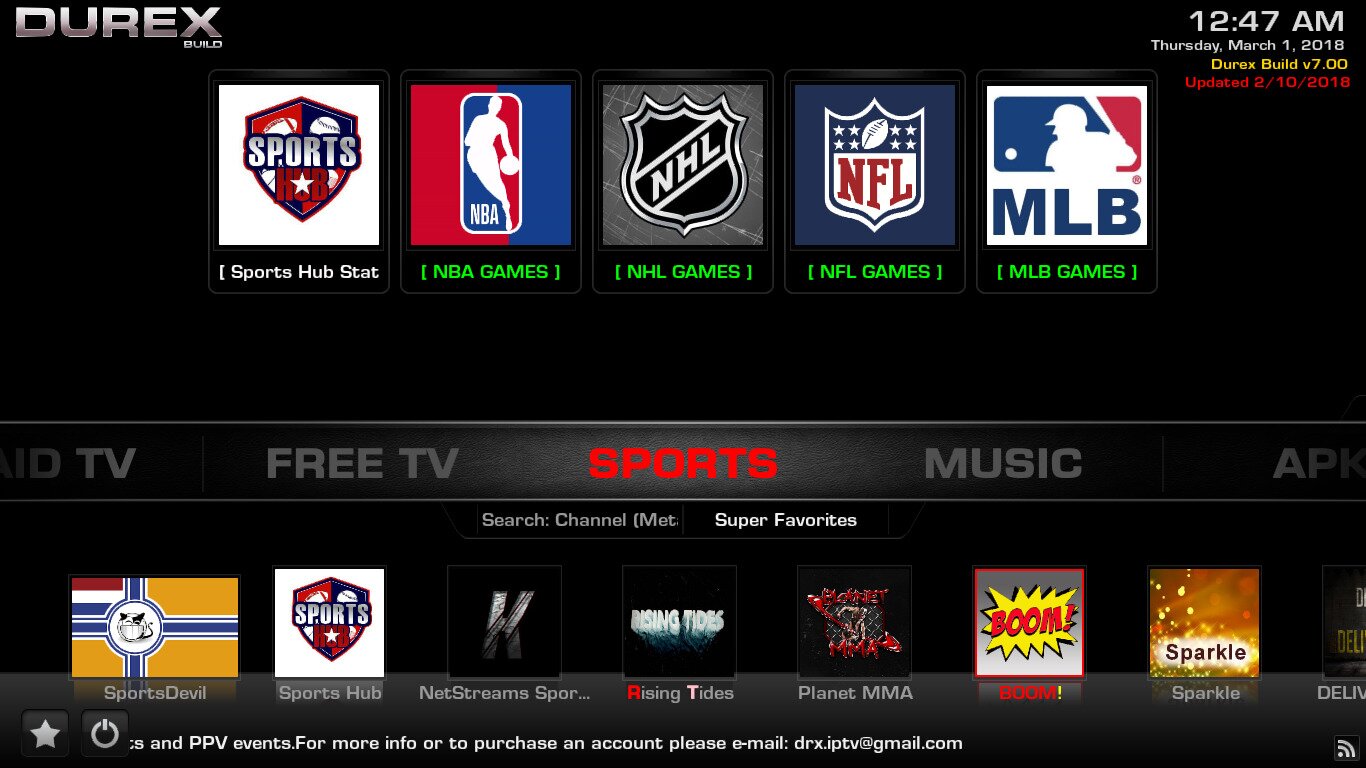
The sports section resembles the Free TV section in that its submenu is identical with the MetalliQ search and Super Favorites as the sole options.
On the other hand, we really love the top icons that allow you to quickly access major league content from the NBA, NHL, NFL, and MLB.
And the bottom of the screen has icons for no less than 27 video add-ons known for the quality of their sports content. Just like the Free TV section, the variety of available content is amazing.
Music
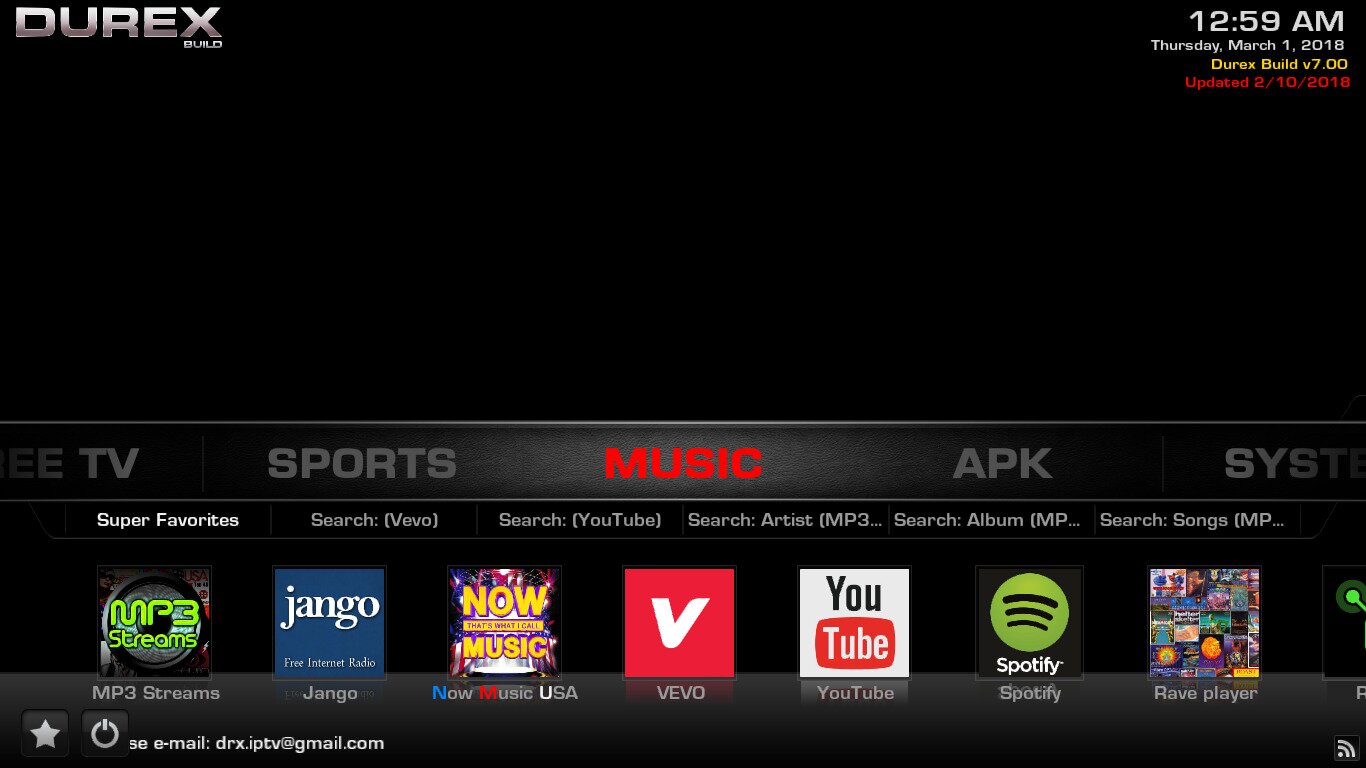
The last section we want to talk about is the Music section. Through some 25 or so add-ons, you have access to a plethora of audio streams, music videos and live concerts.
Wrapping Up
The Durex built has much more content than we were able to show you in this short article. We tried to stick to the best and most important and give you enough to make you want to install it and start discovering it by yourself. This build has content for everyone and the quality of the add-ons it is made of is excellent. You’ll certainly find some dead links here and there, perhaps even one or two complete add-ons that no longer work but, considering their number, it is a small price to pay.
Have you given the Durex build a try? What feature did you like most? Have you encountered any issues installing or using it? Use the comments below to share your experience with us.
Don't miss this great deal
