Specto Kodi Add-on – How to Install and Use Specto
If you like watching movies or TV shows, the Specto Kodi add-on might very well be just what you need to quench your craving for content, especially if you were a fan of the long-defunct Genesis add-on. After all, Specto (more formally known as “Specto Fork”) is based on Genesis.
We’re about to tell you exactly how you can install this content-rich add-on on Kodi. Once we have it up and running, we’ll give you a guided tour of its most interesting features, movies, and TV Shows.
Protect Yourself While Streaming, Use a VPN
We strongly recommend you use a VPN whenever you use Kodi, as it will keep your ISP from seeing what you’re doing and sending you copyright infringement notices or interrupting your internet service. An additional benefit of using a VPN is that it allows you to access geo-blocked content (like another country’s Netflix) by spoofing your location through proxy servers located all over the globe.
There are many VPNs on the market to choose from, but we’ve taken into consideration the following factors to make our recommendation for Kodi users:
- Fast connection speeds – Few things are as frustrating as getting ready to watch your favorite show, only to be interrupted by buffering. An unfortunate reality of VPN technology is that it will slow down connection speeds as it adds layers of encryption and redirects your traffic through far-flung proxy servers. However, the best VPN providers have found ingenious ways to minimize this slowdown, allowing for uninterrupted streams and downloads.
- Zero-logging policies – While streaming currently exists in something of a legal gray area, legislation is always being introduced to curb users’ access to content. VPNs that keep logs of your activity leave you vulnerable to legal repercussions, as the law may change to require providers and ISPs to fork over everything from your traffic to your DNS requests and more. Strict zero-logging policies provide true anonymity, and protect you from future overreach.
- No bandwidth restrictions – As streaming is a data-intensive process, you’ll want to ensure that your VPN doesn’t cap your bandwidth. To avoid sudden interruptions in your Kodi movie night, shoot for providers that allow unlimited bandwidth.
- No restrictions on traffic – Many VPNs prohibit certain types of traffic, most notably P2P and torrents. Many Kodi add-ons make use of these protocols to function, so make sure you pick a provider that doesn’t make you trade functionality for security.
- Software compatibility – In order for you to enjoy the protection your VPN provides, you’ll need to make sure that it can function on the same device that you’ll be using for streaming. The best VPNs work on a wide variety of platforms.
The Best VPN for Kodi: IPVanish
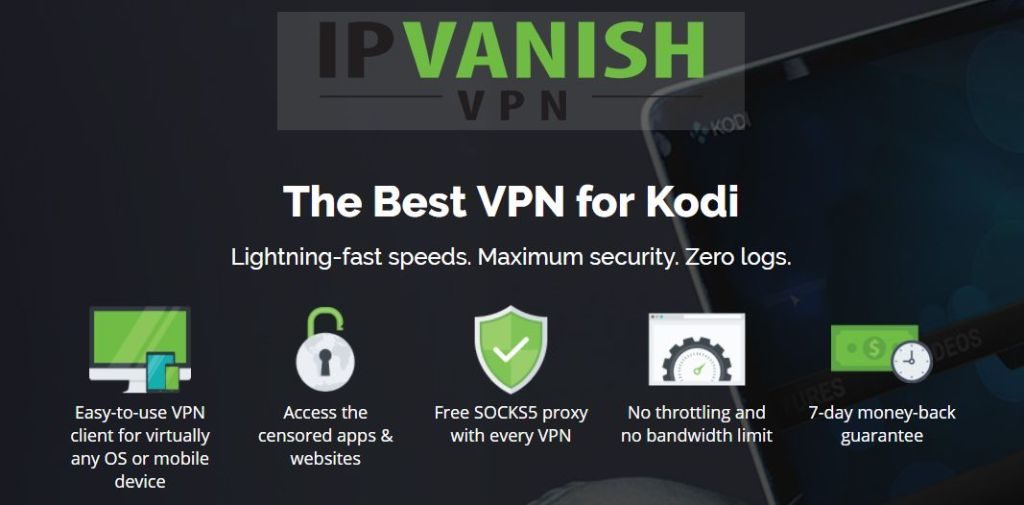
We’ve spent a lot of time testing the various VPNs on the market, and our top recommendation for Kodi users is undoubtedly IPVanish. This provider promises a complete security solution, and according to our criteria, they truly deliver. Employing industry-standard 256-bit AES encryption to obscure your data, it would take the most sophisticated computer millions of years to crack it. You’ll also never have to worry about your privacy becoming compromised when you lose connection (as sometimes happens with VPNs), since IPVanish features an automatic kill switch and DNS leak protection.
Other crucial benefits offered by IPVanish include:
- A massive network of 850 proxy servers in 60 different countries, allowing users ample methods of bypassing geo-blocking and optimizing their connection speeds while maintaining anonymity.
- No speed caps, no throttling, unlimited bandwidth and no restrictions on types of traffic (including P2P and torrent).
- Absolutely NO logging of any kind, ensuring that your activity will never be used against you by overreaching governments or ISPs.
- Lightweight and user-friendly apps available on most major platforms, including Windows, Mac OS, Android, iOS and even the Amazon Fire TV stick.
IPVanish offers a 7-day money back guarantee which means you have a week to test it risk-free. Please note that Addictive Tips readers can save a massive 60% here on the IPVanish annual plan, taking the monthly price down to only $4.87/mo.
Installing the Specto Add-on on Kodi
Installing Specto on Kodi is quite simple, especially if you follow our step-by-step procedure. There are several ways it can be installed but we chose to install it from the Smash repository as we believe it is one of the easiest ways. It is a two-part process where you first install the repository and then the actual add-on.
Before we continue, it’s critical to ensure that your Kodi settings allow for installation of third-party software. You can enable “unknown sources” with the following instructions, starting from the Kodi home screen:
- Click on the parameters icon (the small gear at the top left)
- Click System Settings, select Add-ons on the left pane and you’ll see “Unknown sources” in the main window
- Make sure the option is enabled and click it if it’s not
First Step: Installing the Smash Repository
A repository (more commonly referred to as a “repo”) is collection of add-ons which can be easily browsed and installed into Kodi. It is somewhat like the Google Play Store for Android devices or the Apple app store for iOS devices. But with Kodi, you have multiple choices of repositories. While there is an official Kodi repo, it’s the unofficial ones that contain the most exciting add-ons.
A big advantage of repositories is that whenever you install an add-on, the repo will also take care of any dependencies and automatically install most required add-ons or extensions. The Smash repository contains the Specto add-on, so let’s install that first.
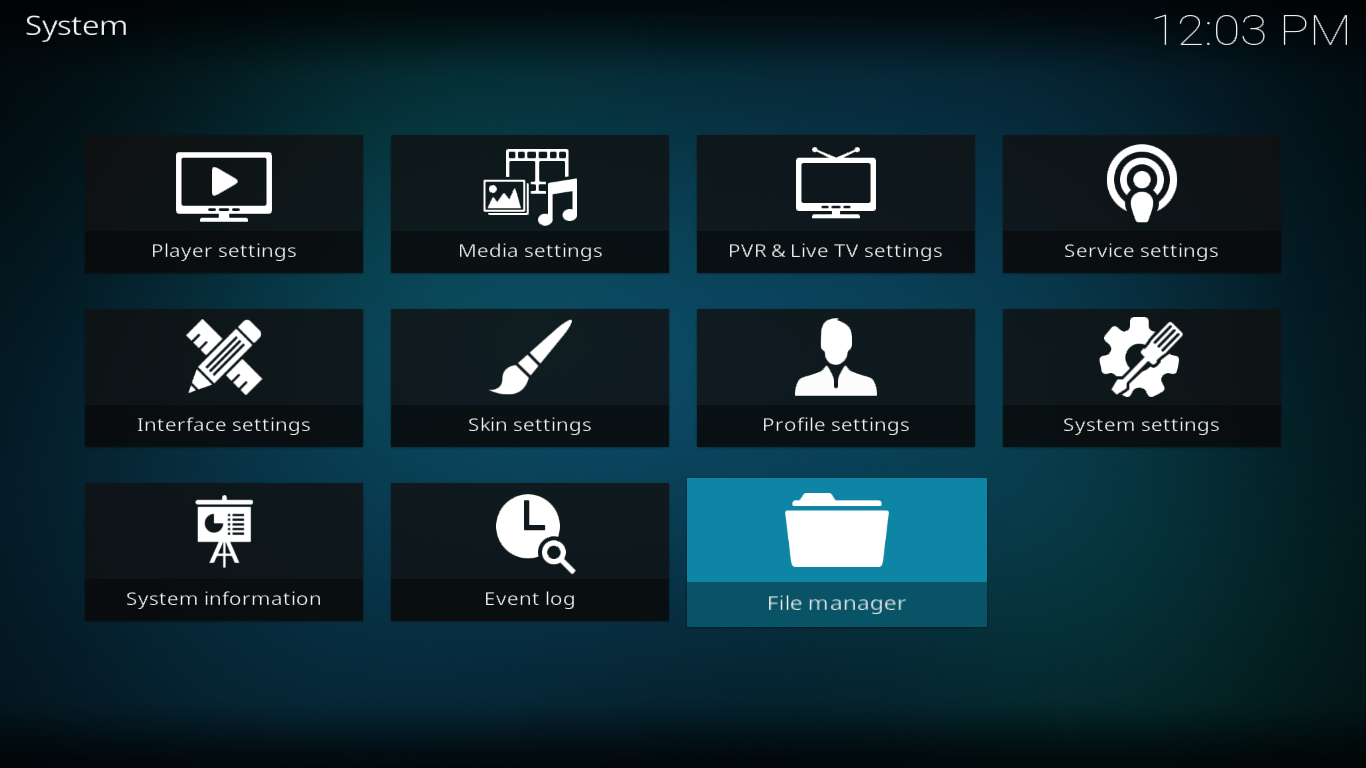
From the Kodi home screen, select the Parameters icon. That’s the small gear at the top left of the screen.
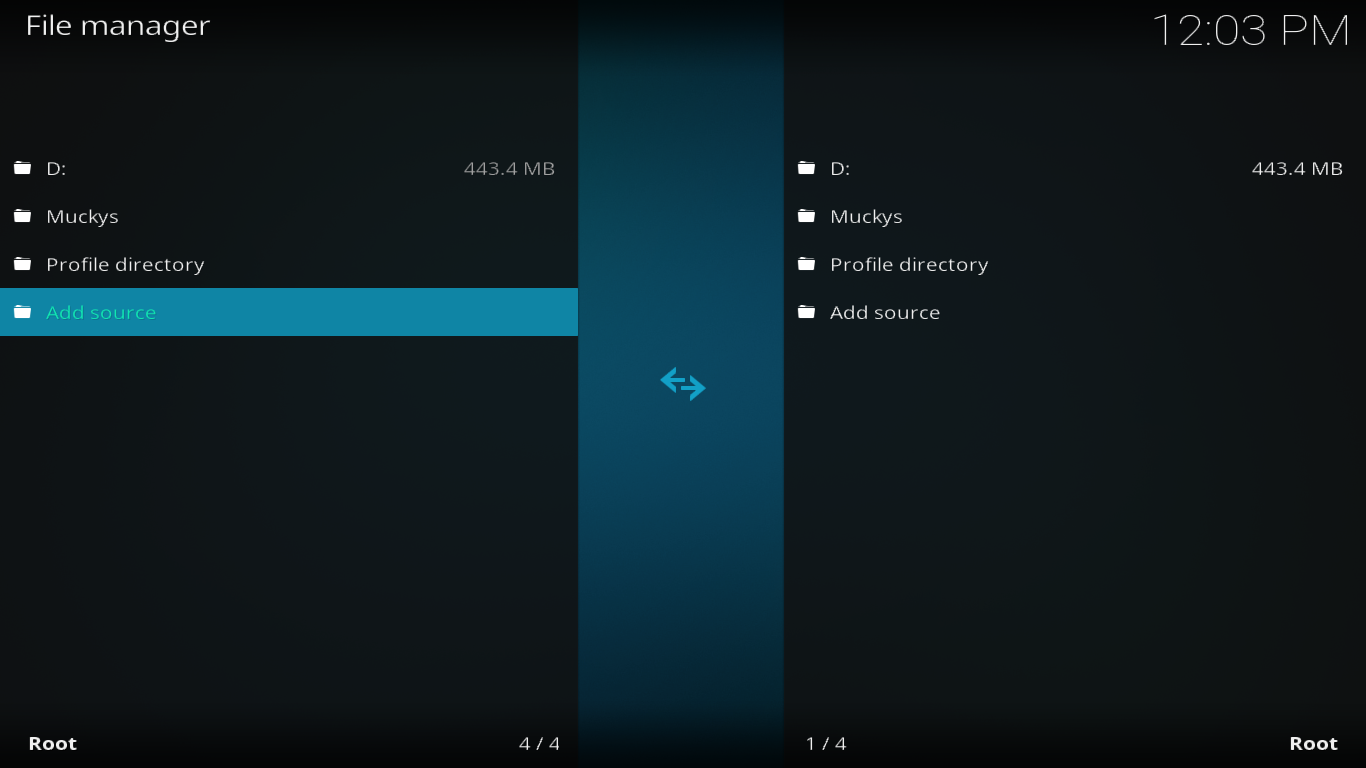
Then, select File manager.
Double-click Add source in the left pane.
Click None and, in the box that opens, enter the source path exactly as follows: https://mediarepos.net/kodistuff/ then click OK.
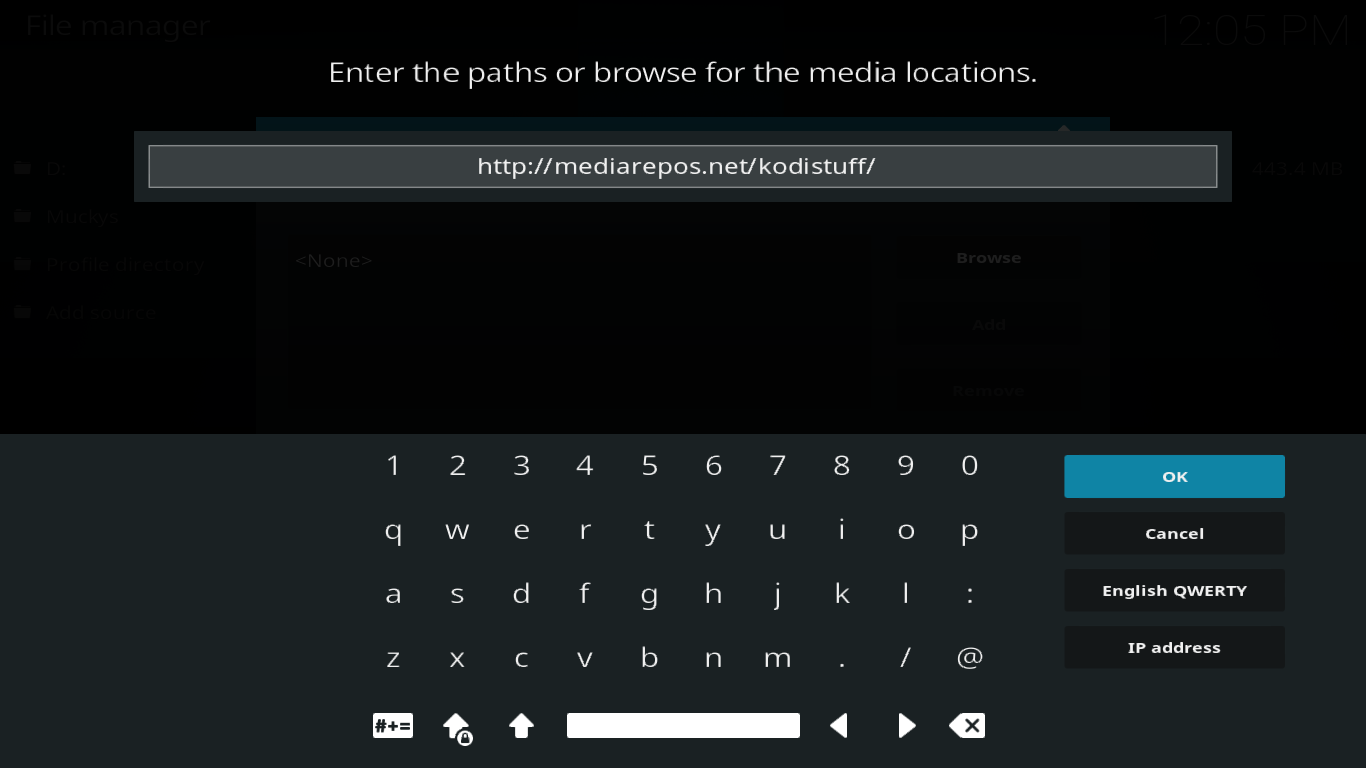
Click OK once more to save the new source.
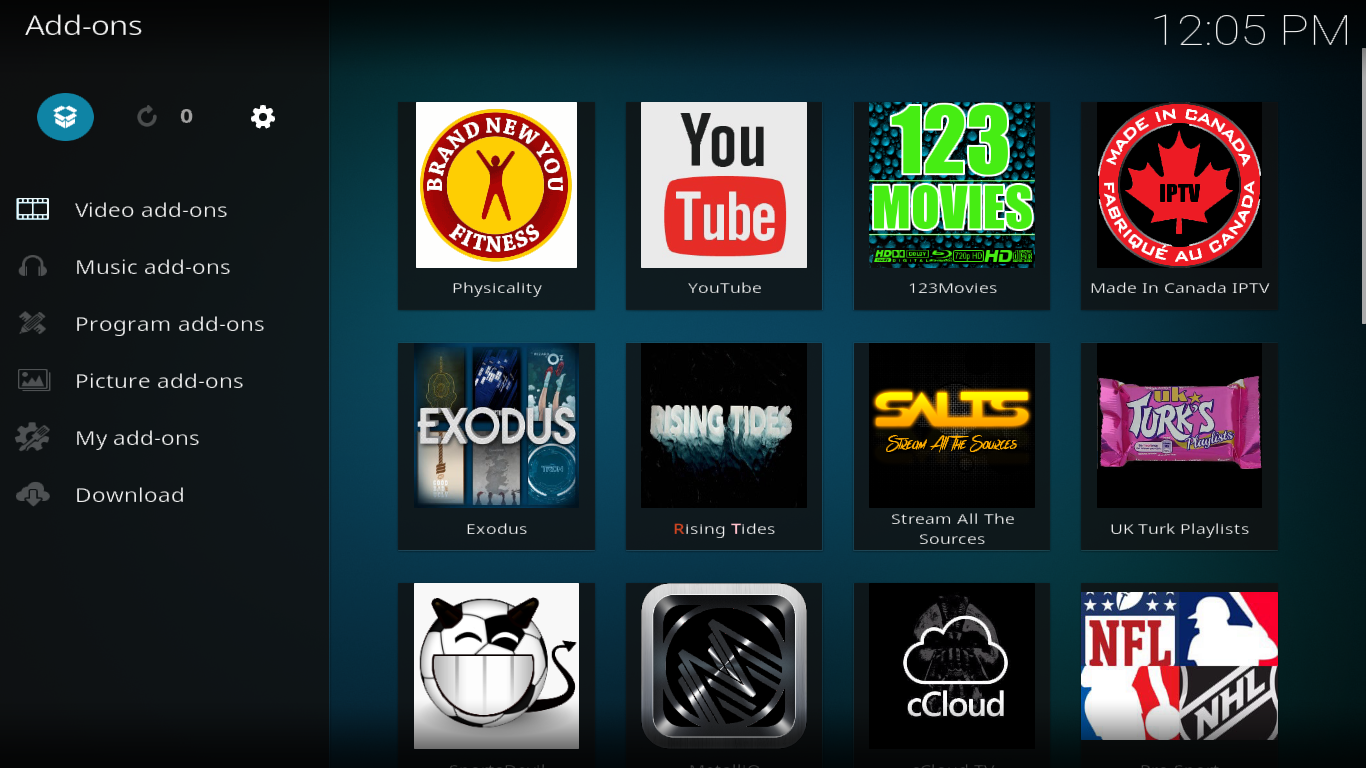
Now, back to the Kodi home screen, select Add-ons in the left pane then select the Package Browser (the small open box icon) at the top left of the screen.
Select Install from zip file then, in the box that opens, select the Kodistuff source. That’s the source we just added.
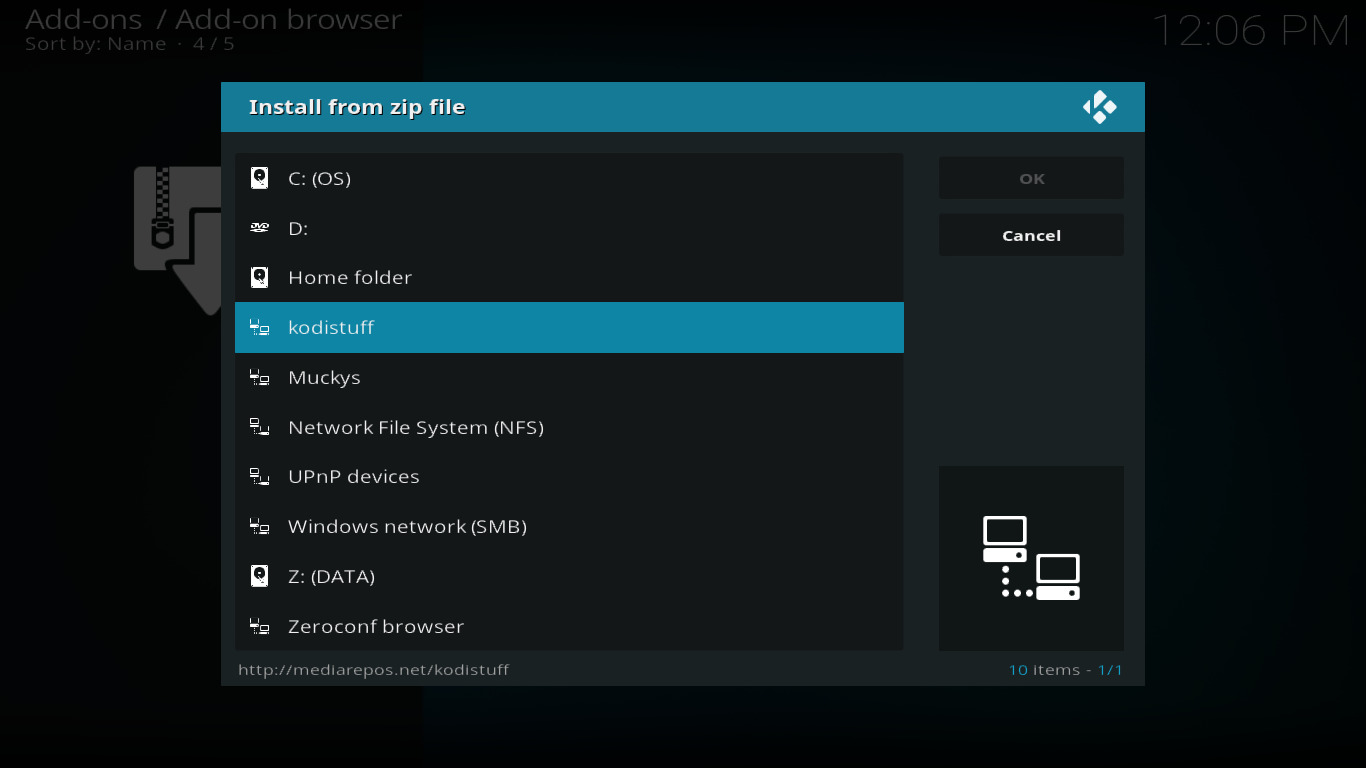
You then select the -SmashRepo.zip file and click OK.
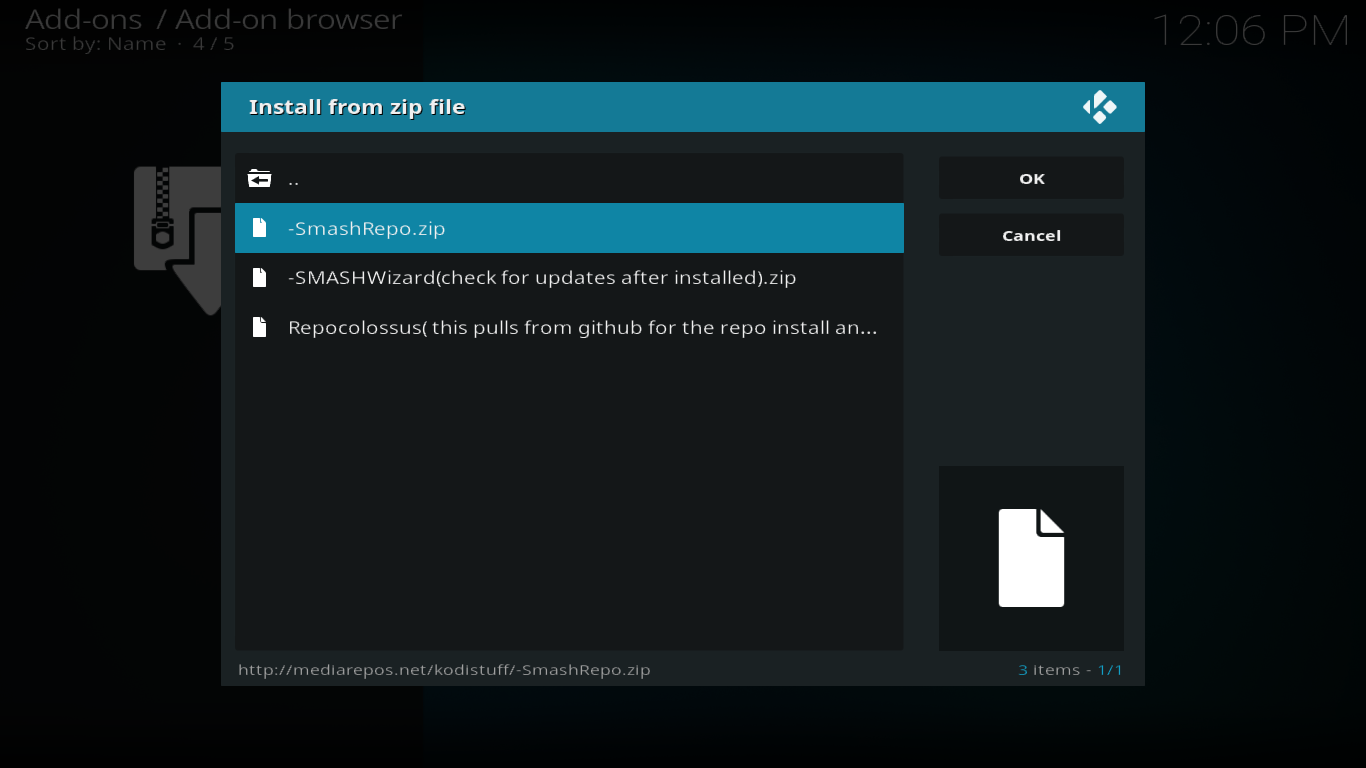
The Smash repository will install as confirmed by the message at the top right of your screen.
Second Step: Installing the Specto Add-on
Now that we have the Smash repository installed, all that’s left to do is install the actual add-on.
You should still be on the Add-on Browser screen. Simply click Install from repository. Within the list of available repositories (yours could be different from the screenshot, depending on what other repos you already have), select -SMASH Repo.
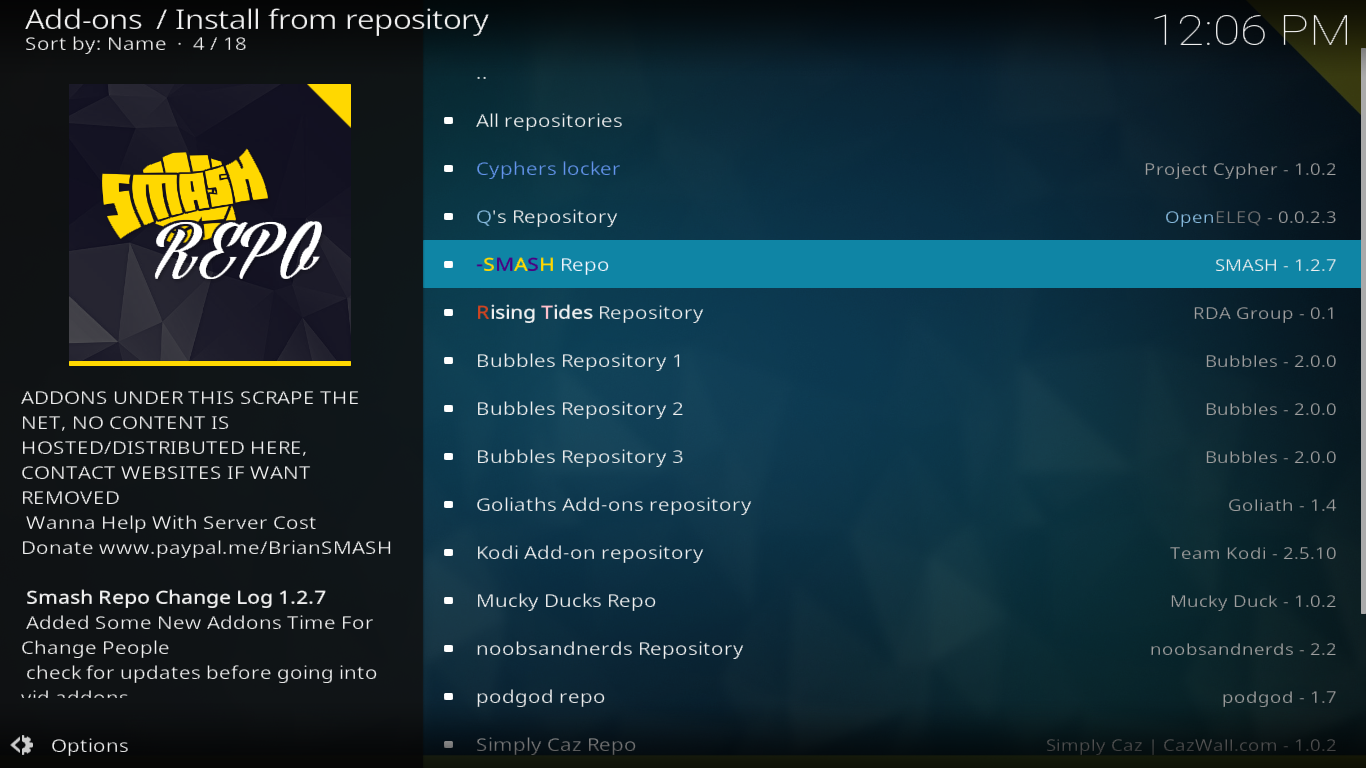
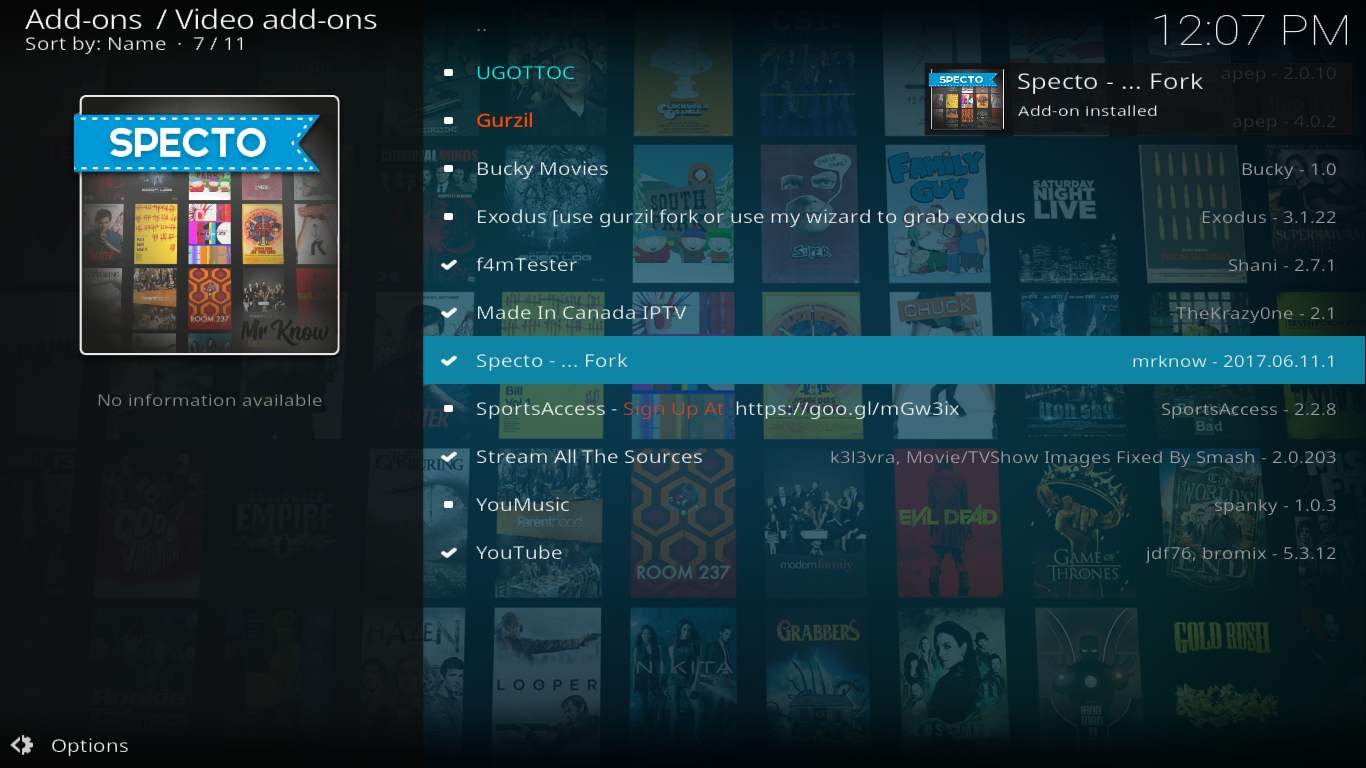
Click Video add-ons then Specto – … Fork.
In the box that opens, simply click the Install button at the bottom right.
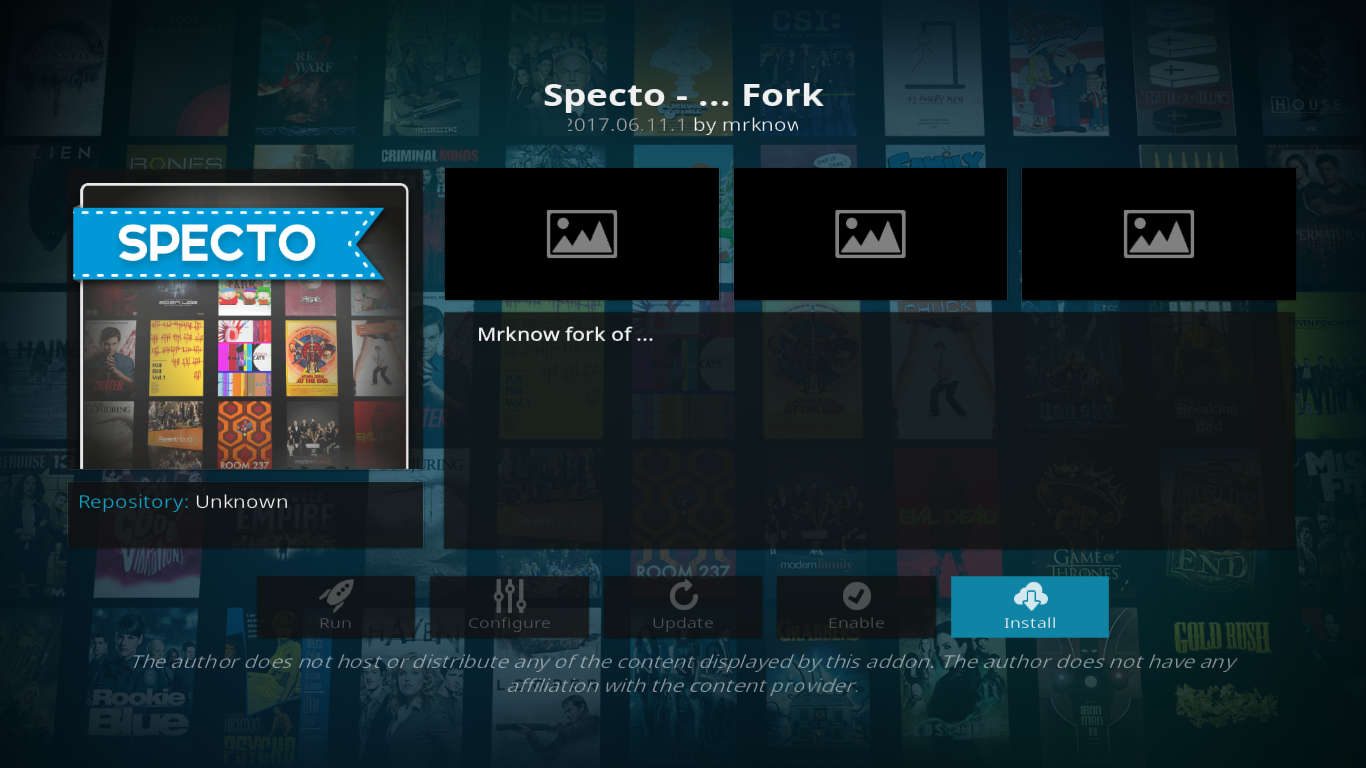
Within a minute or two, the add-on installation will be complete, as confirmed by the message at the top right of the screen and the presence of a check mark next to the add-on name.
That’s it! We’ve successfully installed the Specto add-on.
DISCLAIMER: AddictiveTips.com does not condone or recommend the use of Kodi or any add-on to access copyrighted content to which you have no right. We’re not responsible for what you decide to do with the contents of this article. Software piracy is not something we support or approve, and we strongly advise users to only access content they are legally entitled to. As a Kodi user, you must take steps to ensure you are not in breach of any copyright law.
A Guided Tour of the Specto Add-on
Now that we’ve installed the Specto add-on, let’s have a look at its main and most interesting features.
The Genesis of Specto
Specto is a relative newcomer to the Kodi scene, though its heritage goes back to a hugely popular (and aptly named) add-on called Genesis. The brainchild of a developer named Lambda, users loved its huge selection of movies and TV shows and its impressive choice of sources for each title. Unfortunately, Genesis disappeared a little over a year ago.
All was not lost, though, as another developer called Mr. Know decided to do a fork of the Genesis add-on. A fork, for those unfamiliar with the term, is a piece of software directly derived from another one. You can think of it similarly to how you think of a spinoff to a popular TV series. So, Mr. Know took the Genesis code, modified and improved it, and released it as the Specto… Fork add-on.
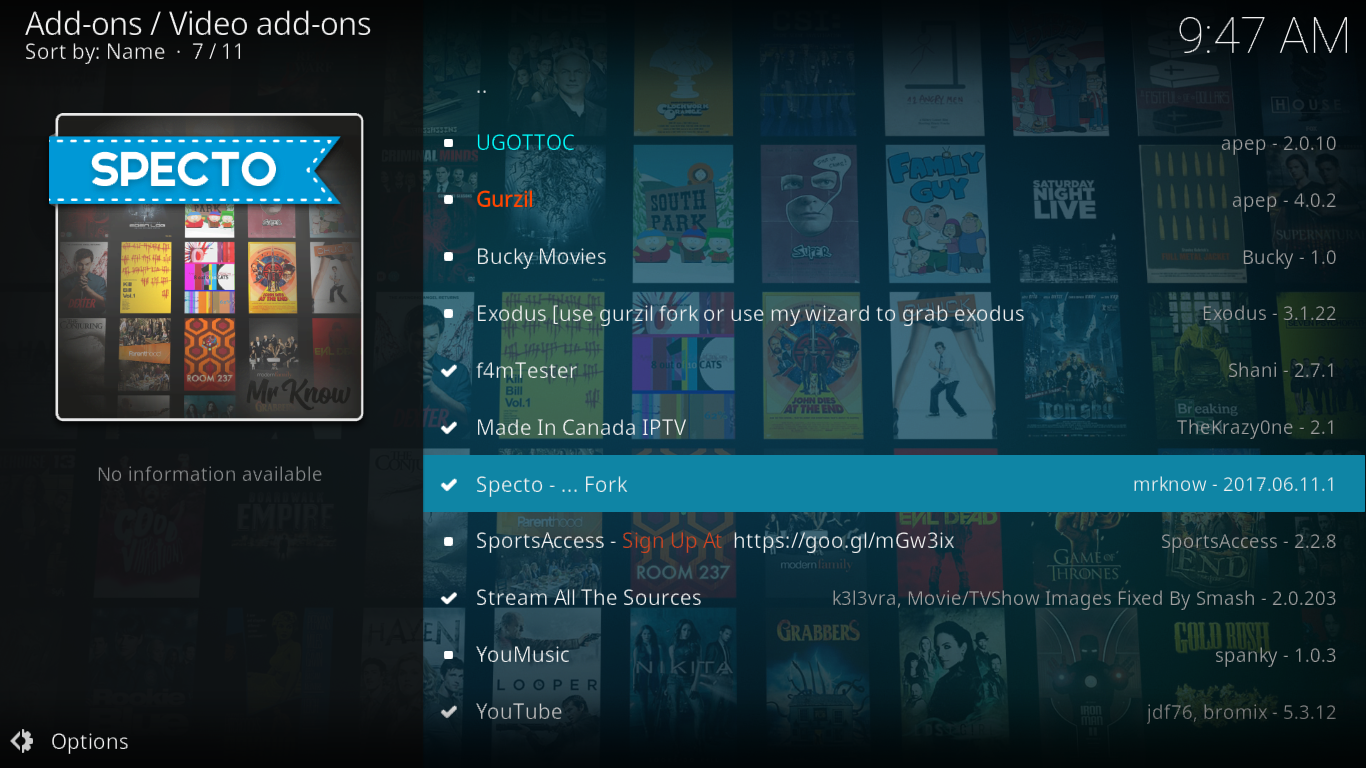
Main Menu
Upon opening the Specto add-on, its main menu is displayed.

We’ll have a deeper look at the Movies and TV shows section in just a minute. As for the other options worth mentioning, My Specto will let you access any content you’ve marked as favorite, Latest Movies and Latest Episodes will list the most recent additions, and Tools will let you access the add-on’s numerous parameters. On the subject of parameters, we strongly advise you not to modify them unless you know exactly what you’re doing. Otherwise, you run the risk of breaking something and losing part of the add-on’s functionality.
The last option on the main menu, Search, will let you search either movies or TV shows by title or by actor name—which the add-on refers to as People.
Movies Section
One of the great strengths of the Specto add-on is its movie selection. When you click on the Movies menu, you’ll see the Movies menu.
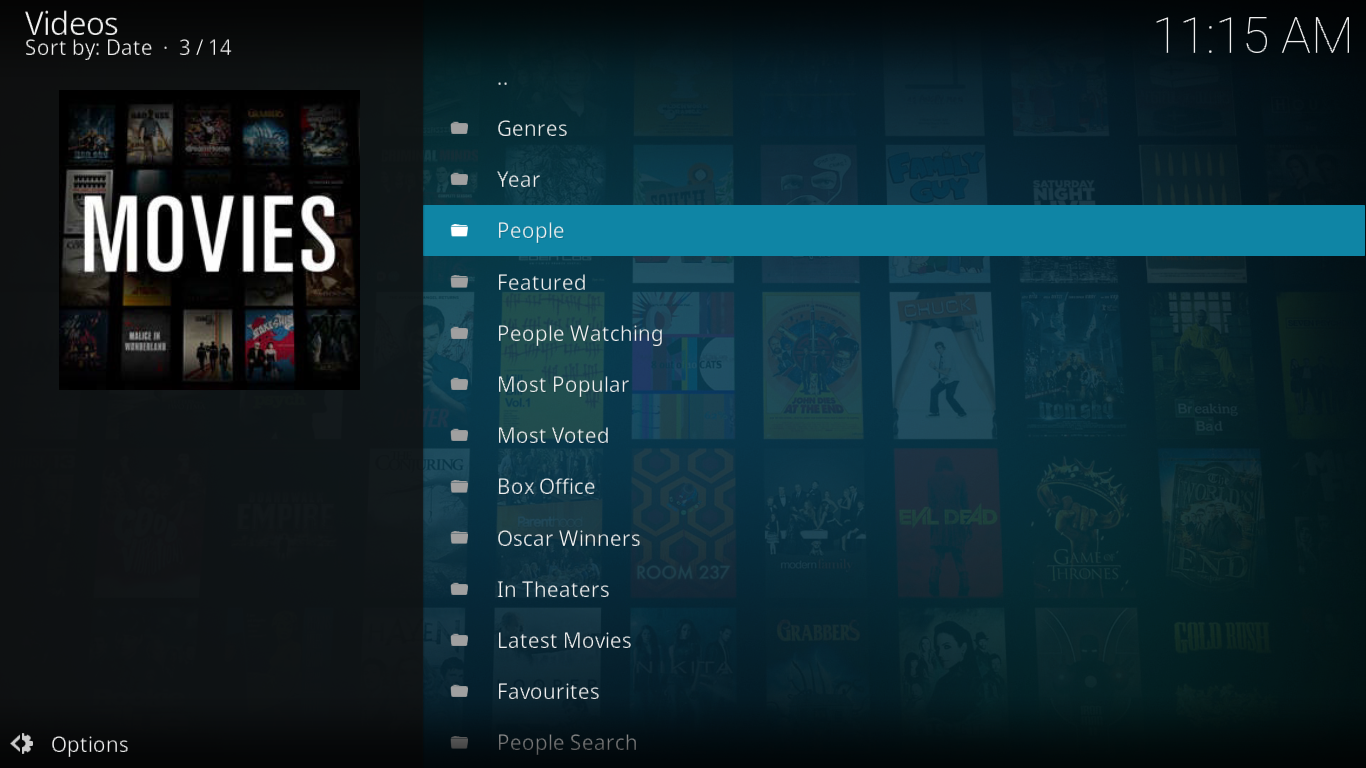
There are quite a few options. Let’s see what each one does.
The first selection will let you browse movie by Genre. There are more than 20 of them to choose from: Action, Adventure, Animation, Biography, Comedy, Crime, Drama, Documentary, Family, Fantasy, History, Horror, Music, Musical, Mystery, Romance, Science-Fiction, Sports, Thriller, War, and Western. This feature makes it easy to browse movies of a specific genre.
The next selection, Year, will let you browse movies by release year. Once you enter that section, you chose a year—it goes as far back as 1969 with over 300 titles for that year alone—and you’ll see a list of all available movies released that year.
The next option, People, lets you browse movies by actor. The usefulness of this section is limited with the list only containing about 100 actors, some of them relatively obscure and missing some huge superstars. Furthermore, it is in random order, making it difficult to find any given actor. Fortunately, Specto’s search functionality makes up for that shortcoming.
The next five options, Featured, People Watching, Most Popular, Most Voted, and Box Office, list the movies sorted in different order of popularity as indicated by each category name. The Featured, People Watching, Most Popular, and Box Office are not much different and will return similar albeit somewhat different results. Most Voted will return different results from the other four as it considers the total number of votes since the movie’s release so older movies might have more votes than recent ones due to their past and/or ongoing popularity and appear higher in the list.
The Oscar Winners selection expectedly lists movies that have won Academy Awards for Best Movie. The list is sorted in descending chronological order, with one film per year. It goes all the way back to the origins of the Academy Awards in the 1920s’.
The In Theaters selection lists movies that are currently still showing in theaters. Very useful if you want to watch the most recent movies.
Latest Movies, lists movies in chronological order of release, with the most recent at the top.
The remaining three selections, Favourites, People Search, and Search will let you access movies you’ve flagged as favorites, search movies per actor or search movies per title. They are identical to the corresponding selection from the add-on’s main menu.
TV Shows Section
When you choose TV Shows from Specto’s main menu, the following menu is displayed
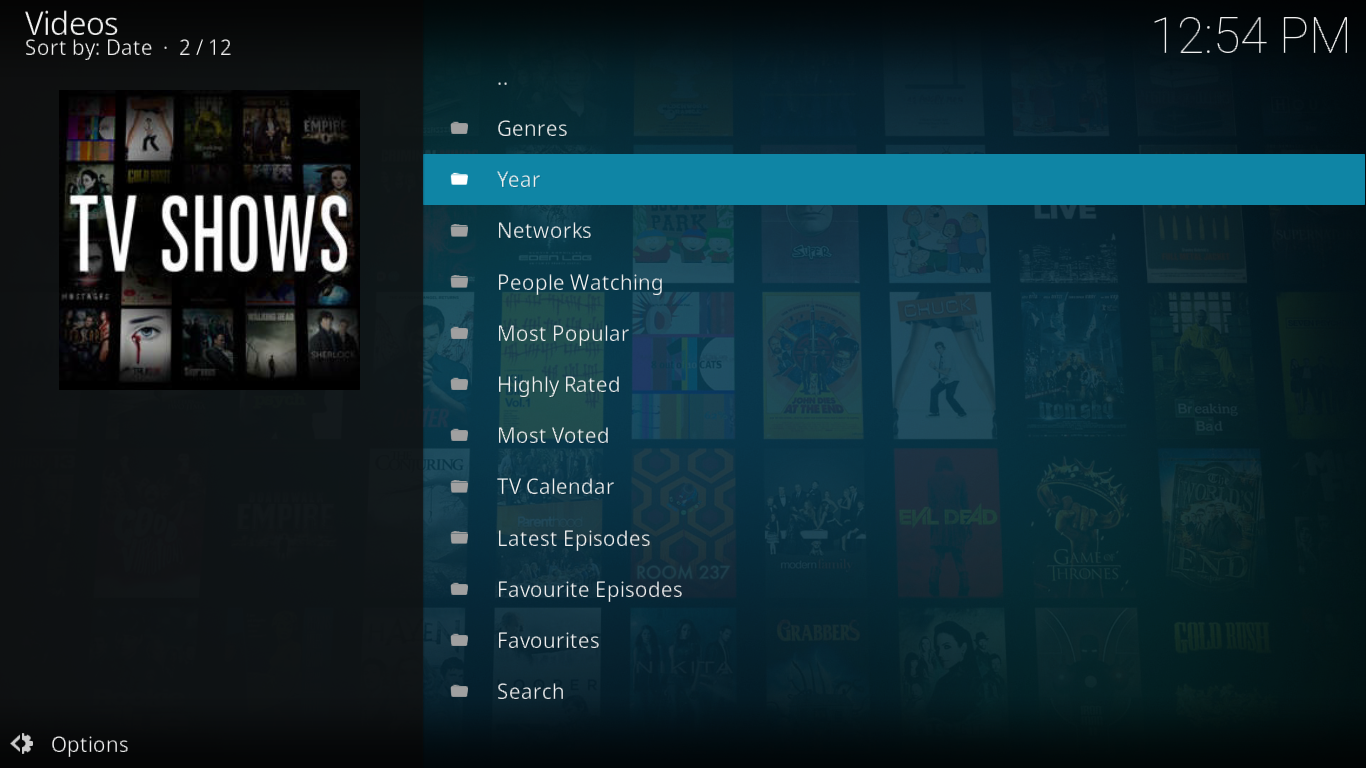
The menu is not unlike the Movies menu although some selections are different or they don’t work the same way. Let’s take a closer look at what’s in there.
The Genre selection contains almost the same items as the movies genre lists with a few TV-show specific additions. For instance, there are Game-Show, Reality-TV and Talk-Show genres whose content are self-explanatory.
The Year selection works a little differently from its movies counterpart in that it considers the starting year of TV series and not current episodes. For example, a show that started back in 2010 will appear under that year, even if it’s still running.
The Network selection will list TV shows by network on which they originally aired. There are over 60 different networks, mostly American, British and Canadian. It includes a mix of standard broadcast networks, cable channels, and a few web-based services.
The next four selections, People Watching, Most Popular, Highly Rated and Most Voted closely resemble their movie counterparts. Indeed, they are not much different from one another, although each has subtle differences.
The next selection, TV Calendar is one of the most interesting. It will display any available episode per air date. When you enter the section, you first pick a date within the past 30 days and a list of all available episodes having aired on that date will be shown. That’s a pretty useful feature to catch up on missed episodes of your favorite TV shows.
The Latest Episode selection will display just that, a selection of the most recent episode of many currently airing shows. Unfortunately, I’m not certain this is always up-to-date as it seems to be missing recent episodes of current shows.
The next two selections, Favourite Episodes and Favourites, will let you access your favorite TV shows. They differ in that the first one will show individually favourited episodes and the second will list complete series that you’ve marked as favourites.
And finally, the Search selection will let you perform a title search amongst all the available TV shows.
Our Favorite and Least Favorite Features of Specto
One of the best features of Specto, one that really makes it stand out, is the number of sources it will scan in real time to locate content for any selection. Let me explain: Once you’ve selected a movie or a TV show episode, Specto will spend several seconds scanning the Internet for sources and present you a list of all available sources.
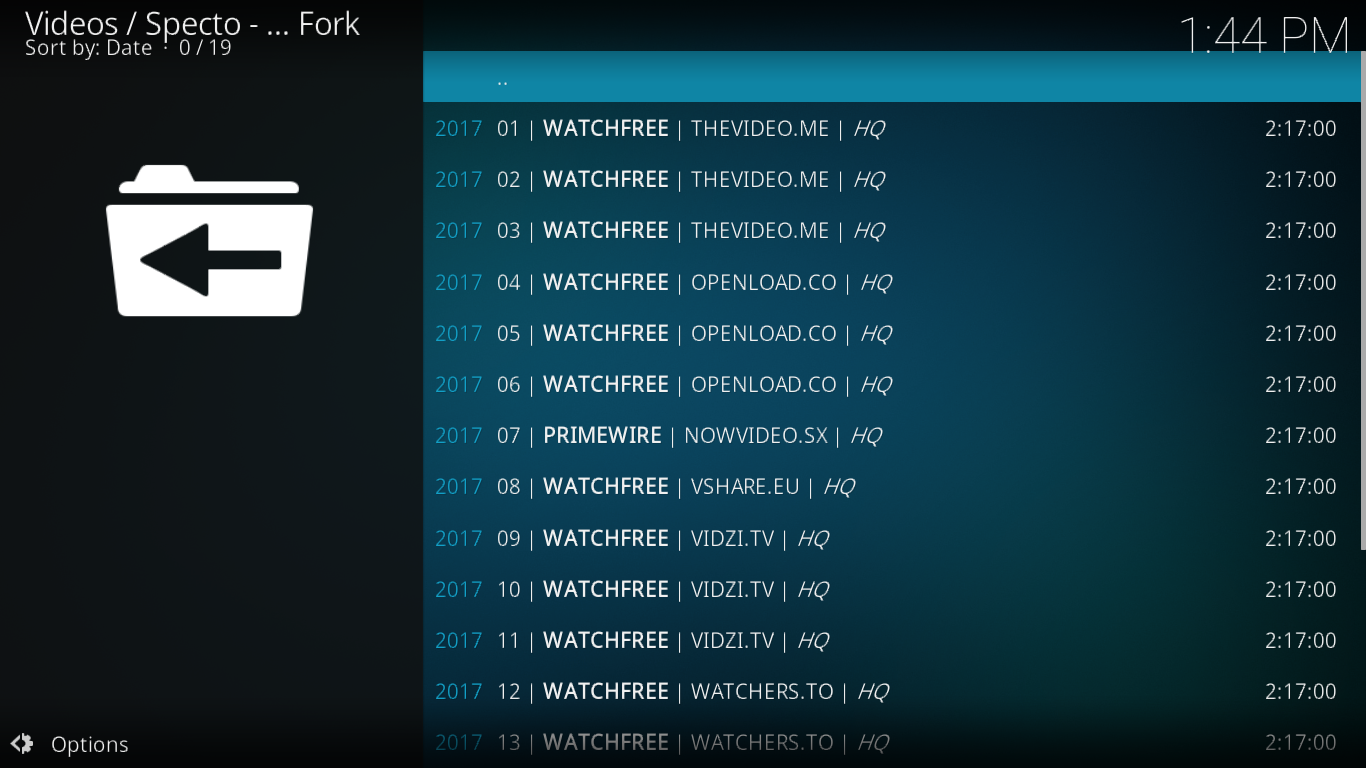
You may pick any of them, but it’s always better to pick the top source, as the list is in descending order of quality. However, if you want to save on bandwidth, you should select one of the lower-quality option (marked LQ) near the bottom of the list. And if a source asks for a pairing, I suggest you don’t bother with that and just click cancel. It will automatically try the next source until it finds one that works.
On the down side, I found that the add-on lacks a description of individual episodes of TV Shows. When browsing or searching for TV Show episodes, the left pane displays the description of the series rather than that of the episode. It’s only a minor inconvenience, though, and certainly not a showstopper.
Overall, the Specto add-on will give you a ton of movie and TV shows content. In fact, a whole lifetime might not even be enough to watch it all! If you’re a movie or TV fan or if you miss the Genesis add-on, this one is for you.
Don't miss this great deal

Smash repo link seems to be dead…