How to Check a Box in Word Doc
Creating a checkbox in Microsoft Word is a useful feature for creating lists, surveys, and forms. Unlike an ordered list (with numbers) or an unordered list (with bullet points), a list with checkboxes lets you mark off an item when you’re done addressing it. Below are some methods for making lists with checkboxes and directions for how to check a box in Word.
4 Ways to Make a Checkbox in Word
This article covers two methods for making checkboxes. The first is a bit more involved than the second, but both are easy enough for anyone to perform.
Method 1: Using the Developer Tab
The Developer tab and Content controls are a feature that lets you customize individual elements within documents, templates, and other Word formats. Examples include drop-down lists, dates, pictures, rich text, and yes, checkboxes. This tab will need to be manually added to access these features, but it is quite easy to do. Here’s how:
1. Go to File > Options.
2. Select Customize Ribbon from the left.
3. In the far right pane, select the box next to Developer, then click OK.
4. In the right pane, check the box next to Developer and click OK.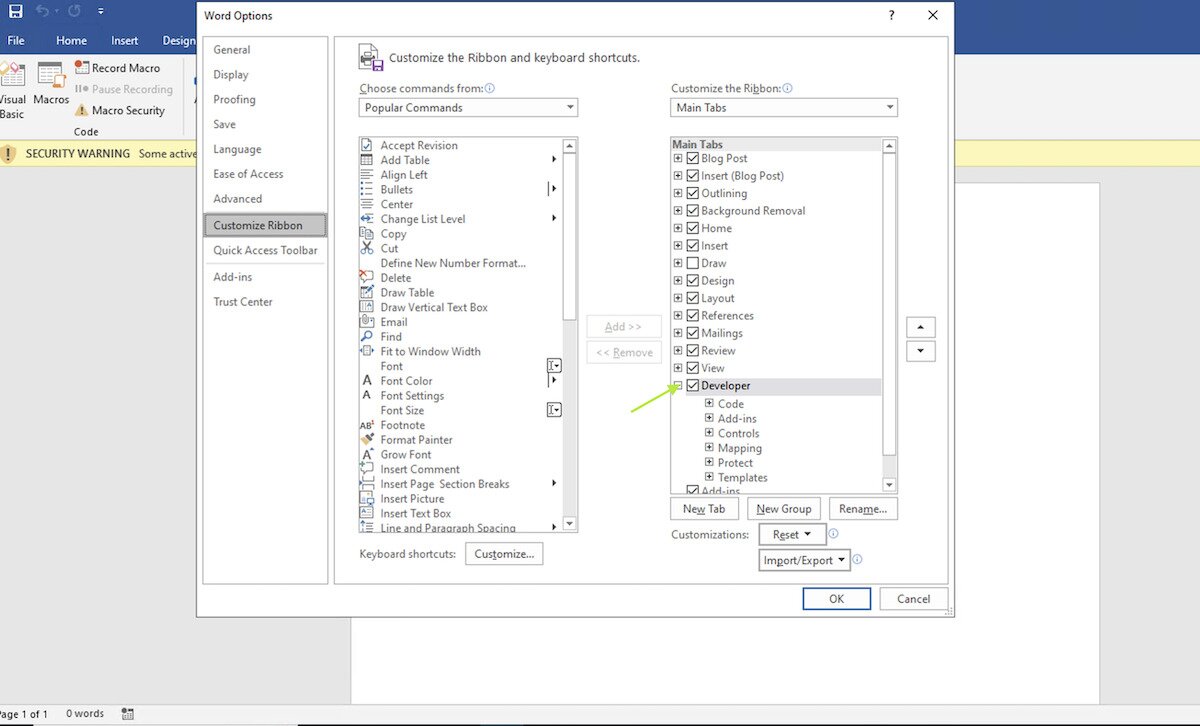
5. Click on the Developer tab in the ribbon at the top of Microsoft Word.
6. From the Controls group, select the checkbox icon.
7. A checkbox will appear in your document where your cursor is placed. To check a box, simply select it.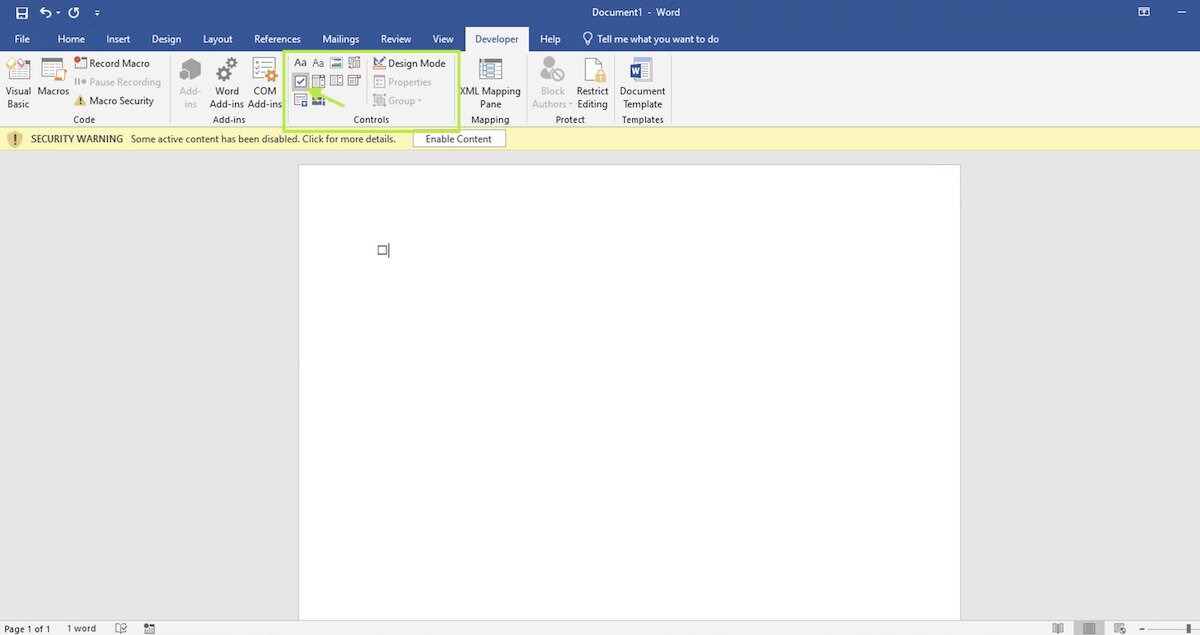
Using Content Control Properties for Checkboxes in Word
Now that you know the basics of how to access the Developer tab and Control Content, you can do some formatting modifications to the checkboxes you add through the Control Content Properties dialog box. Here are some examples of customizations you can make through this feature:
Changing symbols/Styles
- Using the previous steps, insert a checkbox into your word document and highlight it with your mouse
- Go to Properties (within the controls content box)
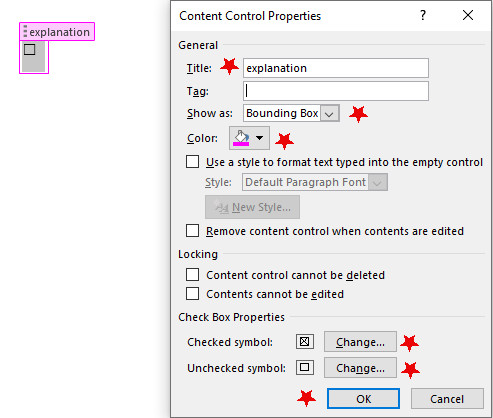
- From there, you will have several options for customization within the Content Control menu, including:
- Start and End Tags
- Colors
- Style formats
- Checkbox symbol options (Go to Checked Box Properties and click Change, clicking on the symbol you prefer)
Adding Explanatory Text
If you want to add explanatory text that you can see when hovering over your checkbox, it’s luckily very easy. This enhances the user’s experience by adding helpful details or instructions, yet it still keeps the document looking tidy and easy to read. Here are the steps:
- Using the Developer tab, insert a checkbox in the desired location
- Highlight the checkbox and click Properties from the Controls dialogue box
- In the Title field, type the text you want to insert and click ok
- Now, when you hover over the checkbox, you should see the text you typed
Changing Fonts, Colors, and Sizes
Changing visual properties of the checkbox is very simple. Once you’ve inserted the checkbox via the Developer tab, highlight the box. From there:
- Go to the Home tab
- At this point you can highlight the checkbox with your mouse and then choose from several possible adjustments, such as:
- Font type (if you’re using letters or numbers for your checkbox symbols)
- Bold, italic, underline
- Box border and checkmark color
- Size of the checkbox/checkmark
Method 2: Convert Bullet Points into Checkboxes
Another way to add a checkbox in Word is to start with bullet points and then convert them to boxes. How you check a box like this works a little differently than the above method because, depending on the box you pick, a check will already exist in it. This is a good method to use if you want to force a neat-looking checkbox instead of the standard one made through the Developer tab.
1. Make a list of items you want to turn into clickable checkboxes.
2. Highlight the list, making sure each item is selected.
3. From the Home tab, in the Paragraph group, select the arrow next to the bullets and choose Define New Bullet.
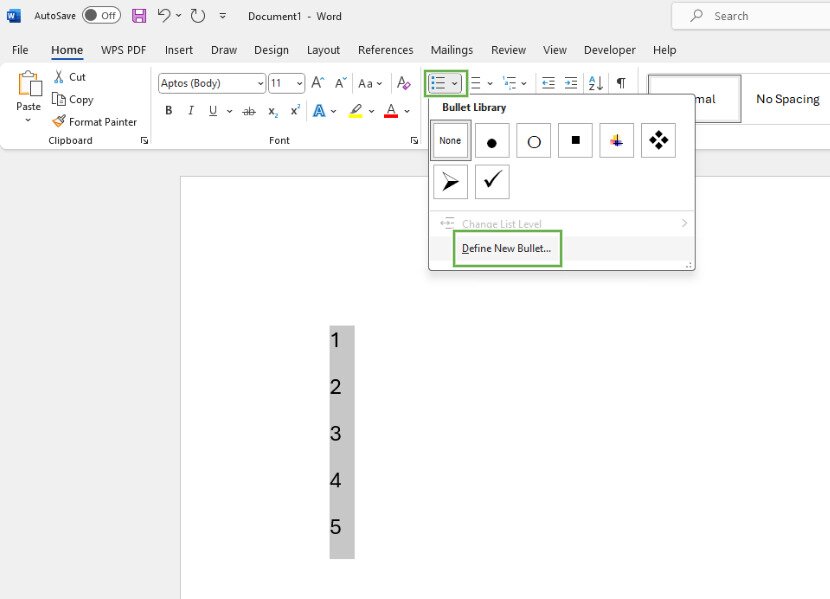
4. Select Symbol and then choose Wingdings as the font type.
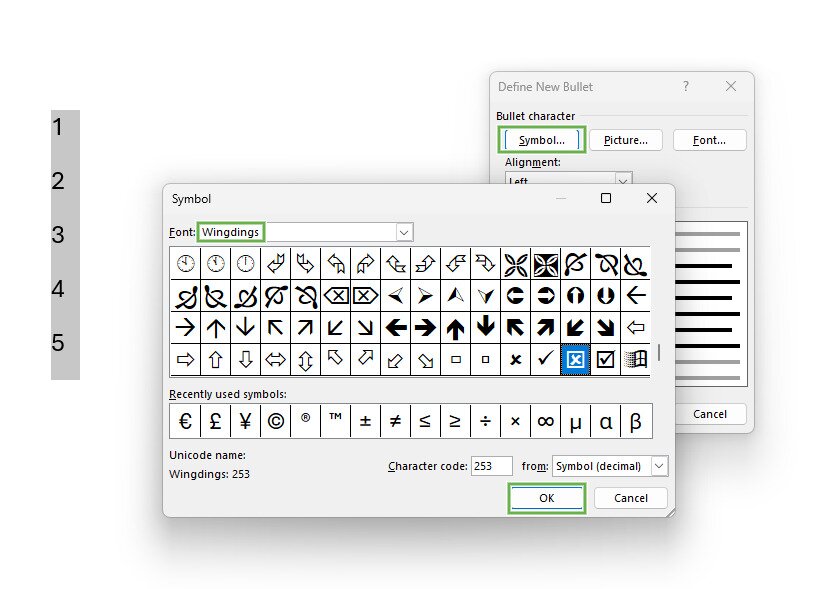
5. Pick a checkbox design. The boxes provided in the preview reveal what the checkboxes will look like.
Method 3: Using the Symbol Dialog Box in Word
Another way to easily insert a checkbox in Word is through the Symbol dialog box. Keep in mind you won’t be able to interact with the checkbox, but it can still be a useful element, especially if you plan on printing out forms or checklists for people to fill in manually. Here are the steps:
- Put your cursor where you want to place the checkbox
- On the top left of the Word document, click the Insert tab
- On the very far right of the ribbon, you’ll see Symbol. Click this. You can either find a suitable checkbox from the menu that opens up, or you can choose More Symbols
- If you chose to explore More Symbols, click on the Font option from the pop-up symbol box. Your best bet for symbol fonts is Wingdings or Sego UI Symbol. Once you find the one you like, click Insert, then Close

- For repetitive use, you may want to simply copy and paste the symbol you added, as it is much faster than going back into the menu every time
Method 4: Using Character Codes for Inserting Check Marks
A quick way of inserting checkboxes and check marks is through character codes. This can be done through the Symbol Dialog Box, such as before. The steps would be:
- Choose where you want your checkbox
- Go to the Insert tab
- Go to Symbol then More Symbols
- Choose Wingdings or Sego UI Symbol for your font
- From there, you can manually type in the character code in the appropriate field to find the right symbol to insert
Common character codes include:
Segoe UI Symbol:
- 2610: Empty Checkbox
- 2611: Checked box
- 2612: Box with X
Wingdings:
- 168: Empty box
- 254: Checked box
- 253: Box with X
You can also use keyboard shortcuts to insert your character code. Here’s how:
- Go to the Home tab and find the Font dropdown list
- Select Wingdings
- Hold down the Alt key as you enter your character code. You will need to use the numerical keypad and put a zero before the code. For example:
- 0252 for an empty checkbox
- 0254 for a checked box
Checking a Box in Other Microsoft Office Applications
Other Microsoft Office applications can also be used for inserting checkboxes and checkmarks. Here is a brief overview of how to insert these in Excel, Outlook, and PowerPoint.
Checkboxes for Microsoft Excel
The steps are pretty similar for Excel as they were in Word. Here’s what to do:
- Open Excel
- Go to File
- Go to Options
- Select Customize Ribbon
- Find the Developer box on the right of the pop-up window and check the box
- Click ok
- The developer tab will open on the top of the excel document
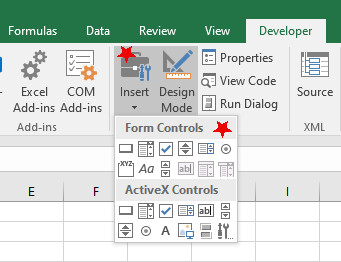
- Click the Developer tab
- In the Controls tab, click Insert
- In the Form Controls box, select the checkbox icon and click anywhere on the spreadsheet to insert it
- It automatically comes with the label “Checkbox1,” which you can easily edit or remove by right clicking the box and selecting Edit Text. You can either change the text or manually delete it
Checkboxes for Microsoft Outlook
Adding checkboxes in Outlook can vary, depending on what version of Outlook you’re using. Overall, the use of checkboxes in Outlook is a static symbol, meaning you won’t be able to uncheck or check the box and interact with it. Whatever the symbol initially is when you insert it, it will stay that way. Still, it can be a great graphic visual to help organize lists and other important content. Here’s what to do:
- Click on the part of the email where you want to insert the checkbox
- Go to Insert
- Go to Symbols
- Choose More Symbols
- Choose the Wingdings font
- In the Character code field, input 252 (for a checked box) or choose a symbol from the options in the menu
- Once you’ve selected your symbol, click Insert, then Close
- You should now have a checkbox
If your version of Outlook doesn’t have these options (which is common), you can create a checkbox elsewhere, such as Microsoft Word, and simply copy and paste it into the email.
Checkboxes for PowerPoint
The steps for PowerPoint are similar to the others. To get a static checkbox:
- Click where you want to put your checkbox within the PowerPoint document
- Go to the Insert tab
- Click on Symbol
- Choose Wingdings from the font menu and choose the checkbox you prefer
- Click Insert and then Close
- You can adjust the style of the checkbox from the Home tab
To insert a checkbox you can click on later:
- Go to File
- Go to Options
- Select Customizable Ribbon
- Check the Developer box and click Ok
- Click the new Developer tab
- Go to the Controls dialog box and click the checkbox icon
- Drag your mouse on your PowerPoint slide to insert the checkbox
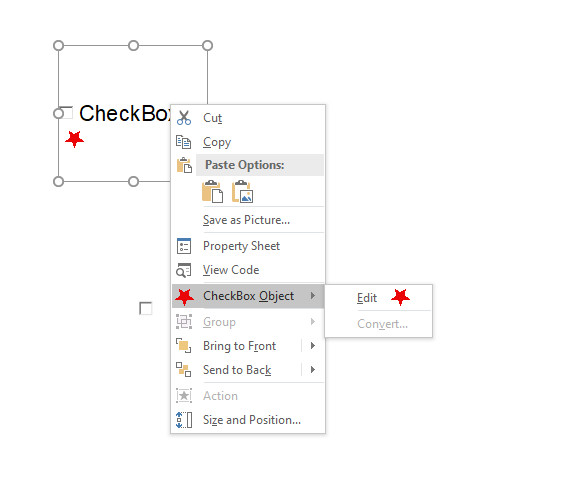
- It will automatically be labeled as Checkbox1. To edit this, right click on the checkbox, go to CheckBox Object and choose Edit. You can either change or delete the text from there. You can check the boxes, but only when you’re playing your presentation as a slideshow
Tips for Adding Checkboxes to Word Doc
- For Printable Checklists: The Developer tab method is great because it leaves open boxes you can check off with a pen.
- For Interactive Forms: Use the Developer tab method so the boxes can be checked off.
- Saving the Document: Ensure to save your document in a format that retains the checkboxes (e.g., .docx).
- Interface Differences: The user interface of Microsoft Word can vary slightly between Mac and Windows versions, but the core functionality remains the same.
- Feature Availability: All the methods mentioned above are available in both Mac and Windows versions of Word.
- Version Consistency: Ensure your Word application is updated to the latest version for the best compatibility and feature availability on Mac and Windows platforms.
By following these steps, you can easily add and customize checkboxes in your Microsoft Word documents, enhancing their functionality and appearance.
Frequently Asked Questions
- How do I insert a tick in a checkbox in Word? Click the empty box to check it off.
- Why can’t I remove a checkbox in Word? Click an already checked-off box to clear the checkmark. If that doesn’t work, restart Word or delete and remake the checkbox.
- Is there a short code for checkboxes? Press Alt+2160 to enter a box that resembles a checkbox. It can’t be interacted with in Word, but it’s useful for a printout.
