How to Indent in Word: 4 Best Methods You Should Know
If you’re writing long-form texts, you should add a structure to the content so that the reader can easily identify the paragraphs. Intending texts or paragraphs in Microsoft Word is one of the best ways to structure your document.
If you don’t have any idea about indenting in the Word app, don’t worry. You’ve come to the right place! Reason to learn how to indent in Word the right way.

1. How to Indent in Word: The Tab Key
The Tab key is the easiest way to indent in Word. Microsoft Word programming lets the tab key insert a 1.27 cm or 0.5” blank space between the left margin and paragraph.
Hence, if you’re working on a short text document requiring only first-line indenting, you may use the Tab key exclusively.
Furthermore, when you use the Tab key on the first paragraph, Word automatically detects the document structure and adds a first-line indent for subsequent paragraphs on its own.
2. How to Indent in Word: First Line Indent
The Tab or Space bar is the unofficial way to insert an indent in a Word document paragraph. If you want to use professional writing structure on your long-form text content, you need to know the built-in indenting tools of Word.
You can start with the First Line Indent tool. Here’s how:
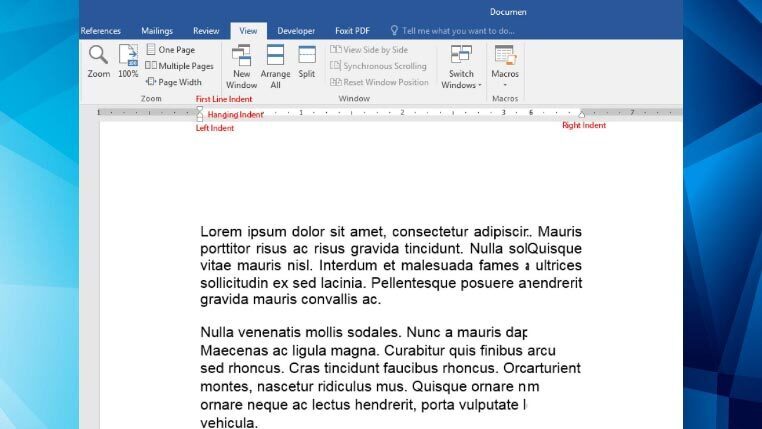
- Click on the View tab of the Word ribbon menu.
- You’ll find the Ruler option in the Show section. Check the box beside it to activate the Ruler.
- You’ll now see a page ruler on top of the Word document.
- The downward triangle is for First Line Indent.
- Put the cursor before the first paragraph and drag the First Line Indent tool to the right by 0.5”.
- Word will automatically apply the indenting format when you start another paragraph.
3. How to Indent in Word: Hanging Indent
If you need to indent all the sentences in a paragraph except for the first sentence, you need to use this indenting tool of Word. Try these steps yourself:
- The upward triangle on the Word ruler is the Hanging Indent tool.
- Put the cursor anywhere on the paragraph and drag the Hanging Indent tool to the right.
- Let go of the tool whenever you’ve reached the desired indent.
- Except for the first line, all the sentences of the paragraph will move according to the indenting length you’ve chosen.
- Word will apply a similar indenting format for the next paragraph automatically.
4. How to Indent in Word: Left and Right Indent
The rectangular box below the Hanging Indent tool controls the left indent of paragraphs. On the other hand, the upward triangle at the extreme right of the ruler is the Right Indent tool.
Whenever you need to insert a specific space gap between the paragraph and left or right margin of the Word document, you need to use the Left and Right Indent tools respectively.
Conclusion
So far, you’ve learned the best and most simple methods of indenting on Microsoft Word. If you’ve performed the indenting examples as mentioned in this “how to indent in Word” tutorial, you should be confident in indenting paragraphs or texts appropriately.
You may also want to learn how to wrap text in Word if your document contains images, and you need to wrap texts around those images the right way.
