How To Insert An Image In MS Word That Updates Automatically
Good documentation is hard to maintain. It’s also important to have good documentation. Whether you’re working on a specifications document or a group project, it will undergo changes. Lots and lots of changes. Enough to make you want to pull your hair out. You will have to manually update the document but it’s a good idea to automate whatever you can. Case in point; the images in the document. You can insert an image in MS Word that updates automatically. In order to do this, the image must be hosted somewhere online. Moreover, your recipients must have an active internet connection to view the images, and get the latest one.
Select Image Hosting Service
The key to inserting an image in MS Word that updates automatically is to host it where you can update the image but keep the link intact. We recommend Dropbox. You can update a Dropbox file without breaking the link. This makes it ideal for our purpose.
Direct Link To Image
You’re gong to insert an image from a URL in MS Word. This is how you get it to update automatically when you need to. We recommend using Dropbox but there’s one little complication you need to get around. Dropbox doesn’t give you the direct link to a file. Without the direct link, you can’t insert the image it points to in MS Word.
The workaround is simple. Copy whatever link Dropbox gives you for your image. Replace the ‘www.dropbox.com’ with ‘dl.dropboxusercontent.com’.
For example;
This link;
www.dropbox.com/s/guoyupf4u0iic6f/Image-1.jpg?dl=0
becomes;
dl.dropboxusercontent.com/s/guoyupf4u0iic6f/Image-1.jpg?dl=0
Insert Image In MS Word
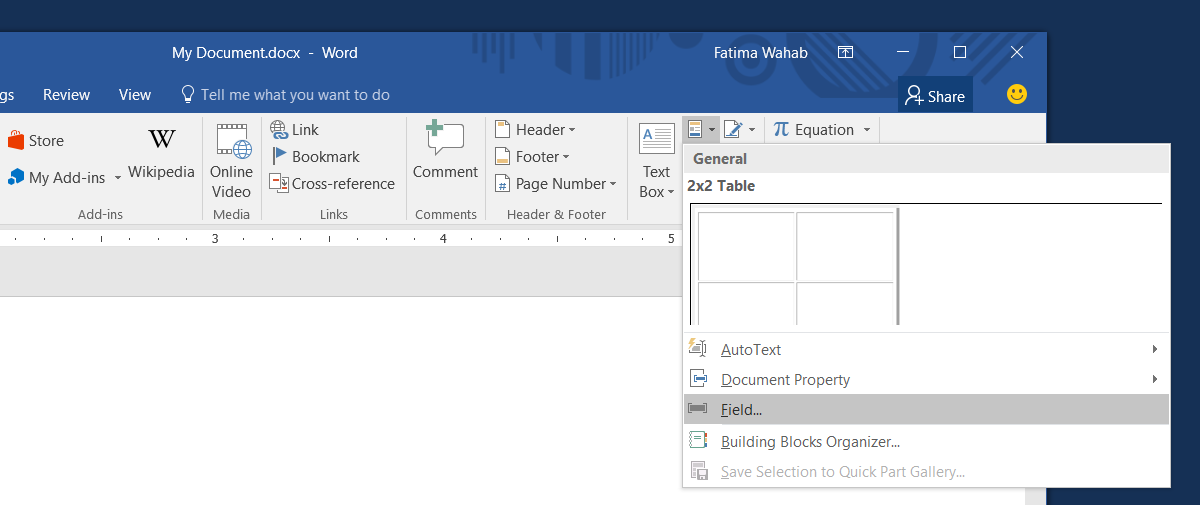
Open the file you want to insert the image in. Go to the Insert tab and open the Quick Parts dropdown. From the dropdown, select ‘Field’.

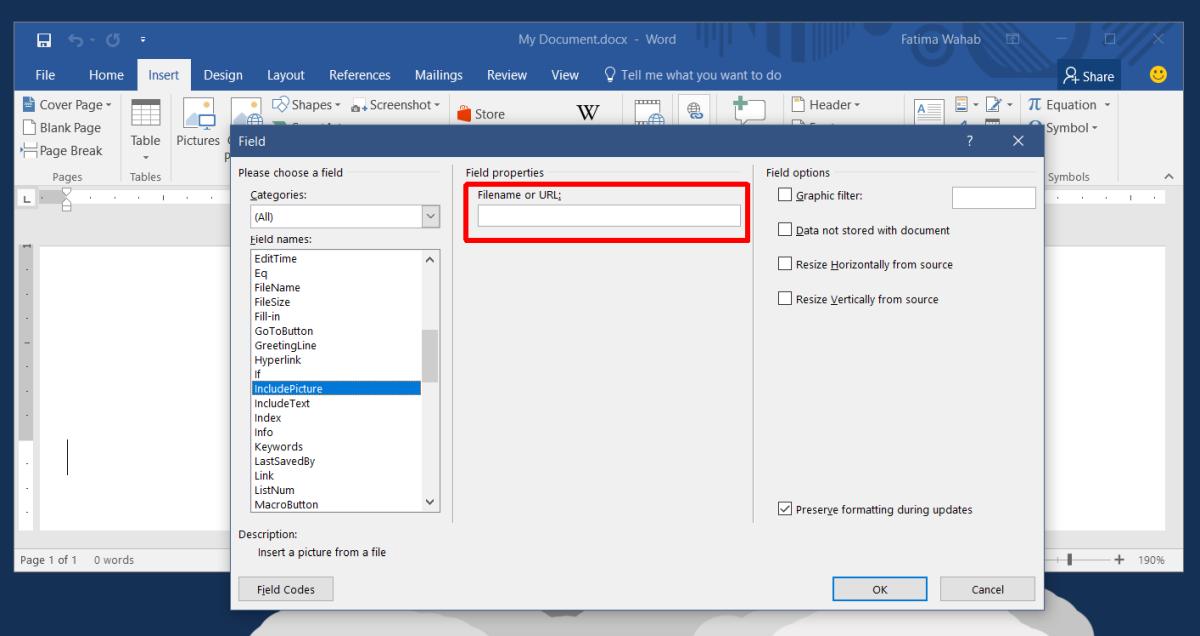
A new window will open listing all the fields you can insert. Look for, and select the InsertPicture field. In the field properties, paste the direct link to the image you want to insert in your document. On the right ‘Field Options’ column, check the ‘Date not stored with document’ option, and the ‘Resize Horizontally from source’ and ‘Resize Vertically from source’ options.

Click Ok, and your image will be inserted.
Replacing Image In Document
Now that you’ve added an image in MS Word that updates automatically, you need to update it. To update the image, you will not need to access the document at all. What you have to do instead is change the image that the URL points to. Simply replace the image in Dropbox. The next time the document is opened, it will fetch the latest image from the URL.
If the document is opened on a system that isn’t online, the image will not appear at all.
InsertPicture Field Options
You might be wondering what the three options you enabled when inserting the image were. The ‘Date not stored with document’ option tells MS Word not to download the image from the URL. Instead, MS Word fetches the image from the link every time the document is opened. This is key to getting the image to update.
The two resize options make sure the new, updated image is resized accordingly so that it fits in the document. If you don’t enable these options, the image might appear stretched. There is also one downside to this option; your text might be displaced. If the image is inserted in-line, you won’t have too many problems.

The correction of the Dropbox link to a direct link should be as follow and not as in the post (probably dropbox changed it ).
www.dropbox.com/s/guoyupf4u0iic6f/Image-1.jpg?dl=0
dl.dropbox.com/s/guoyupf4u0iic6f/Image-1.jpg?dl=0