Angry IP Scanner Review for Network Scanning
Depending on who you ask, you may hear that Angry IP Scanner is one of the most popular IP scanning tools on the market, preferred by network administrators, script kiddies, and professional bug bounty hunters alike.
As you can imagine, Angry IP Scanner is a tool that helps you scan for IP addresses. This is quite suggestive, considering that the very purpose resides in the tools’ very name; aside from the angry part, the name gives it away.
However, you’ll soon learn that scanning for IP addresses is not the only utility of this tool. It can also provide you with a bunch of additional details about the host you’re scanning, such as its ping, hostname, open ports, and web server (if available).

Angry IP Scanner REVIEW
Open-source, multi-platform
First and foremost, it’s worth mentioning that Angry IP Scanner is released with an open-source license. GPLv2, to be more precise. This implies that you can download it, use it, and even modify it for free.
However, it’s also an invitation for novices to tread lightly, especially if they don’t fully understand the implications of downloading and running open-source software on their machines.
Moving on, Angry IP Scanner works like a charm on all popular platforms including Windows, Mac OS, and Linux. We’ll get back to that in a few, in the system requirements section.
If you’re an advanced user who knows its way around programming and you’re not afraid to get your hands dirty, you can also download and compile Angry IP Scanner’s source code on your own.
System requirements
Before we go on further detailing the installation process of Angry IP Scanner, we need to establish if your machine supports it beforehand. That being said, let’s take a look at Angry IP Scanner’s system requirements:
- Operating system:
- Windows:
- 10, 8.1, 8, 7, XP, 2000, ME, 98 (32/64 bit)
- Mac OS:
- minimum supported version is 10.10 Yosemite
- Linux:
- Ubuntu, Debian, Mint, Fedora, RedHat, Mageia, openSUSE (32/64 bit)
- Windows:
- Storage space:
- at least 50 MBs of free HDD or SSD space
- Memory:
- at least 30 MBs of RAM
- Software requirements:
- at least Java/OpenJDK 8, version 11 is recommended
As you can see, you don’t need a supercomputer to run Angry IP Scanner. If you download the legacy version of Angry IP Scanner (2.21) from the official website, you don’t even need to install it.
It goes without saying that you also need a network adapter, and actually being on the network you want to perform the scan on. If you want to run a scan over the Internet, you’ll also need a working Internet connection.
Installing Angry IP Scanner
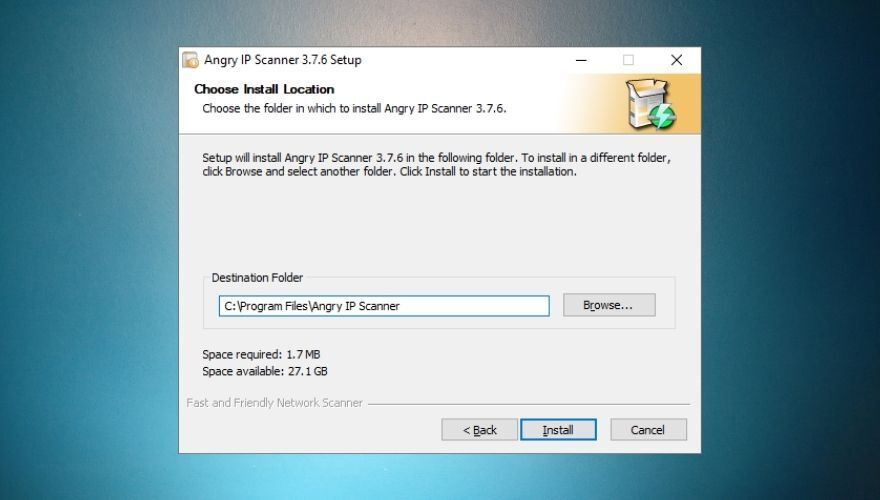
Deploying Angry IP Scanner on your Windows PC (sorry, we only tested it there) is a walk in the park. Despite the app’s somewhat technical nature, installing it is not complicated at all.
After downloading the installation kit executable from the official website, you just need to run it, grant it Administrator rights, and define an installation path on your PC.
Once you do that, all you have to do is press the Install button and wait for the process to complete.
If you download the legacy version we mentioned above, installing the program won’t be necessary at all. You just need to run the executable and start using the app.
However, you can also use the Utils menu to deploy shortcuts on your system if you want to. Check our screenshot below if you need help operating the menu.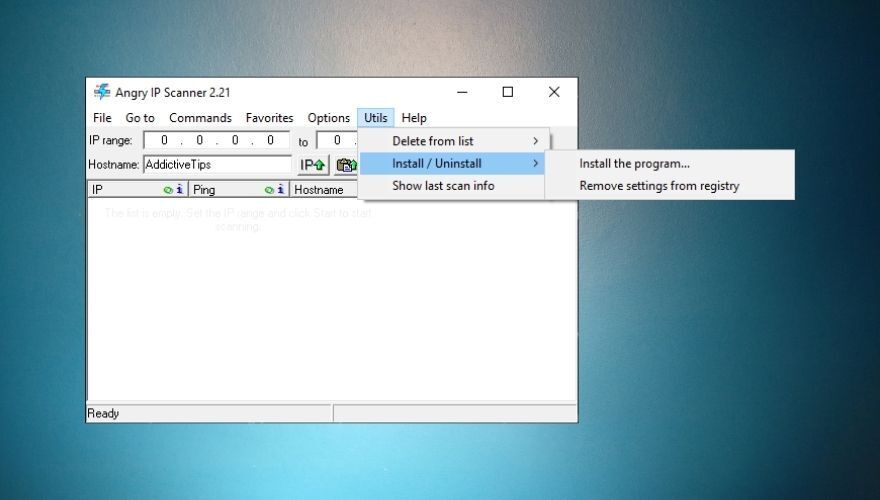
User-friendly interface
Once you launch it, you’ll be greeted by Angry IP Scanner’s main window and a welcome screen sporting some really useful tips that can help you better understand this tool.
If you don’t need the tips, just close the Getting Started window, and let’s explore the tool for a while.
Angry IP Scanner has by no means a modern look. At first sight, it looks like a spreadsheet with some extra features here and there. However, what you’re looking at is an extremely powerful tool in user-friendly clothing.
If you have a bit of experience with networking tools, you should have no trouble understanding the app and its specific terminology. If not, maybe you shouldn’t have skipped that welcome screen with helpful tips. Good thing you can bring it back by pressing F1 on your keyboard, huh?
Does what it says, sans anger
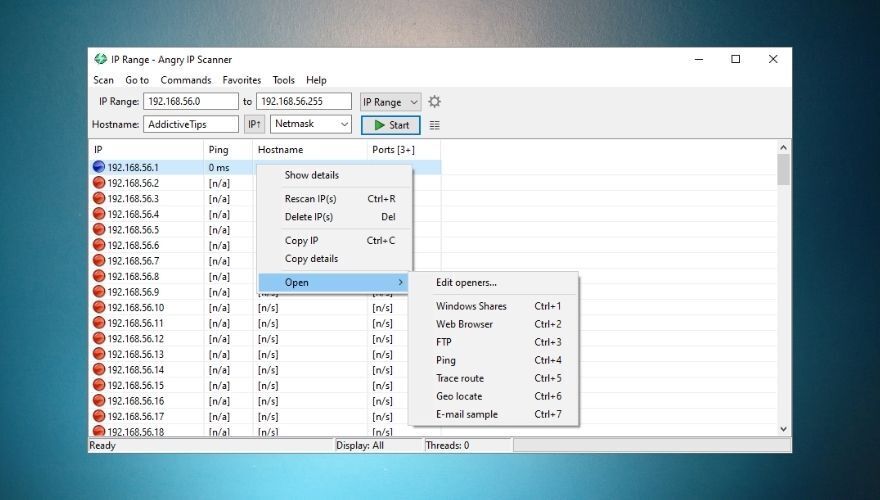
Are you eager to use Angry IP Scanner? Good, so all you have to do is give it a target and hit the Start button. You can choose to define a range of IPs, scan randomly in a given range, or load a text file holding IP addresses by using the IP Range context menu.
Your hostname is automatically typed in the specific field so that you can easily spot your device among the machines you’ll be scanning. Just give it a try and perform a scan using the default settings to see it in action. Quite fast, right?
The program should display detected IP addresses, ping value, hostname, and opened ports. If you’re not satisfied with the scan results, you can always change the netmask by using the dropdown menu next to the Start button.
Additional fetchers included
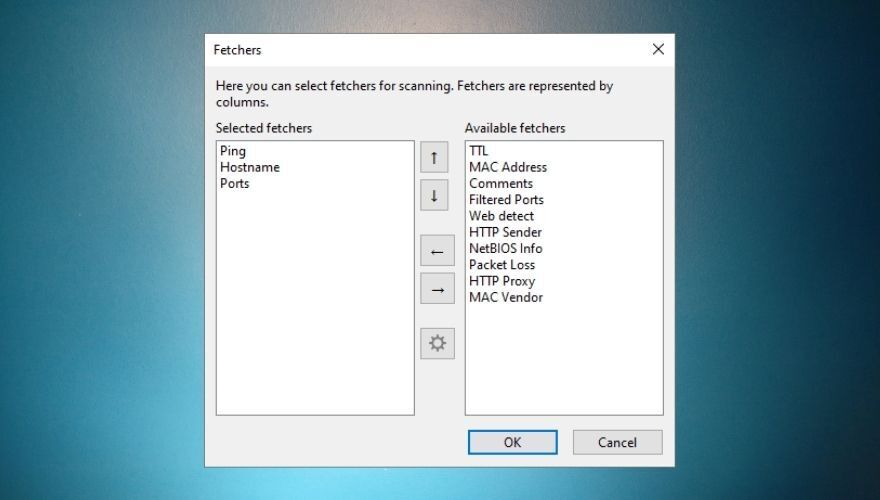
If you already read the helpful tips, good for you; you probably know what a fetcher is and what it does. If not, we’re going to tell you anyway. A fetcher brings you specific details about the host, whether you’re looking for its ping, opened ports, or hostname.
Furthermore, you might’ve noticed that Angry IP Scanner provides you with three fetchers by default. Thus, in addition to the host’s IP address, you can also see how many open ports it has, its hostname, and the ping value.
If you need more details about the host, locate the button at the right of the Start button and give it a hearty click. From the newly opened menu, you’ll be able to choose new fetchers for your project. Namely:
- TTL
- Mac Address
- Comments
- Filtered Ports
- Web detect
- HTTP Sender
- NetBIOS Info
- Packet Loss
- HTTP Proxy
- MAC Vendor
Just select the ones you’re interested in and click the Add button (left arrow) to add them to the Selected Fetchers list. Now each scan you’ll do from this point onward will return additional information about the host, as per your request.
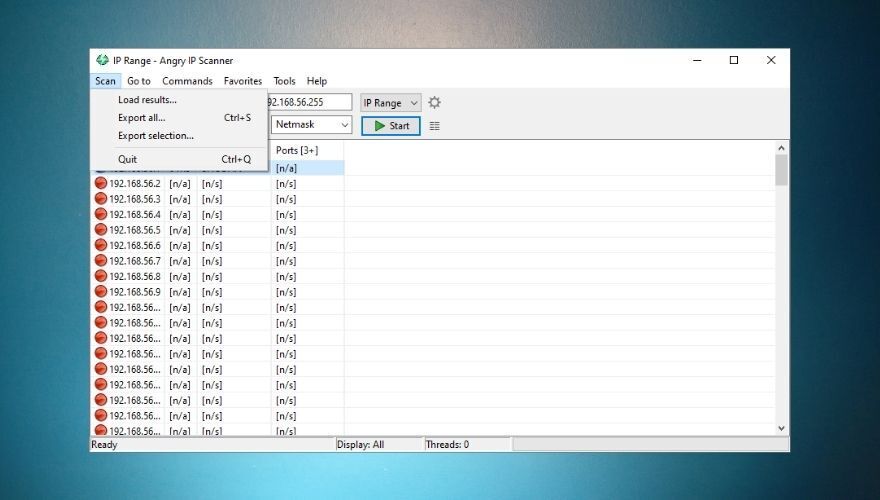
Export results to various formats
After you’re done performing the scans, you can save the results on your PC so that you can easily resume working on your project some other time. Exporting results can be done by using the appropriate features in the Scan menu.
If you want to save all of the results, a quicker way would be using the CTRL + S hotkey combo on your keyboard. Alternatively, you can select just a bunch of results and use the Export Selection feature in the Scan menu to save only selected items.
Angry IP Scanner can export results in four different formats: TXT, CSV, LST, and XML. Furthermore, you can even load previously saved files on your PC by using the Load Results function in the Scan menu.
Bonus: if you’re passionate about jotting stuff down and managing lists, you’ll be glad to know that Angry IP Scanner also has a Favorites section you can use. Just select the hosts you’re interested in and press CTRL + D on your keyboard.
If you want to see your Favorites list, you can simply go to Favorites -> Manage Favorites. Surprise, they’re all there!
Easy to configure
Angry IP Scanner is easy to configure, but only if you know what you’re doing. You can increase the delay between starting threads, adjust the maximum number of threads, switch the pinging method, scan dead hosts, set port connection timeout, and even choose the system language.
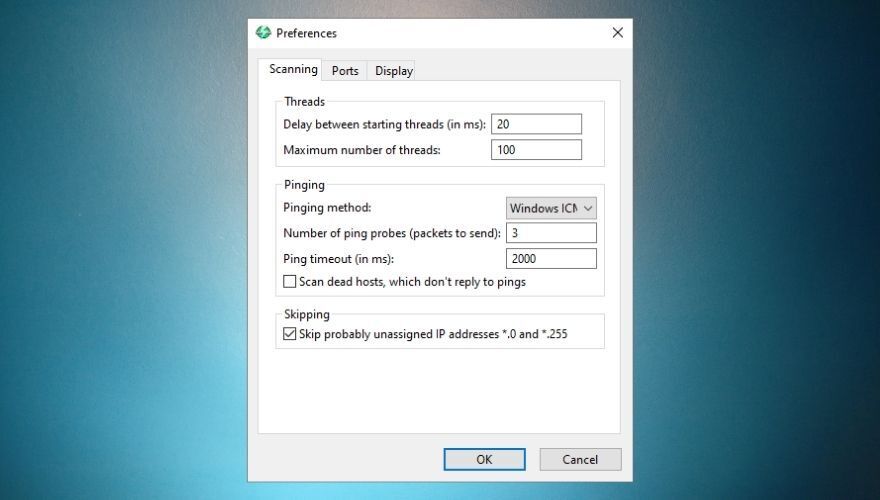
To make these changes you will have to access the Preferences window in the Tools menu. The settings you can adjust are neatly organized in tabs and have quite intuitive descriptions, so you really can’t go wrong.
You can access the Preferences window by accessing directly from the Tools menu or pressing CTRL + SHIFT + P on your keyboard.
User-friendly, lightweight yet powerful IP scanner
All things considered, despite its reduced size, Angry IP Scanner is a powerful tool you can use for network security assessments. It can scan for IP addresses, ports, hostnames, MAC addresses, NetBIOS info, and packet loss extremely fast.
Angry IP Scanner comes with a user-friendly interface, but it requires a bit of know-how if you want to be proficient with it. You can easily configure it and deploying it won’t take much of your time.
Last, but not least, it can save and load results, making it extremely easy to put a pin in your current projects and resume working on them later on, if needed.
