How To Build A Custom Ubuntu Version With Ubuntu Minimal
Have you ever wanted to customize your Ubuntu PC as it installs? With the official minimal installer you can. Ubuntu Minimal is a lesser-known version of the popular Linux-based operating system. If you go to Ubuntu.com, you won’t see a download for it. This is because the company behind Ubuntu doesn’t really push their alternative installer. Still, with each release the Minimal installer receives the latest Ubuntu packages and you can use it to build a custom Ubuntu version.
SPOILER ALERT: Scroll down and watch the video tutorial at the end of this article.
To get everything going, download the ISO file. Then check out our tutorial on burning ISO images, and burn the Ubuntu install image on a CD/DVD or USB drive. When the minimal installer has finished burning, you’ll need to boot it up on your PC. This is done by changing the boot order on the BIOS of your PC. As you load it up, change it so that it loads the USB stick (or CD/DVD) before anything else. This will ensure that the Ubuntu installer boots up correctly.
Note: keep in mind that each PC is different. For some PCs, pressing the F2 key loads the BIOS area. Other times DEL or ESC works. Accessing the BIOS requires a special key combination. To figure this out, refer to your computer’s system manual.
Using The Minimal Installer
The Ubuntu Minimal installation tool is a lot different from the traditional Ubiquity installer. Instead of loading the Ubuntu desktop environment, you’ll be taken to an ncurses tool where you build an Ubuntu installation slowly. The first step is to choose your language. Look through the installer, select the language (if the installer didn’t auto-detect it), and press the enter key. Next, select your country and press enter to continue once again.
On the next page, Ubuntu will ask you to set your keyboard layout. This kind of thing is usually auto-detected, so press the enter key to move to the next step.
After selecting language, country, keyboard layout, etc., the installer will ask you to set up a host-name. The host-name is a nickname you give your Linux PC. This nickname will be seen by other PC’s on the network, so use that to your advantage. Erase the default “ubuntu” host-name, enter a new one and press the enter key.

Setting up the default user for Ubuntu is the next step. Enter the full name for the user, as well as the your desired user name and password into the fields. When the system finishes making the new user, Ubuntu will asks if you’d like to “encrypt your home directory”. Select yes if you’d like extra security. Otherwise, select “no” to continue on.
The next step in the installation process is to partition the disk. There are several options to choose from: guided – use entire disk, guided – use LVM, guided – encrypted LVM, and manual.
Not looking to set up an entire custom partition setup? Select the first option “guided – use entire disk”. Otherwise, select manual to set up your own partition layout. Don’t select LVM unless you actually know what LVM means.

With the partition method selected, Ubuntu will take some time and create the necessary modifications to your hard drive so that the rest of the operating system can install. Be patient. When the base finishes installing, the first part of the installation process is complete.
Customizing Your Ubuntu Installation
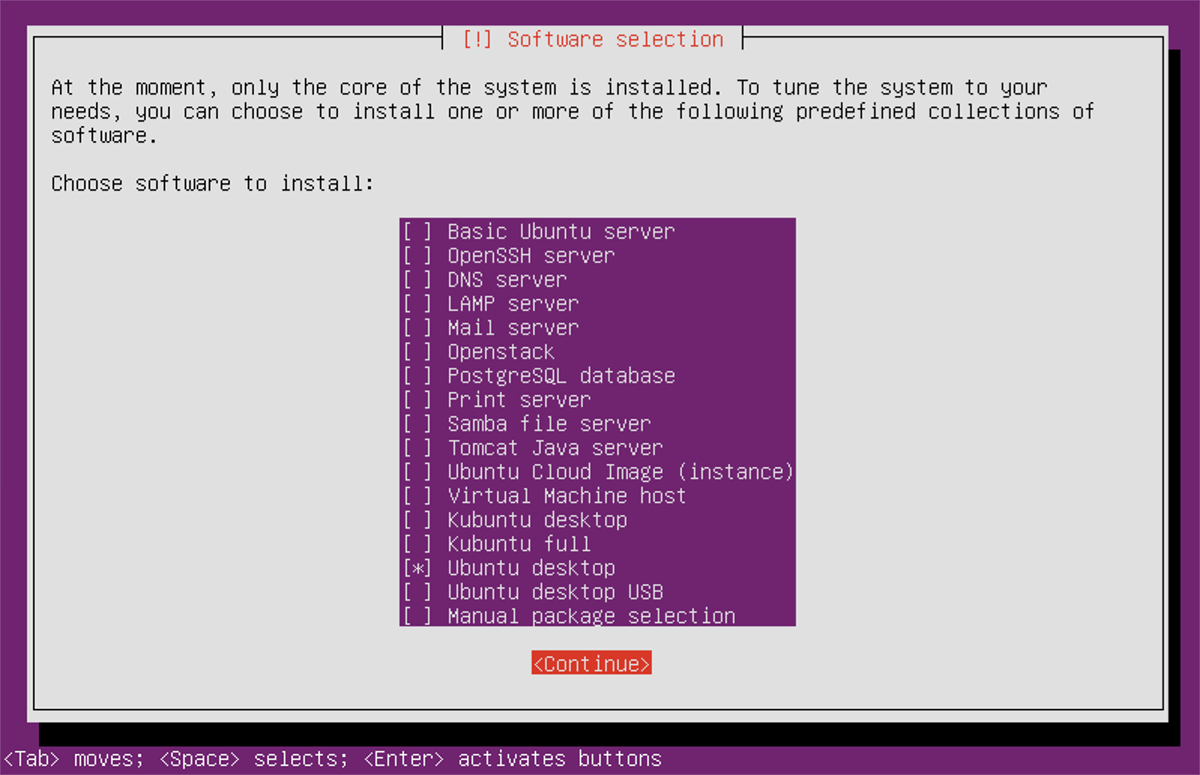
After the base system installs, the next step is to customize your installation with the “software chooser”. The software chooser is a big window that opens up, that the user can go through and select individual items to install.
Ubuntu Minimal lets the user turn this installation into a server, by selecting several of the server options, such as “samba server”, “LAMP server”, “DNS server” and etc. Alternatively, users can install the meta desktop package for any of the individual Ubuntu flavors. What does this mean?
For example, going through the software chooser to select “Lubuntu Desktop” means that Ubuntu Minimal will take all of the Lubuntu packages, and turn this installation into a Lubuntu PC. Programs, loading screen, everything.

Flavors in the installer include: Lubuntu, Kubuntu, Xubuntu, Ubuntu Budgie, Ubuntu Mate, Vanilla Gnome Ubuntu, traditional Ubuntu and other options.
To turn your installation into a specific flavor of Ubuntu, use the arrow keys on your keyboard and find the option you’d like, and press the spacebar to check the box. Keep in mind that the installer will let you install multiple things. This means if you want both Lubuntu and Kubuntu desktops on the same PC, you can select and install them.
Finishing Up

After selecting the software, Ubuntu will download it and install it on your PC. Since none of these packages are on the ISO itself, everything has to download from the internet. When the downloading completes, the installer will show a complete message, and prompt you to reboot. On log-in your new, custom Ubuntu is ready to go!
