The Beginners Guide To The AwesomeWM Windows Manager
If you’re tired of the other tiling widow managers out there and want something a little different, consider using AwesomeWM. It’s a dynamic window manager that makes use of different types of window sorting. With it, windows can be sorted in numerous ways — not just the traditional “tiled” way. It is highly configurable, fast and targeted at power users who have a little bit of technical know-how.
To be clear: heavy customization will require the user know the LUA programming language. On the surface, this seems pretty intimidating because programming is difficult to those that are not versed in that kind of thing. New users: don’t worry! The defaults are good enough that the average user will most likely not need to change anything at all.
Installation
The AwesomeWM is available on most (if not all) mainstream Linux distributions by one name or another. Unlike some window managers, you will not need to create a custom login entry to use it. Instead, as you install the manager, it’ll make a desktop entry to log into.
Ubuntu
sudo apt install awesome
Debian
sudo apt-get install awesome
Arch Linux
sudo pacman -S awesome
Fedora
sudo dnf install awesome
OpenSUSE
sudo zypper install awesome
Other
AwesomeWM can easily be installed by searching your package repository for “awesome”, or “awesomeWM”. The only thing to keep in mind is that some operating systems may label it as “awesome”, or something similar.
If you’re not able to find it in your distribution’s repository, consider going to the window manager’s website, and using the download button. There are many different operating systems listed on the website so you won’t be disappointed.
Using AwesomeWM
Using AwesomeWM is pretty straight-forward. It looks vaguely similar to a lightweight desktop environment (with a panel and everything). Unlike i3, you won’t need to use a launcher to get programs to start. Instead, the window manager scans your entire PC for programs.
To open any program, click the “A” menu. Inside this menu, users can browse and launch any program currently installed on the PC. To open a program, hover over Applications.
Additionally, users can open a terminal, log out and re-load the session by clicking these options in the menu as well.
Virtual Desktops
Though Awesome is primarily a tiling window manager, it also makes heavy use of “desktops”. If you’re not sure what “desktops” are in this instance, the best way to think of them is that they are similar to workspaces on Gnome Shell, Mate, KDE Plasma etc.
These desktops allow users to have an individual page with apps assigned to each page. For example: on desktop 1, you may have several terminals tiled neatly, and so on. This kind of set up allows for a lot of freedom. To switch between any desktop, use the mouse and click the number in the panel. Each number corresponds to a different desktop workspace.
Changing Tiling Types
By default, the window view Awesome uses is “floating”. This just means that the windows are not organized together, and are layered on top of each other. To change this view, click the icon in the top right-hand corner of the panel. This button instantly changes the layout of the windows on screen. These views are in order, so to sort through the different tile types, you’ll need to click a few times.
Startup Applications
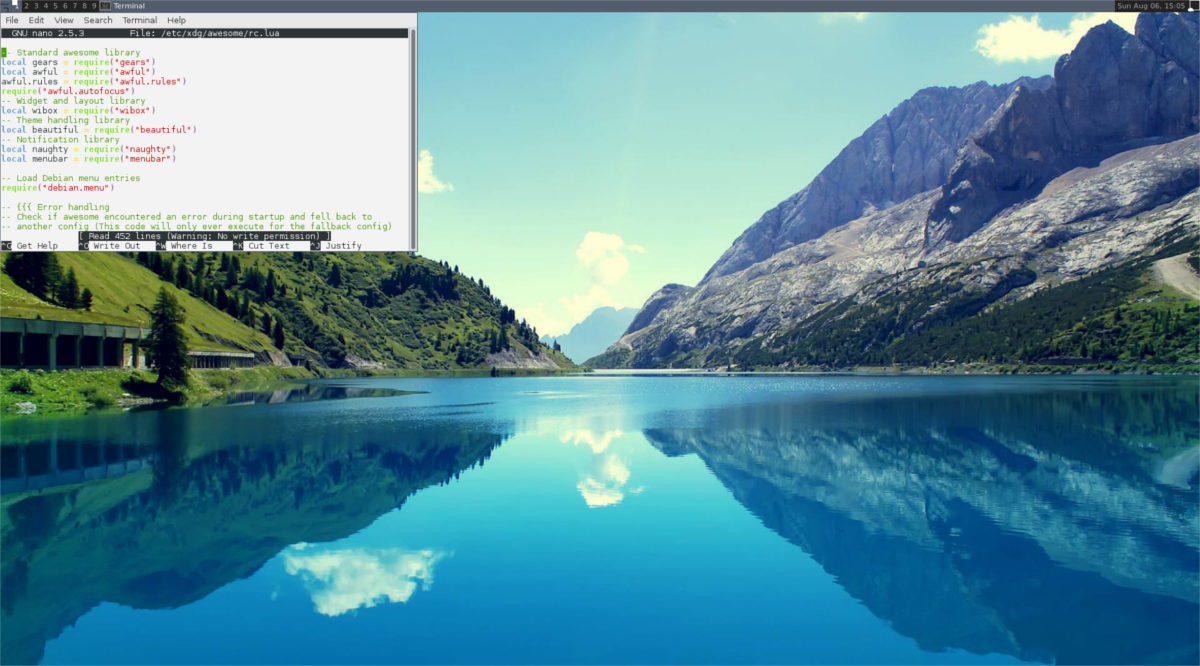
Many desktop environments have the ability to launch programs at login. Here’s how to do it with AwesomeWM. First, open a terminal (by clicking terminal in the awesome menu), and then open the rc.lua configuration file.
sudo nano /etc/xdg/awesome/rc.lua
Navigate all the way to the bottom of the rc.lua file, and paste this code inside of it. Please change “program1”, and etc with the names of programs you wish AwesomeWM to start as you log in. Save the nano text editor with Ctrl + O.
-- Autorun programs
autorun = true
autorunApps =
{
   "program1",
   "program2",
   "program3",
   "program4",
   "program5",
}
if autorun then
   for app = 1, #autorunApps do
       awful.util.spawn(autorunApps[app])
   end
end
Setting The Wallpaper

There are a few different ways to change the wallpaper in AwesomeWM. The first method involves physically swapping out the default wallpaper file with something else. The second method involves adding some LUA code. These methods work fine, but there is an easier solution, and it involves the Feh program.
To start off, open a terminal and install Feh.
Ubuntu
sudo apt install feh
Debian
sudo apt-get install feh
Arch Linux
sudo pacman -S feh
Fedora
sudo dnf install feh
OpenSUSE
sudo zypper install feh
Other
Feh is a simple program, and most distributions have it. To install it on an operating system not listed here, search for the package “Feh”. If for some reason your Linux distribution doesn’t have this app, try going to Pkgs.org. It’s a good resource for finding programs on obscure Linux distributions.
Set Wallpaper With Feh
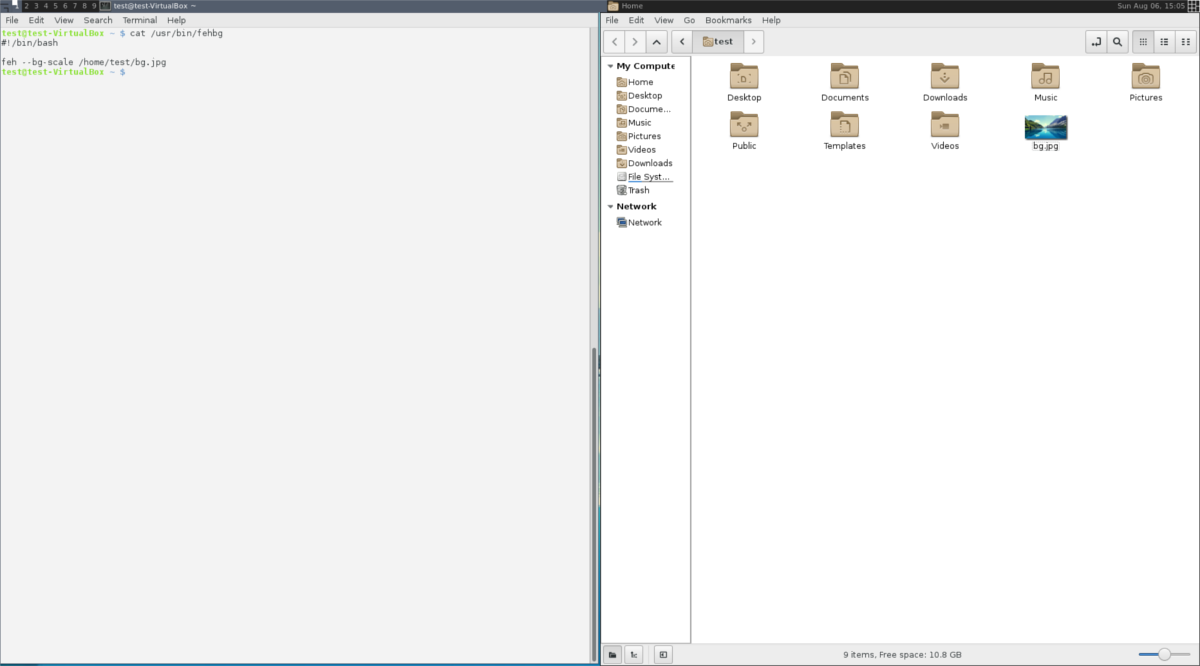
Open a terminal, and create a new text file:
nano /home/username/fehbg
Paste this code inside the fehbg file. This command will tell the Feh program to set the wallpaper.
#!/bin/bash

feh --bg-scale /path/to/wallpaper.jpg
Save fehbg with Ctrl + O.
Change the permissions to fehbg with Chmod:
sudo chmod +x fehbg
Then, move fehbg to /usr/bin
sudo mv fehbg /usr/bin
To set the wallpaper, add “fehbg” to your autostart script, in rc.lua. Refer to the section Startup Applications section of this article for instructions. When the fehbg script is added, AwesomeWM will automatically set the wallpaper as the user logs in.
To edit the wallpaper that Feh sets, simply open a terminal, and edit /usr/bin/fehbg with nano.
Conclusion
Out of all the tiling window managers on Linux, AwesomeWM is a candidate for the most versatile. This is because it brings the best of both worlds. It allows tiling fans to satisfy their needs by providing various tiling layouts, as well as float windows (like traditional desktop environments), and a functional system tray.
Though any advanced configuration will likely mean programming in LUA, don’t let that scare you away. The excellent defaults, and great functionality more than makes up for this. If you’re looking to get into using tiling window managers, try AwesomeWM.

No, do not move fehbg to /usr/bin. Create your own bin directory in your home directory. In your autostart script (rc.lua), refer to the fehbg file in your ${HOME}/bin directory instead. You should keep /usr/bin for files installed by the system. If you really want this in a “central” location, then dump it into /usr/local/bin, but really, it’s your script, not a script for everyone on the computer, that’s why ~/bin/fehbg