What RAM Do I Have? Check Type, Speed & Size in Windows
Not sure what RAM you have? Whether you’re planning an upgrade or troubleshooting a slow PC, you can check your RAM type, speed, size, and form factor directly from Windows — no need to open your computer. This guide covers every method, from quick built-in tools to free third-party apps that give you even more detail.
Quick note on compatibility: DDR4 and DDR5 RAM are physically incompatible with each other. Installing the wrong type will prevent your PC from booting, so it’s worth confirming exactly what you have before buying anything.
Editor's Pick June 2026
How to Check How Much RAM You Have
The fastest way to see how much RAM is installed is through Windows Settings. This works on Windows 10 and Windows 11.
- Press Windows + I to open Settings.
- Go to System, then select About.
- Under Device specifications, look for Installed RAM. This shows your total RAM in gigabytes.
You can also open the System Information tool (press Windows + R, type msinfo32, and press Enter) and look for Installed Physical Memory (RAM) near the top of the System Summary page.
How to Check Your RAM Speed Using Task Manager
Task Manager provides useful system information, including your RAM speed. Follow these steps to check your RAM speed in Windows 11:
- Open Task Manager by right-clicking the taskbar and selecting Task Manager.
- Go to the Performance tab from the left menu. It’s the second from the top if you don’t see the word.
- Select Memory.
- Your RAM speed is displayed under the memory graph, along with other details like usage, how many RAM slots are used, and form factor.
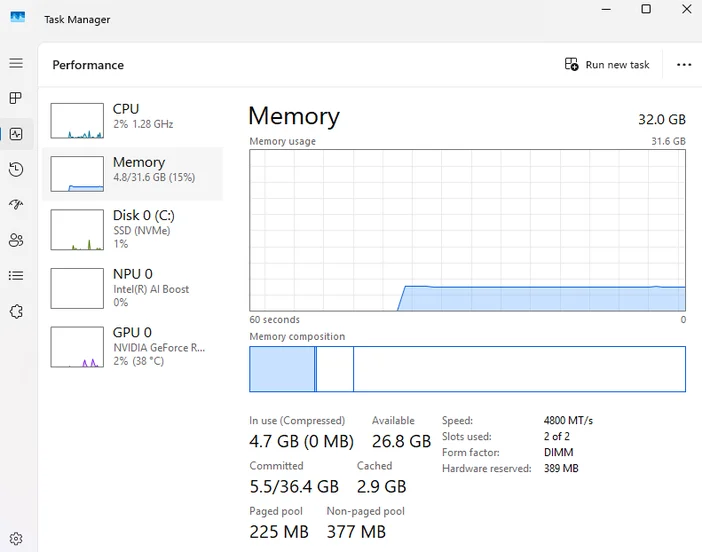
The form factor shown here (DIMM or SODIMM) also tells you what physical type of RAM your system uses — important when shopping for a replacement or upgrade stick.
How to Check RAM Details Using Command Prompt (Type, Speed, Capacity)
Command Prompt can pull up RAM information including capacity, speed, and memory type. The output is a bit more technical than Task Manager, but you get per-slot details which is useful if you have multiple sticks installed.
- Open Command Prompt. Windows 11 may launch Terminal instead, but it works the same way.
- Copy and paste this command:
wmic memorychip get BankLabel, DeviceLocator, MemoryType, Capacity, Speed - Right-click in Command Prompt to paste it, then press Enter.
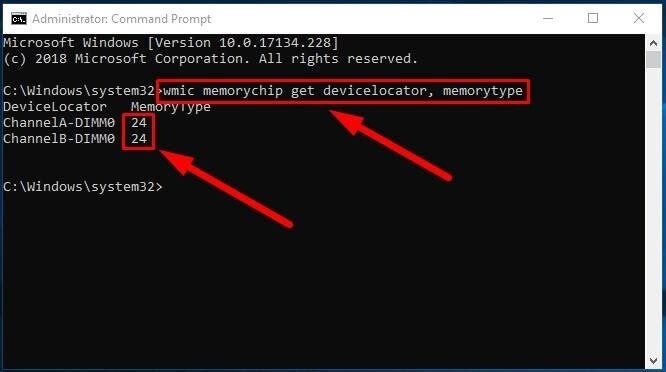
Important: The MemoryType field returns a number, not a readable label. Here’s what the common codes mean:
- 24 = DDR3
- 26 = DDR4
- 0 or 2 = Type not detected — use CPU-Z instead for a reliable reading
Note: The wmic tool is deprecated in Windows 11 and may eventually be removed. If it doesn’t work on your system, use this PowerShell alternative instead: open PowerShell and run Get-CimInstance -ClassName Win32_PhysicalMemory | Select-Object BankLabel, DeviceLocator, MemoryType, Capacity, Speed. The output is the same.
How to Check Your RAM Type by Using Third-Party Tools
For the clearest, most detailed RAM information, free third-party tools are hard to beat. They show DDR type in plain text (no numeric codes), and they surface extra details like manufacturer, part number, and dual-channel status that Windows’ built-in tools don’t always show.
Good options include Speccy, CPU-Z, and HWiNFO. All three are free and widely trusted by PC builders and IT professionals — download only from their official sites.How to check your RAM type using Speccy:
How to check your RAM type using Speccy:
- Download and install Speccy.
- Open Speccy and wait for it to finish scanning your system.
- Select RAM from the left-hand menu.
You’ll see your RAM type, size, speed, and details for each installed module listed clearly on the right.
How to check your RAM type using HWiNFO:
- Download and install HWiNFO, then open the program. A portable version is available from that link if you’d rather not install it.
- Select Start on the first screen.
- Expand the Memory section on the left.
- Choose a memory module, or select whatever is listed if you only see one.
- Look at the Module Type line to find your RAM type. In our testing, this showed DDR4 SDRAM clearly. You’ll also see the Manufacturer and Part Number fields in the same panel — useful if you want to buy a matching stick for a dual-channel setup.

What Does the RAM Type Mean?
Now that you know what RAM you have, here’s a quick breakdown of what each type means — and what it means for you practically.
| Type | Typical Speed Range | Common In | Practical Note |
|---|---|---|---|
| DDR | 200–400 MT/s | Very old PCs (pre-2007) | Obsolete. Upgrading RAM isn’t cost-effective — consider a full system replacement. |
| DDR2 | 400–1066 MT/s | Older PCs (2004–2010) | Largely obsolete. Hard to find new sticks; system replacement is usually the better option. |
| DDR3 | 800–2133 MT/s | PCs from roughly 2007–2017 | Still functional for everyday tasks, but aging. Affordable to upgrade if your motherboard supports it. |
| DDR4 | 1600–3200 MT/s (and higher) | Most PCs from 2014 onward | Current mainstream standard. Compatible upgrades are widely available and affordable. |
| DDR5 | 4800 MT/s and up | Newer PCs from 2021 onward | Latest standard. Faster and more efficient than DDR4, but requires a compatible motherboard and CPU. |
| SODIMM | Varies (DDR3–DDR5) | Laptops, mini PCs | Smaller physical form factor than standard DIMMs. Available in all DDR generations. Check your form factor before buying. |
If your computer is sluggish, slow RAM could be partially responsible. You can overclock your RAM to squeeze more performance out of it for multitasking.
What Does the RAM Type Mean?
Now you know your RAM type, but have you ever wondered how it stacks up against others? Here’s a quick look at the different types of memory modules commonly found in computers:
- DDR (Double Data Rate): DDR RAM is the basic type of memory used in older systems. It transfers data on both the rising and falling edges of the clock signal, which doubles the data rate compared to its predecessor, SDR (Single Data Rate) RAM.
- DDR2 (Double Data Rate 2): DDR2 RAM improved upon DDR by offering higher data transfer rates and lower power consumption. It operates at higher clock frequencies and uses a different pin configuration than DDR.
- DDR3 (Double Data Rate 3): DDR3 RAM further enhanced data transfer speeds and energy efficiency compared to DDR2. It introduced features like higher bus frequencies and reduced voltage requirements to make it suitable for modern computing needs.
- DDR4 (Double Data Rate 4): DDR4 RAM is the successor to DDR3 and provides even faster data transfer rates and lower power consumption. It offers increased memory module capacities, improved reliability, and enhanced performance for demanding applications and gaming.
- DDR5 (Double Data Rate 5): DDR5 RAM is the latest standard, offering significant improvements over DDR4. It boasts higher data transfer rates, increased memory density, and improved power efficiency. DDR5 is designed to meet the requirements of emerging technologies like 5G and AI.
- SODIMM (Small Outline Dual Inline Memory Module): SODIMMs are a smaller form factor of memory modules commonly used in laptops and small form factor computers. They come in the same DDR, DDR2, DDR3, DDR4, and DDR5 variants as DIMMs but are designed to fit into smaller spaces, making them ideal for portable and space-constrained devices.
How Much RAM Do You Need?
If you’re checking your RAM because you suspect you don’t have enough, here’s a simple reference for typical use cases in 2024 and beyond:
- 8 GB — Basic use: web browsing, email, light productivity. May feel tight with many browser tabs open.
- 16 GB — The sweet spot for most users: gaming, multitasking, streaming, and everyday work.
- 32 GB — Heavy workloads: video editing, 3D rendering, running virtual machines, or professional creative software.
- 64 GB+ — Specialized workstations: data science, large-scale video production, server tasks.
If you’re running 8 GB and your system feels slow, upgrading to 16 GB is often one of the most cost-effective performance improvements you can make — provided your motherboard has an open slot and supports the upgrade.
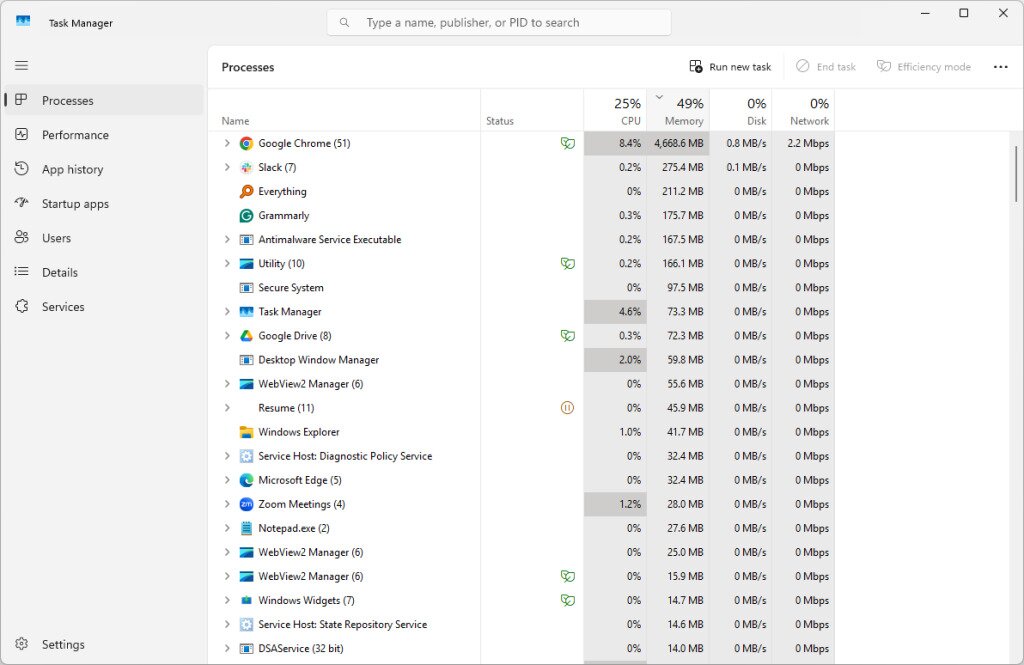
How to Use Task Manager to Find Apps Using Lots of RAM
Task Manager is incredibly handy for taking a glimpse at what’s happening on your computer. You already learned above how to use this tool to see your RAM speed. Now, let’s walk through how to use Task Manager to list all the top RAM hogs.
- Open Task Manager by pressing Ctrl+Shift+Esc.
- Ensure the Processes tab is selected on the left.
- On the right, select Memory at the top to sort the list by whatever is using the most (or least) memory. If the first few entries say 0 MB, select the column heading again to reverse the order.
- Listed near the top are all the apps using the most RAM. This list changes over time, and you’ll notice it fluctuate in real-time.
Tip: Right-click one of these memory hogs and select End task to shut it down. Depending on how much RAM it was using, you could feel performance gains instantly.