Why Is My Computer So Slow? 10 Ways to Speed Up Your PC
Is your PC running slower than usual? Whether it’s sluggish boot times, laggy performance, or programs taking forever to open, you’re not alone. Luckily, there are plenty of ways to get things back on track. In this guide, we’ll show you how to speed up your PC and make it run faster and smoother with some simple tips and tricks. From using Command Prompt commands to help a PC that’s running slowly, to uninstalling old programs and clearing out unnecessary files, there’s a lot you can do. We’ll also cover upgrades like adding more RAM or installing an SSD, plus checking for malware and adjusting your system’s visual settings.
Why Is My Computer So Slow?
These are just a few reasons your PC might be running slower than you’d like:
- Too many startup programs: Your computer might be bogged down by unnecessary programs that launch automatically when you start your PC.
- Old or outdated software: Outdated apps can cause slowdowns if they’re not properly maintained or updated.
- Running low on RAM: If your computer doesn’t have enough memory, it will struggle to keep up with modern programs, especially if you’re multitasking.
- Cluttered hard drive: A hard drive filled with old files, downloads, and temporary data can slow things down immensely.
- Outdated hardware: Using an older mechanical hard drive instead of a faster SSD, or relying on insufficient RAM, may be contributing to your slow computer.
- Malware or viruses: Hidden malicious software (malware) can eat up system resources and make your PC run sluggishly.
- Heavy visual settings: High-end visual effects can look nice but use up a lot of processing power.
10 Working Ways to Speed Up a Computer
Despite many possible reasons for a slow computer, there are several ways to fix it without resorting to buying a new system, including these computer speed fixes:
1. Delete/Uninstall Old Programs
Removing old or unused programs frees up valuable system resources, giving your PC more processing power and storage to work faster. A quick way to check which running apps are using the most resources is to trigger Task Manager through the Ctrl + Shift + Esc keyboard shortcut. Sort by CPU or Memory usage to see the biggest offenders, then use Control Panel to delete the ones you don’t really need. There are also free software uninstallers for Windows that make it easy to delete old or unnecessary apps. If this is the fix for your slow computer, you’ll notice improvements immediately.
2. Limit Startup Programs
Reducing the number of programs that launch at startup helps your computer boot more quickly and prevents unnecessary background tasks from slowing down performance. Follow these simple steps to make your PC run faster and smoother with just a few tweaks:
1. Press Ctrl + Shift + Esc to launch Task Manager.
2. Select the Startup apps tab.
3. Select the Status column heading to sort by apps that are enabled to run at startup.
4. Right-click the unnecessary ones and choose Disable.

If you notice a process called CTF Loader consuming excessive resources in Task Manager, you may need a CTF loader performance fix to resolve the issue.
3. Command Prompt Commands
Using specific Command Prompt commands can resolve performance issues, like clearing temporary files, checking disk health, or diagnosing network problems. Open CMD as an admin and then take these for a spin when your PC is running slowly:
- CLEANMGR: Cleans up unnecessary temporary files and frees up disk space
- CHKDSK: Scans and repairs disk errors to prevent slowdowns caused by bad sectors or corrupted files
- SFC /SCANNOW: Scans and repairs corrupted system files to help prevent crashes
- IPCONFIG /FLUSHDNS: Clears the DNS cache to help resolve browsing speed issues and improve network performance
- NETSH INT IP RESET: Resets TCP/IP settings, fixing network-related issues that can slow down your internet
- TASKKILL: Terminates unresponsive or unnecessary programs, which in turn frees up system resources and improves the PC’s speed
- DISM /Online /Cleanup-Image /RestoreHealth: Repairs the Windows image, which can fix deeper system corruption and improve overall stability and performance
- GPUPDATE /FORCE: Forces an update of Group Policy settings, solving certain configuration issues that affect performance
4. Add/Upgrade RAM
Adding more memory gives your system the ability to handle more tasks at once. If your computer has too little, it struggles to multitask, slowing everything down. Adding more RAM improves speed and lets you handle more programs at once without freezing. Before buying new memory, it’s a good idea to check your RAM type in Windows 11 to make sure it’s compatible with your system.
How you replace or add memory to a computer differs between systems, but here are some general steps to get you started:
- Check your PC’s maximum RAM capacity.
- Purchase compatible RAM sticks. Check our favorite RAM for gamers for some examples.
- Power off your computer and unplug it.
- Open the case and locate the RAM slots.
- Insert the new RAM into the available slots.
- Close the case, plug in your computer, and turn it on.
- Confirm the RAM upgrade through system settings.
5. Install SSD
Installing an SSD (solid-state drive) is one of the best ways to speed up a computer. Unlike traditional spinning hard drives, SSDs use flash memory, which means they can read and write data much faster. This translates to quicker boot times, faster file transfers, and shorter load times for programs. An SSD also makes your system more responsive overall, especially for tasks like gaming or video editing.
Much like upgrading RAM, how you swap out an older drive for an SSD depends on the PC. Here’s what this might look like for your computer:
- Backup your data.
- Purchase a compatible SSD, like one of these for gaming.
- Power off and unplug your computer.
- Open the case and locate the hard drive bay.
- Remove the old drive and install the SSD.
- Connect the power and data cables to the SSD.
- Close the case, power on the computer, and reinstall or clone your operating system.
6. Clear/Delete Old Files
Deleting old or unnecessary files creates more available storage. This improves overall efficiency and response time, especially if you’re still using a traditional hard drive. The best way to do this, aside from searching for old files in the Downloads folder and other places you might store things, is to use an app.
- Everything: This free app is a search tool at its core, but it serves as a really great way to find old files. Search by file type or date, and then select and delete whatever you don’t need. I’ve deleted gigabytes of data this way many times.
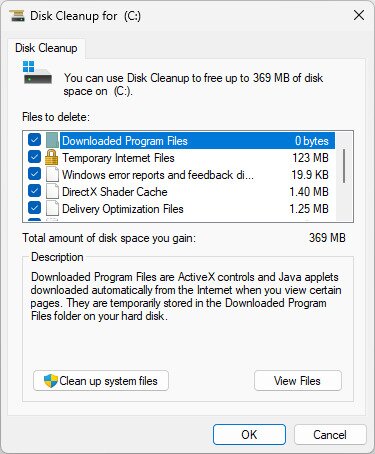
- Disk Cleanup: This opens with the CLEANMGR Command Prompt command mentioned above. Running this tool will collect all the temporary internet files, Recycle Bin content, and other data that you don’t really need anymore, and then provide an easy way to erase it all.
7. Use 3rd Party Apps to Remove Unnecessary Programs
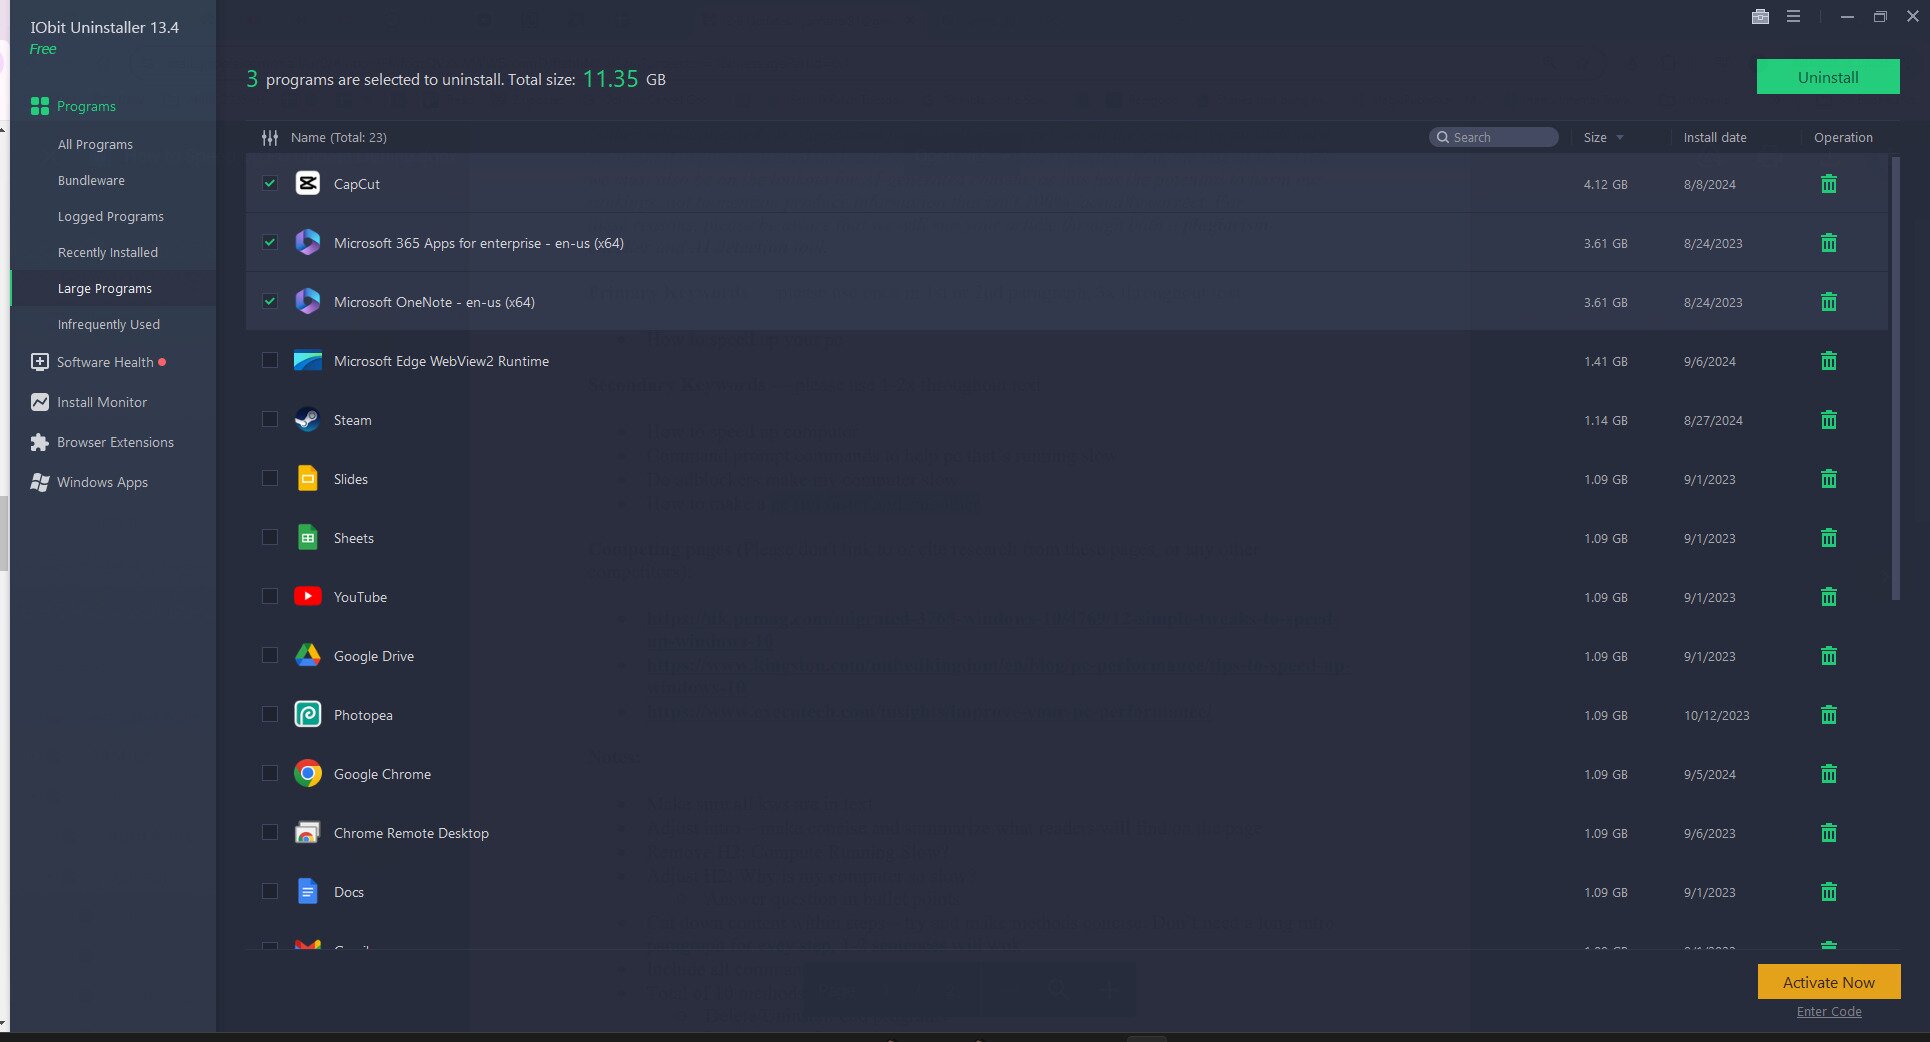
Specialized apps can quickly identify and remove bloatware and clear up memory to speed up the computer. Many of these apps exist, but we’ll IObit Uninstaller because it’s proved to be one of the best over the years. And, it’s totally free.
Here are some ways this tool can make your PC run faster:
- It lists apps you used infrequently.
- All the biggest programs are easy to find.
- Bundleware is identified automatically.
- Mutliple programs can be removed at the same time.
- As a bonus, it can monitor software installations to make removing them far more effective than the built-in app uninstaller in Windows.
8. Check for Malware/Viruses
Scanning for and removing malware or viruses can eliminate hidden processes that consume resources and slow down your PC. Just like any anti-malware software solution that you can buy, Windows includes a quite powerful (and free!) anti-malware solution that is always on alert to scan and prevent malicious files and apps from harming your files. Search for Windows Security in the Start menu to find it. From there, you can start a scan, control the firewall, and more. If you’re using a modern version of Windows, like Windows 11/10, this app is all you need for virus protection. Just make sure it’s on!
Remember, however, that much like any AV app, Microsoft’s might throw false positives, so you should do some additional research on your files before sending them to quarantine or removing them from your PC altogether. In other words, if Windows Security identifies a file as being infected, get a second opinion with an online virus scanning service like VirusTotal, which checks the file against all the top security vendors for a full look at whether it’s dangerous.
9. Adjust Visual Settings
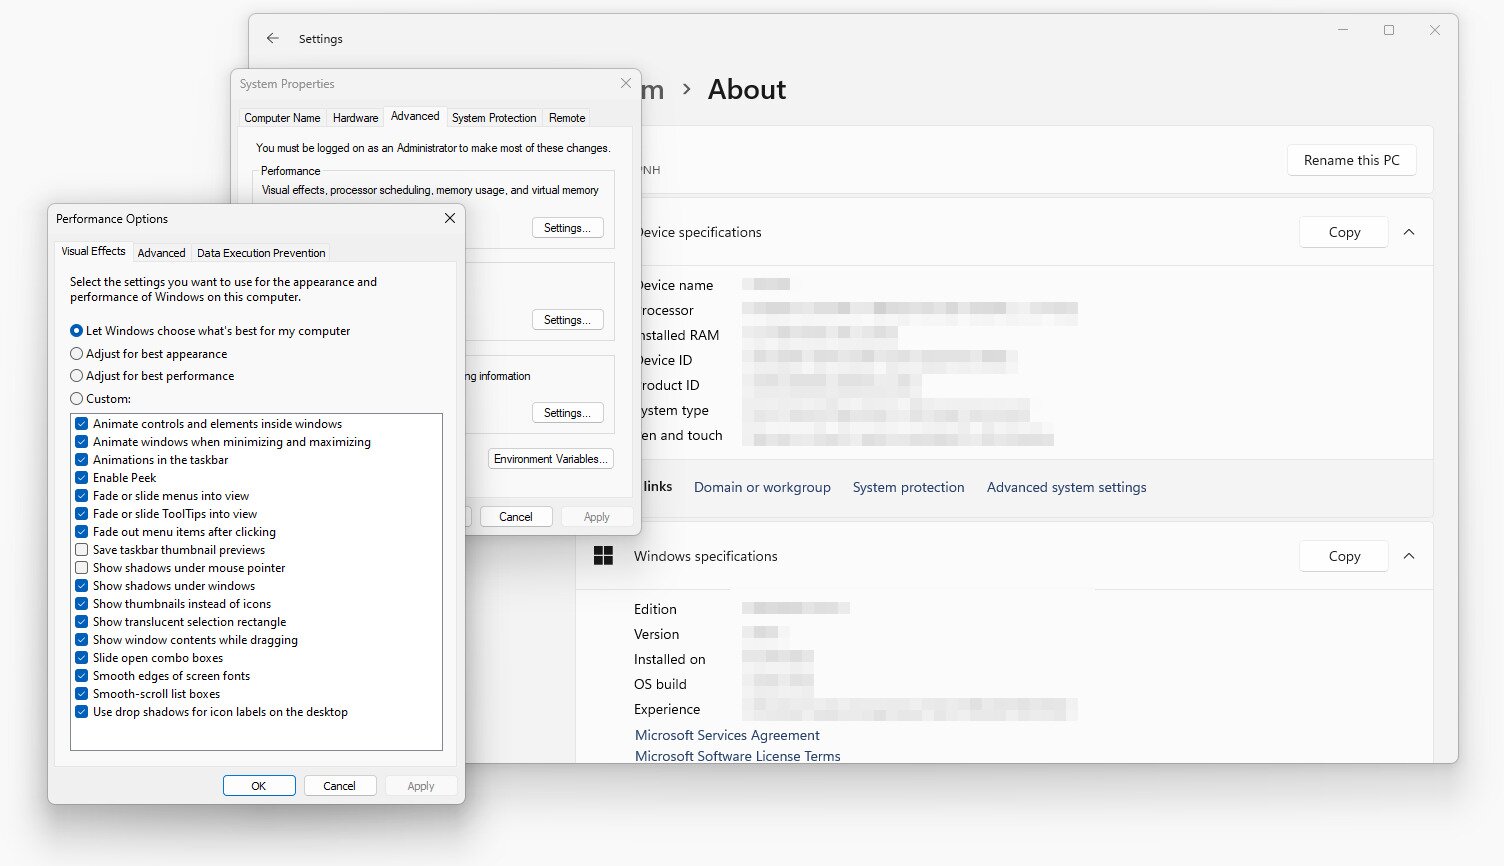
Lowering graphical effects reduces the load on your CPU and GPU, which should lead to smoother performance, especially on older machines. Here’s how it works:
- Open Control Panel by searching for it in the Start menu.
- Go to System and Security > System.
- Choose Advanced system settings.
- Select Settings from the Performance section.
- Choose Adjust for best performance. (It’s worth mentioning that selecting this will disable absolutely every visual effect in that list. If you don’t want your Windows experience to be devoid of every type of eye candy, you could give it a whirl and create your own scheme of visual effects by choosing Custom and start toggling features on or off from the list.)
- Confirm by selecting OK.
- Restart your computer to apply the changes.
10. Disable Unnecessary Features
Windows features rely on background services and processes that can slow down your PC if not managed properly. While many features are enabled by default, turning off those you don’t use can help speed up your system and improve performance.
Here’s how to disable Windows features:
- Open Control Panel to Programs > Programs and Features.
- Select Turn Windows features on or off from the left.
- Toggle off any unnecessary features.
- Select OK to save.
- Restart your computer.

Note that you may want to refrain from haphazardly disabling everything in your wake, especially if you’re a PC novice and have no idea what each of the features depicted in that list helps you achieve on your PC. If you’re not sure about any specific feature and what role it plays on your computer, you may want to steer away from it and keep yourself from disabling it, as doing so may render some parts of your PC partially unusable.
Although the safest way to go with this would be looking up each feature, see what it does and what disabling it could mean for your system, we’ve also included some of the features that you could disable safely, along with what that feature does, and what disabling it could mean for your computer and/or operating system. These features apply specifically to Windows 11 and Windows 10, so if you’re using an older version of Windows some of these items may not apply to you.
- Internet Explorer 11
- You can safely disable Internet Explorer 11 from your Windows 10 PC considering the fact that Microsoft replaced it recently with Microsoft Edge. Internet Explorer still continues to remain available on Windows 10 PCs and there’s no immediate plan to remove it. Furthermore, Microsoft stopped sending Internet Explorer 11 updates through Windows Update, and you’d have to download and install them manually from Microsoft’s website, which is all the more reason to remove it without thinking about it twice.
- Internet Information Services (IIS)
- Recently, IIS started being enabled by default on new Windows 10 installations or during upgrades from older versions of these operating systems. Although it sounds like a big deal, you probably won’t need IIS up and running, so you might as well disable it. This doesn’t apply if you’re running a web server on your PC, in which case you shouldn’t disable IIS. If you do decide to disable it, you could also expand the IIS folder and disable FTP Server, Web Management Tools, and World Wide Web Services, if they’re enabled.
- Internet Information Services Hostable Web Core
- This goes in the same category as the IIS we mentioned and explained just above. If you’re not running any web server of any kind on your computer and don’t intend to do so anytime soon, you can safely disable the Internet Information Services Hostable Web Core if it’s enabled.
- Legacy Components and DirectPlay
- Legacy Components is a feature that enables you to add support for a wide variety of old components on Windows. One example of such a component is DirectPlay, which is a feature that was a part of DirectX a long time ago and is no longer used. If your system can still be considered somewhat new, go ahead and disable both Legacy Components and DirectPlay from the Windows Features screen.
- Media Features – Media Player
- A while ago, Media Features used to have more than just one feature under it, but now it’s just Media Player, Windows’ built-in solution for playing media files on your PC. If you have any experience with Windows PCs, you probably know that Media Player isn’t exactly versatile, as it depends on numerous codecs in order to let you enjoy your favorite video and audio files. If you’re already using a third-party multimedia player, such as VLC or Gom Player, go ahead and disable this feature.
- Microsoft Print to PDF
- This is Microsoft’s virtual printer that lets you export any printable document to a PDF on your computer instead of actually printing it. Personally, I find this feature useful on various occasions, so I keep it enabled all the time. However, if you’re using Microsoft Office or any other third-party tool that can convert documents to PDFs there’s no point in keeping this feature enabled as well, so it’s really your call.
- Microsoft XPS Document Writer
- XPS is a file format that was created by Microsoft as a response to Adobe’s PDF, in order to replace it and provide users with more flexibility over documents created locally without requiring third-party software solutions. If you never heard of XPS and don’t plan to use it anytime soon, our suggestion is to disable this feature.
- Print and Document Services – Internet Printing Client
- If you use a local printer to print documents from your computer instead of using one that’s available and shared on your network (LAN), you can safely disable this feature, as it has little to no use to you. However, if you’re used to sending documents over to a network printer, make sure you keep it enabled.
- Print and Document Services – Windows Fax and Scan
- If you have a fax machine or a scanner connected to your computer, make sure you don’t disable this feature. It’s enabled by default, so just leave it be if you need it. However, if you don’t use fax machines or scanners that are connected to your computer, then you can safely disable it without looking back. Note that certain versions of Windows may lack this feature altogether, so don’t bother looking for it if you can’t find it on your first try.
- Remote Differential Compression API Support
- If you’re not using remote access apps (even those that are built-in and readily available on your PC) or Windows Server, you can disable this feature, as it was introduced in Windows Server 2003 R2 to help users enhance their server management experience.
- Windows PowerShell 2.0
- If you’re a PowerShell user, you probably know that PowerShell 2.0 has been outdated for quite a while now, so there’s absolutely no reason to keep this feature enabled. At the time being, the latest version of PowerShell is 5.1.19041.906, so you can safely disable PowerShell 2.0 support from your PC.
- Windows Process Activation
- On newer versions of Windows, this should be already disabled by default, along with everything within it (.NET Environment, Configuration APIs, and Process Model), so you can guess for yourself exactly how useful this feature is for regular Windows users. If you’re running any home server or plan to do so in the near future you shouldn’t disable this feature, but if you’re just a regular home Windows user, you can get rid of it without even blinking.
- Work Folders Client
- Through this feature, you can connect to any linked device on your network, including other computers, and work on them (in work folders). If you’re simply using your Windows PC alone on your network and don’t need to connect to other devices on your network that you can work on, just disable it.
Note that all the features that you’ve disabled can be easily re-activated by simply following the same steps before our list of features and checking the boxes that you want to re-enable. We’ve personally tested disabling these features before putting them in our guide, so everything should be alright with your PC as long as you follow our guidelines.
However, if you notice any stability or functionality issues that occur after disabling some or all of those features, feel free to re-enable them. Here’s a trick: you can only enable half of them each time so that you know which half contains the troublesome feature, and work your way through them using this technique. It’s faster and can save you a lot of time, especially if you have to restart your PC after enabling or disabling some of the features.
Frequently Asked Questions
- Do adblockers make my computer slower? It depends. In most cases, an adblocker makes a PC run faster and smoother because it stops ads from running, minimizing impact on system resources. Older computers or PCs with slower hardware might suffer, however, because an adblocker does require a certain amount of RAM and CPU power to run effectively.
- Could Google history be making my computer run slower? Probably not, but it’s possible for browser cache to make a computer slower. Clearing the browser cache, which usually also erases browsing histroy, is a good way to speed up your PC.
