How To Change The Time On Your Chromecast Device
Google normally makes it mandatory for users to link their Google accounts with any of its devices or services that they want to use. With Chromecast, there is no such restriction/compulsion and you can install it without ever having to sign in using any sort of online ID. That said, when you don’t connect devices to online services, you miss out on certain customization features. When you install Chromecast, it will automatically pick up the default time (based on timezone) set for the device. Here’s how you can change the time for your Chromecast device.
You can set the time zone from any official Chromecast app which means you can change it from your desktop as well as from your iOS and Android device. All you need to do is access the device’s settings. The easiest way to do this is through the Google Cast extension for Chrome. Install it and click the icon next to the URL bar. From the extensions’ menu, click ‘Options’. On the options’ page, click ‘Manage Device’.
You will see your device(s) listed, click the cog wheel icon to access its settings.

On the settings page for the device, pull down the ‘Timezone’ drop-down and find your timezone from it. If you pull down the ‘Time format’ you can also choose between the 12 or 24 hour format.
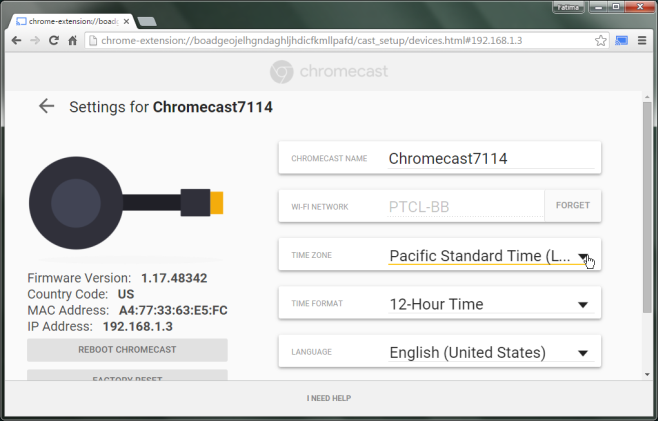
Click Apply and you’re all done. From Android and/or iOS devices, open the Chromecast app and go to the Devices tab. Tap the ‘more button next to the listed device and go to Device Settings. You will be able to edit settings from the screen same as you can from the Chrome extension.
Install Google Cast From The Chrome Web Store

would be great if my win10 laptop could actually find my chromecast